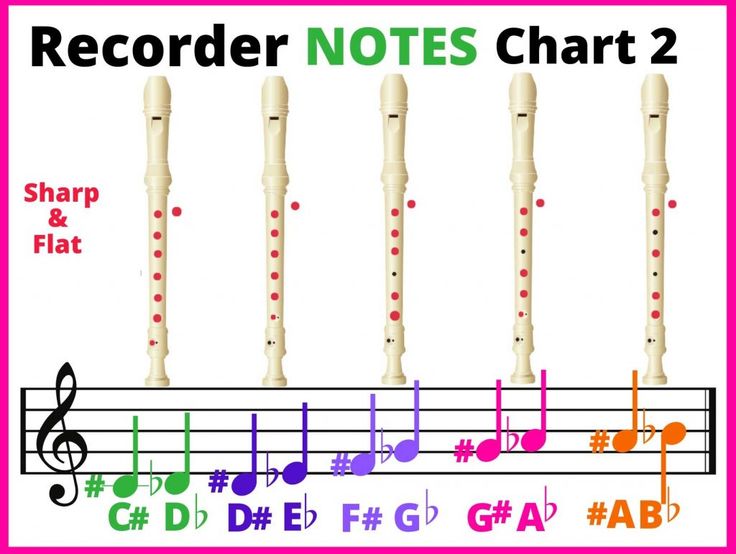
How to play the default dance on recorder
default fortnite music dance | TikTok Search
TikTokUpload
For You
Following
zsevenduckx
Z7duckx
Replying to @that_on3_dude I have no words #Z7duckx #fortnite #defaultdance #fyp
9.5K Likes, 54 Comments. TikTok video from Z7duckx (@zsevenduckx): "Replying to @that_on3_dude I have no words #Z7duckx #fortnite #defaultdance #fyp". Attempting to Default Dance to every beat:. original sound.
240.4K views|
original sound - skyler sanchez
oldfortniteclips2018
Fortnite
The old default dance music😫😫 #fyp #fortnite #fortniteclips #foryou
379 Likes, 9 Comments. TikTok video from Fortnite (@oldfortniteclips2018): "The old default dance music😫😫 #fyp #fortnite #fortniteclips #foryou". original sound.
9871 views|
original sound - Fortnite
mynameis4g
4G
I wonder if we will ever see it return one day? 🤔😭 #fortnite #gaming #fortnitememe #fortnitebr #fortnitememes
93.9K Likes, 287 Comments. TikTok video from 4G (@mynameis4g): "I wonder if we will ever see it return one day? 🤔😭 #fortnite #gaming #fortnitememe #fortnitebr #fortnitememes". Why Was The 3rd Default Dance Song Removed? 🤔😳. Fortnite Menu Theme.
746K views|
Fortnite Menu Theme - fortnite
amosdoll
Amosdoll Music
Learn how to play Fortnite Default Dance music on piano! #fortnite #fortnitedefaultdance #defaultdance #LearnOnTikTok #pianotutorial #pianoguides
489 Likes, 5 Comments. TikTok video from Amosdoll Music (@amosdoll): "Learn how to play Fortnite Default Dance music on piano! #fortnite #fortnitedefaultdance #defaultdance #LearnOnTikTok #pianotutorial #pianoguides". original sound.
19K views|
original sound - Amosdoll Music
mikekara372
Mike Kara
Reply to @luker0b "Fornite Default Dance Music" #clonesquad
739 Likes, 37 Comments. TikTok video from Mike Kara (@mikekara372): "Reply to @luker0b "Fornite Default Dance Music" #clonesquad". Default Dance: Dance Emote (From "Fortnite Battle Royale").
11.4K views|
Default Dance: Dance Emote (From "Fortnite Battle Royale") - Gaming World
skylersanchez29
skyler sanchez
Fortnite default dance sound
TikTok video from skyler sanchez (@skylersanchez29): "Fortnite default dance sound". original sound.
97.1K views|
original sound - skyler sanchez
r3p_gerg
R3p_gerg
FORTNITE DEFAULT DANCE BASS BOOSTED#fyp #foryoupage
702 Likes, 14 Comments. TikTok video from R3p_gerg (@r3p_gerg): "FORTNITE DEFAULT DANCE BASS BOOSTED#fyp #foryoupage". original sound.
27.4K views|
original sound - R3p_gerg
hungryspongy
HungrySpongy
Fortnite default dance 🎶#funny #fyp #meme #fortnite #dance
386 Likes, 5 Comments. TikTok video from HungrySpongy (@hungryspongy): "Fortnite default dance 🎶#funny #fyp #meme #fortnite #dance". Originalton.
8720 views|
Originalton - HungrySpongy
chaydeeuwu
Haydee
Responder a @kriseli04 #dance #defaultdance #fortnite
855 Likes, 68 Comments. TikTok video from Haydee (@chaydeeuwu): "Responder a @kriseli04 #dance #defaultdance #fortnite". Default Dance: Dance Emote (From "Fortnite Battle Royale").
22.8K views|
Default Dance: Dance Emote (From "Fortnite Battle Royale") - Gaming World
og.fortnite.2k17
Fortnite Chapter 1
#og #Fortnite #default #fy #fyp #viral #noob #foryou
2.6K Likes, 65 Comments. TikTok video from Fortnite Chapter 1 (@og.fortnite.2k17): "#og #Fortnite #default #fy #fyp #viral #noob #foryou". Do you Remember all 3 Default Dance Sounds?💪. Originalton.
69.7K views|
Originalton - Fortnite Chapter 1
How To Record While Playing Music on an Android Device
Music video popularity continues to surge, particularly among content makers. While you may add music to an existing video using numerous video editing apps, this takes extra time. Shooting a video with music inserted simultaneously is a much quicker process, but what do you do if Android instantly pauses the music you’re playing when you start recording the video portion? We’ve got your back.
Today, we’ll share the best apps that let you record videos with music playing in the background. Additionally, we’ll explain how to add music to a video from your gallery using Instagram. Read on to find out how you can make any video more entertaining by adding sound.
How To Record Video With Music Using Together
By default, any music you’re playing stops when you start recording a video on Android. However, this can be solved by installing a third-party app, such as Together. Here’s how to record a video with music playing in the background using the app:
- Visit Google Play Store and download the Together app.
- Launch your music app and play the desired track.

- Launch the Together app and tap the video camera icon at the bottom to start recording. The music should continue playing.
- When you wish to stop the recording, tap the same button that now looks like a square.
How To Record Video With Music Using Instagram
Alternatively, you can record videos with music playing in the background via Instagram. To do this, follow the steps below:
- Open your music app and play any track.
- Launch Instagram on your phone.
- Swipe from left to right to open the camera.
- Tap and hold the white button in the center to start recording.
- Release the white button to stop recording.
- To save the video, tap the downward arrow icon at the top of the screen. If the video is long, you’ll need to save it in multiple parts as Instagram can only shoot short videos (between 3 and 60 seconds).
 You can navigate between the video parts at the bottom of the screen.
How To Record Video With Music Using Snapchat
Snapchat also allows users to play their music in the background while recording video. Here’s how to do that:
- Play your desired track in any music app.
- Launch Snapchat and open the camera.
- Tap and hold the capture button at the bottom of your screen.
- Release the capture button when the recording is done.
- Optionally, add text or filters to your recording.
- Tap the downward arrow icon located at the bottom left corner to save the video. Alternatively, tap Send To to send it in a direct message.
How to Add Music to an Existing Video Using Instagram
Instead of shooting videos with music playing, you can add music on top of any existing video using Instagram. Here’s how to do that:
- Launch Instagram and swipe right from your feed to open the Stories camera.

- Tap your gallery icon at the bottom left of your screen.
- Select a video from your gallery.
- Tap the sticker icon at the top of the screen.
- Select Music from sticker options.
- Type in the name of the desired track and tap the song when you find it.
- Tap on the sticker to change its shape if needed.
- Select the part of a song you want to use in your video by shifting the toggle at the bottom of your screen.
FAQs
Why Can’t I Record Video While Playing Music on Android?
By default, the music stops playing on Android devices when you launch the camera app. This happens no matter what music app you use. The reason for this is convenience. For instance, you may want to record something urgently, such as your cat doing something funny, and may not have time to pause the music.
In addition, you can add music to the video later using almost any video editing app. But with the rising popularity of TikTok and Instagram Reels, this feature may, conversely, be seen as inconvenient by some users.
Please Don’t Stop the Music
Hopefully, with the help of our guide, you can now shoot videos with music playing in the background. While you can use Instagram or Snapchat for this, these apps only let you record short videos. Dedicated apps such as Together let you record videos of any length hassle-free on these platforms, so we recommend trying them out.
Do you think Android developers should let users decide whether they want to pause music when using the native camera app? Share your thoughts in the comments section below.
View Apple Fitness+ workouts and meditations on iPhone
Apple Fitness+ in the Fitness app can help you find the right workout, meditation, or workout program. You can view individual workouts or meditations, start a multi-edition program, sort and filter workouts by type, or select a workout recommended to you based on your activity. Mindful recovery workouts last five minutes or more, and all other types of workouts last ten minutes or more. New workouts appear weekly. Meditations can be 5, 10 or 20 minutes long.
View workouts and get recommendations
Apple Fitness+ workout recommendations are based on your activity in the Fitness app and other apps that are compatible with the Health app. Apple Fitness+ will even offer you new trainers and workouts to help you perfect your workout routine.
-
Open the Fitness app on your iPhone, then tap Fitness+.
-
View workouts and trainers.
-
View by workout type. Swipe left or right to view workout types at the top of the screen.
-
Time to walk. Select the audio workouts you want to play.
-
View recommended workouts. Scroll down to a category such as New Workouts, New Meditations, Popular, or Simple and Quick.

-
View by trainer. Scroll to the Fitness+ Trainers section, then tap Show All.
-
You will love it. View workouts from trainers you frequently choose and workouts by activities you frequently do in other fitness apps that are compatible with the Health app.
See View data in the Health app on iPhone.
-
Try something new. View workouts that are similar to what you normally do but from other trainers, as well as suggested workouts by activity that will make your training regimen more balanced.
-
Media library. Workouts added to My Library from the Workout Details screen or from the Workout Overview. In the Library section, you can maintain a list of your favorite workouts, create your own workout mode, or save workouts to play them offline.
-
View and start meditations
-
Open the Fitness app on your iPhone, then tap Fitness+.
-
Tap Meditation and do one of the following:
-
Tap the meditation session, then tap Try to start the session.
-
Tap Filter. Select a trainer, duration, or topic, tap Done, tap the session, then tap the start session button.
If you want to preview your session before starting, tap Preview.
-
Multi-issue workout or meditation programs
-
Open the Fitness app on your iPhone, then tap Fitness+.
-
Do one of the following:
-
Training programs. Scroll to the Workout Programs section, then tap Show All.
-
Meditation programs. Scroll to the Meditation Programs section, then tap Show All.
-
-
Select a programme.
Each program displays the types of workouts and the number of episodes.
-
Follow the steps below.
-
Program preview.
 Tap "Watch Video" to view a video about the goals of the program and the types of workouts it contains. You can also read the program description for more details.
 -
Adding episodes to the Library section. Tap next to the episode you want to add, or tap to add all episodes to your Library.
-
View an individual release of the program. Touch an issue in the list, then touch the button to start a workout or meditation.
-
When you end a program release, the next release is automatically displayed under the Next Workout heading. So you can always check where you left off and what workout is next, but you can also choose any other edition of the program.
Sorting and filtering workouts
To find the right workout faster, you can sort and filter workouts of one type or another (for example, rowing or dancing) using parameters such as the name of the trainer, duration of the workout, music genre, and more .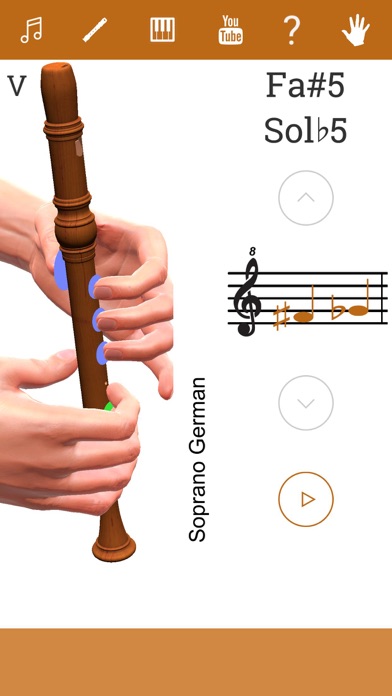
-
Open the Fitness app on your iPhone, then tap Fitness+.
-
Select a workout type, and then do any of the following:
-
Workout sorting. Tap Sort, then select an option such as Trainer or Time.
-
Workout filtering. Tap Filter, then select one or more filters you want to apply.
If the filter is not available for selection, it means that no workout matches this filter.
-
When viewing workouts, the thumbnails of workouts that you have done before are marked with a flag.
51 Convenient iOS Features You Might Not Know About
Settings
1. Check Warranty Expiration Date
After the release of iOS 12.2, the system now has the ability to check the warranty expiration date for your iPhone.
To do this, open "Settings", go to the "General" section, expand the "About this device" menu and select "Limited Warranty".
2.
 Add a second face for Face ID
 This can be done in the "Face ID & Passcode" menu in "Settings". You need to select the item "Alternative appearance" and follow the recommendations on the screen.
This opportunity is useful if you sometimes change your appearance a lot: for example, grow or shave off your beard.
It can also be used to add the face of a spouse or other trusted person to Face ID.
3. Enable or disable USB accessories
In iOS 12 and later, there is a USB Accessories switch in Settings → Face ID & Passcode.
When it is turned off, iPhone will not respond to connecting additional devices if it has not been unlocked for more than an hour.
If enabled, additional devices can be connected to iPhone without restrictions.
4. Check iPhone battery status
iPhone uses lithium-ion batteries. They gradually wear out: after 500 charges, the capacity usually drops below 80%, the voltage drops below normal, and the iPhone can turn off in the cold.
You can check the battery status in the "Battery" menu → "Battery status" in "Settings".
Shows the maximum capacity as a percentage and indicates peak performance support.
5. Disable automatic system update
After the release of iOS 12, the menu "Settings" → "General" → "Software Update" appeared the item "Auto Update".
Turn it off if you want to wait for the first feedback before updating the main unit.
6. Set up QR code scanning
iPhone learned how to scan QR codes without third-party software with the release of iOS 11. Today there are three ways to do this.
- Activate the "Scan QR code" item in the "Settings" → "Camera" menu.
Now the "Camera" will always recognize the information on the QR code that has entered the viewfinder and show a notification with a suggestion to use it.
- Add "QR Code Scan" to the "Customize Email" menu. control" in the "Control Center" section in "Settings".

Now the "Camera" will recognize QR codes only after activating this function in the "Control Center" - they will be ignored during normal shooting.
- If your iPhone supports 3D Touch (iPhone 6s and above, excluding iPhone SE and iPhone XR), forcefully press the Camera icon on the home screen and select Scan QR Code from the context menu.
This is how the app will scan the QR code regardless of its settings.
7. Share saved Wi-Fi password
Even if you don't remember the password of the Wi-Fi network your iPhone is connected to, you can still transfer it to another iPhone.
To do this, try to connect to the network on the second iPhone, bring the first one closer, and it will immediately prompt you to share the password. It remains only to agree.
8. Boost Wi-Fi with cellular data
By default, iPhone can use cellular data even if the device is connected to Wi-Fi. This allows you to speed up Internet access.
If you are using a data-limiting plan or are roaming, you can disable this feature in Settings → Cellular → Wi-Fi Assist switch.
9. Enable Face ID Attention Control
Open Settings, go to General, expand the Accessibility menu, and select Face ID & Attention.
Turn on the "Require Attention for Face ID" switch to prevent your iPhone from unlocking when you're not looking at it, even if your face is already recognized.
This way you can protect the data on your smartphone while you sleep. Unlock it with your face without your knowledge will not work.
Home screen
10. Drag and drop several icons on the home screen
First, put the home screen into edit mode. To do this, press and hold any icon for a second or two.
After that start moving it with one finger and tap other icons with the second to add them to the group.
Move the icon group to the desired location and release. This way you can speed up the organization of space on the home screen.
11. View app notifications in a folder
To see the number of notifications for each app in a folder on the home screen, press it firmly.
To do this, your device must support 3D Touch.
12. Organize apps
Open Settings, go to General, and expand the Reset menu. Here, select "Reset Home Settings" and click "Reset Settings" to confirm your intention.
After that, the icons of standard applications on the home screen will line up in the default sequence, and third-party ones - in alphabetical order.
Safari
13. Show Icons on Safari Tabs
Go to Settings → Safari and turn on Show Icons on Tabs.
Icons next to the title of pages appeared only in iOS 12, and they are easier to navigate in open sites.
14. Open the desktop version of the site
Press the page refresh button in the Safari address bar and select "Full site". This feature is useful if not all the necessary data is shown on the mobile.
15. Go to one of the previous pages
Press the "Back" button to open the navigation history and return to any of the previous pages.
16. Open the last closed pages
To see the list of the last closed pages, hold down the "+" button in the tab menu. This is useful if you accidentally closed the page and want to return it.
17. Close tabs by search term
Go to Safari's tab menu, swipe down to see the Search in Tabs menu. Enter keywords to search for the pages you need, hold down the "Cancel" button and select "Close N tabs that match".
This way you can close not one, but several pages of a particular site at once.
18. Close all tabs at once
To do this, go to the tab menu using the button with two squares, hold down the “Close” button and click “Close N tabs”.
19. Add to bookmarks or reading list
To do this as quickly as possible, hold down the go button in the bookmarks menu in the form of an open book and select "Add Bookmark" or "To Reading List".
Siri
20. Open the "Settings" of the software through Siri
If you activate Siri on the home screen and give the assistant the command "Settings", he will open the "Settings". If you do this while using any application, you will be redirected to its menu in Settings.
21. Search for wireless AirPods
Activate Siri and ask: "Where are my AirPods?" The voice assistant will prompt you to beep.
If you are not sure that no one is listening to them now, don't do it. The headphones will begin to play a ringing trill at maximum volume and may cause pain.
If you decline the signal, Siri will redirect you to the Find My iPhone app, where you can see the location of all your devices.
22. View music search history
A list of tracks that you have recognized through Siri's "Recognize Song" command can be viewed in the Siri section of the Wishlist menu in the iTunes Store.
Here you can see their names to add to Apple Music, as well as immediately buy in the iTunes Store.
23. Run quick command by voice
To do this, open "Teams", go to the edit shortcut menu and expand "Settings". Then select "Add for Siri" and set the voice command you want to use. Now it is enough to activate Siri and say the recorded command.
You just need to activate the assistant through "Hey Siri" and give the command "Let's go to work" to turn on your favorite playlist, activate the "Do not disturb" mode and turn on Google maps with the necessary route.
24. Give commands to Siri with text
Open Settings, go to General menu → Accessibility → Siri → Text input for Siri.
Now, after activation, the voice assistant will not wait for a voice command from you, but a text one. This is useful if you are in a meeting or in the library and can't talk.
Notes
25. Protect important notes with a password
First, go to Settings → Notes → Password and set a password that you will use to protect your notes in the application.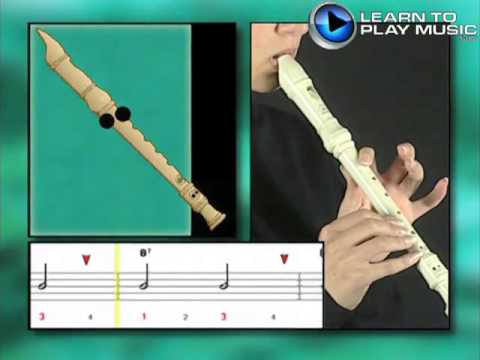
After that, open Notes and click on the more actions button in the upper right corner of the screen. Select Block.
A protected entry in Notes is marked with a padlock. If it is open, you can use it, if it is closed, you need to enter a password or use Touch ID or Face ID.
The secure entry remains open after entering the password until you exit Notes.
26. Show absolutely all attachments
Open Notes, navigate to any folder and click on the button in the lower left corner of the screen.
This will open the catalog with all the photos and videos, scanned images, documents and other data.
Do Not Disturb
27. Activate Do Not Disturb for location
Open Control Center and firmly press the Do Not Disturb icon (just long press if you are using a device without 3D Touch).
Select "Until I leave this location" to enable the mode until you leave the specific location.
This is useful if you have arrived for a meeting, do not know when you will be free, and do not want to be disturbed by calls, messages and notifications.
28. Enable Do Not Disturb Driver automatically
Go to Settings → Do Not Disturb. Select Activation from the Do Not Disturb Driver menu and select the Automatic option.
Do Not Disturb mode will now turn on when the iPhone detects that you are driving and moving off.
App Store
29. Sort reviews by category
Open the App Store, select the desired application and click on the "View all” next to the subheading “Ratings and Reviews”.
Click the sort button and select Most Helpful, Most Positive, Most Negative, or Most Recent.
Positive and negative ones will tell about the pros and cons of the application, respectively, and recent ones may contain up-to-date information about the latest updates.
30. Pause download or make it a priority
Press the icon of the application that is downloading on the home screen with force (requires 3D Touch support) and select "Pause download" to pause it.
In the same way, you can use the "Prioritize download" function to make the system allocate more resources for its completion.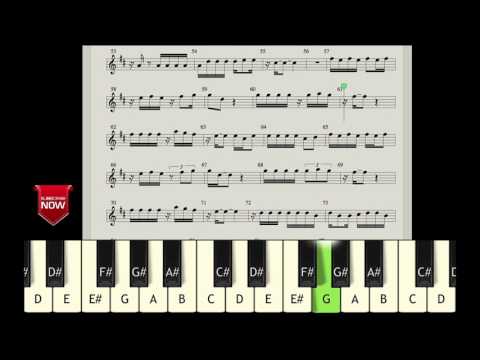
31. Download unused apps
After the release of iOS 11, the system now has the ability to clear iPhone storage space. To do this, it can automatically remove applications that you have not used for a long time.
When iPhone runs out of space, this feature will replace some app icons on the home screen with download links from the App Store. At the same time, application data will remain on the device and will even be included in backups.
You can activate the "Download unused" function in the menu "Settings" → "iTunes Store and App Store".
32. Pay for purchases from the internal account
Open the App Store and go to the account menu. Here, select "Add money to Apple ID", determine the amount, click "Next" and confirm the transfer from the card.
Your internal Apple ID account now has money for the App Store and iTunes Store. For any purchases, these funds will be withdrawn first, and only then money from a bank card or mobile phone account.
An internal Apple ID account allows you to control the amount of purchases in Apple stores and limit impulsive spending.
33. Turn off requests for ratings and reviews
To do this, turn off the item "Ratings and reviews" in the menu "Settings" → "iTunes Store and App Store". Apps will no longer ask you to rate them in the App Store.
Camera
34. Using the built-in level
Turn on Grid in Settings → Camera. Now launch the "Camera", point the viewfinder down and pay attention to the two sights in the center of the screen.
Align them by tilting the iPhone so you keep your smartphone parallel to the surface.
This feature makes it easy to shoot subject photos and Flat Lay layouts.
35. Change Aperture Depth in Portraits
You can change the aperture depth (background blur) in portrait shots on iPhone XR, iPhone XS, and iPhone XS Max.
To do this, open the "Camera", activate the "Portrait" mode and click on the button for changing the aperture depth in the upper right corner. Adjust the amount of blur and take a photo.
You can also change the aperture in Photo. To do this, select a portrait photo and click "Edit". Adjust the depth and click Done.
Messages
36. Make notes on the photo before sending
Open "Messages" and go to the desired dialog. Click on the button with the image of the camera and go to the gallery using the button in the upper left corner of the screen.
Click on the desired image and select the "Markup" option. Use a felt-tip pen, marker, pencil and other tools to add the necessary notes. Click Save, Done, and send the snapshot.
37. Delete messages automatically
Go to "Settings" → "Messages" and select "30 days" or "1 year" in "Leave messages". Now the application will automatically delete the history of correspondence after a month or a year.
This will free up storage space on your iPhone. This will be especially noticeable if your dialogs contain a lot of photos and videos.
Photo
38. Share a photo using the link
Open Photos and select the desired photo. Navigate to the More Actions menu using the button at the bottom left of the screen and select Copy iCloud Link. Wait for the link to be prepared and send it.
Photo link is active for 30 days. It can be opened not only from the iPhone, but also on any other device.
39. Turn Live Photos into Videos
Find any picture in Photos that was taken using Live mode. Swipe it up and choose the Loop or Pendulum effect to create a looping video.
40. Find things, people, and places
Since the release of iOS 12, the Photos app has received an enhanced Search menu. Enter the name of the object (“car”, “dog”, “person”) or location in the search box, and you will immediately see suitable pictures.
41. Show photos taken nearby
Select the desired photo in Photos, swipe it up and select Show Photos Nearby.
The application will show you all the photos taken near the place where the selected photo was taken.
Voice recorder
42. Improve sound quality in recordings
To do this, go to the menu "Settings" → "Voice recorder" → "Sound quality" and select "Lossless".
Recordings will now take up noticeably more storage space on iPhone, but the speech will be more intelligible.
43. Automatically clear the records in the recycle bin
Recordings of the voice recorder that you delete are placed in the "Recorder" recycle bin. If you actively use the app, it will grow quickly and take up too much space on your iPhone storage.
To avoid this, go to the menu "Settings" → "Voice recorder" → "Clear deleted" and select the retention period.
Apple Music
44. Set a timer for listening to tracks
Open Clock, go to the Timer section, and expand the When finished menu. Select the Stop option, set the time and start the timer.
When the time runs out, iOS will disable Apple Music and any other apps that are playing content.
You can use the timer in this way before going to bed if you can fall asleep while listening to music or watching videos.
Miscellaneous
45. Undo almost any last action
To undo your last action, shake your iPhone, then select Don't Apply.
This works when typing and formatting text in Notes and messengers, moving letters in Mail, and more.
46. Turn AirPods into a listening device
First, add the "Hearing" function to the "Control Center" through the menu "Settings" → "Control Center" → "Set up elem. management".
Insert one or both AirPods into your ears, open Control Center, select Hearing, and turn on Live Listen.
iPhone now acts as a microphone. The smartphone can be placed near the child in the next room and control his sleep through AirPods, as through a baby monitor.
At the same time, the "Live listening" distance is limited by the Bluetooth operating distance - about 10 meters.
47.
 Add exchange rates to the Stocks application
 Open Stocks. In the search box, enter RUB=X for the buying rate of dollars for rubles, EURRUB=X for euros for rubles, EURUSD for euros for dollars. Select one of the results and add it to the list using the + button.
You can also add "Promotions" to the widget menu to always see the current rate.
48. Set up the new iPhone with the old one
Bring the old iPhone close to the new one during the initial setup. On the screen of the first, a proposal will appear to transfer data to the second. Click "Next" and wait for the operation to complete.
This feature is only available on iPhone with iOS 11 and above.
49. Pull down the interface on an iPhone without a Home button
You can pull down the iOS interface using the Easy Access feature. With it, you can reach the top elements of the system and applications using one hand.
An iPhone with a Home button has it enabled by default. To activate it, you need to double-tap Touch ID.
On an iPhone without a Home button, you can turn on Ease of Access in Settings → Accessibility. To turn it on, swipe down from the bottom of the screen.
50. Launch keyboard trackpad without 3D Touch
To enable the trackpad to move the cursor on a 3D Touch-enabled iPhone, you must firmly press the keyboard.
On other iPhones, you can turn on the trackpad by holding down the space bar.
51. Add a reminder by geolocation
You can receive notifications about cases not only by time, but also when geolocation changes. For example, if you pass by a supermarket, iPhone can send you a reminder to buy groceries at home.
To do this, open Reminders, create a new entry or find an existing one. Go to the "Details" menu using the "i" button and activate the "Remind me at the place" option.
Go to the Geolocation menu, define the location and select the desired condition "When I arrive" or "When I leave".