How to secure a wig when dancing
3 Best Ways to Secure a Wig When You Dance (Expert Tips)
This is a guide on how to secure your wig when you dance.
I am Lori, a wigs enthusiast and I love dancing. Salsa, ballroom, Tango. And I have a lot of friends who are professional dancers and beautiful drag queens. Very often, they need to perform with a wig.
Over the years, I’ve gathered valuable experience regarding how to secure a wig for dancers.
In this article, I will share the top three ways of securing your wig on the dance floor or stage. All these methods work pretty well for me, and I hope you will find them helpful too.
Sounds good? Keep reading!
Top 3 Ways to Secure Your Wig When You Dance
Here are the top three ways and detailed steps for holding your wigs firmly on your head when you dance.
Method 1: Wig Grip or Wig Cap
Using a wig grip or a wig cap is the best method to secure your wig when you dance. It is perfect for all people with natural hair under the wig and those without hair. In fact, I often use a wig grip as a temporary solution to make my wig smaller.
This method works very well if you have short or thin hair. Besides, the installation of a wig grip or wig cap is super easy.
When you dance, you will sweat a lot, so try to go for a wig grip or cap made with breathable material. Also, pick a product that comes with an adjustable strap, so you can easily tighten your wigs a bit when you dance.
Detailed Steps
Step 1: Secure all the hair on your head. For instance, flatten flyaway hairs on your head using gel or hairspray.
Step 2: Place the wig grip on top of your hairline. If you are using a wig cap, just put it on from the front to back. Then, adjust the size with the Velcro strap at the back.
Step 3: Put on your wig, adjust the position on the grip; start with the front part of your wig first, then the side and bottom.
Step 4: Shake or move your head side to side to make sure that your wig is secure.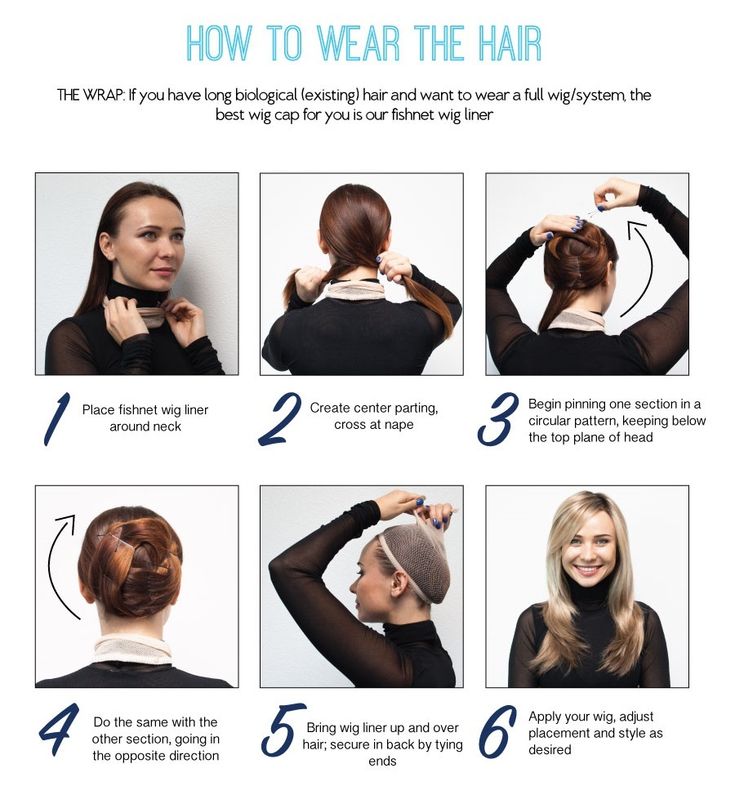 If the wig cap or grip is too loose, remove the wig and repeat the steps.
Method 2: Wig Tape
Wig Tape is a double-sided tape that can hold your wig on your head firmly when you dance. If you are longing for some chill dancing like mild ballroom, salsa, and belly dance with your partners, wig tape should be good enough.
Try to purchase a wig tape that comes with a no-sweat liner; it’s easier to apply and more comfortable.
Detailed Steps
Step 1: Rub a cotton ball soaked in alcohol along your hairline to clean the skin and remove oil or dirt, so the tape can stick better.
Step 2: Use a new cotton ball to protect your skin against the tape, apply a thin layer of liquid-aid to the skin below the hairline. Make sure you do this if you have sensitive skin or if you sweat a lot.
Step 3: Cut the tape into several small pieces, so it’s easier to stick them on the skin next to your hairlines; try to leave no space between each tape section. Begin at the front of your head and move to the nape of your neck.
Step 4: Remove the top layer of the tape (it’s easier if you do this with a tweezer). Place the front of the wig over the tapes, make sure all the wig tapes are covered. Press firmly to apply pressure on the wigs and tape to secure them further.
Method 3: Wig Glue
Wig glue is a highly secure method that you can use to hold your wig when dancing. If you love something that involves many movements, Hip-Hops, pole dance, and choreography. Wig glue is probably your best option.
Just be very careful that you do not apply the glue to your edges. Besides, choose carefully if you have sensitive skin, some of the wig glues in the current market are suitable for sensitive skin while some are not.
Tips: Make sure you remove all the wig glue everytime you take off your wig for protecting your hairline.
Detailed Steps
Step 1: Clean the skin with alcohol to remove all the dirt, makeup, or oil.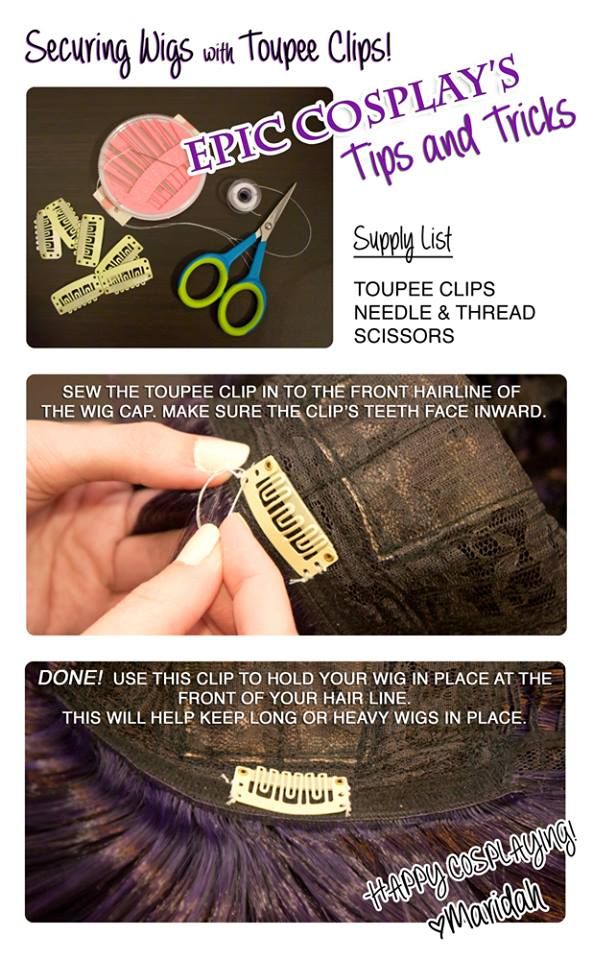
Step 2: Use a cotton swab to apply a thin layer of wig glue on your hairline (depending on different products’ instructions, sometimes, you may need to let them dry a bit before putting on the wigs).
Step 3: Put on your wigs according to this sequence: head first, then the side, and finally the back.
Step 4: Gently press your wigs for around a few minutes, so it’s more secure on your head.
FAQs
Here are quick answers to some of the questions related to securing a wig when dancing.
How do Drag Queens Keep Their Wigs on?
Most drag queens use a combination of wig caps and wig glues to keep their wigs on. If they need to dance and swing a lot, they may use some heavy-duty wig tapes as well.
How to Secure a Wig with Short Hair?
If you have short hair, the easiest way to secure your wig would be wearing a wig grip or wig cap with adjustable straps. Sometimes, the combs on the wig cap may not be working so well on short hair, so you may need to use wig tape to provide extra adhesive.
Finding the best way to secure the wigs when we dance is very important because it allows us to swing and move freely on the stage. These three methods worked really well for my friends and me.
Do you wear wigs too when you dance? How do you keep them from slipping off? Leave a comment and share your thoughts!
How to Secure a Wig While Dancing
How to Secure a Wig While Dancing
Posted on admin
Drag Queen Wigs
If you’re a drag queen or interested in the community, you most definitely know that a good wig is an essential part of the drag queen look. However, with the entertainment that a drag queen provides, it can be quite hard to keep the wig in place.
Drag queens are known to give performances with lots of dancing and singing, and amidst all the moving around, you have to be sure that your wig is secured efficiently. Read on to find out how to wear a wig properly and keep it in place throughout your dancing routine, along with other tips on how to make a drag queen wig secure.
Steps On How To Glue Down A Wig:
For this tutorial, you must have your wig, a wig cap, rubbing alcohol, hairspray, some toilet paper, a popsicle stick or spoon, bobby pins, and a brush.
1. Tie your hair up and pin it tightly into place and then, proceed to pull your wig cap on.
2. Remove any makeup around your hairline and rub the area with rubbing alcohol so that the wig can stick better.
3. Apply the glue ( pros-aide or spirit gum or wig glue ) near your hairline all the way down to your ears, but make sure that it doesn’t touch your real hair at all since wig glue can be very strong.
4. Spray over this glue and your hairline with your hairspray, so that everything is nice and secure.
5. Now plug in your blow dryer and run it over the glue and your hairline to set everything into place. If you want to be extra sure about the security of your wig, do another round of glue, hairspray, and blow drying.
6. Once the glue and hairspray is nice and dry, it’s time to put the wig on. If you’re using a lace front wig, hold it so that the lace is closest to you and sits atop your forehead when you put it on.
7. Lean over, bow your head, and pull your wig on so that the back of your head is covered.
8. Sit back up and pull the wig forward till it reaches where you want the hairline to be, and then press it down on where you’ve lined the glue.
9. Before working on the sides of your wig near your ears, brush back any stray hairs so it doesn’t stick to the glue. Then you can just press down the rest of the wig’s hairline on the glue.
10. If you see that the lace front of the wig is sticking out unflatteringly, douse a popsicle stick in hairspray and use it to press down the lace front to your skin.
11. Bring out your blow dryer again to set everything in place.
12. Some parts will definitely look a bit discolored, so use some makeup to make it match your skin tone.
13. Once you’re satisfied with how the front looks, flip your hair over and tie it in place before you secure the wig to the cap using some bobby pins. Crisscross them for added security and add bobby pins discreetly wherever you deem necessary.
14. Viola! You can flip your wig back and it’s finally secured in place. You’ll never have to worry about moving out of place during your performances.
Other Tips:
To remove your glued down wig, smear some coconut oil on the glue when you’re removing your wig. Massage it in a little and you will notice it loosen up.
If you can get your hands on one, get yourself a wig grip band which will ensure complete safety for your wig from slipping off. It’s also best to get lace front wigs, especially with metal wig clips, as they stay in place better than other wigs.
Good Job!
Follow the steps from our drag wig tutorial attentively and keep all the above mentioned drag queen secrets in mind while putting on your next wig to make sure it doesn’t move an inch while dancing. Now that you have all the necessary information, you can head over to our drag queen wigs, where you’ll find lace front wigs for sale and many other beautiful wigs for queens at an affordable rate with absolutely no compromise on quality or versatility.
Share this on:
Posted in: Drag Queen Wigs
How to properly attach a wig to your head
How to attach a wig so that it stays secure, comfortable to wear and looks like your own hair? Usually, when buying, specialists in the store help to put on a wig, but at home you are left alone with a new hairstyle. We have prepared detailed instructions on how to fix the wig so that it does not fly off and looks as natural as possible.
Before attaching the wig
- We recommend buying a model with short or long bangs. This wig is very comfortable to wear and fasten. The bangs well cover the front line of the transition of the forehead to false hair, due to which the hairstyle looks more natural.

- Adjust the volume of the wig cap. In the back of any model there are special hooks / Velcro that allow you to reduce / increase the volume by a couple of centimeters.
- If there is no hair on the head, wipe the scalp with an alcohol-based product. Pay special attention to the forehead and temples - this is where the glue will be applied to fix the hairstyle.
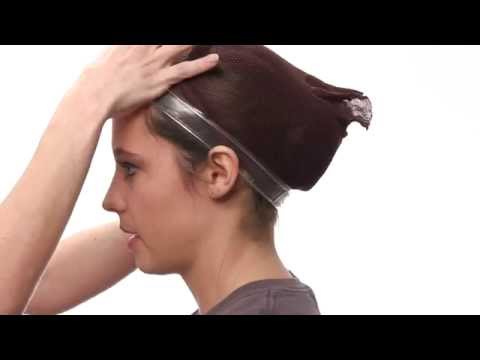
- Prepare the wig net in advance. It is not required for a bald head, but if hair is present, this net can greatly facilitate the process of putting on and attaching a wig.
In a specialized store Parikof.ru the net is given free of charge to the customer with the purchase of a wig - as a gift.
Why experts advise wearing a wig on a net
- It fixes and smoothes the hair well and prevents it from tangling under the wig.
- The mesh material does not cause allergic reactions and eliminates discomfort when worn.
- Thanks to the mesh, the base of the wig does not slip or slip even with active movements.
- Mesh wicks away sweat and keeps the montage clean.
- It creates a small space for air exchange between the base of the wig and the head.
How to fix the wig on your head: instructions
1. Tidy up your hair (if any). Short ones are easy enough to comb. And if there is a bang, remove it from the forehead with the help of an ordinary flat rim. It is better to divide long hair into 3-4 parts, braid the spikelets and fix the ends with invisibility.
2. To securely fix the hair under the wig, put on a thin net that will hide all the irregularities of the hairstyle. The ends of the mesh must be fixed at the back of the head with clamps.
3. Take the wig, shake and pull slowly, spreading over the entire scalp. Adjust the hairstyle along the natural hairline and fix it with small clips in the temple area, behind the ears. For a more secure fixation, you can use hypoallergenic glue or double-sided adhesive tapes (read about this below).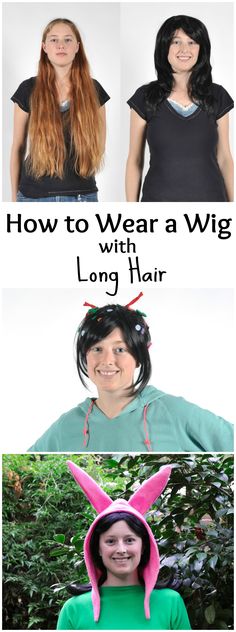
4. It remains only to style the hair of the wig beautifully. Models made of kanekalon and modacrylic are easy to comb - they have a memory effect and retain volume and styling well. Thermofiber products can be curled with a curling iron and make beautiful curls, and natural hair does not have any styling restrictions at all - curling, straightening, coloring, toning.
When buying in a store, experts tell in detail and show how to fasten a wig on your head so that wearing it is not only comfortable, but also invisible to those around you.
How to securely fasten a wig if the head is without hair
In this case, you can do without mesh, adhesive tapes and other devices - any modern wig keeps well on the head due to silicone inserts. Silicone becomes soft from body heat, due to which it securely fixes false hair. You can run and dance without fear for your hair, but if you want to swim in the sea and engage in active sports, it is better to “plant” the wig on a special glue.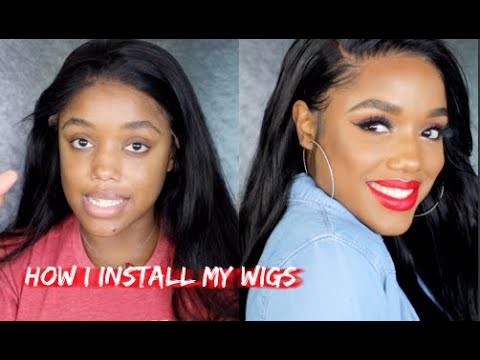
How is a wig attached to a hairless head?
1. First, wipe the scalp with an alcohol solution. And then put on the wig as we described above. Adjust the hairstyle so that it sits naturally, along the growth line of your own hair.
2. To secure the wig all day, you will need double-sided adhesive tape. Use it to glue the montage in especially important places - forehead, temples, behind the ears. To prevent the strands of the wig from sticking together, it is better to gather them in a ponytail or stab them in advance.
3. You can also use special glue. It should be applied with a brush in a thin layer along the hairline, let it dry for a minute (during this time it will become more viscous), pull the wig and press it firmly against the skin.
The above methods are universal and are suitable both in the absence of hair and in the presence of hair on the head.
How to attach a wig to your head?
This can be done with a hypoallergenic, ultra-strong transparent adhesive.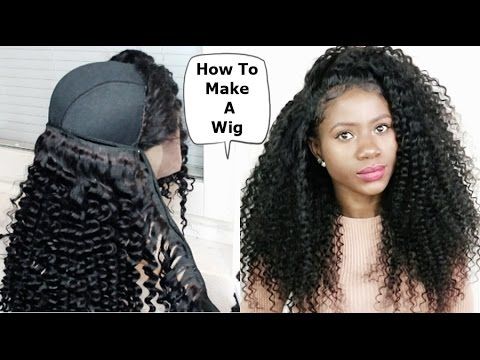 A few drops are enough and the pad will last a month and a half. As a rule, there is no latex in such glue, and it is easily removed with organic solvents.
You can also use transparent adhesive tape with increased water resistance. It provides high-quality fastening of wigs and hair replacement systems.
Experts recommend fixing the wig with double-sided tape (especially for beginners). They are much easier to work with, and if you make a mistake, it is easier to re-glue them.
How to attach the lace front wig
These are models without bangs at all. Here, on the line of the forehead, there is a mesh (monofilament), into which hairs are woven by hand. This technology creates the effect of natural hair growth, due to which the hairstyle looks extremely natural.
Lace front is put on just like any other model - first you need to hide your hair under the net, and then pull on the wig. But there is one feature here - the forehead line is not covered by bangs, which means that it needs to be given special attention.
- In a new wig, you must first cut the net so that it follows the natural growth line of your hair. It is ultra-thin, with silk fibers in the composition. Natural vellus hair is woven into the mesh mesh to create the look of natural growth.
- Lace front is fixed with glue - they need to lubricate the edges of the mesh and press firmly to the scalp. Due to this fixation, the hairstyle will hold securely all day. Instead of glue, you can also use a special double-sided tape, which was written about above.
- To prevent the glue from staining the curls of the wig, tie it into a ponytail before putting it on. Mask the line of contact between the mesh and the skin with foundation.
Thanks to glue or tape, the wig stays on your head well, and you can live your usual life - dancing, running, doing fitness - without looking at your hair
How to fix a children's wig
Exactly as described above in the article. You can fasten children's wig with hairpins or glue - it all depends on the model of the wig or the effect you want to achieve.
- If the wig is for a party and a New Year's party, then you can get by with ordinary hairpins. Just braid the child's hair and put on the wig, grabbing it behind the ears and at the back of the head with invisibility. So he will not slip during active games and dances.
- If the baby has lost his hair due to illness and needs a wig every day, then the situation becomes more complicated. Firstly, the wig in this case must be of high quality, handmade. Necessarily breathable on a mesh basis. Secondly, parents should help to put on and fasten the wig, at least at first. Due to the silicone inserts, the wig will hold well even without glue, so over time the child will learn to put on the “hairstyle” himself.
Come shopping with your baby - Parikof store consultants will definitely tell and show you how to fix the wig on the child's head so that he is comfortable.
We hope this article has helped you figure out how to properly style your wig and wear it in style, discreetly and comfortably.
How to put on a wig: easy, fast, safe
If you are going to wear a wig, do it right and in style! In this step-by-step article, we'll walk you through how to wear your wig correctly to look your best and feel comfortable at the same time.
How to put on a wig quickly and easily: instructions from the pros
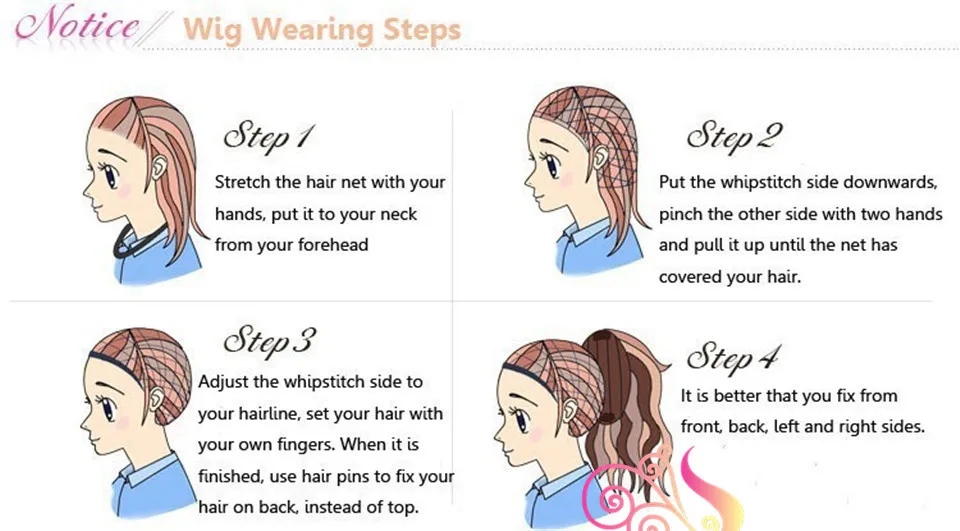
1. Prepare your hair. Short ones need to be combed back and fix the bangs with a thin rim. Divide the length to the shoulders and below into several parts, braid with pigtails or tie with ponytails, and fasten the ends with invisibility. If there is no hair, there is no problem. It is enough to treat the scalp with an alcohol solution and you can put on a wig.
2. Put on the special mesh. It tightly fixes the wig and does not allow it to slip off with active movements of the head. Plus - it hides all the irregularities of the hairstyle. The mesh is first put on the neck, and then lifted onto the head, aligned along the hairline and begin to gently spread over the head, hiding the hair under it. The ends of the mesh are fixed with clips-hairpins in the back of the head.
3. Now it's the turn of the wig. Take it with both hands at once and begin to carefully pull it from your forehead, carefully spreading the cap over your entire head, to the very back of your head. It remains only to adjust the hairstyle for yourself so that the wig sits exactly, not below and not above the natural growth line of your hair. If it seems that the wig did not fit tightly, fix it with invisible hair in the temple area, capturing the net and a strand of your hair. Or put on glue (we will talk about this below).
4. Final touches. Comb the hair of the wig and style it as required Material:
- Synthetic wigs made of kanekalon and modacryl are enough to comb, spray with water and style with your hands. These products should not be curled, dried with a hot hair dryer and generally subjected to thermal effects. The advantage is that kanekalon has the ability to "remember" and retains a given shape even after active use and numerous washes.
- Thermofibre models , on the contrary, are not afraid of curling irons and curling irons. They easily withstand exposure to 180-200 degrees, so they provide more opportunities for creativity and creating new hairstyles, curls and curls.
- Natural wigs will need to be styled every time after washing, just like your own hair. But at the same time, they look natural, last at least three years and allow you to change hairstyles to your taste and mood every day.
When buying a wig, the specialists of the Parikof store tell and show in detail how to put on a wig, style your hair, and take care of the product. You can always get a free consultation on any issue regarding the choice and wearing of artificial and natural wigs.
To wear with or without mesh?
Professionals recommend wearing mesh wigs for several good reasons:
- It holds your own hair well and prevents it from getting tangled under the wig.
- Eliminates the risk of any unruly strand or short bangs slipping out from under the wig cap.
- Prevents the wig from slipping through the hair and scalp, prevents it from slipping when turning the head sharply and waving.
- The mesh material is hypoallergenic and pleasant to the touch, it creates a small air gap between the scalp and the base of the wig, which makes wearing the latter more comfortable.
- The mesh absorbs moisture well, so in the summer, when perspiration increases, the wig cap stays clean longer.
We give away a net for free with every wig purchased from Parikof stores, so that our customers not only look perfect, but also feel comfortable and at ease.
You can do without the mesh if you have a short pixie or boy haircut. But it is extremely difficult for girls with bob hair to tie ponytails or braid them to fix and hide them under a wig. Some girls, in an attempt to save money, use nylon stockings - they tie a knot at one end and cut off the excess length from the other. But don't expect a secure fit with such a homemade accessory.
The special mesh is inexpensive and very convenient to use. You can choose a light or dark shade, the color of your hair, or you can universal beige.
How to quickly and easily put on a wig for long hair
A wig allows you to instantly change your appearance, and for this it is not at all necessary to trim your hard-growing curls. It is enough to hide them well under the net and know the technology, how to put on a wig for long hair correctly, quickly and easily:
1. First, carefully comb your hair. If they are fluffy and electrified, a spray for hair smoothness with a thermal protection effect or ordinary mineral water will help to remove static.
2. Long curls are best divided into two parts, twisted crosswise at the back of the head and fixed with invisibility. But this must be done very carefully, as the invisible ones can crawl out through the base of the wig and damage it. From above, the laying must be fixed with a mesh (as we described above).
3. Now it's the turn of the wig. It also needs to be prepared before putting it on. First, adjust the size of the cap so that the product fits snugly on your head, but does not cause discomfort. Secondly, comb the hair of the wig well and put it on as described above in the instructions.
Remember - if you have worn a wig for 10-12 days, then it's time to wash it. How to do this, we told in detail here .
Do not collect long curls in one voluminous bun - it will bulge ugly and can deform the base of the wig. If the hair is not only long, but also thick, just braid 3-4 "dragon-pigtails" or make two low ponytails, and then put the ends under the net (it will fix them securely).
How to properly put on a wig with and without bangs
A model with bangs is much easier to put on than a product without it ( lace front wigs ). In the first case, it is enough to hide your hair under the net and put a wig on your head. And then just “seat” it in place - visually compare the length of the hair from all sides, correct the fit if necessary, comb and style the strands to your liking. The bangs hide the front growth line of the curls, so no tricks are required here.
As for lace front wigs, you'll have to try hard. But the effect of a completely natural hairstyle is worth it. These models come without bangs. Instead, on the front line, there is a transparent mesh (monofaliment), into which hairs are woven (100% handmade). Thanks to this technology, a visual effect of natural hair growth is created, and the hairstyle looks as relaxed and natural as possible.
Wigs of this kind are called Hollywood hair because they are often worn by celebrities who want to hide the imperfections of their own hair.
How do you put lace front wigs on your head? Just like any other wig, they first hide their hair under the net, and then they put on the wig itself. Here the forehead line deserves special attention, so there are secrets and features:
1. If the wig is new, then you need to first cut the front mesh along the line of your hair growth, as the manufacturer leaves it too long.
2.. Lace front wigs without bangs are fixed with glue, which lubricates the edges of the mesh so that the hairstyle does not move out and stays firmly on the head all day. You can also use a special adhesive tape (it is double-sided), which is placed on the forehead and temples.
3. To prevent the wig from getting stained with glue, it is better to put it in a ponytail and fasten it. The glue should be applied with a thick brush and allowed to dry for 2-3 minutes before putting on the wig.
4. To make the wig invisible, mask the junction of the net and skin with foundation. So the front mesh will merge with the tone of the face and will not give out your little secret.
This fixation of wigs is very secure. You can do fitness, swim in the pool, relax in the sauna, dance at the disco. In general, lead an active lifestyle, without worrying at all that you will “lose” curls from a sharp turn of your head.