How to polka dance steps
How to Polka Dance - Free Video Lessons
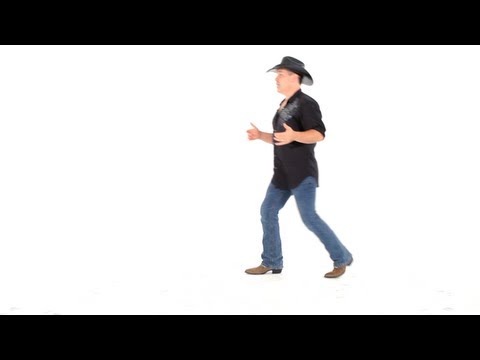
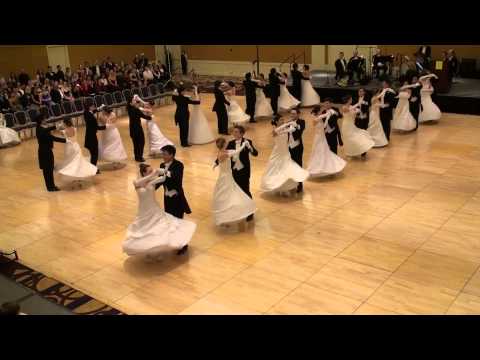
Polka dancing is a quirky and energetic folk dance performed in 2/4 time. It is filled with quick movements and lively hops that give the dance an abundance of personality. The steps of the polka are fairly simple to learn, but the speed and hops can quickly throw you off rhythm. Learn how to polka dance with this free video lesson from Howcast!
History of the Polka
Polka dancing was first performed by Czech peasants during the early 1800s. The name is derived from the word pulka, which means half in Czech and is an ode to the fast-paced nature of the dance. It is rumored that a peasant by the name of Anna Slezak created the dance simply to amuse herself.
After its creation, the dance caught on quickly and became a popular folk dance that ended up in Prague ballrooms. From there, it spread to the ballrooms of Paris and was a sensation with French dancers. Because of this, it didn’t take long for polka to make its way to both the U. S. and England, where it is still performed today.
How to Polka
While the steps of the polka are not that difficult, understanding the hop and time signature can make the dance somewhat confusing at first. When learning how to do the polka, it’s best to perform the it slowly to start, then speed up once you can successfully execute the steps. Here are some tips to help you get started:
Body Position
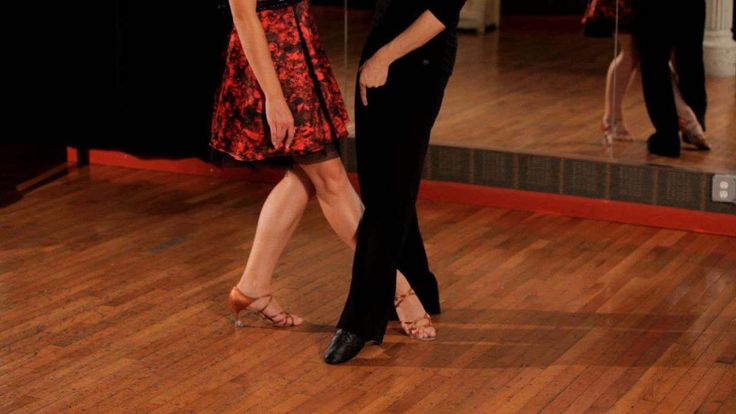
You should start with ample room between you and your partner. A man’s left hand will extend out at about shoulder level, while a woman’s right hand will extend out to meet it. The man’s right hand should be placed below a woman’s left shoulder blade and the woman’s left hand will rest atop the outstretched arm with the hand on top of the man’s right shoulder.
Counting
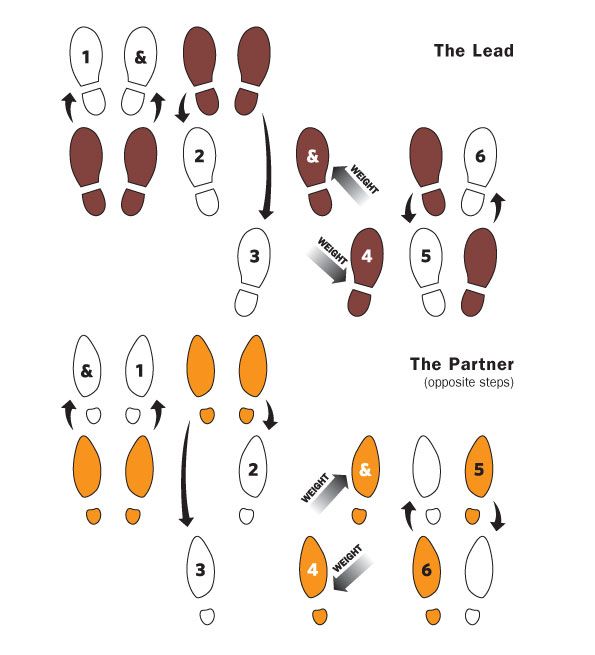
Because the polka is done in 2/4 time, counting it is fairly straightforward. This means that there are two beats per measure, and each measure contains three steps. You can count this by just saying: “1 and 2,” repeating this as you dance.
How to Do the Polka Basic Steps
Before you get carried away with fancy twirls and moves, learning the basic steps are important for building a foundation to work with. Using your knowledge of the count and body positioning, you can begin to perform the basic steps of the polka:
- Stand with your feet together, knees relaxed. If you're the man, hold the woman along her back with your right arm. If you're the woman, rest your left arm along the man's back, pressing your extended hands together.
- Step and hop. Step to your left, if you're the man. If you're the woman, step to your right. Each person hops the second step with their opposite foot, the other just coming off the floor. Then bring your feet down next to each other.
- Reverse step. Draw your partner back with you as you reverse the step with a right, and then a right-side hop, setting the left foot down. TIP: Take lessons or buy some CDs to get the rhythm down before trying.
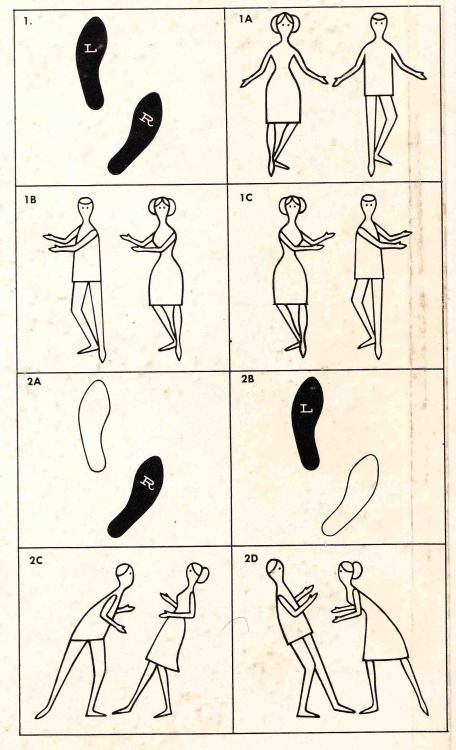
- Spin and hop. Turn out slightly by hopping out on your left if you're the man, and spinning yourself 180 degrees. The woman follows, hopping instead on her right.
- Swing her. Swing the woman around with you as you hop back now with the right, finishing a circle and bringing her around to starting position as you set both feet down, side by side again.
- Start again. Start the steps all over again as you wheel around the floor, hopping on the first notes of each phrase. Remain in sync with the music on each step. TIP: These steps convert nicely to country western standards.
- Get crazy. Put in additional steps wherever you choose as you feel more comfortable. The polka is about letting loose and having fun.
You Will Need
- Partner
- Dancing shoes
- Ballroom or beer hall
- Music
- Dance lessons (optional)
- CDs (optional)
Start Polka Dancing!
By now, you’ve likely mastered the polka dance! To learn more dance styles with free video lessons, explore our main How to Dance page!
Polka information, tips, free dance videos and music examples
| See also: Ballroom Dance DVD's & Videos >> << Learning Center Intro |
The polka is a gay, fast-traveling dance that is easy to learn, but requires lots of energy.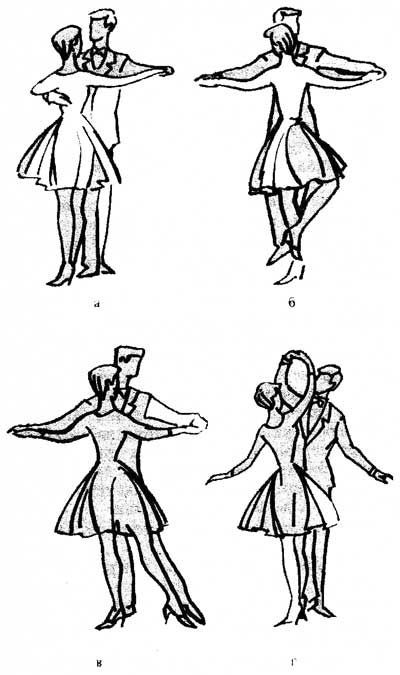 The polka was originally a Czech peasant dance. The dance was first introduced into the ballrooms of Prague in 1835. The name of the dance (pulka) is Czech for "half-step,” referring to the rapid shift from one foot to the other. The polka is the state dance of Wisconsin. In the 1990’s, polka regained popularity among country-western dancers.
| The Basic Step of the Polka PLAY
| |||||||||||||||
- The Moves
- The Music
- History
- Tips & Info
The basic Polka step is a continuous series of step-close-step “triple steps.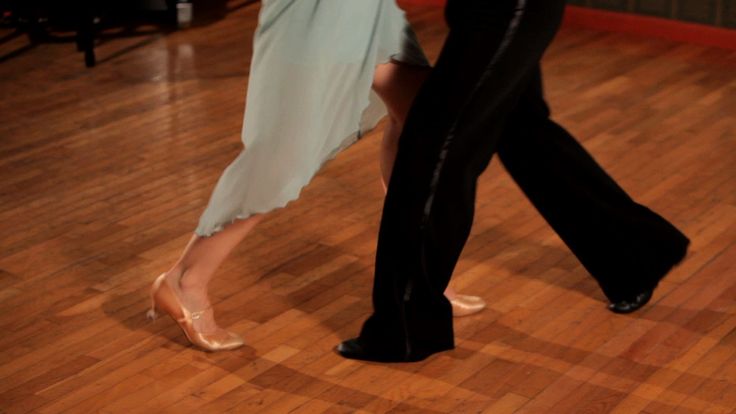 ” Some people liken the basic movement to “galloping.” Like the two step and Viennese waltz, the polka is a fast traveling dance that is generally danced around the perimeter of a large dance floor.
<< Back to top
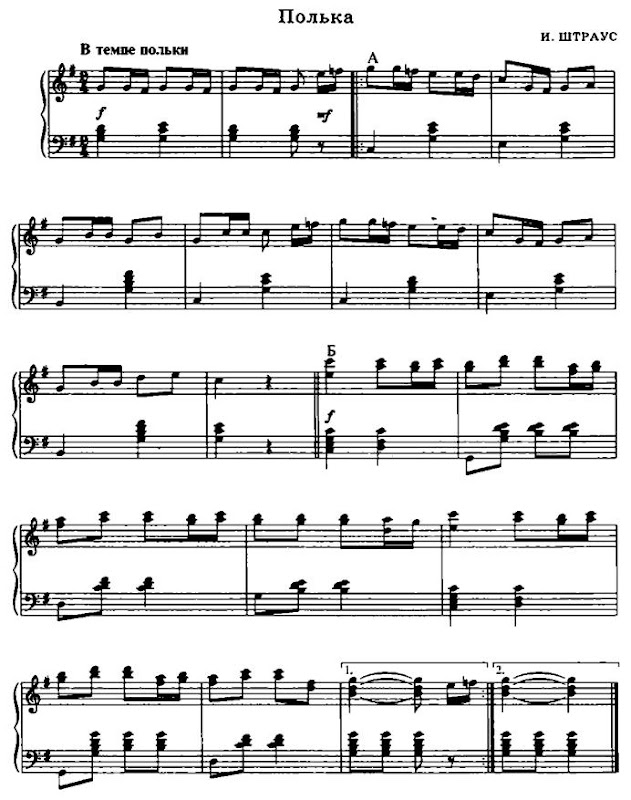
Polka music is written in 2/4 time and the tempo is fast, usually more than 190 beats per minute. The polka was originally a European peasant dance and was danced to lively folk music. Perhaps the most well-known polka song is the “Beer Barrel Polka,” made famous by Frank Yankovic.
Polka Music Examples >>
<< Back to top
The polka was originally a Czech peasant dance that became popular in the mid 1800’s. European immigrants brought the polka to Wisconsin and polka became the state dance of Wisconsin. Polka is very popular among country-western dance competitors.
<< Back to top
Here are some "universal tips" for learning how to dance a partner dance such as polka.
- First, acquire a few audio CD's of the music and play the music over and over in your home or automoble. Next, count the step timing in time to the music. This you can do sitting down, perhaps while driving. For example, for waltz, call out the 1,2,3 1,2,3 step timing in time to the music. For foxtrot, call out the step timing using slows and quicks. For cha cha and rumba, it's important to recognize the first beat of each measure. Otherwise you may dance on the incorrect beat. If necessary, have your instructor assist you in learning to count the step in time to the music. Dancing in correct time to the music is absolutely essential. Continue this "sitting down and listening" exercise for as long as necessary until you can easily and automatically count the step in time to the music. The Ultimate Ballroom Practice CD sold by The Dance Store might be a helpful
tool.
- Next, practice the basic step, including the step timing, until the step is automatic - like tying a shoe.
 Using east coast swing as an example, practice the triple step, triple step, rock step basic until it's automatic. Next, practice this basic to music until it becomes automatic. Many basic steps can be practiced without a partner.
At this point, your brain is "freed up" to allow learning steps and patterns because you no longer have to concentrate on timing and step counting.
Many folks get frustrated if they can't dance competently immediately. Certainly individuals vary in dance aptitude, but all dancers must go through the awkward stages before they get to the polished stage.
<< Back to top
Study of the polka step, the main element of the Polka dance
Methodological development
Study of the polka step, the main element of the Polka dance, in a group of beginners.
Author: Posrednikov VS, a teacher of additional education at the State Budgetary Educational Institution of Children and Children's Children's Children's Youth "On Lenskaya".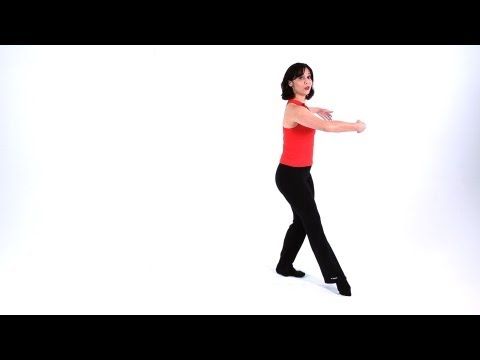
"Polka" - the birthplace of this dance is the Czech Republic. There are Hungarian, German, Swedish, Finnish, Gallop Polka, Mazurka Polka. You can dance alone, or you can dance in pairs or in a group.
Composition of those involved - a group of boys 6 - 7 years old, beginners.
Purpose: to teach how to perform (dance) the polka.
Tasks:
learn polka movements;
introduce the musical meter of the Polka dance;
develop coordination of movements, ear for music;
develop ease of movement, posture;
develop the child's physical data, memory, attention.
Practice "Polka step, spade step, jump step",
“Improvement of the polka step, spade step, jump step”
Motivation and relevance of the topic
Choreography classes are held to improve health, achieve life and professional goals, and promote a healthy lifestyle.
Questions to consolidate knowledge
1. What motor qualities do the elements of folk dances develop?
2. Why was the dance called Polka?
3. How many measures are there in Polka?
Sample answers to questions
1. The use of folk dance elements in choreography classes develops coordination of movements.
2. The dance was called the Polka, because its main step was divided into half steps (Czech Pulka - half).
3. There are 28 measures in the Polka dance.
Evaluation criteria
"5" - the motor action was performed correctly, clearly, confidently, freely, all technical requirements were exactly met; "4" - the motor action was performed in accordance with the requirements, while no more than two minor errors were made; "3" - the motional action was performed basically correctly, but with one significant or more than three minor errors; "2" - when performing a motor action, one gross error was made and the number of other errors was more than three.
| The use of folk dance elements in choreography classes develops coordination of movements, develops the ability to maintain a beautiful posture in movement and helps to raise the emotional state of those involved. The dance was called Polka because its main step was divided into half steps (Czech Pulka - half). Students stand in lines in a checkerboard pattern. Starting position: legs in the first position, hands placed on the belt. (advancing the legs on the toe alternately forward and two half-squats).
The polka step is an alternating step done in light jumps. Polka steps are distinguished forward, backward and with a turn around. Step Polish forward
Back polka step I.
Polka step with a circle turn - Ш position, right in front of the hand on the belt.
| Question 1. What motor qualities are developed by the elements of folk dances? Question 2. Why was the dance called Polka? During the exercise, you should monitor your posture; the back should be absolutely straight. Performing half-squats, try to spread your knees to the sides as wide as possible. In measure 19, starting to shake the hands, turn them back to each other, then they turn down (shake with almost one finger), the movement is continuous, the arms simultaneously go down through the sides, then they are placed on the belt in measure 21. Question 3. How many measures are there in Polka? In the back polka, side steps are performed at a canter step (same as in the forward polka). The body is turned in the direction of the leg of the same name, taking a step back, the head is turned in the opposite direction. |
 p. - Ш position, right in front of the arm on the belt
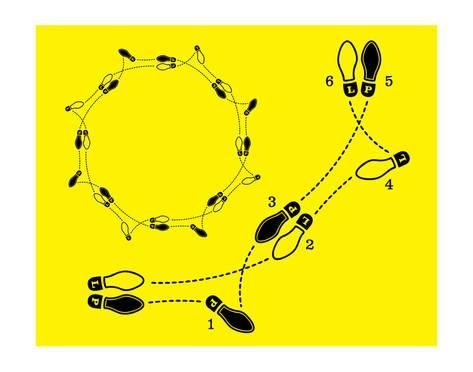
Polka step
Name:
Pas (French) - step
Polka - folk Czech dance
Pas polka (Pa polka) - polka step, basic dance movement.
Music
Time signature 2/4.
Pa polka takes 1 measure.
Score: I-1-I-2
Preparatory exercises
- Transfer of body weight from two legs to one.
- Bringing the leg to the toe - battement tendu - tandu battman in 3 positions in a cross one at a time (right foot and left foot).
- Rise on half-toes (relevé - relevé) in 3 positions.
- The position of the leg in the position sur le cou-de-pied (sur-le-cou-de-pied) in front and behind: the foot is at the ankle of the supporting leg with the toe extended, the knee is bent and laid aside. Sur le cou-de-pied (fr.) Literally - “on the neck of the leg” (on the ankle).
- Throw a leg with a straightened knee and a pulled toe - jeté (jeté).
- Jump (step with jump)
- Pa glisse
- On the Chasse
On the POLKS FORWARD
Starting position:
The dancers stand in a circle, facing along the line of dance.
Legs - in 3 positions (right leg in front).
Hands - on the belt or in the ball position.
1 measure - Pa polka forward from the right foot:
| Score | Movement description |
| Start-up (I) | Before starting the movement, slightly soften the knee of the supporting left leg. With a slight jump on the left leg, the right leg is thrown forward with a straightened knee and a drawn toe (jeté). The leg is raised slightly above the floor. |
| 1-I-2 | Chassé right foot forward: Score 1 - Glide (gliding step) with the right foot forward in 4 pos. from the sock to the entire foot. The knee of the right leg softens slightly. The left leg remains behind on the toe (in 4 pos.). The knee of the left leg is straightened. Account I- Straightening the knee of the right leg, with a sliding movement of the toe along the floor, pull the left leg to the right leg in 3 pos. Count 2- Second Pa glide (gliding step) with the right foot forward in 4 pos. from the sock to the entire foot. The knee of the right leg softens slightly. The left leg remains behind on the toe (in 4 pos.). The knee of the left leg is straightened. |
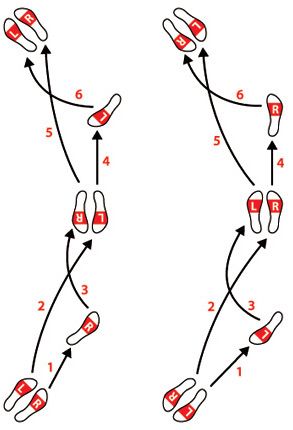 (behind the right leg) and rise on the half-toes of both legs. The knees are almost straight.
 2 measure - Pa polka forward from the left foot:
| Account | Movement description |
| Start-up (I) | The left leg, standing behind on the toe, softens slightly at the knee and is brought forward along the floor through 1 pos. With a slight jump on the right leg, the left leg is thrown forward with a straightened knee and a drawn toe (jeté). The leg is raised slightly above the floor. |
| 3-I-4 | Chasse with left foot forward (similar to the account 1-I-2). |

Notes:
- When performing the Pa polka forward, the forward leg throw to the back of the beat - jeté (jeté) must be low and restrained. The knee is straightened, the toe is pulled back.
- When performing Pa Polka forward, the head is slightly turned towards the leg that performs the step.
PA POLKS BACK
Starting position:
The dancers stand in a circle, facing along the line of dance.
Legs - in 3 positions (right leg in front).
Hands - on the belt or in the ball position.
1 measure - Pa polka back left foot:
| Score | Movement description |
| Start-up (I) | Before starting the movement, slightly soften the knee of the supporting right leg. With a slight jump on the right leg, the left leg rises from the floor, and remains behind at the ankle of the supporting right leg with bent knee and pointed toe - in the position sur le cou-de-pied (sur-le-cou-de-pied) behind . |
| 1 | Straightening the left leg back and slightly to the left (drawn toe - on the floor), perform a small sliding step with the left foot back in 4 pos. on low toes. Housing rotates slightly to the left. The head remains in position - full face. |
| and | With a sliding movement of the toe on the floor, pull the right leg to the left leg forward in 3 pos. (in front of the left foot) on low toes. The weight is transferred to the right leg. |
| 2 | Perform the second small sliding step with the left foot back in 4 pos. on low toes. The right leg with a toe on the floor is pulled to the left leg forward in 3 pos. (in front of the left foot) on low toes. Weight remains on the left leg. |
 The knee of the left leg is directed to the side.
 2 measure - Pa polka back from the right foot:
| Score | Movement description |
| Start (I) | Before starting the movement, slightly soften the knee of the supporting left leg.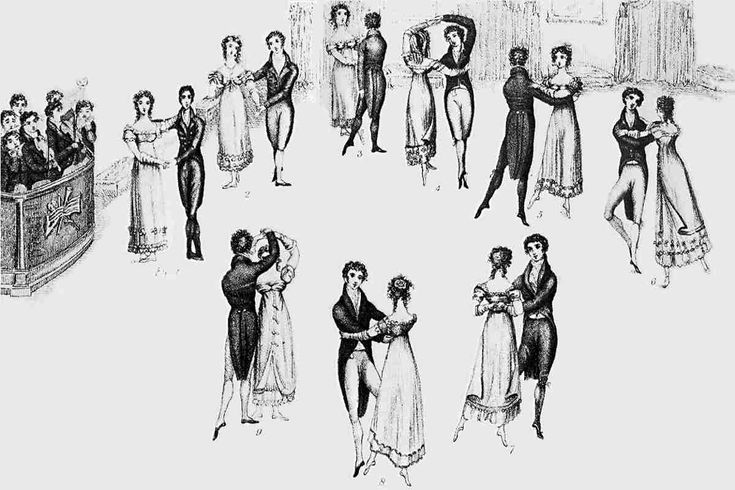 With a slight jump on the left leg, the right leg with a toe on the floor after 1 pos. moves to a position behind at the ankle of the left leg, with a bent knee and a pulled toe - to the position sur le cou-de-pied (sur-le-cou-de-pied) behind. The knee of the right leg is directed to the side. |
| 3-I-4 | Repeat the movements of the count 1-and-2 with the right leg. |
Remarks:
- Pa polka back is performed on low toes.
- When performing Pa Polka backwards, the body turns slightly towards the leg that performs the movement (to the right - when performed from the right leg, to the left - when performed from the left leg). At the same time, the head remains in the position - full face.
PA POLES TURNING TO THE RIGHT
Starting position:
The dancers stand in a circle, facing the center.
Legs - in 3rd position (right leg in front)
Hands - on the belt or in the ball position.
The movement takes 2 measures of musical accompaniment.
| Account | Movement description |
| Start-up (I) | Before starting the movement, slightly soften the knee of the supporting left leg. With a slight jump on the left leg, the right leg is thrown forward / to the side with a straightened knee and a pointed toe - jeté (jet). The leg is raised slightly above the floor. Head turns to the right. |
| 1 | Starting to turn the body to the right, perform a small sliding step with the right foot forward / to the side (along the line of dance) on low toes. Shift your weight onto your right leg. The left leg remains behind on the toe. |
| and | With a sliding movement of the toe on the floor, pull the left leg back into 3 pos. (behind the right leg) on low toes. |
| 2 | Perform the second small sliding step forward/sideward with the right foot (along the line of dance) on low toes. Shift your weight onto your right leg. Shift your weight onto your right leg. The left leg remains behind on the toe. Slightly soften the knee of the supporting right leg. |
| and | With a slight jump on the right foot, the first half of the turn to the right by 180 degrees ends. (to the position - back to the center). On the jump, the left leg is bent at the knee and pulled up to the ankle of the right leg from behind (the pulled toe of the left leg almost touches the floor). The left leg is in the position sur le cou-de-pied (sur-le-cou-de-pied) behind the supporting right leg. Head turns to the left. |
| 3 | Continuing to turn the body to the right, perform a small sliding step with the left foot forward / to the side (along the line of dance) on low toes. Shift your weight onto your left leg. The right leg remains behind on the toe. |
| and | With a sliding movement of the toe on the floor, pull the right leg back into 3 pos. (behind the left leg) on low toes. (behind the left leg) on low toes. |
| 4 | Perform a second small sliding step with the left foot forward / to the side (along the line of dance) on low toes. Shift your weight onto your left leg. The right leg remains behind on the toe. Slightly soften the knee of the supporting left leg. |
| and | With a slight jump on the left foot, the second half of the turn to the right by 180 degrees ends. (to the position - facing the center). The right leg is bent at the knee and pulled up with the toe along the floor to the ankle of the left leg in front (the pulled toe of the right leg almost touches the floor). The right leg is in the position sur le cou-de-pied (sur-le-cou-de-pied) in front of the supporting left leg. Head turns to the right. |
Notes:
- Pa polka in turn is performed on low half-toes.
- When performing Pa polka in a turn, the working leg performs the jeté (jeté) movement only on the lead-in of the first measure (on the first jump on the supporting leg).
 In the remaining measures on the back-beat (on jumps), the free leg should be pulled up to the supporting leg in the position sur le cou-de-pied (sur-le-cou-de-pied).
 - When performing the Pa polka in a double turn on jumps, the free leg is also in the position sur le cou-de-pied (sur-le-cou-de-pied).
- When executing the Pa polka in a turn, most of the turn is done on the bounce.
-
When performing Pa polka in turn, the head turns in the direction of movement.
In this case, the left leg is pulled into the position sur le cou-de-pied (sur-le-cou-de-pied) behind the supporting right leg, and the right leg is pulled into the position sur le cou-de-pied (sur-le-cou -de-pied) in front of the supporting left leg.
The leg is brought out in the direction of movement just before the execution of the step.
General remarks:
- In all cases, when performing the Pa polka, the off-beat movement is preliminarily performed - a jump on the supporting leg and preparation of the working leg for the step.

- Pa polka jumps are small and light.
- Be sure to slightly soften the knee of the supporting leg before jumping up.
- The jump is executed with a slight slip in the direction of movement.
- When playing pa polka, springy up/down swings should not be emphasized. Movement is horizontal, along the floor.
- The free leg is brought forward or back close to the skating leg with the knee slightly bent.
- All steps start at the toe. Feet - turn out.
Literature
- " Ballroom dance of the 16th - 19th centuries ". Ivanovsky N.P. Under the editorship of Yu.I. Slonimsky. Moscow-Leningrad, ed. Art, 1948
- " Modern ballroom dance ". Manual for students of cultural institutions, students of cultural and educational schools and leaders of ballroom dance groups. Edited by V.M. Striganova and V.I. Ural. M., "Enlightenment", 1978
- " Historical and everyday dance ". Tutorial.
 I. Voronina. M., "Art", 1980 g.
 - "Ballroom dancing". Sarikojumu dejas. Lasman Milda. Publishing house Latvias Valsts Izdevnieciba, Riga (Riga), 1954
- "Dance ". Textbook for theatrical universities (on stage dance). Vasilyeva E.D. M., Art, 1968
- Educational and methodological recommendations for organizing work with the whole class in elementary school on rhythm, rhythmoplasty and ballroom dancing . Shutikov Yu.N. St. Petersburg, 2006
- " Rhythm at school, the third lesson of physical culture ". Teaching aid. Zh.E. Firileva, A.I. Ryabchikov, O.V. Zagryadskaya, Rostov-on-Don "Phoenix", 2014
Note
According to the description in the literature
This description of the movement is given in the interpretation of G. M. Kondratenko, head of the City Methodological Association of Ballroom Dance Teachers at the St. Petersburg City Palace of Youth Creativity. staccato) and executed as Pa chassé See DANCE ELEMENTS with preliminary jump See DANCE ELEMENTS on the supporting leg.