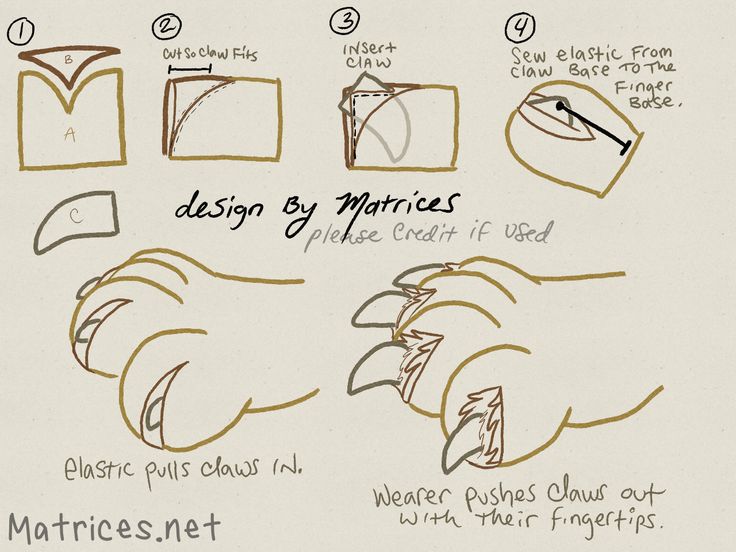
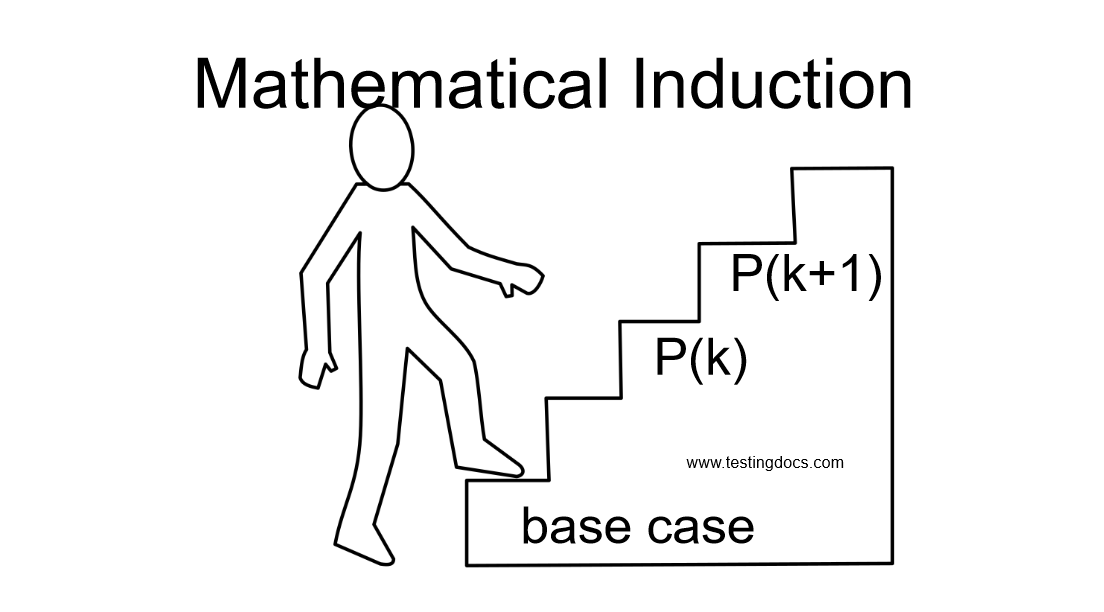
How to make your own dance paws
The Perfect Pirouette
Suggested Blogs
Finally a Break Just Sharing a Dance Moment Pole and presence An Open Letter to Pole Dancers To BecomeDancing can be harsh on your feet. In pole dancing, we often begin our classes in bare feet in order to work on proper foot exercises and form while dancing. As an instructor, I teach my students to point their feet creating clean lines beginning from the foot up the leg while maintaining weight on the balls of the feet. The balls of the feet often get sore with repetitious movement during a dance practice. In order to prevent soreness, the dance industry has introduced products that protect the dancer's sensitive areas of the foot. I have been fortunate enough to try out three of the products currently on the market: [www.dancepaws.com][www.nutura.com.sg] and [www.walgreens.com]
Dance Paws, Capezio Foot Undeez, and Toe-kini are elastic half socks that dancers place on their feet. Dance Paws require the user to place each toe in it's own cut out in the half sock. The bottom of the half sock is made with a thick suede pad that allows smooth movement for the dancer on hard floor or carpeted surfaces all while protecting the ball of the foot. Dance Paws are available in light nude, dark nude, and black. Dance Paws also have an adjustable elastic strap secured with velcro or the option of a fixed strap. I have the adjustable elastic strap in light nude. I really enjoy using my Dance Paws. The thickness of the suede pad keeps my feet comfortable during dancing. I'm also able to climb the pole effortlessly with my Dance Paws on.
Capezio Foot Undeez look like a pair of tiny underwear with two holes- one for the big toe and another for the remaining four toes. The suede pad on the ball of the foot is divided into two separate pads and placed where weight is distributed in the foot as opposed to the Dance Paws which have a single one piece suede pad.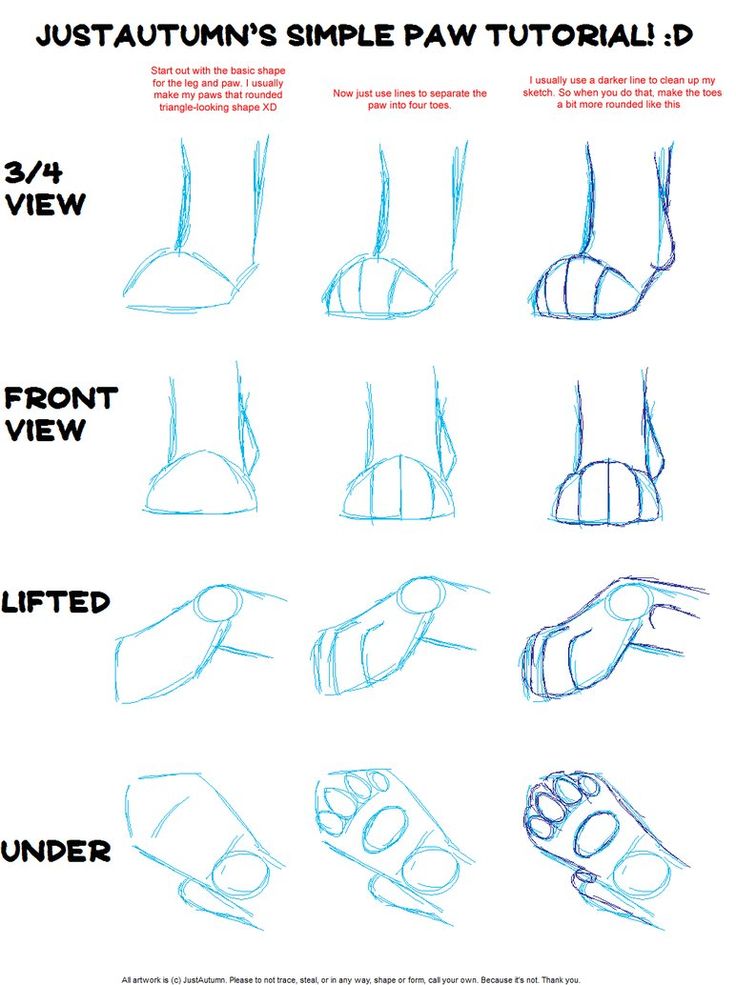 The division of the pad when wearing the Capezio Foot Undeez appears to be slightly thinner than the Dance Paws, however the difference is not significant enough to cause post dancing soreness in the areas of intended protection. The Capezio Foot Undeez are easy to put on and remove quickly compared to the Dance Paws which require careful placement to assure all toes are correctly inserted into the toe holes and the additional time to adjust the elastic strap. Capezio Foot Undeez are available in trendy designs and colors which appeal to dancers of all ages.
Toe-kini are a less expensive version of the Capezio Foot Undeez. Toe-kinis are comparable to the structure of the Foot Undeez, however the difference is a significantly thinner suede pad. The Toe-kinis allowed me to perform as desired, however post work out I experienced soreness in the balls of my feet. The durability of the Toe-kini is inferior to the Dance Paws and Capezio Foot Undeez, however I highly recommend the use of Toe-kini if you are considering whether or not you'd be able to tolerate dancing with the half socks on your feet. Toe-kinis are inexpensive and was easily found in the foot care department at my local Meijers or Walgreens stores. Please note that the intended purpose of Toe-kini are for wearing with high heels to add extra cushion in shoes that are otherwise uncomfortable, however they also advertise the product is suitable for dance performance in addition to it's common use.
All products are easy to clean. I use a nickle size amount of laundry detergent with warm water in the sink, rinse thoroughly, and air dry. The nude colored products have a tendency to look dirtier from walking around dance studios, so I recommend purchasing a darker color. Overall, I found these products to be wonderful additions to the dance industry. There are some days I don't want to wear my shoes and I find these to give me the perfect alternative to bare feet that allows me to incorporate smooth, beautiful, and painless transitions in my dance practice.
- Latest blog post from: [www.poleharmony. blogspot.com]
Dance Paws - Etsy.de
Etsy is no longer supporting older versions of your web browser in order to ensure that user data remains secure. Please update to the latest version.
Take full advantage of our site features by enabling JavaScript.
Find something memorable, join a community doing good.
(182 relevant results)
from an old sweater, made of artificial fur
Gaiters - stockings covering the shin from the ankle to the popliteal cavity. This is not only a modern and stylish product. They perfectly protect the legs in the cold season. For such a useful quality, they are highly appreciated by lovers of miniskirts. Yes, and male fishermen have long kept them in their wardrobe.
But most often they are used by those who are fond of dancing. Usually a dance lesson lasts from 1.5 to 2 hours. During this period, the calf muscles of the dancers are constantly loaded, which leads to a strong heating of the ligaments. Therefore, leggings are a prerequisite for the health of the dancer's legs. Well-warmed muscles minimize the possibility of injury. Leg warmers stimulate blood circulation in the muscles and make it more intense. This is especially true for girls. When the legs are not protected by anything, their rapid cooling will certainly lead to the fact that the ligaments will be stretched.
The density and height of the gaiters depends on the ambient temperature.
Important! The colder it is, the longer and thicker your workout gaiters should be.
They are usually sewn from knitted fabric or knitted from wool with acrylic thread. Synthetics contribute to the elasticity and strength of products.
We will tell you how to make leggings for gymnastics or dance classes with your own hands.
How to make leggings from an old sweater
Leggings without seams for dancing are easy to make with your own hands from an old sweater bought at a sale or lying around at home.
Choose the right sweater for your next care.
- Wool : durable thread, but will need regular hand washing .
- Acrylic : durable, but cannot be washed often .
- Cotton : very durable, easy to match machine wash .
How to use
- Cut off the sleeves at the shoulder seam with tailor's scissors.
 The rest of the clothes can then be used at your discretion.
 - Lay out the sleeves on the worktop or ironing board. Straighten them without wrinkles.
- Take the triangle and align the gaiters to the shape.
- Put on your legs: you can pull them along the length or gather them in an "accordion".
If the resulting gaiters are too long, they can be easily shortened by cutting off the top. If the leggings slip, then you can narrow them down with a pin.
How to make faux fur gaiters
Look for fluffy, plush fabric in the textile section of your local store. synthetic fur fabric will also look good. Purchase one meter of the material you like. Perhaps a smaller footage will suffice if the leggings are conceived as low, covering only a pair of shoes.
Doing the job
- Measure the feet of with a tailor's meter.
 Need to do it just below the knee . Add 2.5 cm to the resulting volume . Otherwise, the elastic will be very tight.
 - Measure the roe at its widest point.
- Don't forget to measure the lower leg . The standard circumference when wearing different shoes is 56 cm. It is important to accurately measure the distance from the ankle to the popliteal region.
- Cut the fabric into two pieces . The width of each of them is equal to the length of the leg, and the length is equal to the girth of the calf at its widest point. Add 1 or 2 cm for seam allowances.
- Flatten the cut on the table with the lining side up. Set aside the length of the measurements along the ankle, the middle of the calf, and the popliteal region.
- Place a sewing elastic along all three horizontal lines. When the accuracy of measurements is not guaranteed, it is better to sew an elastic band on top and bottom a little closer to the middle, then the leggings will sit tighter.

- Sew the elastic, stretching it a little.
- Fold the piece of fabric in half. Hand-sew a blind edge seam that is well camouflaged by fluffy fur. You can also flash it by car, but in the middle you usually still have to flash it with your hands.
Help . Synthetic matter does not require a mandatory hem at the bottom of the leggings.
- Work the second part in the same way.
- Try on directly over tights or over shoes.
Tips and Tricks
In order to amaze others with the extraordinary beauty and grace of these accessories, fashionistas should take note of a few tips.
- Leg warmers with colorful stripes - a cheerful mood and a feeling of joy . Pick up some striped sweaters in your favorite colors from a second-hand store. For example, red and black, white and blue, yellow and blue, light green and turquoise, gray and pink.
 Set a goal and make your favorite little things with your own hands that will bring only positive emotions into your life.
 - Leggings will look extraordinarily feminine and charming if you wear an openwork mesh over them. A cute flirty image will give the girl self-confidence.
- Half stockings made of a wool sweater knitted using the pigtail technique, even visually look very warm . Immediately there is a desire to wrap them around your legs in order to immerse yourself in their cozy beauty.
- Cool stockings with a bow are a detail from 's childhood. I want to wear them without taking them off.
- The most dull and inexpressive gaiters will immediately come to life if they are decorated with bright cheerful pompoms.
As you can see, it is not difficult to make leggings with your own hands. It just takes a little effort and imagination.
Takori hat
How to wash leather sneakers in the washing machine
Like this article? Share with friends:
Article author:
Elena Evdokimova
I willingly take on non-standard tasks, I love unusual topics that the reader sometimes does not even think about. It is important for me that my work is understandable to a person, and most importantly, useful. I am ready to devote all my time to authorship, because I treat it with great responsibility and interest. The main goal for me is to make your life a little easier and easier, so I'm always ready to answer your questions
Ask the author a question
Sports knee pads
Step-by-step master class with photos "How to sew sports knee pads with your own hands"
For sewing knee pads, it is important to choose an elastic and elastic fabric that will retain its appearance during active use. Suitable supplex, scuba, jersey.
Pattern of the knee pads
We need three measurements to make the pattern:
- Girth of the leg above the knee
- Leg circumference under the knee
- Knee pad height
Knee pad height can be customized. I like high knee pads, they stay on the leg better and don't fall off when you move.
The height of my knee pads is 27 cm.
Cut out a rectangle twice as high as the measurement. 27*2 =54 cm.
The width of the rectangle is equal to the circumference above the knee -2 cm.
Fold the rectangle in half and sew along the edge. The line is better to lay on the overlock. If you do not have an overlock, then sew in a zigzag. The seam at this point will be prone to stretching and the straight stitch will not hold up. Remember to use a knitting needle.
We move the seam to the center of the product and iron.
You can further strengthen the seam by ironing it and sewing over the top with a zigzag stitch. I like how the triple zigzag looks in such products.
We cut the lower part along the edges so that the width is equal to the width under the knee -2 cm. Fabrics have different coefficients of stretch and you need to make sure that the knee pad sits snugly on the leg.
Let's move on to filling the knee pad. I cut out a rectangle a little less than half the width of the knee pad and a height of 20 cm.
I round the edges.
Filling should be done with soft tissue. I have a "sandwich" of two layers of fleece and between them two layers of synthetic winterizer 200. It turns out not a very thick layer, sufficient for dancing. For football and other contact sports, it is better to make the filling denser.
Trace the fleece onto the fabric of the knee pad, mark the stitch with a pencil.
Insert the "sandwich" inside the knee pad, exactly under the picture. We fix with pins and sew with our hands. First we fasten along the contour, and then along the main lines of the picture. Do not skip this step, otherwise, when sewing on a typewriter, it will be very skewed.
The stitching on the knee pad can be done in any shape, such as embroidering hearts or a star.
We cut off the edges of the knee pad from the inside and sew in a circle.