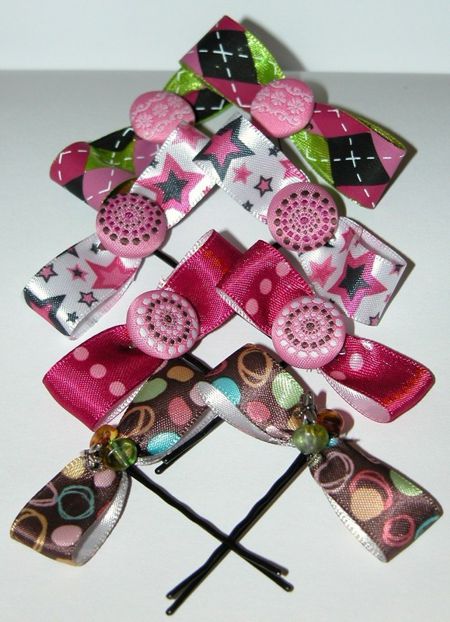
How to make dance hair bows
Dance Team Bow - Etsy.de
Etsy is no longer supporting older versions of your web browser in order to ensure that user data remains secure. Please update to the latest version.
Take full advantage of our site features by enabling JavaScript.
Find something memorable, join a community doing good.
(313 relevant results)
Dance Bows - Etsy.
Etsy is no longer supporting older versions of your web browser in order to ensure that user data remains secure. Please update to the latest version.
Take full advantage of our site features by enabling JavaScript.
Find something memorable, join a community doing good.
(1,000+ relevant results)
Hairstyle bow - 119 photos of works
Hair bow was created by stylists for everyday and evening styling. It is created on straight long strands, looks elegant and neat. The main feature of styling is versatility. Suitable for little girls, naughty girls, socialites and mature ladies, if done in an age-appropriate style.
Hairstyle bow for long hair
There are different options for creating styling and each of them has a different technique. It is best to do it on long hair - visually it will add volume. The bow goes well with pigtails, bangs, bun.
For a youthful look, the element can be placed at the top, and for mature ladies, a low bow on the back of the head in various variations is suitable - with a tail, oblique or simply assembled from all strands. Get a strict but elegant style. If a woman is going on a date or a party, she can release a few strands in front and curl them. Hairstyle gives the lady a special charm and coquetry.
Medium length hair
For medium length, there are various styling options, one of them is semi-loose hair with a bow. The strands are left straight or curled. In both cases, the hairstyle looks neat, suitable for the office, walking, meeting with friends.
A small bow, which acts as an accent detail, looks beautiful. It is placed in different parts of the head - it will not attract much attention, but it will favorably emphasize facial features. You can release the ends of the strands - slightly curl them or leave them straight.
Bow for girls
This is ideal for little girls in kindergarten, school. Laying looks neat, does not cause trouble.
Any hair clips, bright elastic bands, decorative elements, headbands will suit little fashionistas as decorations. If the strands are short, then two or three playful bows on top look great. For a festive option, you can pick up a bow from strands processed with a corrugated curling iron.
For girls
Girls choose daring options, especially if they go to a party or festive event. They coquettishly place the bow on the side and fasten the shiny barrette at the base.
If this is a wedding look, then the element is made from a part of the hair, generously sprayed with varnish to add gloss, and the remaining strands are curled into neat curls.
In addition, girls can combine different types of weaving with a bow from their own hair. Braids can be small, openwork, large. Well holds the strands of pre-made fleece.
At a young age, you can not be afraid to experiment with the image, so the bow hairstyle in any variation looks original and spectacular.
Before you create a stack, you need to read these recommendations:
- it is not recommended to make an element on thin strands, because the end result will cause disappointment;
- if the face is plump, it is worth abandoning the bow, as it will make the image heavier;
- bangs can be made straight or combed;
- it is better to choose the color of accessories closer to the shade of the strands so that they cannot overshadow the styling itself.

If you follow these recommendations, the bow hairstyle will turn out neat and will attract attention.
4 perfect ways to easily make a hair bow in minutes. Details about hairstyles with a bow for any length of hair.
You are here: » Home » Hairdressing » Hairstyles » Evening Hairstyles » Braided hair
Did you see a celebrity's hair bow? Do you want to learn how to do the same on your own head? Then let's start learning!
Be patient and in a good mood so that your bows will turn out easily and bring joy. Have you already chosen which bow do you like best?
Malvinka or with braids, or maybe a tiny bow from a pigtail?
We invite you to learn all the ways to create hair bows right now, learning from photos and videos. Pay attention to everyday and evening options for bows.
Did you see a celebrity's hair bow? Do you want to learn how to do the same on your own head? Then let's start learning!
Be patient and in a good mood so that your bows will turn out easily and bring joy. Have you already chosen which bow do you like best? Malvinka or with braids, or maybe a tiny bow from a pigtail?
How to make a hair bow?
Unusual stylish hairstyles are in fashion today. And the original hair bow can be attributed to them with confidence.
It will help you stand out from the crowd at a noisy party, and at the same time it is perfect for Sunday shopping. Many will be surprised, but a complex-looking hair design is actually done in a matter of minutes. And fashionistas will be especially pleased that they can easily make a bow hairstyle at home, using a minimum amount of aids.
Do you want to make a chic bow? Learn how to make a beautiful tail with photo and video instructions.
A properly tied ponytail without cocks and with volume will allow you to create bows of any complexity.For lovers of wearing a bow with oblique bangs, we suggest reading about: the secrets of oblique bangs, selection rules and styling options here.
And a lot of photos will help to see the finished image.
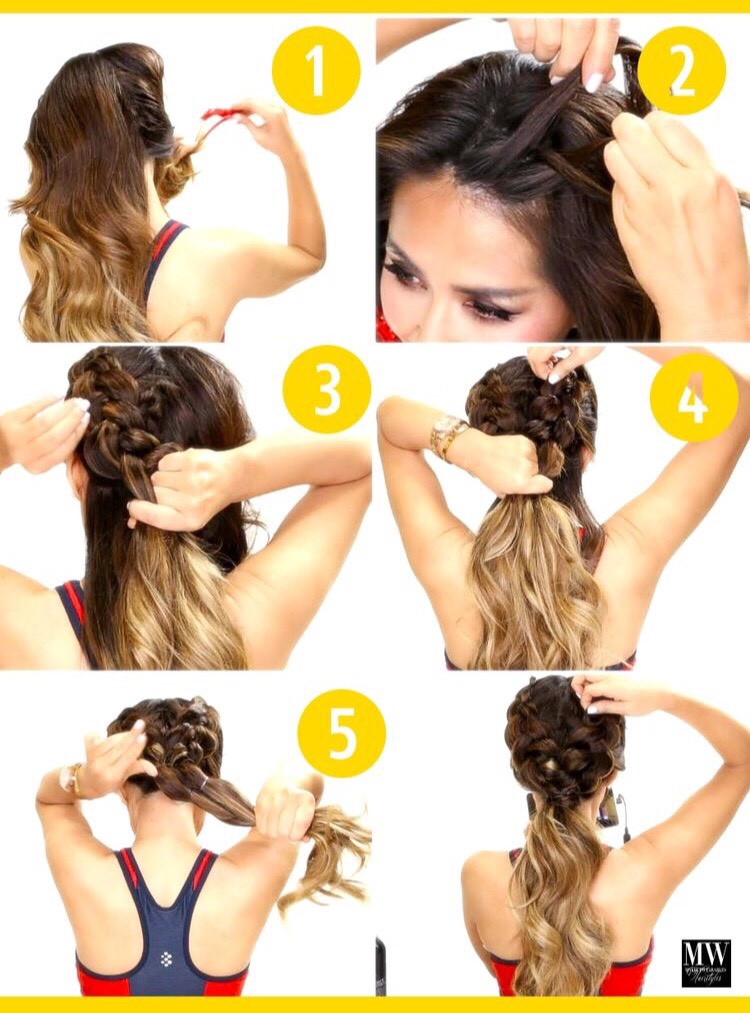
How to make a hair bow: step-by-step instructions
Preparing your hair for a hairstyle
Before you start styling, you need to prepare your hair. They must be thoroughly washed and dried, so that you do not have any difficulties with unruly curly curls, they must be leveled with an iron.
Tip: Don't forget to use styling products in preparation. The hair gel and mousse will give the hair manageability, while the wax will add shine. After the preparations are completed, you can start creating hairstyles.
Hair bow from hair 1 method
Making a bow from hair
1 method
- Determine the location of the bow
- Making the middle of the bow
- Bow lugs
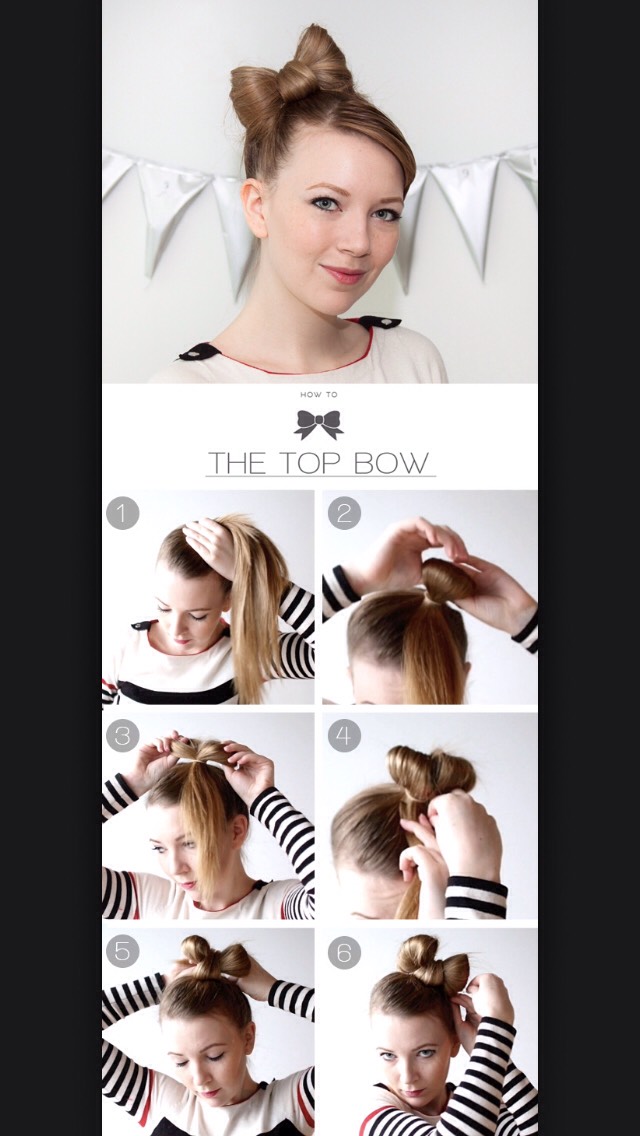
First of all, determine where exactly your bow will be placed? On the back of the head, above or on the side. At this point we tie the hair into a regular ponytail. Try to use a thin elastic band, the color of which is as close as possible to the shade of your hair.
It is necessary to carefully separate a thin strand (1.5-2 cm wide) from the top of the tail. Put it on the head, in the direction of the forehead. We fix it with a hairpin, in the future it will be needed to create a beautiful middle of the bow.
Approximately in the middle of the tail we tie another elastic band. We carefully divide the hair between the elastic bands into two equal parts - these will be the "ears" of your bow. After separation, they should be formed by fixing with invisibility. The tail, which is located below the second gum, is also divided in half - and, having slightly twisted each strand into a tourniquet, we hide it under the "ears". The previously separated thin strand is carefully lowered, forming with its help the middle of the bow. We fix it with invisibility or hairpins with decor, and hide the tail again under one of the “ears”. A little hairspray and your amazing and stylish bow is ready.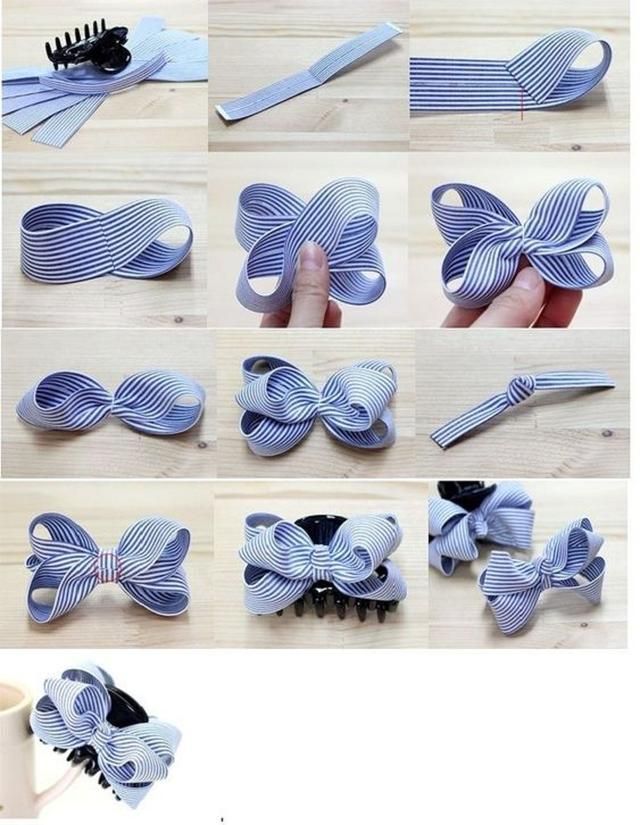
2nd method
Hair bow 2nd method (photo)
- The hair gathered in the ponytail in the last turn of the elastic band is not stretched to the end. You are left with the end that you have in front.
- Then, divide the tail into equal 2 halves and smooth.
- We shift the tail back and fix it with invisibility. We hide the remaining tail with the help of 2 invisibility.
3 way how to make a hair bow
- We collect the hair in a ponytail, wrap the ponytail with one thin strand to hide the elastic. We fix the end with invisibility so that it does not fall out of the hairstyle. We spray our strand on the tail with varnish and smooth it with our fingers.
- Divide the tail into 2 equal halves and comb through thoroughly. After that, start winding the strand around your finger from the end to make a hollow circle.
 Lay it near the tail, adjusting the resulting roller. We fix it invisible on the back side. Pick up invisibles according to the color of your hair. With the second strand, we perform similar manipulations.
 - The hairstyle is ready, we decorate it with a beautiful hairpin on the ponytail or in front of it.
4 way
4 way to create a bow from the hair on the head
- Making a tail. We tie the rubber bands from above, from the base of the tail down. We hide each rubber band behind a strand of hair, securing the end with an invisibility.
- We put the resulting tail in a bow so that it is in front of the tail.
- We pin the end of our main tail with an elastic band to make it flat. Then we fix the bow with invisible or hairpins and with the help of varnish or wax we make sharp ends sticking up.
Malvinka bow
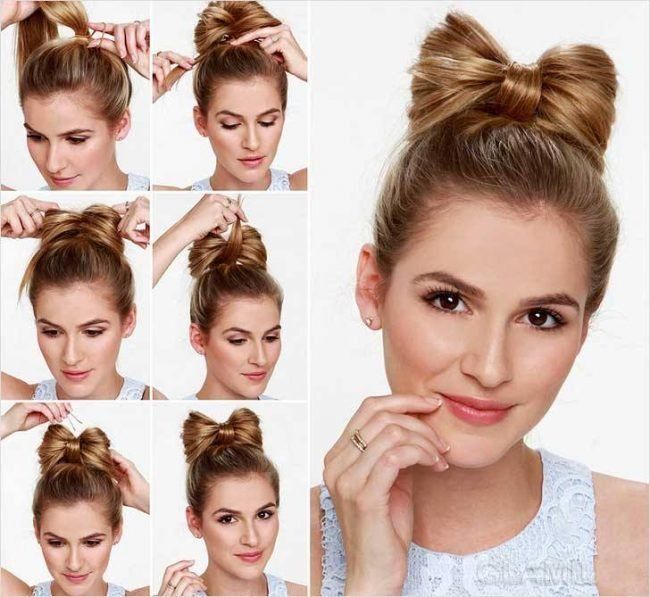
Is your goal a bow on top with loose curls? Then the implementation of such a hairstyle will be somewhat different from the classic version of the bow.
Separate the top part of the hair at the crown and form a bow as described above. Optionally, we select hair at the temples or leave curls. Having formed a bow, we do not hide the remaining strands, but lay them and wind them on curlers or a curling iron, tongs.
Evening version in the style of Malvinka (video)
This is the easiest way to make a bow. It is ideal for owners of long, or medium length, straight hair. At the same time, the use of a corrugated curling iron will help make your bow even more original and mischievous. To do this, at the stage of preliminary hair preparation, give them light waves.
Variants of braided hair bow
Braided hair bow (photo)
There is another way to make the hairstyle more unusual and stylish. Pre-braid a pigtail-spikelet. The difficulty lies in the fact that you will not have to weave from top to bottom (that is, from the back of the head to the neck), but vice versa.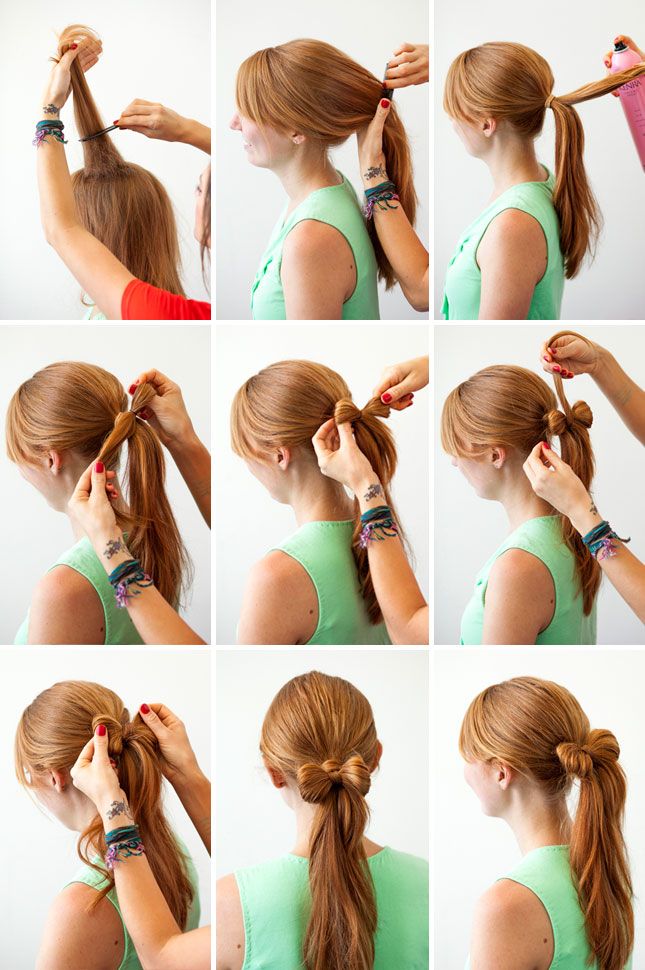 Your pigtail will rise from the neck to the back of the head.
How to do this hairstyle?
Tilt your head forward, carefully combing and waxing your hands with mousse or wax, begin to weave a regular French braid. Pick up strands on both sides and add to the main ones. Having brought it approximately to the back of the head, we tie the tail and form a bow according to the previously described steps. The braid can be located not only below the level of the bow.
How to weave such a braid, look at the video from Lily Moon
Secret: owners of "thin" or thin hair, this hairstyle is also suitable. It is enough to master the methods of adding volume described in the article how to make a wave on the hair. Paying special attention to subsections with instructions on how to create waves.
If you want to make a bow with a braid, you should master the instructions on how to weave a French braid, described here.
Add a hair bow with a spectacular little crown and all the secrets of weaving it are available at this address http://ovolosah.com/parikmaher/kosi/7-master-klassov-prichesok-koron-iz-volos-foto-video.html.
Hair bow hair (video)
Pigtails can be braided on both sides of it. Or, braid the braids in the tail prepared for separation - so that each passes along the outside of the formed "ear".
If you don't want to form a bow with all your hair, you can make it small by using a relatively small section. To do this, tie a tail, after separating the hair at the back of the head. Curl the strands that do not fall into the bow a little - this will allow you to create an incredibly gentle, romantic look.
How to make small bows? or Braid with hair bows
Braid with small hair bows
Delicate little bows can be added to almost any hairstyle with a braid. We braid a not very dense pigtail, and then, pulling a few strands out of it, form a bow.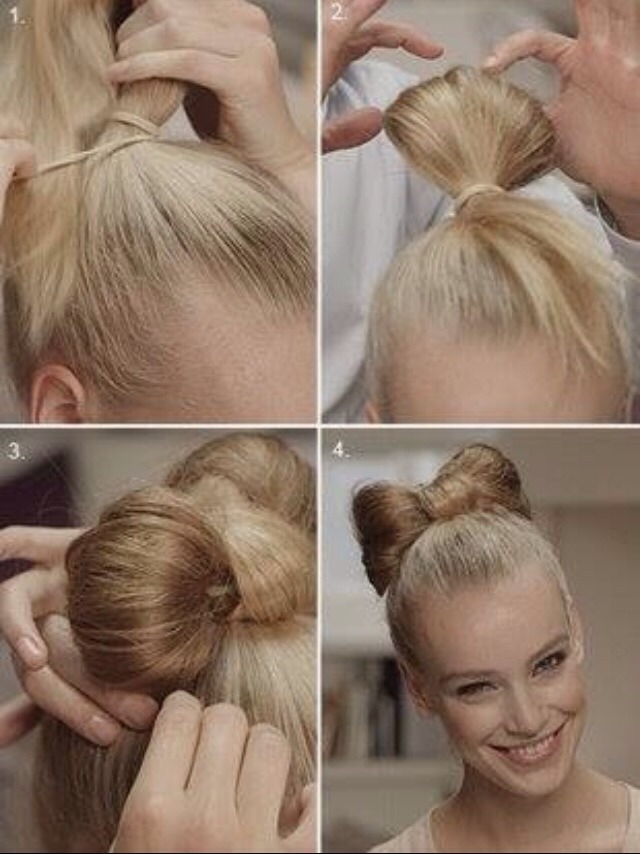 In order for the "ears" of the bow to hold well, they should be fixed with varnish.
Fastest hair bow
Bow in 3 minutes
It is suitable for medium length and long curls. If you have hair of different lengths, then it will be difficult to stab the ends with 1 crab, use several or invisible ones.
You will need: rubber band, comb and crab.
- Pull hair into a high ponytail. In this case, you should have 1 more turn for threading the hair. Pin the falling strands on the back of the head with invisible or hairpins.
- Make a bun by pulling the ponytail through another turn of the elastic. You should end up with a bun and ponytail hair in front.
- We divide the bundle into 2 parts and throw the remaining ends of the tail back through the middle. Got the middle.
- Wrap the ends of the elastic band in front to close it completely.

- We stab the ends with a crab from behind.
- Straighten the ears of the bow and press lightly.
Choose an elastic band that matches your hair, this will make it easier to make it invisible under your hair.
Bow hair video in 3 minutes, it works, just click on it and it will start playing:
Bow with bagels
To create a voluminous and festive bow, you will need: elastic band, 2 hairpins, 2 bagels, hairpins and invisible, silicone rubber bands.
- With the help of a rubber band and 2 hairpins we make a tail on the back of the head. We hold the collected hair with our hand, fasten the hairpin and wrap it several times around the tail with an elastic band, and fasten the second hairpin in the same way to the tail. Comb thoroughly.
- Tie it at the end with silicone rubber.
 We divide the tail into 2 parts and lay on the sides.
 - The tip of the tail should be in front, then we shift it back and fasten it. We process the tip itself with varnish and fix it at the back - this is the middle of our bow. We fix another silicone rubber band on the tip of the tail. And from the back side we fix at the base of the tail.
- It remains to raise the side parts of the bow. To do this, we hide bagels in the side pockets and carefully hide them with the help of hands and varnish.
- For bagels that do not match the hair color, carefully remove the bagels and once again treat the bow with varnish. Be sure to wait until it dries.
Bagels chosen to match the hair color,
leave them in a bow, they will be imperceptible.
Accessories
It is not always possible to make a bow on your own the first time, but the situation is fixable.