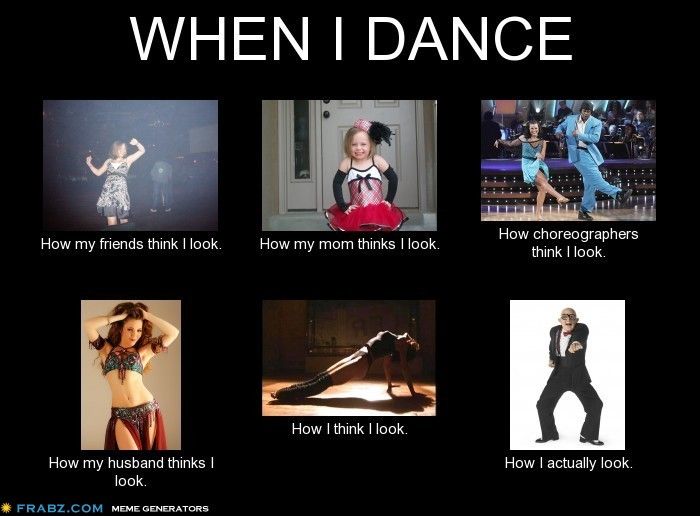
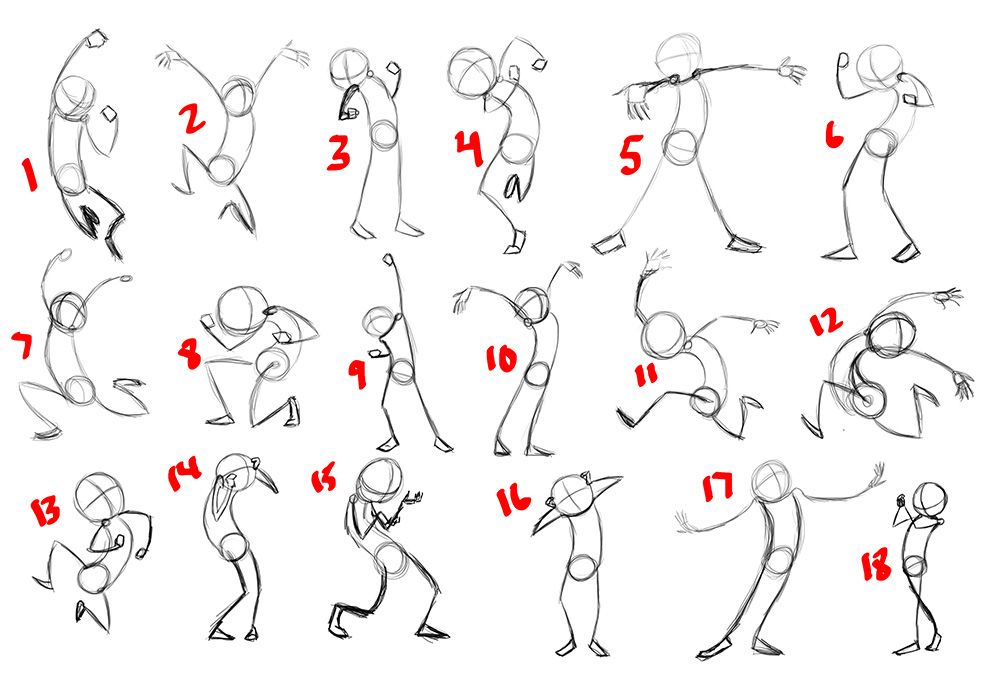
How to half step dance
Two Step Dance | Learn the Basics of Country Two Step
Every beginner country dancer needs to learn the basic patterns for country two step. If you want to learn how to country two step, also called progressive two-step, you’re in the right place. Two step is a fun dance that travels around the line of dance with walks and spins to fast country music. First, we need to master the basic steps. Below is a simple syllabus to get you started on the basic two step patterns as a beginner.
TAKE ACTION> Download our Basics of 2-Step Video for FREE
Powered by Convert Plus
TAKE ACTION> Jump to the Two Step Basic Patterns on this page
What is Country Two Step?
Country Two Step also known as Texas Two Step is a fun social dance seen in dance halls and country bars all over north america! It’s a partner dance that follows a counter clockwise pattern around the dance floor with lots of spins and wraps. Although it’s typically done to country music, there is plenty of two stepping done to non country music as well!
What is Texas Two Step?
Is it different from Country Two Step, Triple Two Step or Nightclub Two Step?
Texas Two Step is essentially the same as Country Two Step!
It IS different from Triple Two Step and Nightclub Two Step (don’t worry we will explain below)
This is what the basics of Country Two Step AKA Texas Two Step look like.
Remember dance is like language. You’ll find different accents in language across the country just like you’ll find different versions of two step across the country as well. Rest assured Country Two Step and Texas Two Step is all the same dance with slight regional differences.
However there are ‘two steps’ associated with country dancing that ARE different.
Triple Two Step and Nightclub Two Step (AKA Nightclub) are totally different.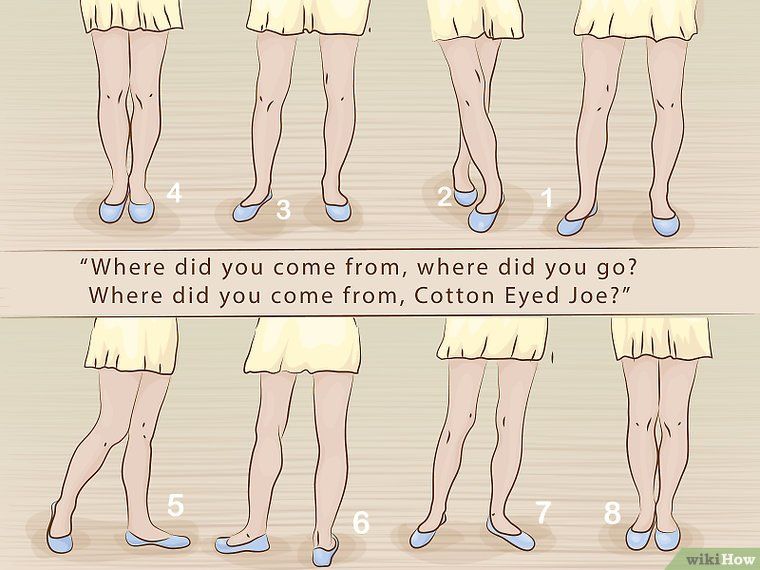
This is NOT Texas Two Step nor Country Two step!
It is it’s own form of two step thought. Confused?
Don’t worry we will make it clear as we go 🙂
What is Nightclub Two Step?This is NOT Texas Two Step nor Country Two Step!
To avoid confusion this dance has changed its name and is just known as Nightclub.
Slightly less confusing 🙂
Country Two Step Basic Patterns
Ok now it’s time to learn the Country Two Step Basic patterns In this beginner two step tutorial you’ll lean all the basic patterns you need to look great on the dance floor, even as a beginner! Lean the basic, the outside turns, the inside turns and the couples turns!
Country Two Step Beginner Patterns
Below is a list of individual patterns that you’ll need to know as a beginner. These are the country two step basics that you’ll need to know to feel comfortable in a honky tonk, dance hall or dance studio anywhere in the world! Sometimes two step is called traveling west coast swing.
Forward Basic in country two step
The man traveling forward and the lady backward in closed or open dance position, walking with a series of four walks to the basic timing of quick, quick, slow, slow. Walks may be dance with either a heel or toe lead. This is a debatable topic among many dance professionals, with camps on both side of the fence (or should I say foot)?! An alternate timing is to count by the numbers: 1, 2, 3, 5 (holding counts 4 and 6, as they are part of the slow beat).
Backward basic and transition from forward to backward for country two step
This is the same as the first pattern, except the man travels backward while the lady walks forward. To transition from the forward basic to the backward basic, there needs to be a few side steps or chasses to smooth the change of direction.
Lady’s Right Turn ending in Promenade for country two step
The man preps the lady for a right, or outside turn, on the second slow. He leads her spin on the quick, quick, and finishes in frame in the promenade position, with both the leader and follower facing the line of dance, ready for the next pattern.
Lady’s Left Turn to Wrap for country two step
The man preps a left or inside turn for the lady on counts slow, slow, by leading a subtle swivel action with his hands and body. The follower turns to the left on the quick, quick, with her arms wrapping up into the cuddle position around her waist.
Lady’s Right Turn to Back Line of Dance for country two step
The man follows the same procedure as the previous right turn for the lady, except finishes with both partners backing the line of dance. This is the preparation for one of the most popular basic patterns, often referred to as a weave or lace. The free arm may be stylized straight out to the side for both the leader and the follower.
Chasse to Forward Line and Back Line
A chasse (or side together side) is danced facing your partner, first ending in a cross over break line, and then repeated to end in the original line, backing the line of dance.
Patty cake Vine
This combines elements of the chasse with the popular grapevine, which cross back, side, and front. Lady’s left turn to back line of dance or face partners. An inside turn for the lady is a great way to transition to different positions on the floor and to end the current position. Inside turns are generally easier for the follower to dance well.
Check weave
This pattern is the heart of the dance. Many intermediate and advanced patterns stem from this one beginner pattern. So it is very important to master and understand the connections for this figure. This step involves an inside turn for the lady. This is similar to the check weave except is danced with a lady’s outside turn, instead of an inside turn.
Two Step Dance Moves
There are an endless set of two step dance moves you can learn. First you need to master the basics. Then the followers have to be comfortable with their spins and turns in two step. Once you’re comfortable, it’s time to start learning some new patterns. The best way to learn them is with a membership to our website. It’s like Netflix for Dancers! All the moves are laid out step by step so you never have to worry if the next pattern you’re learning is within your skill set. We’ve taken the guesswork out. Give it a try!
Country Two Step Music
Now that you’re dancing you’ll need some tunes to dance to. We’ve got you covered. On the other side you’ll get our top 10 Two Step Dance tunes as well as over 100 songs that you can practice to. We have lists for country music lovers AND music suggestions for non country music as well. Winner. See our Country Two Step Song List here.
The next big step in learning how to two step dance!
Inside our members area we have 0ver 500 instructional videos to help you learn all styles of country dance. Two Step, East Coast Swing, West Coast Swing, Cha Cha, Nightclub, Waltz and more. You can grab a free membership and get access to 50 videos to help you improve totally FREE. Grab your Free Membership
Basic Rhythm Two-Step – Country Swing AZ
Type Step
Level Level 1 Beginner
Other Names The Basic Step, Two-Step, Arizona Two-Step
Leads To Outside Turn, Open Position, Inside Turn, Cross-Handed Open Position, Sway Step
Every dance has a basic step that helps the dancers establish the timing and character of the dance. It serves as a home base to go back to between dance moves. In some dances, it is also a way to travel across the dance floor. For Country Swing, many people use the Rhythm Two Step as the basic step.
What is Two Step?
There are several dances called the Country Two-Step. The two most common are:
- The Texas Two Step, aka Progressive Two Step, which consists of a basic 3-count pattern that moves on “1&2, 3.” Dancers move either straight forward or backward around a counter-clockwise track and never pause in place. All turns and moves are done while continuously traveling.
- Rhythm Two Step, aka Arizona Two Step, which moves on every half-beat “1&2&3&” with smaller steps, done relatively in place. Not every step is given equal weight (which I explain later). It is possible to travel in rhythm two-step by stepping sideways. Often, dancers will turn slowly while traveling to make the dance look and feel better.
Like virtually any other dance, the basic step can be done in any position. Beginners are encouraged to learn it from Closed Position first to promote good leading and following habits. Other positions will be covered in later articles.
The elements of the basic step (for any dance) are:
- Rhythm
- Footwork
- Frame
- Connection
The rhythm of the Rhythm Two Step is “Quick quick, slow (tap), slow (tap)” which may be counted “1 & 2 & 3 &,” stepping for each count and &.
Rhythm is the timing of the music’s beat. Listen to the bass guitar and drum for the most reliable measure of the tempo or speed of the music. The steps are relatively small, just about a foot-length, or shoulder-width. The faster the music is, the smaller the steps, and closer to the ground they will be, to conserve energy.
Footwork
The footwork is “Left, together, left, together, right, together” for leads, and “Right, together, right, together, left, together” for follows.
The footwork below will tell you which foot to pick up from the ground, and whether it’s a full weight transfer (FWT) or not. Many beginners will start by moving sideways, and this is okay. But once you have the footwork down, try slowly turning while stepping.
(In case you don’t know what is meant by “full weight transfer,” that’s when you change from one supporting leg to the other, e.g. when you walk you transfer your weight to the foot you put in front.)
The following chart is for leads.
The follow’s footwork is the same as below but switch the right and left directions.
| Count | Step | Foot | Notes |
| 1 | Quick | Left | FWT in direction of travel |
| & | Quick | Right | FWT in direction of travel Meets your left foot (feet together) |
| 2 | Slow | Left | FWT in direction of travel |
| & | (Tap) | Right | No transfer Tap the ball of your right foot next to your left.  |
| 3 | Slow | Right | FWT, opposite your direction of travel |
| & | (Tap) | Left | No transfer Tap the ball of your left foot next to your right. |
- In Closed Position the lead places his right hand on the follow’s shoulder blade, and his left hand is in extended a little to the left about eye-level with his follow. The follow places her left hand on the lead’s shoulder with that arm draped over her lead’s arm, and her right hand in his left hand.
- The hand hold should be firm but don’t squeeze! Relax, cup your hand, and press into your partner’s palm.
- Also, don’t let your arms droop and go limp like noodles. You should be more like the bowl than the spaghetti.
- Lift your chest a little, like you’re trying to show off your necklace or you just did chest day at the gym.
- Your feet should be off-center with your partner’s feet.
 Whether you’re the lead or follow, it should be your left foot on the outside, and your right foot between their feet.
The connection is more easily felt than described. It is the force of pushing or pulling between partners that allows you to move as one unit together. Obviously too much pushing or pulling will lead to trouble, even confusion or injury. The lead pulls slightly (very slight!) on the follow’s shoulder blade, and the follow presses out slightly on the lead’s right shoulder and against his hand on her shoulder blade. Both partners lift their chest and lean their upper body out just a bit.
Both partners press lightly into each other’s palm on the hand-to-hand side. This is secondary in importance to the connection felt on the other side. You can dance in closed position with that hand completely free if the connection on the other side is strong.
If you’ve ever seen dancers spin together in a tight circle, that’s the work of a good connection! Forget about your feet for a minute and try just moving your follow around in clockwise or counter-clockwise motion in the frame–quickly, slowly, a little, a lot. Your right hand tells her where to be. Is she getting the message?
- Rhythmically challenged individuals can practice finding the beat when listening to music each day. Do something to externalize the beat you hear–snap along, tap on your steering wheel to the beat… if you eternalize you can hear if what you’re doing matches or not. Later, when you are dancing you will feel the beat internally, and it will help you step in rhythm.
- The direction and force of the move come from the lead’s right hand. The left hand is, for the most part, where you communicate changes such as a spin.
- Keeping a strong frame and connection will allow you to move around easily and keep you feeling light on your feet.
- If you’re having trouble with the frame and connection, let go of the hand hold and focus on the sensations on the other side.
- Mind your space partner-to-partner. Keeping an open frame is most acceptable and formal for dancing with anyone.
 Closing in the space between you makes the dance more intimate. This could make your partner uncomfortable if they don’t know you well. There is a fine line between creepy and flirty, so air on the side of being a gentleman (or woman).
 - Follows, if a lead is closing in your personal space too much, press or grab on his shoulder more and push him away with more force than you would normally need for the frame and connection. This will hurt him enough to show him he needs to back off.
See the articles on these positions for more information.
- Open position
- Crossed-handed open position – same as open position but the hands are left to left, and right to right. Lends itself to other moves.
- Hammerlock
- Shadow Position
- Cuddle Position
Like this:
Like Loading...
Study of the polka step, the main element of the Polka dance
Methodological development
Study of the polka step, the main element of the Polka dance, in a group of beginners.
Author: Posrednikov VS, a teacher of additional education at the State Budgetary Educational Institution of Children and Children's Children's Children's Youth "On Lenskaya".
"Polka" - the birthplace of this dance is the Czech Republic. There are Hungarian, German, Swedish, Finnish, Gallop Polka, Mazurka Polka. You can dance alone, or you can dance in pairs or in a group.
Composition of those involved - a group of boys 6 - 7 years old, beginners.
Purpose: to teach how to perform (dance) the polka.
Tasks:
learn polka movements;
introduce the musical meter of the Polka dance;
develop coordination of movements, ear for music;
develop ease of movement, posture;
develop the child's physical data, memory, attention.
Practice "Polka step, spade step, jump step",
“Improvement of the polka step, spade step, jump step”
Motivation and relevance of the topic
Choreography classes are held to improve health, achieve life and professional goals, and promote a healthy lifestyle.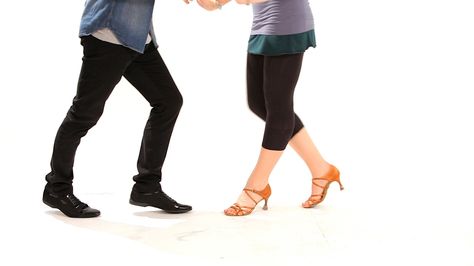
Questions to consolidate knowledge
1. What motor qualities do the elements of folk dances develop?
2. Why was the dance called Polka?
3. How many measures are there in Polka?
Sample answers to questions
1. The use of folk dance elements in choreography classes develops coordination of movements.
2. The dance was called the Polka, because its main step was divided into half steps (Czech Pulka - half).
3. There are 28 measures in the Polka dance.
Evaluation criteria
"5" - the motor action was performed correctly, clearly, confidently, freely, all technical requirements were exactly met; "4" - the motor action was performed in accordance with the requirements, while no more than two minor errors were made; "3" - the motional action was performed basically correctly, but with one significant or more than three minor errors; "2" - when performing a motor action, one gross error was made and the number of other errors was more than three.
| The use of folk dance elements in choreography classes develops coordination of movements, develops the ability to maintain a beautiful posture in movement and helps to raise the emotional state of those involved. The dance was called Polka because its main step was divided into half steps (Czech Pulka - half). Students stand in lines in a checkerboard pattern. Starting position: legs in the first position, hands placed on the belt. (advancing the legs on the toe alternately forward and two half-squats).
The polka step is an alternating step done in light jumps. Polka steps are distinguished forward, backward and with a turn around. Step Polish forward
Back polka step I.
Polka step with a circle turn - Ш position, right in front of the hand on the belt.
| Question 1. What motor qualities are developed by the elements of folk dances? Question 2. Why was the dance called Polka? During the exercise, you should monitor your posture; the back should be absolutely straight. Performing half-squats, try to spread your knees to the sides as wide as possible. In measure 19, starting to shake the hands, turn them back to each other, then they turn down (shake with almost one finger), the movement is continuous, the arms simultaneously go down through the sides, then they are placed on the belt in measure 21. Question 3. How many measures are there in Polka? In the back polka, side steps are performed at a canter step (same as in the forward polka). The body is turned in the direction of the leg of the same name, taking a step back, the head is turned in the opposite direction. |
 p. - Ш position, right in front of the arm on the belt
Interaction in pairs for beginners to dance Argentine tango
Festival "Planetango 18". Adrian Ferreyra & Dana Frigoli
When I started, I heard a lot about "leading" everything. And about chakras with “cosmic energy”, about “spiritual connection”, “correct work of the hands and feet”, “rigid frame”, “energy quantization” and what else is esoteric-technocratic. As a result, a terrible mess formed in my head and nothing was clear. More precisely, theoretically “as if” is understandable, but practically what to do with such a contradictory theory is unclear. And it's kind of hard. That's where I am, and where, for example, "energy quantization"?
It's funny, but in a sense, all of the above explanations contain a grain of truth, and even help someone, but, alas, I was not one of them. And only after Juanovsky's explanation I realized that leading is just a process of interaction in pairs, and quite simple and intuitive, which, alas, does not make it easy to explain. And therefore, instead of theoretical explanations, I propose to consider it through exercises that allow even complete beginners to actively interact, and not portray it. Juan, by the way, solved the problem of explanation not through exercises, but through “tasks”. He set me a “problem” and watched with irony the attempts to solve it, criticizing the erroneous options. The path is effective, but not suitable for group or independent studies. Therefore, I prefer lead-in exercises that make it possible to feel the right sensations, and then, according to Juan's precepts, an independent search for one's own path.
Interaction exercises:
1. Stand in front of each other in a half step and in a training hug, knock a little, standing still, leaning on both legs. Gently, so that the body moves without changing the angle of the torso, and the shape of the hug is maintained.
1
And there should not be someone who “follows”. Both lead, all the time pushing the partner away from themselves, the “leader” forward just needs to do it a little more intensively than the “follower”. "Initiative" is transferred to the partner, after the complete transfer of his weight to the back leg. When moving, it is important that the hulls maintain their position relative to each other and move the same distance:
Fig. 1. A' - displacement of the center of gravity of the partner (for the partner B'). Simply A is the displacement of the hull. At the same time, A is approximately equal to A’ and equal to B.
If in principle it turns out, then try to repeat the same thing to the music, “pushing” to the “beat”.
2. Now bring the legs together and do exercise 1, standing still, shifting only due to the transfer of weight between the front and back of the foot:
Ex. 2
Naturally, the range of motion will be greatly reduced, but the rule A=A’=B=B’ must still be observed.
Fig. 2
If it worked out, then now give the main lead to the partner, and the lady continues to resist this lead only a little. It is very important that outwardly nothing has changed in a couple. Then carefully increase the amplitude of the "pushing" so as to reach the "extreme" point, beyond which it will be impossible to maintain the vertical of the body and the shape of the embrace.