How to build a floating dance floor
How to Build Your Own Studio or At-Home Dance Floor
A proper dance floor system used to be an expensive and complicated project. No more. We are talking about a real professional floating wood sub-floor and marley floor surface with a taping or adhesive system, for as little as $3.50–$4.00 per square foot.
Do it yourself does involve time and effort for which you are rewarded by saving money.
Let’s first start out with a list of materials:
- If you are starting with a clean level concrete slab, you will need a vapor barrier, which can be liquid or visquin (clear vinyl sheeting) and water proof tape. If you have VCT tile or glued commercial carpet there is no need for a vapor barrier.
- Two layers of underlayment grade plywood, each a ½ inch thick. The bottom layer should be B/C, meaning that neither side has been sanded. The top layer should be A/C, meaning the top side is sanded smooth. Underlayment plywood does not have any knot holes or vacancies between the laminations.
- One inch counter sink deck screws. Nails are a no-no.
- Ardex Featherlite or Feather Finish filler for the screw holes.
- Foam blocks or foam cubes.
- Transition for doorway to access the raised dance floor system.
- (Optional) Vented Cove Base.
- Marley type flooring.
- Tape or adhesive.
That’s it. All products are available at Stagestep except the plywood, screws and Ardex.
Tools Needed:
- Circular saw with wood blade
- Power screw driver
- Matte knife
- Sander
Tips:
The bottom layer of plywood should be cut when necessary to stagger the seams. Boards should be 1/2 inch from the walls. Glue or peel and stick foam blocks or cubes to the plywood. 52 Blocks or 100 Cubes per 4 x 8 panel. See directions online, of placement of foam at Stagestep.com. Download installation guide. See page 33.
Flip all boards over so the foam blocks or cubes are in contact with the concrete or vapor barrier.
If the bottom ply runs North/South, the top ply should run East/West. Top ply should be cut where necessary to stagger the seams. Counter sink the screws using between 75-100 screws per 4 x 8 ply panel. Fill countersunk screws with a filler such as Ardex Featherlite or Feather Finish, Do not apply filler to the seams.
The following day, level the top layer of ply by sanding the filler smooth to the surface. Vacuum or sweep the subfloor
You are now ready to install your floor surface.
Installing your Marley Floor
There are five ways you can install your roll out marley. But first, there are a few things you need to do prior to the install.
- All rolled flooring needs to be stored standing up prior to installation, or else, if lying down they could develop roll set(floor has waves in it when rolled out)
- Roll out your flooring lose and let it acclimate to room temperature. This could take 24 hours.
- Make sure the subfloor has been swept or vacuumed before installing the floor.
Installation methods:
Temporary
Temporary installation of the floor from a few hours to a couple of weeks is primarily used for touring shows, conventions, competitions and in situations where the floor has to be pulled up and re-installed frequently.
Use top surface tape only. Seams should be separated by 1/16 of an inch before taping. Tape should be applied to all seams and circumference of the floor. Tape comes in two types, vinyl and cloth and in two widths, 1.5 inch or 2 inch. Your preference.
Tape residue should be removed prior to re-application with Wipeout Plus.
Semi-Permanent—One to three years.
2 inch double-faced tape and top tape.
This method has been around for many years. The double-faced tape is installed around the perimeter of each roll and down the middle of each roll.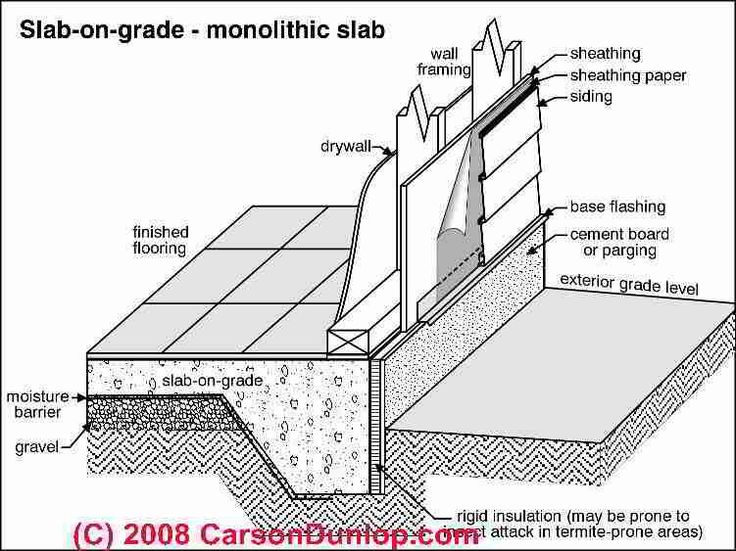
The floor is rolled out and trimmed in place. Then one roll is rolled ½ way back up, employing a 4 inch tube (all floors are shipping with floors rolled around a tube so do not throw them away).
Apply the tape and peel off the top protective coating and roll your floor over the tape. Continue the process until all floors have been installed with the double-faced tape. Top tape all seams and around the circumference of the room. Remember to leave a 1/2 inch gap between the floor and the end of the subfloor to accommodate the top tape.
Semi-permanent Long Term—Three to four years.
Utilizing 4 inch installation double-faced tape, install the exact same way as 2 inch double-faced tape. However, In this case, all seams are tight and no top tape is needed. Therefore all flooring should be flush to the sub-floor.
Long Term Semi-Permanent.
Stagestep offers a unique installation product called ReUseIt. It is a sticky netting that utilizes suction to hold the floor to the subfloor indefinitely. Just peel up your floor to remove. Leaves no residue.
ReUseIt is installed over the entire subfloor prior to rolling out your floor. Install is perpendicular to how your floor is running.
ReUseIt comes in rolls 39 inches wide and 268 feet long. One person walking backwards unspooling the netting while a second person with broom in hand pushed it onto the subfloor. Cut roll when you get to a wall and repeat, going edge to edge with the previously applied ReUseIt.
Roll out your floor, running in the opposite direction of the ReUseIt. Match seams and trim to fit the room. Utilizing the 4 inch tube that came with the flooring, roll flooring ½ way back up. Peel protective top sheet of ReUseIt running across the width of the floor exposing 39 inch by 6.58 feet of ReUseIt (width of a roll of flooring) . Roll floor out over exposed ReUseIt and repeat until install is complete.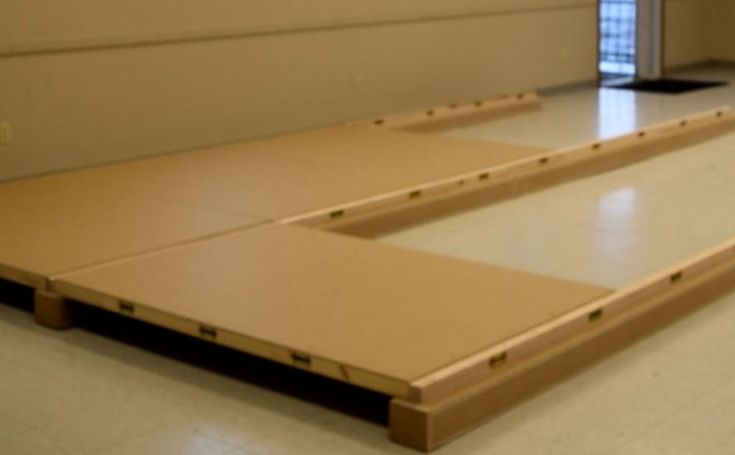
A 75-150 pound roller is sometimes used to smooth out and further secure the flooring. No top tape needed.
Permanent
Permanent installation requires adhesive and a professional crew to do the job. If you have never glued down a floor, do not make this your first project.
Dance Floor Over Concrete Ideas & Options: Budget DIY Subfloors
As with every sport, safety and self-care are of the utmost importance in staying injury free in dance. Of course this includes the basics, such as warming up and stretching. What may not be as obvious, however, is the role a dance floor plays in a dancer's health and safety.
Dancers spend countless hours on dance floors turning, leaping and moving. Each movement may not feel much different than the last, but for lower extremities, small impacts with the floor add up. Over time, high-intensity connection with the floor can create damage to muscles and joints.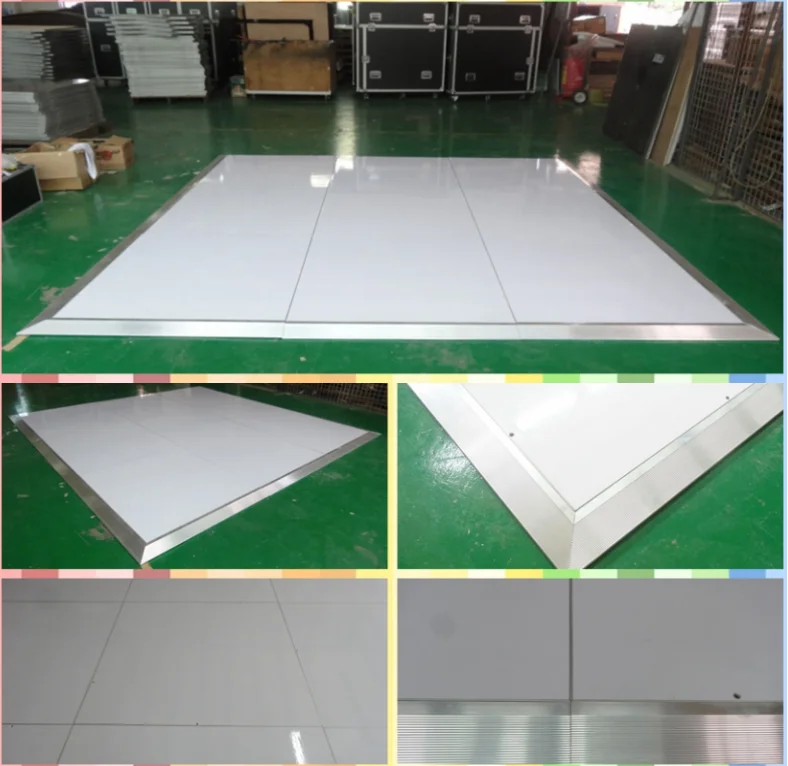
Studies have shown that a softer dance floor with higher shock-absorption reduces the impact of movement on muscles and joints. At the same time, a dance floor can't be so soft that one's movement is altered. It's important to find the right balance between cushion and hardness in a dance floor.
There are a ton of different dance floor options on the market, ranging in stiffness, quality and price. Although reduced stiffness floors are recommended for dancers, many of them cost a fortune to purchase, not to mention the cost of installation. Fortunately, there are money- and time-saving options.
Dance Subfloors
By installing a inexpensive dance subfloor, you can install a forgiving dance floor over concrete without paying a cringe-worthy amount. Greatmats recommends a few difference dance subfloors, all of which are meant to be installed under an all-purpose marley vinyl surface top. Read on to learn which subfloor might be right for you.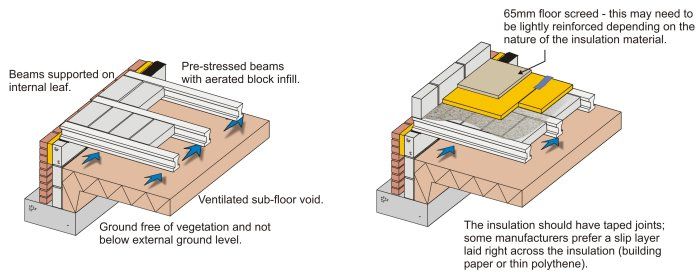
High Density Foam Dance Subfloor Over Concrete
If installing a dance floor over concrete, utilize a high density foam as the base layer. Greatmats recommends Sports Plus Designer Foam tiles, which are 2x2 feet in size and ⅜ inch thick. These economical dance subfloor tiles create the right amount of separation between the unforgiving concrete and the marley surface.
Foam tiles are easily installed for a dance floor over concrete utilizing a puzzle-piece style interlocking system. With this system, it only takes minutes to have the dance subfloor complete. From there, simply lay the marley surface on top for a complete multi-purpose dance floor. No adhesives are necessary for the creation of the dance floor over concrete. However, you can tape down the sides of the marley surface if you so choose.
If you're starting from scratch, Greatmats offers a package that includes 20 feet of Adagio marley dance floor, foam tiles and a roll of tape - everything you need to create an entire dance floor yourself. The price of this package deal is slight in comparison to the dance floor prices that often range in the thousands of dollars.
Be aware, a foam underlayment is not the choice subfloor for advanced ballet and pointe. The flooring is a bit too soft and slow to respond for pointe. If the dance floor will be mainly used for pointe, use a plyometric rubber underlayment for your dance floor over concrete instead. Rubber rolls provide a firmer base while still offer some impact absorption and are also extremely economical.
Foam Dance Subfloor For Sale
Plastic Court Tile Dance Subfloor over Carpet
If you're wanting to install a dance floor over carpet, there is no need to tear up existing carpet. Instead, you can use the carpet to your advantage. By installing hard plastic tiles over it, carpeting acts as the cushion layer for the dance floor. Greatmats recommends Flat Top Court Tiles as the firm surface over carpet and under the marley layer.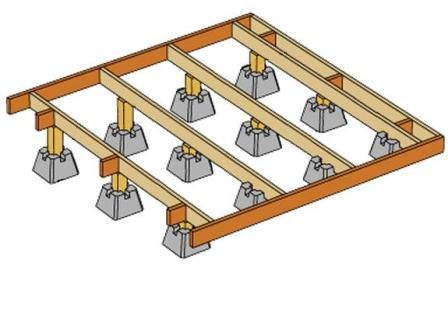
These low-priced dance subfloor tiles are made of high-quality polypropylene plastic. They are designed with a supreme, tight-fitting loop and hook connecting system. All you have to do is snap tiles together for an installation you can count on. Once tiles are put together, simply lay the marley layer on top, tape down the sides if you choose, and voila! - you're ready to dance.
Plastic Dance Subfloor For Sale
Foam and Plastic Dance Subfloor System over Concrete
Another option for installing a home dance floor over concrete or other hard surfaces is to layer plastic court tiles on top of foam tiles. This type of dance subfloor layering achieves maximum cushion and support for your dance floor over concrete. Install foam tiles first, then place plastic court tiles directly on top. Because of the grip of foam tiles, plastic tiles will not shift around. Layering foam tiles and plastic tiles is a cheap subfloor alternative to sprung dance floor systems. This method is not recommended for commercial or high traffic installations and is most commonly used for home or traveling dance floors.
Home Dance Subfloor System For Sale
For higher traffic areas, consider Greatmats Studio Subfloor Elite system, which utilizes a plyometric rubber bottom layer, topped by plastic court tiles as a subfloor for your marley.
Pro Dance Subfloor System For Sale
Sprung Dance Floor over Concrete
Sprung dance floors are a highly sought-after option, as they provide just the right amount of flexibility to help prevent injuries and accentuate movement. At the same time, sprung dance floors also provide enough resistance so movement stays seamless.
Typically, sprung dance floors are one of the pricier dance subfloor options. However, Greatmats offers competitive prices on sprung dance floor systems. Greatmats' sprung floor panels can save you loads of money down the line because of their portability. Almost anyone can install panelized sprung floors themselves, and they are just as easily deinstalled and transferred to a different home or studio.
Greatmats offers sprung floor panels that feature a wavelock connecting system, which eliminates all soft and hard spots across the floor. If you already have marley and wooden panels, there is no need to start over with an entirely new floor. Greatmats also has DIY sprung subfloor panels that yield the perfect underlayment for any marley dance floor over concrete.
Sprung Dance Subfloor Panels For Sale
Final Note
Dance floors are subject to so much wear and tear that it's of the utmost importance to install a high-quality, durable floor. When you choose to invest in a dance floor, it should be an investment that will last you. Greatmats understands that higher price doesn't always mean higher quality. That's why at Greatmats, you can invest in a dance floor that won't cost you an arm and a leg, but will yield all the quality you could possibly hope for.
Which Dance Floor is Right For You
Dance Studio Owner | December 2022
Step Draft floor "Springstep". share Tweet share Comments
Here the experts at Stagestep Flooring Solutions share their advice on building your own dance system for your studio.
Creating your own dance floor system starts with preparation, planning and asking the right questions. Do this, and as a result, you will have a successful project, saving time and money.
wade robinson dance
The dance system system consists of three elements:
- Plate - Your foundation
- Black floor - for absorption of energy
- dance floor
There are many options that should be taught many options that should be taught. , both in what elements are needed to meet your needs, and in how these elements are combined.
Questions you should ask yourself:
- How will the space be used? Just dance? Multipurpose? Parties and other non-dance related events?
- What dance style(s) and how often will the space be used?
- Is this a temporary, semi-permanent or permanent installation?
- What is your budget?
Springstep IV Subfloor by Stagestep
In addition, you will need to decide if you will do it yourself from scratch, use a ready-made system for self-installation, hire someone on site to install it, or have the manufacturer do it all for you. you.
Once the questions have been asked and answered, you will have a plan of action. Whether you make it yourself or give it to a farm, you need to know the following so you don't miss any important steps.
boston ballet summer intensive 2018
Slab must be level and vapor barrier, especially if it is concrete. If it is uneven, you may need to apply a degreaser to it.
Floating Subfloor is available in many configurations. You will need to decide, based on features, installation instructions, budget, and performance in terms of resilience and cushioning, which type of subfloor is right for you. Make sure you have a floating subfloor and not a raised subfloor. Floating means air under all points on the surface. Foam has air.
Dance floor surface can be vinyl (gauze) or wood. Within each category, there are a variety of options based again on budget, appearance, usage, required maintenance schedule, and whether the flooring needs to be moved (e.g. to a concert stage).
Take your time and make decisions without first exploring all options, knowing your needs, talking to "experts" and other owners who have similar needs or have gone through the process.
For the purposes of this lesson, let's say we're in a studio for a few dances with a long-term arena (or we're the owner) and we have the ability to do it ourselves.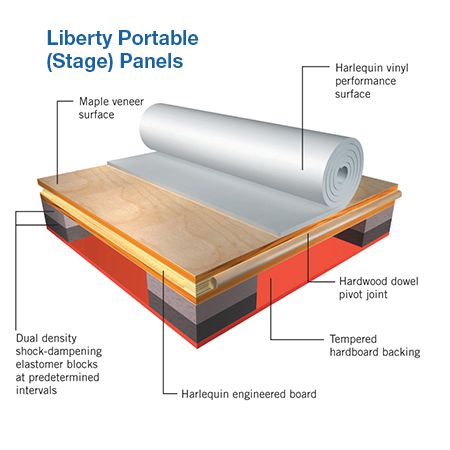
Woodstep dance floor installation by Stagestep.
First we check the stove. If it is uneven, broken in places or uneven, it must be repaired. If it is a new construction, a moisture test (a so-called "calcium chloride test" available at a hardware store) should be performed to check the moisture percentage and moisture pressure in the slab. A concrete slab needs a vapor barrier with a liquid or viscous vinyl coating. It is easy to install or apply.
The basic versatile floating subfloor for multi-purpose dance classes is called the Springstep II. . Items required:
- High Density Foam Blocks or Styrofoam Cubes (52-100 per bottom plywood)
- 2 plywood with ½" backing - top ply to be A/C (finished on one side), bottom ply B / C (unfinished on both sides)
- 50-75 top plywood screws
- 1" decking screws threaded to head
- wood filler
- sander
- electric screwdriver
- circular saw
- tape or glue to attach the floor to the subfloor
vertical position, curled up on a cardboard or plastic base.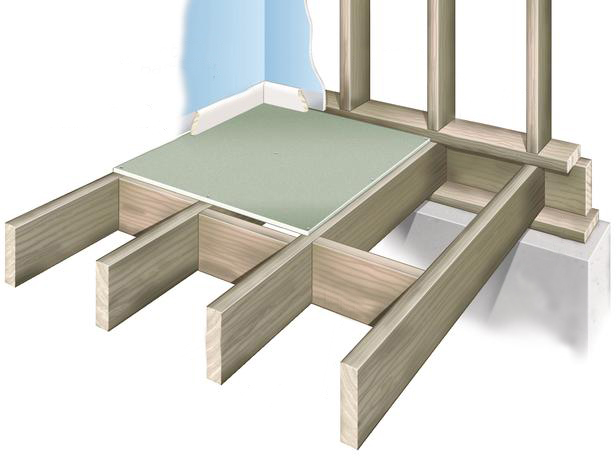
The first step is to roll out the subfloor on the floor for 24-48 hours so that it can acclimate. Always use an industrial cutting tool (not a box cutter) to cut the floor.
There are four ways to install: temporary (top tape), semi-permanent (up to two years with 2" or 4" double-sided tape), permanent semi-permanent (ReUseIt 2.0), and permanent (adhesive). Professional installation is required for permanent installation. The rest of the options you can do yourself.
Routes are available online at www.stagestep.com. They are simple and do not require special skills. This will take time, but you can save up to $2.00 per square foot. Other options include Springstep IV, a prefabricated floating subfloor that eliminates the use of screws, sanding and wood filler, and plywood. This will save you up to 80 percent assembly time.
how old is Peter McKinnon
Remember that preparation, planning, and asking the right questions will ensure that the studio floor is right for your students, your schedule, and your budget.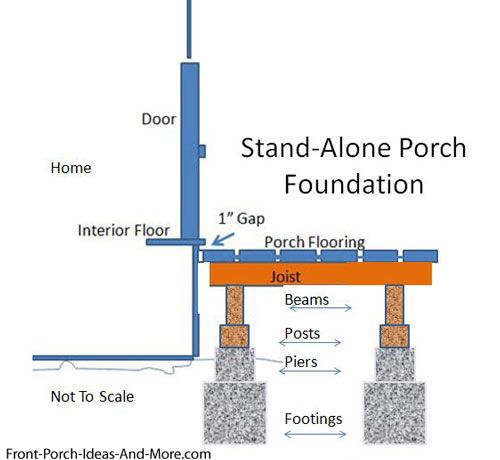
Advise what to do with bass?
konstantin
New Member
- #one
Good day! I work as a dj in a bar. An ordinary DJ, (closed on the sides) in the middle from the bottom of the table, is such a subwoofer
http://www.pop-music...id=88880000950.
The fact is that when I play, I have enough lows and I’m happy, but in the hall itself they are lost, if you make the subwoofer louder (and there is a reserve), everything is fine in the hall, but it’s not possible to stay in the DJ for a long time, the bottoms just kill, after work headache. It is not possible to move or remove to another place, the location of the bar does not allow. Subover, stands on the same surface with me (on the floor), maybe that's why the bottoms are so beaten? if you lift the DJ will be good? Tell me what to do to feel the bottoms less?
Inage
Member
- #2
I'm not really versed in such matters, but I, purely logically, do not understand why the sub is "general"?
That is, from your words, I understood that you are listening to him? What for? In such establishments, even though the bar is not a club, as a rule, the acoustics are located in front of the DJ at a certain distance . .. it seems to be ... and the control is carried out either in headphones or on their own acoustics (if the place of the DJ was well spent ).
The first thing that comes to mind is to isolate the subwoofer and control it with headphones...
PS I don't think that changing the plane of your seat will help much IMHO...
convex
without show-off
- #3
konstantin , buy ear plugs for musicians decibel at 15-20
for example, here is an option http://jaaz.ru/
konstantin
New Member
- #four
I only see control in headphones, there are no monitors for control, the acoustics itself is located at the top in the corners, but the sub is under the DJ table.
I have the same ear plugs, they don’t help, the sub clogs everything and I have to increase the volume in the headphones, it just hurts
Inage
Member
- #5
konstantin wrote:
I only see control in headphones, there are no monitors for control, the acoustics itself is located from the top in the corners, but the sub is under the DJ table.
I have the same ear plugs, they don't help, the sub clogs everything and I have to turn up the volume in the headphones, it just hurtsClick to expand...
I still advise you to isolate the subwoofer, that is, if it is under the table (does it interfere with your legs, in a sitting position?) - put a partition and upholster with damping material from the side of the subwoofer.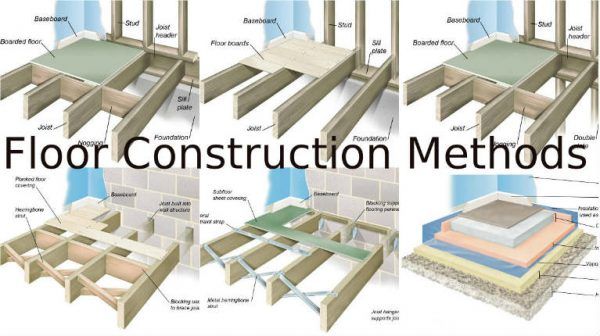 Better yet, not just a flat partition, but a box as wide as a table, that is, to make a kind of mouthpiece.
convex
without show-off
- #6
and really move the sub to another place? it’s clear that you’re bassed much more than on the dance floor, you have to do something, otherwise you’ll end up without ears
konstantin
New Member
- #7
convex wrote:
and really move the sub to another place? it’s clear that you’re bassed much more than on the dance floor, you have to do something, otherwise you’ll end up without ears
Click to expand.
..
It is not realistic to rearrange the sub, on another forum, they advised me to hang the sub on the wall, the only way to lower the bottoms, to move the source away. (but I don’t really like this idea, the bottoms are allowed from the bottom according to the idea)
konstantin
New Member
- #eight
convex wrote:
and really move the sub to another place? it's clear that you bass a lot more than on the dance floor, you have to do something, otherwise you might end up without ears
Click to expand...
It is not realistic to rearrange the sub, on another forum, they advised me to hang the sub on the wall, the only way to lower the bottoms, to move the source away.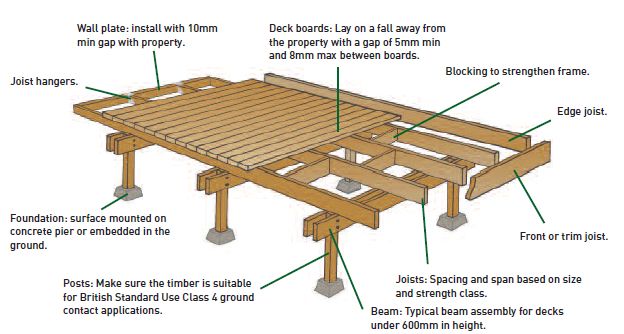 (but I don’t really like this idea, the bottoms are allowed from the bottom according to the idea)
konstantin
New Member
- #9
Inage wrote:
I still advise you to isolate the subwoofer, that is, if it is under the table (does it interfere with your legs, in a sitting position?) - put a partition and upholster with damping material from the side of the subwoofer. Better yet, not just a flat partition, but a box as wide as a table, that is, to make a kind of mouthpiece.
Click to expand...
This is interesting! It interferes with the legs, it is almost flush with the edge of the table, the difference is 10 cm, the partition will fit there without any problems.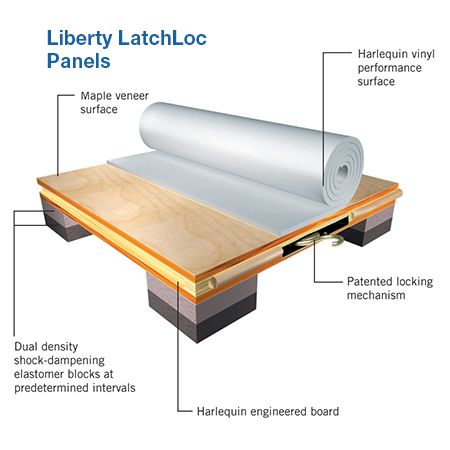
Inage, tomorrow I'll go to work and take a picture of the DJ, I'll post it on Friday, tell me what and how to do it? (it is clear that you understand this)
PROMO
Well-Known Member
- #ten
konstantin wrote:
the bottoms are allowed from the bottom according to the idea)
Click to open...
that's it for their strengthening! the floor acts like a piece of mouthpiece.
Inage
Member
- #eleven
konstantin wrote:
This is interesting! It interferes with the legs, it is almost flush with the edge of the table, the difference is 10 cm, the partition will fit there without any problems.
Inage, tomorrow I'll go to work and take a picture of the DJ, I'll post it on Friday, tell me what and how to do it? (it is clear that you understand this)Click to expand...
Yes, a photo would be nice.
PROMO wrote:
that's it for their strengthening! the floor acts like a piece of mouthpiece.
Click to expand...
Well, yes. This is more needed by visitors, it would be possible to put the workplace on a vibration isolating pad, but this will only partially eliminate vibration ...
Reactions:
constantine
DAZZER
Electronic English Audiophile
- #12
that's it, just vibration.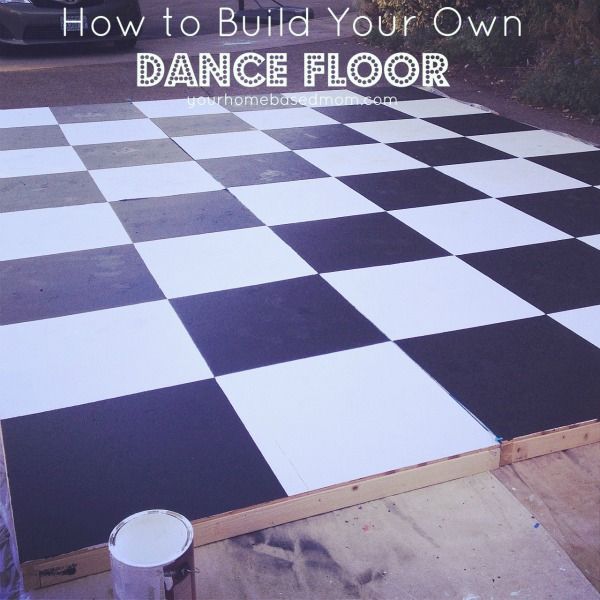 so you already answered the advice to "isolate" the sub. the bass doesn’t just go down your legs) although if you work a little more there, then that’s exactly what will happen.
konstantin wrote:
I was advised to hang the sub on the wall, the only way to lower the bottoms, to move the source away. (but I don't really like this idea, the bottoms are allowed from the bottom according to the idea)
Click to expand...
not true. We have in one big pretentious concert hall worth Pts. many kilowatts of good sound. All subs are decorated and rise from above along the perimeter of the stage, i.e. along the ceiling. I also saw many times how subs hang on chains on the sides, next to the tops.
konstantin wrote:
Tell me what to do to feel less bass?
Click to expand...
change bar. but times already
konstantin wrote:
it just hurts
Click to expand.
..
it is better to change profession (hearing is not restored or cured).
Last edit:
Inage
Member
- #13
DAZZER wrote:
that's it, only vibration. so you already answered the advice to "isolate" the sub. the bass doesn’t just go down your legs) although if you work a little more there, then that’s exactly what will happen.
Click to expand...
I wrote about the isolation, and TC works in the bar.
I meant that to put the subwoofer on a special stand - only vibration reduction. But it’s not the vibration from the floor that presses on his ears, so it would be possible to make at least a partition, as a maximum - a box in the form of a mouthpiece ...
konstantin
New Member
- #fourteen
Here is a photo taken by friends http://www.sendspace.com/file/hsbbd4 posted in the exchanger. I think that the picture will become clearer.
what do you say?
Inage
Member
- #fifteen
konstantin wrote:
Here friends made a photo http://www.
sendspace.com/file/hsbbd4 posted in the exchanger. I think that the picture will become clearer.
what do you say?Click to expand...
Tin of course...
I would advise you to make this box:
With a wall width of at least 30 mm, and stuff it tightly with rags (from the cheapest options).
Upholster the lower surface of the box with soft material, or at least the part where the sub is located. Again, depending on the amount of money, you can use different materials: starting with coasters from Auralex and ending with the same felt from an old coat ... fortunately, there is a margin for height, as can be seen from the photo.
This whole box with a subwoofer is only then to be put under the table.
But there is a problem with the back wall, given the fact that the subwoofer is already a little bit advanced. There should be a soft layer between the back wall and the subwoofer, at least 15-20 centimeters.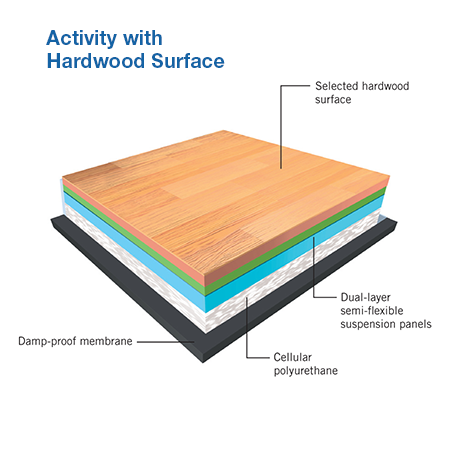 There are two options here: either you push the sub forward (decoratively decorate the outside of the step for it), or sacrifice your inner space.
In general, it's none of my business, of course, but something needs to be radically changed: either the workplace, or the work itself... You yourself are in a kind of sub-woofer...
P. S. True, there is one point here .. .now, your workplace, a kind of box, amplifies the rumble on the bottoms ... if you reduce it, plus eliminate the vibration between the subwoofer and the floor, won't it turn out that the bass will become quieter ... and customers will ask you to turn up the sound louder, in the end, it will turn out the same as it was ... here you need to think about how and how much the sound will change after adjusting the workplace ...
Last edit:
Reactions:
constantinekonstantin
New Member
- #16
Inage wrote:
Tin, of course.
..
I would advise you to make such a box:
With a wall width of at least 30 mm, and stuff it tightly with rags (from the cheapest options).
Upholster the lower surface of the box with soft material, or at least the part where the sub is located. Again, depending on the amount of money, you can use different materials: starting with coasters from Auralex and ending with the same felt from an old coat ... fortunately, there is a margin for height, as can be seen from the photo.
This whole box with a subwoofer is only to be put under the table.
But there is a problem with the back wall, considering also the fact that the subwoofer is already a little bit advanced. There should be a soft layer between the back wall and the subwoofer, at least 15-20 centimeters. There are two options here: either you push the sub forward (decoratively decorate the outside of the step for it), or sacrifice your inner space.
In general, of course, it’s none of my business, but something needs to be radically changed: either the workplace, or the work itself.
.. You yourself are in a kind of subwoofer...
P. S. True, there is one thing here ... now, your workplace, a kind of box, increases the hum along the bottoms ... if you reduce it, plus eliminate the vibration between the subwoofer and the floor, won't it turn out that the bass will become quieter .. .and clients will ask you to make the sound louder, in the end it will turn out the same as it was ... here you need to think about how and how much the sound will change after adjusting the workplace...
Click to expand...
Thank you, I got the idea. I think it's worth the candle? about your postscript, and YOU are right, it really can turn out that way. Here you need to think carefully.
Inage
Member
- #17
Well, this is like the final version.