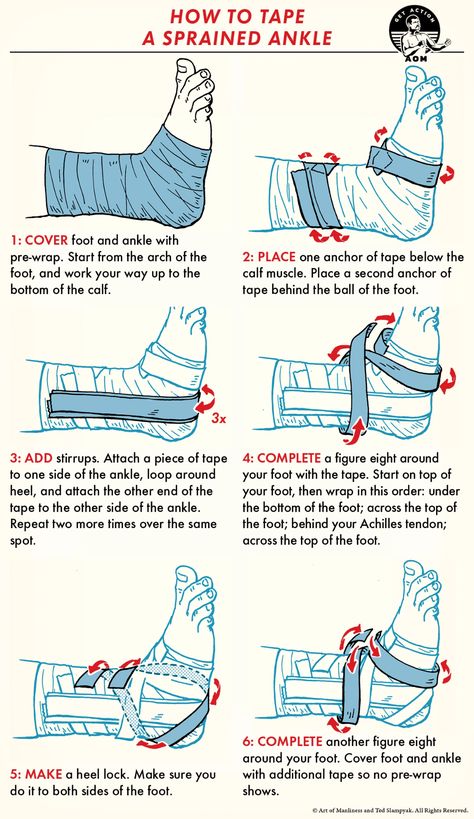
How to tape an ankle for dance
It's a Wrap
- Follow
- Follow
- Follow
- Follow
- Follow
January 22, 2007
Whether you’re going back to class after an injury or just need extra support, a proper tape job can do the trick. Here’s how to wrap your ankle, arch and patellar tendon.
Target:
Ankle
To support:
Weak ankles
Use: Elastikon
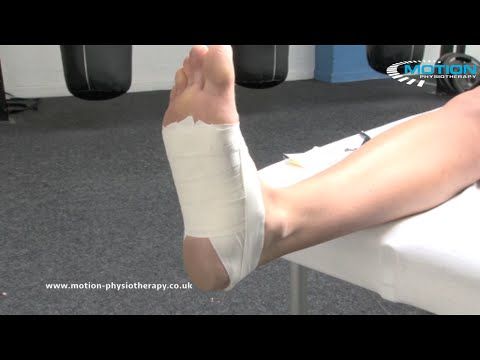
- Flex foot, and lay the tape across the ankle from the inside anklebone down toward the outside of foot.
- Wrap underneath foot, pulling tape tight, but not so tight it stretches out the tape.
- Continue wrapping up and over the arch.
- Cross in front of the ankle to complete a figure 8.
- Repeat winding the tape in the figure-8 pattern, 4-5 times.
- Finish at the top of the foot to prevent curling. Cut and press down until tape sticks to itself.[
Tightness Tests
:
Use the following to make sure the wrap isn’t cutting off circulation:
- Press and release the nail bed of each toe—the blood should return to the bed instantly.
- Touch skin of foot. It shouldn’t tingle, be too hot or cold or have changed temperature.
- When you stand up, you should be able to feel all your toes on the floor.
Target:
Arch
To prevent:
Rolling in resulting from weakness
Use: Elastikon
- With toes splayed as wide as possible, place end of tape slightly below ball of foot.
- Wrap around foot once, keeping tape taut and pressed smoothly and firmly against skin.
- Continue to wind tape around foot 4-5 times. On each consecutive wind, pull taut at the inside of arch.
- Finish at the top of foot to prevent curling. Cut and press down until tape sticks to itself.
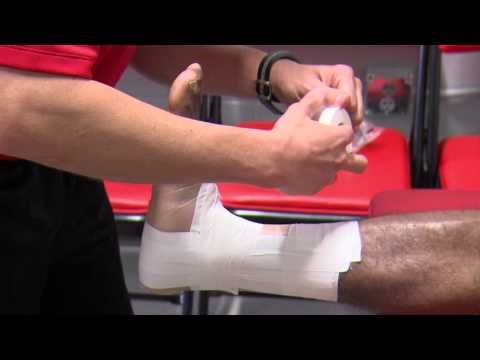
Target:
Patellar Tendon
To relieve:
Patellar tendonitis, without limiting range of motion
Use:
Foam prewrap
- Relax knee by lifting heel off floor and resting weight on ball of foot.
 If this is uncomfortable, place a small block underneath heel. Then, starting above the thigh, wrap the foam around the leg.
 - Work your way down to about an inch below knee.
- Locate your patellar tendon between the kneecap and above the tibia. It will feel like soft tissue.
- Roll the foam from the top down and the bottom up, toward the patellar tendon.
- Finish with the foam band running across the patellar tendon. The foam will place pressure on the tendon, relieving stress at either end, where it connects to the tibia and the kneecap.
Tightness Tests:
Use the following to make sure the wrap isn’t cutting off circulation:
- Gently rub the back of knee, where there are many nerves and blood vessels. There shouldn’t be any discomfort.
- There shouldn’t be any temperature changes or sensations running down your leg.
Stock Your Bag
For this article, PT Megan Richardson used:
- Elastikon, an elastic cloth athletic tape that is thin enough to fit into pointe, ballet, jazz and tap shoes, and sticky enough to prevent curling for barefoot dancers.
- J-Wrap Pretaping Underwrap, a soft foam prewrap designed for use beneath athletic tape to protect skin.
Both are made by Johnson & Johnson and are available at medical supply stores and some drugstores such as CVS or Duane Reade.
Caution!
Remember that wrapping should never be used as the only treatment for injury or in the place of strengthening exercises—always consult your doctor and physical therapist prior to dancing with or returning from an injury.
Megan Richardson is a physical therapist at the Harkness Center for Dance Injuries at the NYU Hospital for Joint Diseases in NYC.
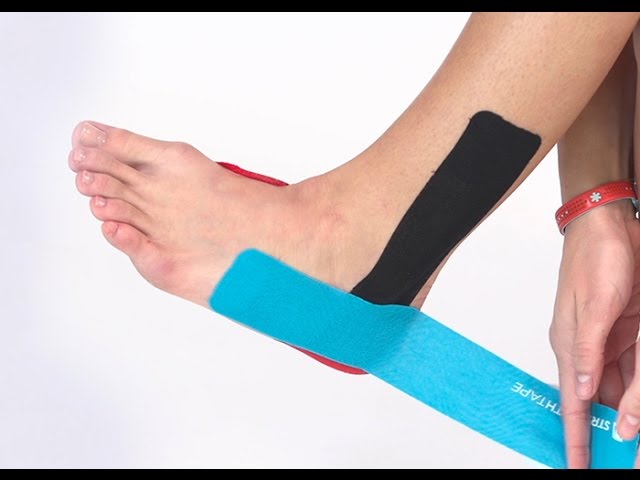
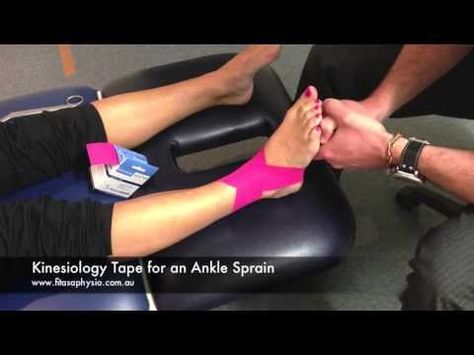
How to Tape an Ankle with Medical Tape or Kinesio Tape
Share on PinterestWe include products we think are useful for our readers. If you buy through links on this page, we may earn a small commission. Here’s our process.
Ankle tape can provide stability, support, and compression for the ankle joint. It can help reduce swelling after an ankle injury and prevent reinjury.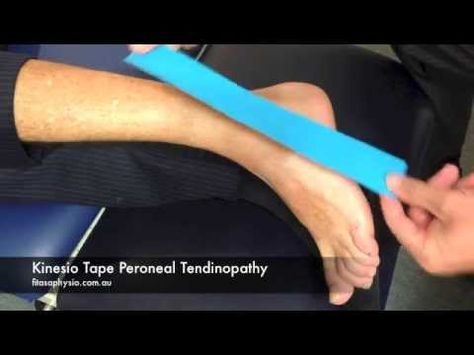
But there’s a fine line between a well-taped ankle, and one that’s taped too tight or doesn’t provide the needed support.
Keep reading for our step-by-step guide on how to effectively tape an ankle.
Tape
You have two main options for taping your ankle: They are athletic tape, which an athletic trainer may also call strapping or rigid tape, and kinesio tape.
Athletic tape
Athletic tape is designed to restrict movement. The tape doesn’t stretch, so it’s usually best-suited for stabilizing an injured ankle, providing significant support to prevent injury, or otherwise restricting movement.
You should only wear athletic tape for a short period of time — roughly less than a day unless a doctor suggests otherwise — as it can affect circulation.
Shop for athletic tape online.
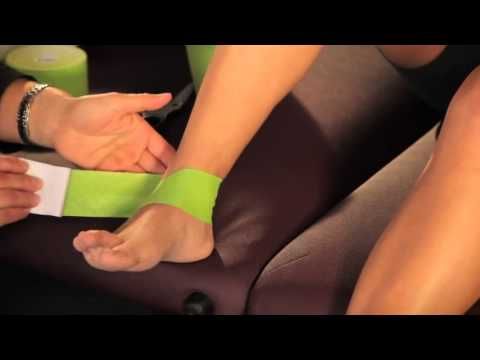
Kinesio tape
Kinesio tape is a stretchy, moveable tape. The tape is best-suited for when you need range of motion in the ankle, but want additional support.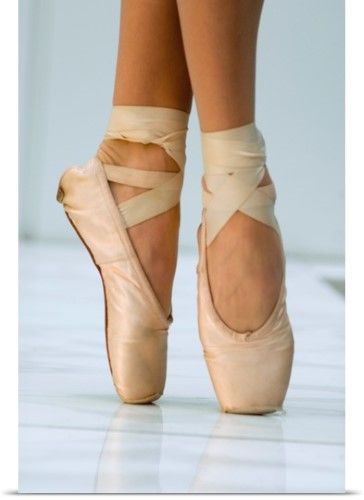 You may want to wear kinesio tape if:
- you’re back to physical activity after an injury
- you’re back on the playing field
- you have unstable ankles
Kinesio tape can stay on much longer than athletic tape — usually up to 5 days. The stretchy nature of the tape doesn’t usually restrict blood flow and is waterproof, so you can still shower or bathe with the tape on.
Shop for kinesio tape online.
Support accessories
Some people may also use special accessories to increase the tape’s effectiveness and reduce blistering or discomfort that it can sometimes cause. Examples include:
- heel and lace pads, which are applied on the top of the foot and over the heel
- taping base spray, which helps reduce friction while also allowing the tape to better adhere to the skin
- prewrap, which is a soft, stretchy wrap that’s applied before athletic tape and makes the tape easier to remove
Shop for heel and lace pads, taping base spray, and prewrap online.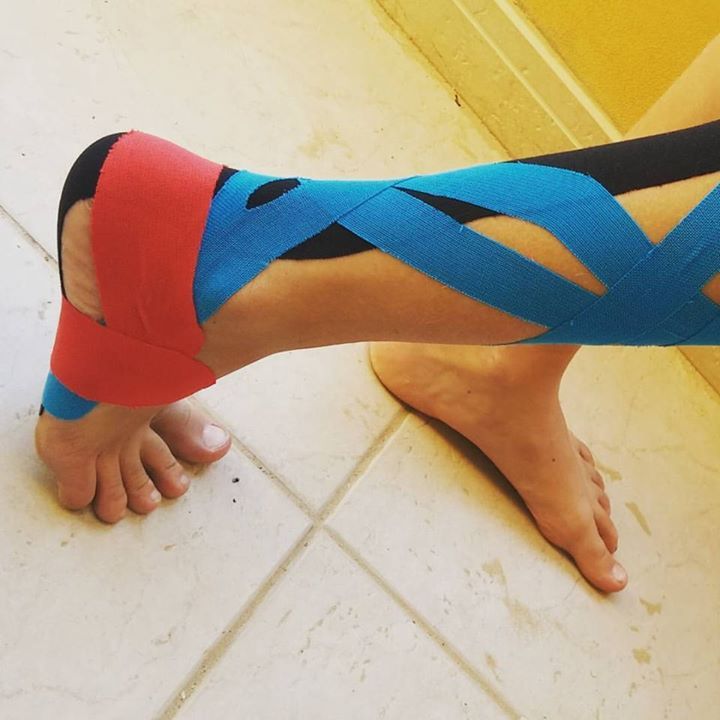
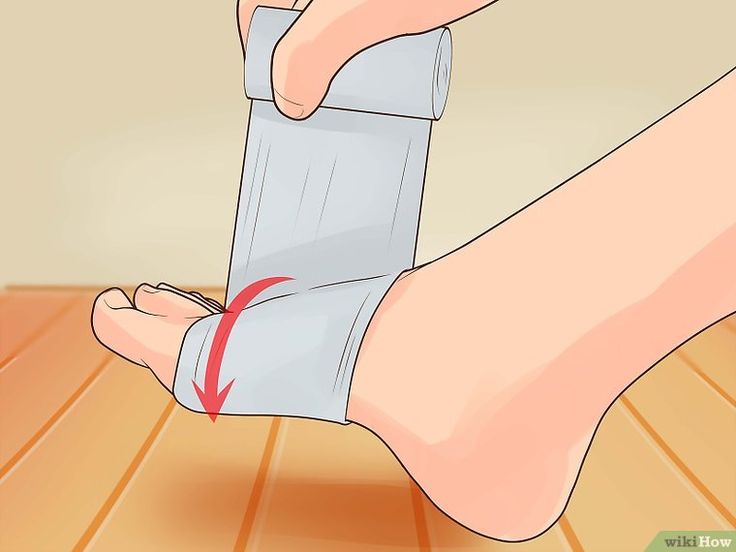
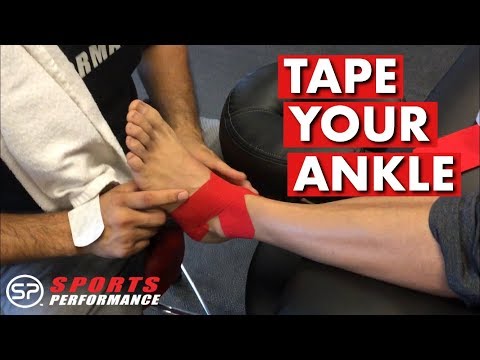
Since using athletic tape involves a different approach than kinesio tape, there are a few separate steps for each approach. Both approaches will start with clean, dry skin. Be sure to avoid taping over open wounds or sores.
Desired, but not required, first steps
- Apply a base spray to the ankle, spraying on top of the foot and on the ankle.
- Then, apply a heel pad to the back of the foot, starting just behind the ankle (where shoes often rub), and a lace wrap on the front of the foot (where shoelaces often rub) if desired.
- Apply prewrap to the foot, starting just underneath the ball of the foot and wrapping upward until the ankle (and about 3 inches above the ankle) is covered.
- Take the athletic tape and apply two anchor strips at the top-most part of the prewrap. This involves starting at the front of the leg and wrapping until the strips of tape overlap by 1 to 2 inches. Apply an additional strip halfway past where the first strip is located.
- Create a stirrup piece by applying the tape against the top of one anchor strip, advancing it over the ankle, going over the heel, and ending at the same place on the opposite side of the leg. This should look like a stirrup.
- Repeat and place an additional stirrup piece slightly more in the center of the top part of the foot, going around the ankle, and having the tape adhere to the anchor strip.
- Place another anchor strip over the stirrup tape, wrapping about halfway from the start of the last anchor strip. This helps hold the stirrup piece in place. Continue wrapping in this fashion until you reach the top of the foot.
- Wrap the heel using a figure-eight technique. Starting on the inner aspect of the arch, bring the tape across the foot, angling down toward the heel. Cross over the foot and ankle, continuing the figure-eight for two complete wraps.
- Finish by placing pieces of tape from the front of the lower leg, around the arch or heel to the other side.
 You may also need additional anchor strips. You shouldn’t have any open areas of skin.
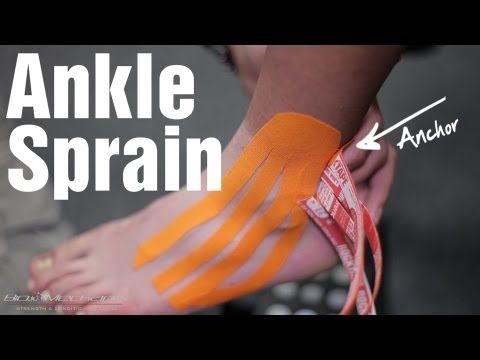
Kinesio tape doesn’t cover most of the foot and ankle as athletic tape does. While different methods exist, here’s an example of a common kinesio ankle taping approach:
- Take a piece of kinesio tape, and start on the outside of the ankle, about 4 to 6 inches above the ankle. Create a stirrup-like effect as you take the piece of tape over the heel, pulling the tape to the opposite side, over the inner aspect of the ankle, and stopping at the same level as the first piece of tape.
- Put another piece of tape on the back of the foot, centering it with your Achilles (heel) tendon. Wrap the tape around the ankle to circle it around the foot. The tape should be tight enough so the foot bends, yet still feels supported.
- Some people don’t circle the tape around the ankle, but instead cross it like an X. This involves centering a piece of tape under the arch and bringing the two ends across the front of the lower leg to create an X.
 The ends of the tape are secured behind the leg.
Be sure to remove any tape you may have applied if at any time your toes appear discolored or swollen. This could indicate the tape is too tight and may be affecting your circulation.
According to an article in the journal Best Practice and Research: Clinical Rheumatology, 28 percent of people treated with tape report the most common adverse effects are discomfort from too-tight tape or an allergic reaction or sensitivity to the tape.
Steps for removing athletic tape
- Use a pair of bandage scissors (scissors with blunt ends and an extra blunt edge on the side) to slide the scissors under the tape.
- Cut the tape gently until you have made a large cut over most of the tape.
- Slowly peel the tape away from the skin.
- If the tape is especially persistent, consider using an adhesive remover wipe. These can dissolve the adhesive and are usually safe for skin as long as they’re labeled as such.
Shop for adhesive remover wipes online.
Steps for removing kinesio tape
Kinesio tape is intended to stay on for several days — therefore, it takes some extra effort to remove sometimes. Steps include the following:
- Apply an oil-based product, such as baby oil or cooking oil, to the tape.
- Allow this to sit for several minutes.
- Gently roll the edge of the tape downward, pulling the tape away in the direction of the hair growth.
- If you have residual glue from the tape after removal, you can apply the oil to further dissolve it.
Ankle taping can help prevent injuries and reduce discomfort following an injury. The approaches to taping depend on the type of tape you use.
If you’re having trouble taping your ankle, talk to your doctor or a sports medicine professional. They can recommend injury- or body-specific taping approaches that may help.
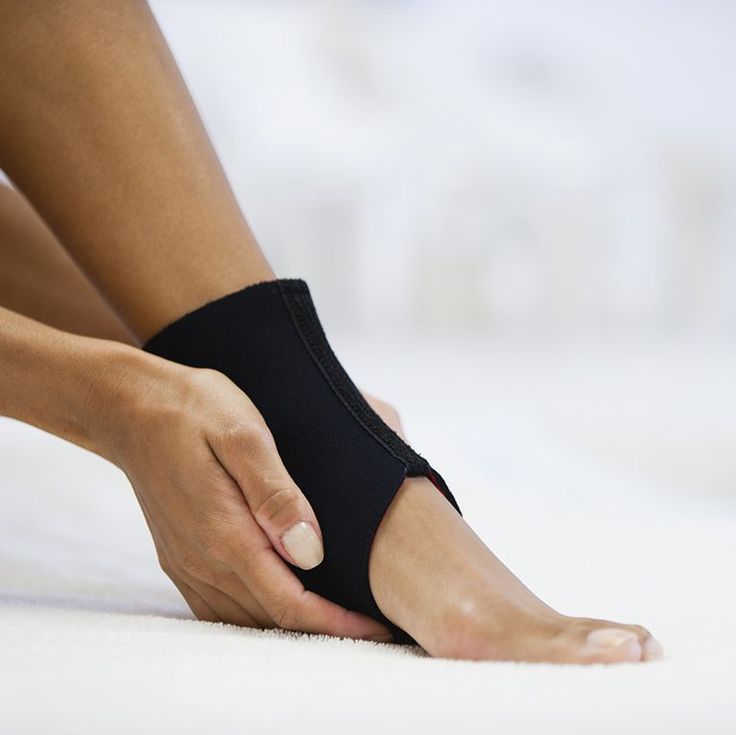
Ankle brace
The information in this section should not be used for self-diagnosis or self-treatment. In case of pain or other exacerbation of the disease, only the attending physician should prescribe diagnostic tests. For diagnosis and proper treatment, you should contact your doctor.
The ankle is a fragile joint, almost not protected by muscles. It can be damaged when playing sports, slipping on ice, or simply accidentally tripping and unsuccessfully leaning on your foot. The bandage for fixing the ankle joint is used both for the treatment of injuries and for their prevention.
What is the difference between bandage and plaster?
A bandage is a device that helps to fix a part of the body. For minor injuries, it is made of dense fabric, for more serious ones, it may contain plastic or metal inserts. The bandage for fixing the ankle joint looks like a sock: it is put on the foot, leaving the toes open, and securely fixing the heel and ankle.
Although the cast can be quite compact, the bandage is more comfortable. The main difference from plaster and splints is, of course, convenience. The bandage takes up little space, you can wear shoes on it, and soft fabric options are almost invisible under clothes. In addition, you can purchase a ready-made version at a pharmacy with a preliminary fitting, or order online.
Ankle bandages are available both ready-made and universal (for some types, the size can be changed by lacing), and by personal order. To select a brace, first of all measure your entire leg: you need the circumference of the shin, the length of the ankle and the exact size of the leg. Knowing these dimensions, you can easily choose the finished device. If you have a non-standard shape or leg size, it would be more correct to apply for the manufacture of a bandage according to your own parameters.
Injuries requiring a brace to fix
There are a lot of options for injuries in which a bandage is used. It helps with sprains, arthrosis, dislocation, fracture and recovery after surgery. The degree of bandage tightness depends only on the severity of the injury.
For mild sprains, bruises and arthrosis in remission, the doctor will prescribe a soft elastic bandage. It is made of elastic dense fabric, so it does not rigidly fix the foot - with minor injuries, this makes no sense.
A tighter version of the ankle brace is required for torn ligaments, severe bruises and loose joints. Such a bandage differs from a soft bandage by the presence of plastic or silicone elements, as well as clasps and laces that allow you to adjust the device to the size of your leg. It may be recommended to you if you have previously used a mild version, and it did not bring the expected effect.
This is what a rigid ankle brace looks like. Rigid bandage consists of metal and plastic inserts. Only it provides complete immobility of the ankle joint, and therefore is used for the most severe injuries: fractures, arthritis, extensive torn ligaments and serious dislocations. These are the most expensive models, but only they will ensure complete immobility of the diseased joint and allow the bones and ligaments to recover in the shortest possible time.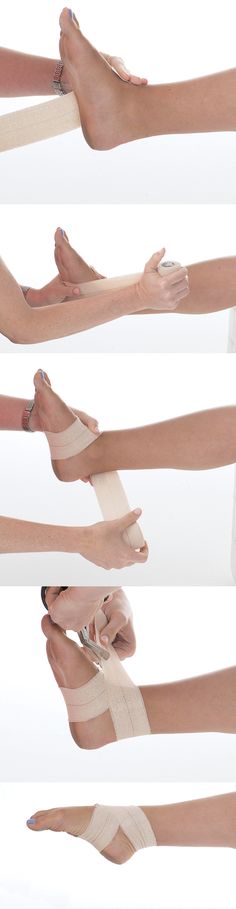
Are there any contraindications?
This fixation option is not suitable for everyone. The main contraindication: diseases of the skin and veins of the lower extremities. An open fracture or serious wounds at the site of joint damage do not allow a tight bandage to be worn. A variety of skin problems such as rashes, allergies, ulcers (including those with diabetes) also do not allow the use of a bandage. Since the bandage will be tightly pressed to the skin for a long time, the disease may worsen.
Contraindications for venous disease include thrombosis, venous ulcers and arterial occlusion. In severe vascular diseases, it is contraindicated to tighten the limb and disrupt blood circulation in the affected area. The bandage fits the leg too tightly, and it will be dangerous for damaged veins and arteries.
Instructions for use and care
The bandage should be worn in a sitting position, over a thick cotton sock. In the first days, wear it for no more than an hour so that the leg gets used to its new position.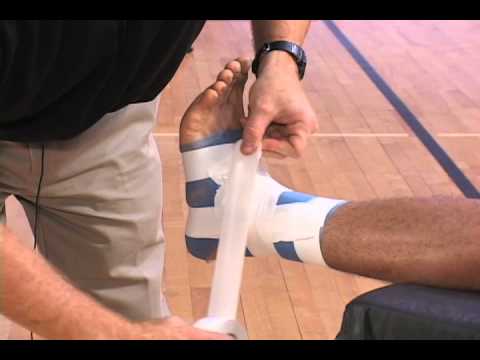 You can gradually increase the wearing time, but do not forget to remove the bandage regularly to check the condition of the skin. If there is no redness or irritation on it, you can increase the load on the legs.
Remove the fixation every 6 hours to allow the feet to rest and treat the skin with an antiseptic.
Attention!
Only a doctor can prescribe a bandage. Without consulting a specialist, you are unlikely to be able to choose the right model and level of fixation.
The band itself also requires maintenance. Regularly clean it from dirt, soft bandages can be washed in warm water and soap. Dry them after that away from batteries and hot air.
Prevention and training bandage
Soft elastic bandage can be used not only for treatment, but also for the prevention of injuries. This is especially important for lovers of an active lifestyle: in some sports, you simply cannot do without it. You can choose special sports models, or you can pay attention to medical, soft and medium hardness.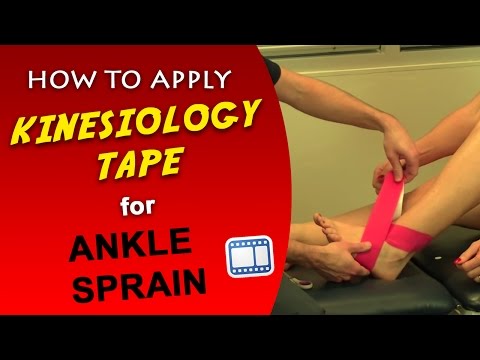
If you play football, basketball or volleyball, then the brace will protect your ankles from possible sprains and sprains. It will also help in dancing, gymnastics or running - in other words, in all sports where there is a high load on the ankle and there is a risk of dangerous incorrect positioning of the legs.
In case of power loads, a tight bandage on the joints is used both as an injury prevention and to increase the load. In addition, a medium-hard brace is necessary if you have recently recovered from an ankle injury and want to return to training as soon as possible.
If you do manual labor or like to walk in heels, a soft bandage will also be useful for you. It will help you avoid injury, strengthen tendons and reduce fatigue after a long day on your feet. The main thing is to choose the right device together with the doctor, choose the right size, and the bandage will significantly improve your well-being and health in general.
References
- Alekseev V.
 V., Amelin A.V., Davydov O.S. [and etc.]. - Neuropathic pain: clinical observations. Edited by N.N. Yakhno // Guidelines for the diagnosis and treatment of neuropathic pain - M .: Publishing house of the Russian Academy of Medical Sciences.-2009.-S.6-31.
 - Danilov A.B., Davydov O.S. neuropathic pain. - M .: BORGES - 2007. - P. 191.
- Bruyère O., Honvo G., Veronese N., Arden N. K., Branco J. et al. An updated algorithm recommendation for the management of knee osteoarthritis from the European Society for Clinical and Economic Aspects of Osteoporosis, Osteoarthritis and Musculoskeletal Diseases (ESCEO) // Semin Arthritis Rheum. — 2019.
- Abbott NJ. Astrocyte-endothelial interactions and blood-brain barrier permeability // J Anat. - 2002. - Vol. 200(6). - 629-38.
- Chichasova N.V. Treatment of chronic diseases of the joints // Modern rheumatology, 2012. link
- Sakovets T.G. Features of neuropathic pain with joint damage // Practical medicine, 2014.
 link
link
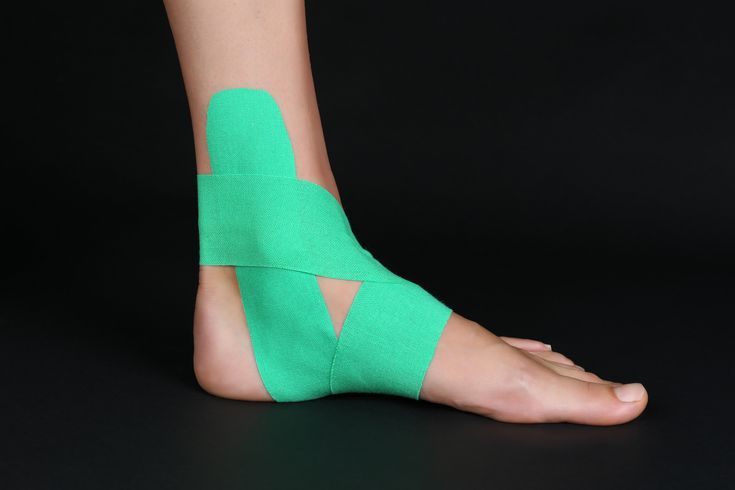
Ankle taping for joint injuries, sprains
Ankle injury occurs most often in athletes as a result of excessive loads or careless movements, jerks. Ankle taping is a modern approach to anesthetizing an injured joint, relieving muscle tension and rehabilitation. Being an excellent alternative to elastic bandages and bandages, tapes provide the correct movement of muscles, while the athlete does not need to worry about an untimely untied or dropped bandage.
What injuries require ankle taping? Most often, the cause of such injuries is dislocations and twisting of the leg when performing various exercises, running. As a result of unfavorable movement, the joint capsule and adjacent muscles and ligaments are stretched. A sign of a broken fiber in a bundle is cotton. Injuries can affect the top or bottom of the foot.
Ankle taping with tape is the most popular form of immobilization in athletics, football, basketball, hockey and other running and playing sports. Applying teips allows you to anesthetize the injured joint, avoid the impact of excessive load, microtraumas and, as a result, chronic inflammation of the muscle. The ligaments are securely fixed with cotton tapes with an adhesive base, provided that the necessary mobility of the limb is maintained.
Ankle sports taping - actively used for bruises and swelling. The patch lifts the skin, thereby restoring microcirculation, removing inflammatory mediators as a result of normal blood circulation. In addition, there is a decrease in irritation of pain receptors and the associated discomfort in the athlete is eliminated. Tapes applied taking into account the structure of ligaments, the location of lymph nodes and tendons, contribute to the formation of correct muscle movements, eliminating the risk of muscle spasm.
Contraindications and side effects
by direct indications for the ankle taping are:
- injury,
- increased load,
- bruises,
- damage to connective tissues,
- of the MIOs, arthros, arthros, arthros, arthros , tendovaginitis of the Achilles tendon, hemarthrosis,
- swelling,
- consequences of a stroke,
- convulsions,
- injury prevention.
Ankle ligament taping allows you to maintain motor activity, which has a positive effect on the course of rehabilitation. Provides fast and efficient recovery. It also provides high-quality prevention of contractures in the joints.
Kinesio taping is prescribed for people with joint diseases accompanied by complications with the ankle joint.
This modern technique is actively used in therapy:
- injuries of the musculoskeletal system;
- traumatic hemiplegia, paresis;
Despite such a positive effect, the technique has some contraindications:
- skin diseases,
- hypersensitivity of the skin,
- excessive stimulation of nociceptors, causing pain and itching,
- hematomas.
Improperly fixed tapes can cause discomfort. If you experience tingling, blanching of the skin, a decrease in the temperature of the toes, pain, you should remove the application and re-tape the ankle. For preventive purposes, it is recommended to wear applications for no longer than 5-10 days.
Foot taping in case of injury or impact
Using a special plaster will help relieve pain and eliminate inflammation. The method and place of applying the application is selected depending on the location of the pain.
But for all types of ankle injuries, the following rules apply: The patch is fixed in a position that ensures dorsiflexion of the foot. The toes should be stretched as far as possible; Taping the foot in case of a bruise improves blood circulation, eliminates swelling and bruising. The duration of wearing the application should not exceed 5-7 days. In the presence of concomitant pathology (for example, bursitis or sprain), immobilization with tape can be extended until complete recovery. Stabilization of the ankle joint after a bruise or injury can be achieved in the following ways: Bursitis is accompanied by inflammation, swelling and pain. The main reasons for its development are injuries, infectious processes in the tissues, running in inappropriate sneakers. Applying tapes for bursitis can reduce pressure on the joint and reduce the manifestation of pain. Taping can be done in the following ways: This type of injury entails the development of acute pain, inflammation and gait disturbance. Torn ligaments are taped as follows: This method is most effective with little stretch. With strong tension, the following scheme is used: Taping of the ankle joint in case of dislocation is carried out similarly to applying a patch in case of dislocation, but with more pronounced immobilization of the articular surfaces. To provide enhanced fixation allows stretching the tape. Ankle and ankle are usually injured at the same time, because they are in the same anatomical region and are almost a single structure. Ankle sprain can be taped in the following ways: In case of serious injury, such as a broken ankle, be sure to consult a specialist before taping. If left untreated, arthrosis can lead to destruction of the cartilage in the joint. To prevent overstretching of the metatarsophalangeal joint, tape using the following method: ; Sports people often injure the lateral ligaments of the ankle. You can buy high-quality tapes from us and undergo distance learning methods of therapeutic, segmental and orthodynamic taping, magnetic taping. Upon completion of the course, a certificate is issued. If you already know how to tap and want to improve your skills and become a highly effective and multifunctional specialist, we offer you training in our online courses. Our training complies with the European and National Standards, the Academy has been training since 2013 and has trained more than 17,000 people, more than 10,000 people have been trained in online courses. Ankle bruising
 One tape 5 cm wide is applied to the ankle in such a way that one end of it completely covers the heel, and the other end is at the top of the lower third of the leg. A slight tension should be provided in the heel area, the second end of the tape should be fixed above the bone. The second tape is laid around the ankle so that its end is in the center of the arch of the foot. The band is glued to the outer part of the foot and then around the heel with a stretch of 50%. The edge is laid under the heel and fixed without tension on the beginning of the patch. The third tape is fixed on the outside of the foot, around the heel and below with a stretch of 50%;
 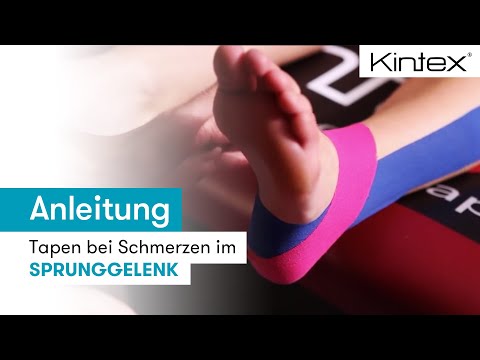 The length of the second tape should correspond to the length of the foot from the inner to the outer part of the calcaneus. The protective film is torn in the middle and in the area of \u200b\u200bthe "anchors". Tape locks in from heel to ball of foot. Then it is led out and then to the inside. Anchors are fixed last. The second strip is applied with significant tension to the flexion area at the top of the foot. It is necessary to ensure that the "anchors" are on the calcaneus.
 Kinesio taping for ankle bursitis
 3 cm are left uncut on each side. Anchors are fixed below and above the heel. In a sitting position, the toes are pulled towards themselves as much as possible, and the heel is moved away. Tape beams are glued in the affected area and to the side of it;
 Taping for ankle and foot sprains
 To do this, the middle is fixed on the heel from the side of the sole perpendicular to the length of the foot. The tails of the patch lead up and are glued just above the ankles.
 The tape is applied in the area of the heel and Achilles tendon with a slight tension;
 Ankle and ankle taping
 The first tape, 5 cm wide, is applied in the direction from the ankle to the middle of the lower leg. The anchor is fixed at the top of the foot with the utmost care. Stretching the tape to the ankle, it is necessary to ensure a minimum tension. The second tape, 12-15 cm long, is glued with a slight stretch perpendicular to the first one in the focus of soreness;
 Taping for osteoarthritis of the ankle
 The causes of the disease in athletes, most often, is the frequent injury of the ankle and chronic vascular disease. Taping for arthrosis is performed with a 5 cm wide tape with a stretch. The “anchor” of the first patch is fixed from the outer part of the lower leg, then it is carried around the heel and glued in the area of the bone from the inside. The second tape is applied on the back of the foot, from the middle of the inner part and ending under the heel. The third tape is fixed similarly to the second patch, but from the outside of the foot.
 Big toe sprain
Ankle taping in various sports
 To prevent injuries, it is recommended to strengthen these areas before the game. In jumping sports such as volleyball and basketball, the Achilles tendon and calf muscles undergo fixation. In wrestling, correction of the ankle joint with tape is also relevant. In hockey, despite tight protection, all structures of the ankle and foot are taped - the Achilles tendon, lateral ligaments, and the sole area. Applications applied for the purpose of prevention are performed with wide tapes with minimal tension.