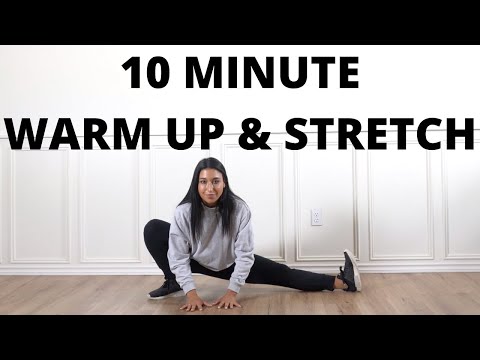
How to prevent knee injuries in dance
Common Dance Injuries and Prevention Tips
Featured Experts:
Dance may look effortless, but it requires a lot of strength, flexibility and stamina. It also comes with a high risk of injuries. Whether you are a dancer, the parent of a dancer or a dance teacher, you should be aware of the most common dance injuries and learn how to avoid them.
Johns Hopkins performing arts physical therapists Andrea Lasner and Amanda Greene share valuable information about dance injury treatments and prevention tips. Lasner and Greene, both dancers, have turned their love for the art into a means of helping injured dancers.
What are some common dance injuries?
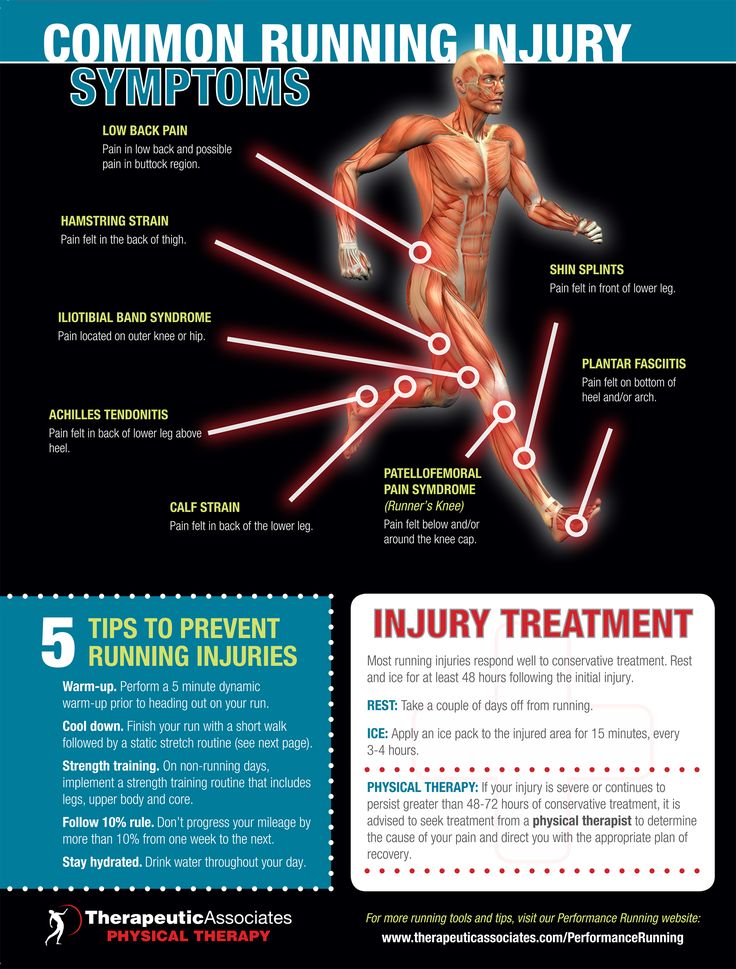
A few studies that looked into dance injuries found that injuries from using your joints and muscles too much (overuse injuries) are the most common in dancers. The majority of these overuse injuries involve an ankle, leg, foot or lower back. Some common dance injuries are:
- Hip injuries: snapping hip syndrome, hip impingement, labral tears, hip flexor tendonitis, hip bursitis and sacroiliac joint dysfunction
- Foot and ankle injuries: Achilles tendonitis, trigger toe and ankle impingement
- Knee injuries: patellofemoral pain syndrome
- Stress fractures: metatarsals, tibia, sesamoids and lumbar spine
- Dancers are also likely to develop arthritis in the knee, hip, ankle and foot
Generally, dancers have a much lower rate of anterior cruciate ligament (ACL) injuries than other athletes. One explanation could be that dance training involves much more intense jumping from an earlier age than other sports, which helps improve muscle control.
How do I know if the pain is from an injury?
In most cases, the pain you experience after dancing is muscle soreness that usually subsides within 24 to 48 hours. Sometimes, it takes a few days for muscles to get sore, which is also normal. However, if you experience the following types of pain, you may have suffered an injury:
- Pain that wakes you up at night
- Pain that is present at the start of an activity
- Pain that increases with an activity
- Pain that makes you shift your weight or otherwise compensate your movements
If you experience such pain, consult with a medical specialist — preferably a physical therapist or physician with experience in treating dancers. They will be able to determine whether additional testing is needed and will formulate an appropriate treatment plan.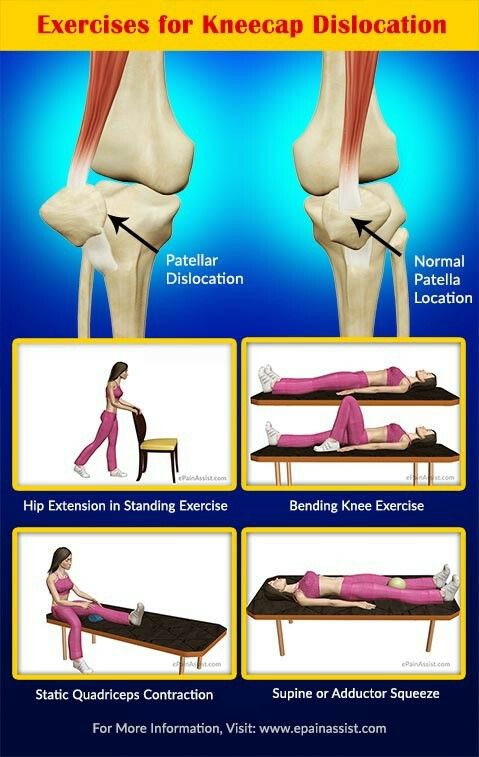
Why do dance injuries happen?
Dance is a physically demanding activity. Dancers perform repetitive movements for several hours a day. Studies have shown that dancing five hours a day or longer leads to an increased risk of stress fractures and other injuries.
On top of the intensive training, many dancers get little time to recover between the sessions and have no "offseason." Restrictive diets and unhealthy body weights may also contribute to dance injuries. Proper nutrition is important for dancers of all ages.
How do dancers get ankle sprains?
Ankle sprains are the number one traumatic injury in dancers. Traumatic injuries are different from overuse injuries as they happen unexpectedly. When an ankle is sprained, ligaments on the inside or outside of your foot get twisted or overstretched and may experience tears. Ankle sprains often happen due to improper landing from a jump, misaligned ankles (when they roll in or out) or poorly fitted shoes. Torn ligaments never heal to their preinjury condition. Once you've sprained your ankle, you are at risk of doing it again. It's important to build muscle strength to prevent further injuries.
Dance Injury Prevention
How can dance injuries be prevented?
The majority of overuse injuries and even some traumatic dance injuries can be prevented. Follow these guidelines to reduce your risk of injury:
- Eat well and stay hydrated before, during and after class.
- Get enough rest and avoid overtraining.
- Do cross-training exercises to build strength and endurance in all parts of your body.
- Always wear proper shoes and attire.
- Always warm-up before training or performances.
- Lead a healthy lifestyle and get to know your body.
When injuries happen, address them immediately and get advice from a doctor or physical therapist.
What are good cross-training exercises for dancers?
Core and hip strengthening exercises like Pilates and stability-based yoga are great for dancers.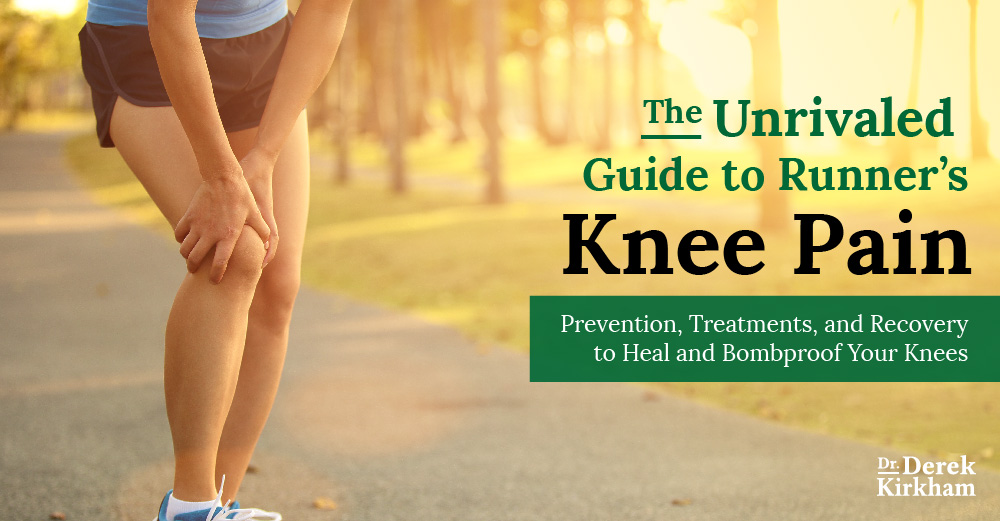 And so are aerobic and cardiovascular activities, such as running, swimming or biking. They get your heart rate up and help build stamina for long performances.
Many dancers don't do enough cardio during their regular training. Just 30 minutes three to four times a week is usually enough to improve your endurance. As always, do this in moderation and in short intervals to avoid stressing your joints. Being screened by a physical therapist with experience treating dancers will help you identify individual areas of weakness to address with specific exercises.
How much rest should a dancer get?
While many experts stress the importance of proper rest, there are no specific guidelines on the frequency and amount of rest. However, we know that dancing five hours a day or longer is linked to an increased risk of injury. It is also known that intense activity leads to microdamage, which peaks in recovery 12 to 14 hours after a workout. So it would make sense to take the next day off after a high-intensity activity.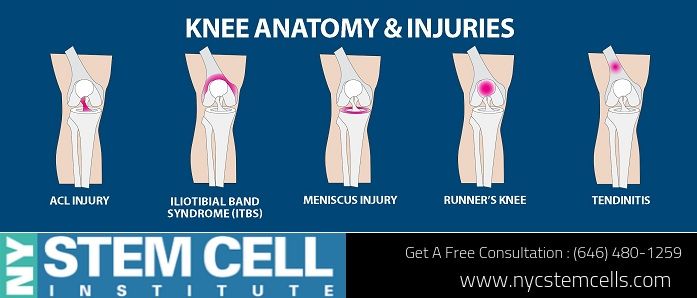 Dancers should work at their highest intensity a couple of times per week and then take at least two days off, preferably in a row. Also, a three- to four-week period of rest after the season is ideal for recovery.
Dance Injury Treatment
Should I ice or heat after a dance injury?
If it's a sudden injury, it's best to apply ice first to reduce swelling and inflammation. RICE treatment is a common approach that involves rest, ice, compression and elevation. After a few days, you can switch to heat to increase blood flow to the area and promote healing. However, every person is different. If you feel that ice helps you better than heat, then there is nothing wrong with continuing to ice. But be careful not to ice before dancing or stretching, because you want those muscles to be warmed up to prevent re-injury.
What are my treatment options for a dance injury?
It depends on the type of injury, your level as a dancer and many other factors. For example, for traumatic injuries like ankle sprains, your doctor may recommend RICE, joint protection and physical therapy. For stress fractures you may need to limit weight on your foot by using crutches, wearing a leg brace or walking boots. Surgery is typically used as the last resort. It is best to discuss your treatment options with a doctor who specializes in dance injuries. And if you are working with a physical therapist, make sure he or she is experienced in treating dancers. A big part of physical therapy is correcting the training technique that led to the injury. Otherwise, you risk hurting yourself again by making the same mistake.
What should be in the first aid kit for dance injuries?
Your regular first aid kit might already have many of the essentials for handling a medical emergency. However, when it comes to common dance injuries, you may want to include a few additional items, such as:
- Instant cold pack
- Pre-wrap and athletic tape (if qualified providers are available to apply)
- Elastic bandages (to be used only for compression, not support while dancing)
- Crutches
- Topical pain reliever
Sign Up for Our Free Newsletter
One of the best things you can do to protect and improve your health is to stay informed. Your Health is a FREE e-newsletter that serves as your smart, simple connection to the world-class expertise of Johns Hopkins.
Sign Up
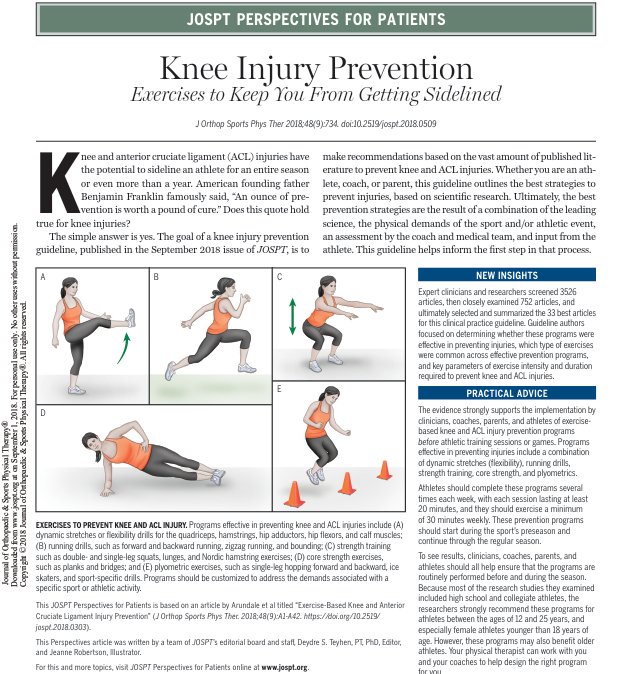
The 3 Best Exercises to Help Dancers Prevent Knee Injuries
When it comes to injury-prone body parts, knees reign supreme for dancers. But a little strengthening can go a long way in preventing painful outcomes. We turned to Dirk Hartog, a physical therapist with Westside Dance Physical Therapy in NYC, for three exercises that’ll support and stabilize your knees.
Photography by Erin Baiano. Hair and makeup by Angela Huff for Mark Edward Inc. Modeled by Nellie Licul.
Your browser does not support the video tag.
Exercise #1: Knee Rotation Control
NOTE: This exercise encourages proper rotation and control of your lower
leg, which, if incorrectly turned out, can strain around and below your knee.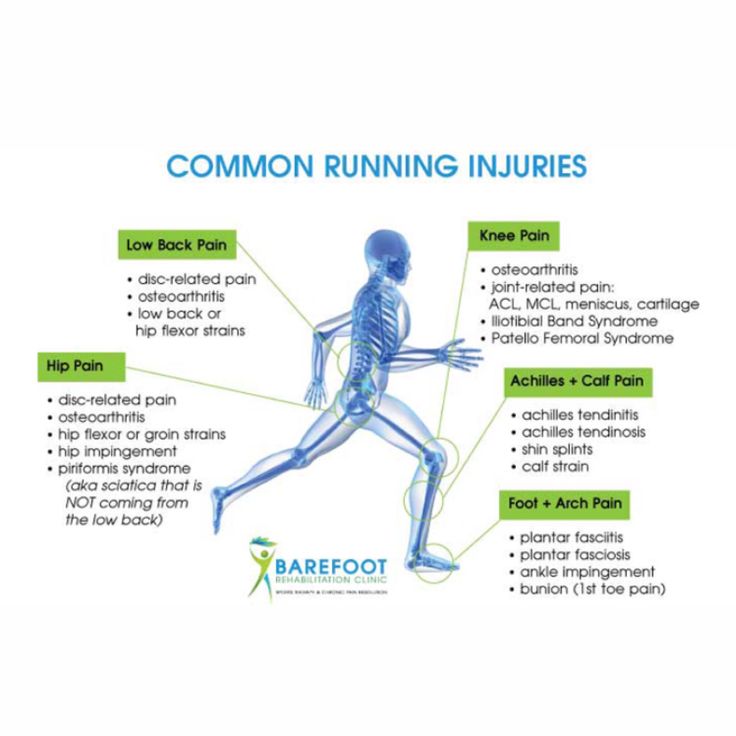
1. Put a sock on your right foot. Lie on your back with your hips and knees bent at about 90 degrees and your feet hip-width apart and planted firmly against a stable wall. The front of your tibia should be in line with the space between your second and third toes.
{“adCodes”: [], “adsOrder”: [3]}
{“product_info”: {“caption”: “Buy Now”, “product_price”: 0, “product_vendor”: false, “linkout_url”: false, “product_compare_at_price”: 0}, “headline”: “Exercise #1: Knee Rotation Control”, “credit”: “”, “description”: “u003cpu003eu003cstrongu003eNOTE: This exercise encourages proper rotation and control of your lower u003c/strongu003eu003cstrongu003eleg, which, if incorrectly turned out, can strain around and below your knee.u003c/strongu003eu003c/pu003eu003cpu003eu003cspanu003eu003c/spanu003e1. Put a sock on your right foot. Lie on your back with your hips and knees bent at about 90 degrees and your feet hip-width apart and planted firmly against a stable wall.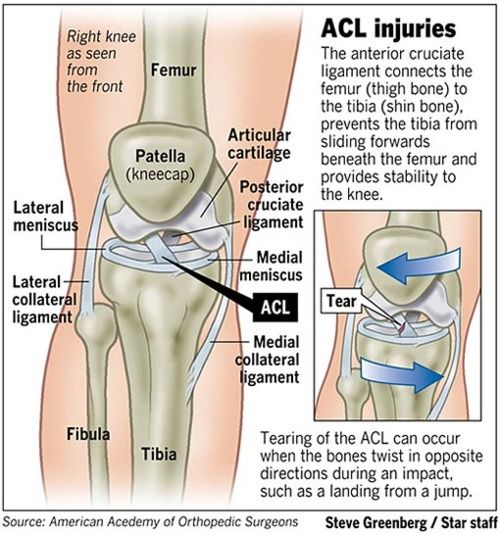 The front of your tibia should be in line with the space between your second and third toes.u003c/pu003e”, “caption”: “”}
{“product_info”: {“caption”: “Buy Now”, “product_price”: 0, “product_vendor”: false, “linkout_url”: false, “product_compare_at_price”: 0}, “headline”: “Exercise #1: Knee Rotation Control”, “credit”: “”, “description”: “u003cpu003e2. Slide your right foot up, stopping just before your heel or ball of your big toe comes off the wall.u003c/pu003e”, “caption”: “”}
{“product_info”: {“caption”: “Buy Now”, “product_price”: 0, “product_vendor”: false, “linkout_url”: false, “product_compare_at_price”: 0}, “headline”: “Exercise #1: Knee Rotation Control”, “credit”: “”, “description”: “u003cpu003e3. Leading with your heel, slowly slide your foot back down the wall, until your tibia internally rotatesu2014 you’ll know if it has because your right foot will be slightly turned in and pointing to your left foot.u003c/pu003e”, “caption”: “”}
{“product_info”: {“caption”: “Buy Now”, “product_price”: 0, “product_vendor”: false, “linkout_url”: false, “product_compare_at_price”: 0}, “headline”: “Exercise #1: Knee Rotation Control”, “credit”: “”, “description”: “u003cpu003e4. Slide your foot back up the wall, which will encourage your tibia to return to its neutral position. Repeat this exercise 10u201315 times with your right foot, then switch legs.u003c/pu003e”, “caption”: “”}
Exercise #2: Body-Weight Squats
NOTE: This exercise helps strengthen your quads, so they can absorb the shock of jumps and floorwork, protecting the soft-tissue
structures of your knees.
1. Begin with your feet hip-width apart and your toes slightly turned out. Find your neutral lumbar spine position.
{“adCodes”: [], “adsOrder”: [3]}
{“product_info”: {“caption”: “Buy Now”, “product_price”: 0, “product_vendor”: false, “linkout_url”: false, “product_compare_at_price”: 0}, “headline”: “Exercise #2: Body-Weight Squats”, “credit”: “”, “description”: “u003cpu003eu003cstrongu003eNOTE: This exercise helps strengthen your quads, so they can absorb the shock of jumps and floorwork, protecting the soft-tissue u003c/strongu003eu003cstrongu003estructures of your knees. u003c/strongu003eu003c/pu003eu003cpu003eu003cstrongu003eu003c/strongu003e1. Begin with your feet hip-width apart and your toes slightly turned out. Find your neutral lumbar spine position.u003c/pu003e”, “caption”: “”}
{“product_info”: {“caption”: “Buy Now”, “product_price”: 0, “product_vendor”: false, “linkout_url”: false, “product_compare_at_price”: 0}, “headline”: “Exercise #2: Body-Weight Squats”, “credit”: “”, “description”: “u003cpu003e2. Extend your arms in front of you and slowly sink into a squat until your thighs are parallel to the floor.u003cspanu003eu003c/spanu003eu003c/pu003e”, “caption”: “”}
{“product_info”: {“caption”: “Buy Now”, “product_price”: 0, “product_vendor”: false, “linkout_url”: false, “product_compare_at_price”: 0}, “headline”: “Exercise #2: Body-Weight Squats”, “credit”: “”, “description”: “u003cpu003e3. As you squat, imagine that you’re easing into a chair, so that your knees pass over your toesu2014this will encourage your upper body and hips to remain properly positioned throughout. u003cspanu003eu003c/spanu003eu003c/pu003e”, “caption”: “”}
{“product_info”: {“caption”: “Buy Now”, “product_price”: 0, “product_vendor”: false, “linkout_url”: false, “product_compare_at_price”: 0}, “headline”: “Exercise #2: Body-Weight Squats”, “credit”: “”, “description”: “u003cpu003e4. Return to the starting position and repeat the exercise 10u201315 times for 2u20133 rounds with 30-second rests in between.u003c/pu003e”, “caption”: “”}
Exercise #3: Turnout Stabilization
NOTE: This exercise promotes proper use of your glutes and external hip rotation to control turnout, which takes pressure off your knees.
1. Begin standing with feet hip-width apart. Soften the backs of your knees so your quads are relaxed and you’re not hyperextended. Find a neutral position for your lumbar spine by tucking your pelvis under, then arching your back—the midpoint between the two is where you should be. Place your left hand on your chest and your right hand over your belly button.
{“adCodes”: [], “adsOrder”: [3]}
{“product_info”: {“caption”: “Buy Now”, “product_price”: 0, “product_vendor”: false, “linkout_url”: false, “product_compare_at_price”: 0}, “headline”: “Exercise #3: Turnout Stabilization”, “credit”: “”, “description”: “u003cpu003eu003cstrongu003eNOTE: This exercise promotes proper use of your glutes and external hip rotation to control turnout, which takes pressure off your knees.u003cspanu003eu003c/spanu003eu003c/strongu003eu003c/pu003eu003cpu003eu003cspanu003eu003c/spanu003e1. Begin standing with feet hip-width apart. Soften the backs of your knees so your quads are relaxed and you’re not hyperextended. Find a neutral position for your lumbar spine by tucking your pelvis under, then arching your backu2014the midpoint between the two is where you should be. Place your left hand on your chest and your right hand over your belly button.u003c/pu003e”, “caption”: “”}
{“product_info”: {“caption”: “Buy Now”, “product_price”: 0, “product_vendor”: false, “linkout_url”: false, “product_compare_at_price”: 0}, “headline”: “Exercise #3: Turnout Stabilization”, “credit”: “”, “description”: “u003cpu003e2. Slowly sink into a pliu00e9 (about 50 percent of the way down) and shift your weight onto your left leg. Make sure to keep both knees in parallel, and distribute the weight slightly more onto the heel of your left foot.u003c/pu003e”, “caption”: “”}
{“product_info”: {“caption”: “Buy Now”, “product_price”: 0, “product_vendor”: false, “linkout_url”: false, “product_compare_at_price”: 0}, “headline”: “Exercise #3: Turnout Stabilization”, “credit”: “”, “description”: “u003cpu003e3. Keeping your pelvis square, bend your right knee so that your foot lifts off the ground. Swivel your right leg to the right, away from your standing leg. Activate your deep hip external rotators by keeping your kneecap aligned with your second toe as you rotate. Make sure to keep your left knee facing forward, and your rib cage and pelvis aligned. Hold for 10 seconds, then return to the starting position.u003c/pu003e”, “caption”: “”}
{“product_info”: {“caption”: “Buy Now”, “product_price”: 0, “product_vendor”: false, “linkout_url”: false, “product_compare_at_price”: 0}, “headline”: “Exercise #3: Turnout Stabilization”, “credit”: “”, “description”: “u003cpu003e4. Repeat this exercise 8u201310 times, then switch legs.u003c/pu003e”, “caption”: “”}
A version of this story appeared in the April 2019 issue of
Dance Spirit with the title “The Bee’s Knees.”
causes and methods of dealing with them
Contents
Dancing is a traumatic art, and it makes no sense to deny it. The intricate elements of the ballet , the exciting break-dance tricks, the dynamics of the latin and long workouts put the dancers' bodies to the test, and the knees are the most commonly affected. Fortunately, dancers' knee injuries can be prevented by taking all the necessary precautions.
Causes of knee injuries in dancers
If knee injuries in professional dancers tend to occur due to excessive loads during intense rehearsals, then amateur legs often suffer for another reason. Doctors note that the risk of injury increases significantly if the dancer neglects the warm-up before classes and stretching.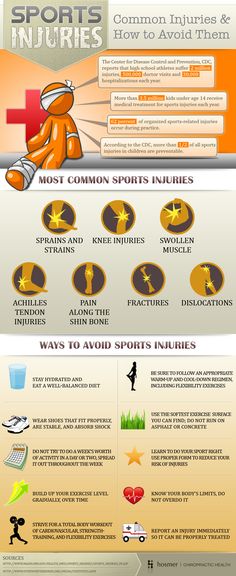 Or because of a muscle imbalance. Uneven development of the muscles leads to a violation of the symmetry of the joints, which is why the knees quickly “give up”. That is why professional dancers always pay great attention to the development of all the muscles of the body, strengthening weak points and preventing imbalances.
Sign up for a trial lesson
Common knee injuries among dancers
- Patellofemoral syndrome - the same crunch in the patella during jumping and squatting, as well as pain when sitting for a long time. Indicates a displacement of the patella. During loads, the cup begins to erase the cartilaginous tissue of the femur, which is fraught with unpleasant sensations and possible complications. The appearance of the disease requires a visit to a specialist and the necessary treatment.
- Patellar tendonitis - inflammation of the tendon in the knee joint. Makes itself felt aching pain and swelling. The problem is temporary, but during the healing period, rest, special ointments for inflammation and application of cold will be required.
- Pre-patellar bursitis - appears after hitting the knee on the floor, resulting in inflammation of the bursae - sacs with joint fluid. In the case of a simple injury, conventional anti-inflammatory drugs will help, but in case of a complication, surgical intervention will be required.
- Damage to the minisci - cartilaginous disks of the knee joints, which act as shock absorbers. Miniscus tear is a very serious injury, and one of the most common. If the miniscus is damaged, the help of doctors is required: they block the joint, use anti-inflammatory and painkillers. In case of repeated injury, an operation is prescribed.
- Ligament injury. Sharp turns and unsuccessful landings threaten to rupture the lateral ligaments of the knee joint. Such damage cannot be cured without qualified help. Rupture of the cruciate ligament, which can occur with unnatural eversion of the knee, requires surgical intervention and long-term rehabilitation.
How to avoid injury
There are accidents when injury cannot be foreseen and avoided, but more often, knee injuries can be prevented if you approach classes wisely, namely, follow a number of recommendations from professionals:
- Choose qualified teachers.
 An experienced choreographer will not give wards tasks that do not correspond to their level. Complex elements, jumps and supports require the necessary physical preparation, which is developed gradually.
 - Do not neglect your warm-up. Light movements before the main lesson are important to prepare the body for stress. "Warm" feet and knees will be less prone to sprains and sprains.
- Don't forget about stretching, which makes the ligaments elastic and the muscles flexible.
- Develop the muscles of the whole body so that muscle imbalances do not occur. In addition to classes in a dance studio, regular physical education in the gym or at home will not be superfluous.
- Wear comfortable clothes for dancing. Many dancers use leg warmers to keep their joints warm. And, of course, special shoes. Whether ballet slippers or ballroom shoes, they are designed specifically to reduce the risk of injury during rehearsals and performances.
How to avoid knee injury?
Ballroom dancing is not only beautiful but also traumatic sport. One of the biggest problems dancers face is knee injuries. They can not only seriously slow down the training process, but simply put an end to the dance career. About how to avoid problems with the knees, we talked with the exercise therapy methodologist, Stanislava Prodan.
Stanislava went through a difficult path to the profession. Childhood in a dance family, bright career in ten dances, RSUPC, intensive teaching work. But at the age of 25, her life changed dramatically. She stumbled literally out of the blue, as a result - a compression fracture of the head of the bone, rupture of the menisci and ligaments. Ahead of her loomed an unpleasant prospect of surgery, crutches and conflicting forecasts of doctors: the probability of recovery is 50 percent ... But her athletic nature and a fluke completely changed this vector ...
A month after the operation, on crutches, Stanislava met at the airport with Sergei Shnurov, the leader of the Leningrad group, who invited her to participate in his new concert. This gave an additional incentive to recover from injury. She spent at least five hours a day on physical rehabilitation: exercise therapy, exercise equipment, a swimming pool ... And two and a half months later she was dancing in Moscow with Leningrad.
After that, Stanislava decided to devote herself to physical rehabilitation, helping people with various injuries "get back on their feet."
"If I had known what I know now, I could have prevented all further consequences caused by non-specific connective tissue dysplasia, the structure of the bones of the legs and my physical characteristics. Ballroom dancing only increased my natural predisposition to such injuries. And although we studied at the institute for five years, no one explained to us what to do with it.If all the connective tissues in your body are subject to a stronger stretch, then you need a certain physical activity that will stabilize the correct muscle groups and maintain the muscle corset.
Fortunately, in 2016 the World Health Organization decided that conservative treatment of a meniscal injury is no worse than surgery. And, given the duration of rehabilitation after surgery, it is even better. I was lucky because the former artistic director of the Bolshoi Theater taught in our hall. To continue coaching, I used my knowledge of exercise therapy and ballet class to restore the right muscle groups. This allowed me to overcome the pain that periodically occurred after the operation.
Of course, not everyone in ballroom dancing is at risk of knee injury. But if we talk about predispositions, then a lot can be determined by the structure of the body. We have the so-called torsion of the femur. When we are born, this bone is, roughly speaking, relatively straight. As we grow, one head twists relative to the other. Increased external tibial torsion, femoral anteversion, and lateral displacement of the tibial tubercle determine whether there is knee valgus. Valgus is the so-called X-shaped leg. There are O - shaped legs, that is, when a person puts his legs together, they can look either like a wheel or like X.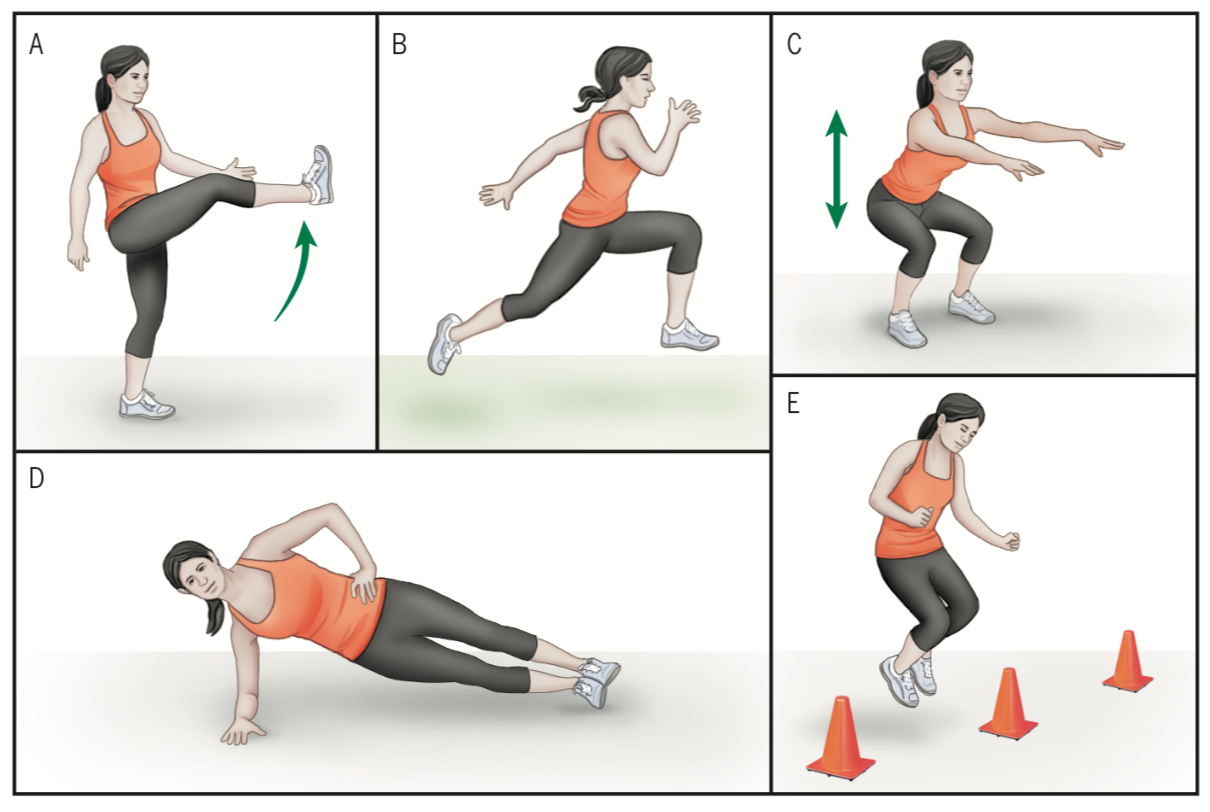 X - this is a valgus, such a deformation increases the risk of injury.
Of course, those who have nonspecific connective tissue dysplasia also have an increased risk of injury. And dysplasia in dancing is a very common occurrence, because dances are initially more flexible. It is easier for them to tear ligaments if there is no good muscle corset. Another increased risk factor is girls' flat feet, as we have "early" heels in ballroom dancing, which further contributes to the knees "flying" in adolescence. The correlation between the degree of flat feet and pain and crunch in the front of the knee has been scientifically proven.
Ballroom dancing has a lot of dynamics. And if the muscles are weak, the ligaments are weak, then the joints can be loosened very quickly. Especially when it comes to Latin American dances. For example, samba is simply deadly for the knee joint. This is due to the fact that all the time there is a rotation in the knee, plus it is constantly bent and unbent.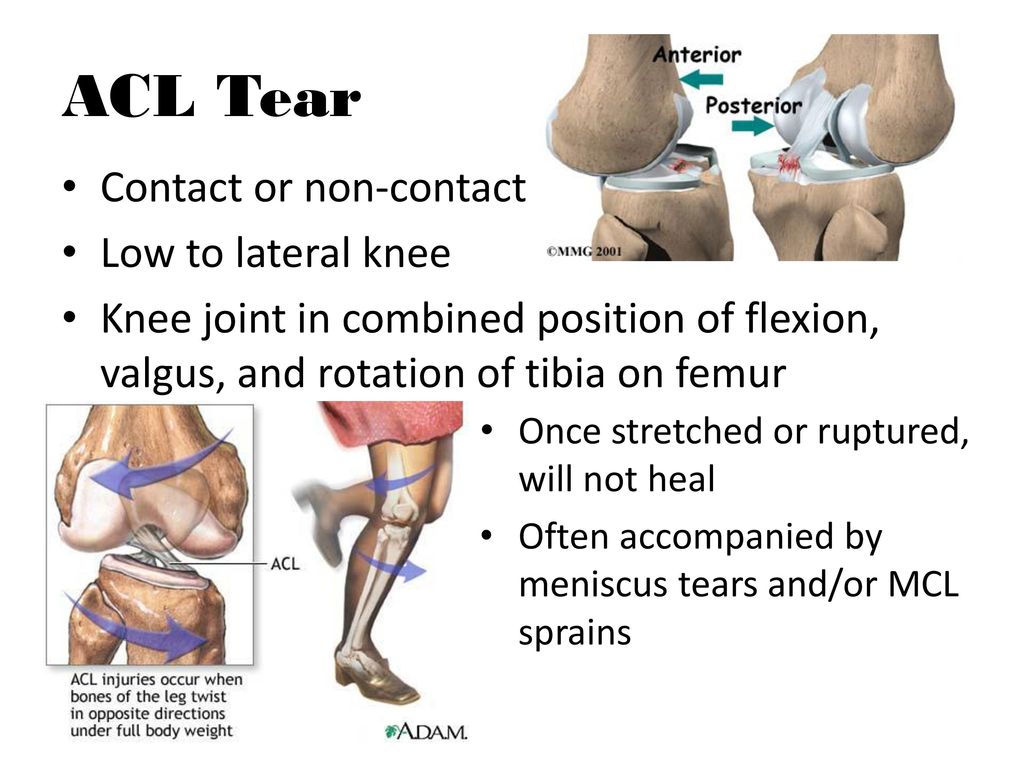 Most often, we lack strength in the quadriceps, hip abductors, gluteus maximus, and medius. That is, simplistically, we can say that this is the front surface of the thigh and buttocks.
Now there are not so many dancers who do a set of exercises aimed at compensating for individual physical characteristics and compensating for the stress of dance training. In order to understand what exercises to do, special measurements are taken, such as orthopedic testing and manual muscle testing. At a minimum, the Q-angle is measured, which indicates whether there is a valgus (that is, how much the knees fall inward). So you can track how the angle of the valgus changes, depending on muscle tone. Not always the cause of knee pain lies in the pathology of the knee joint. Often, pain occurs when a nerve root is compressed in the lower back. In this case, the lower back is treated. After all examinations and tests, a special complex of physical training is compiled.
Completion of sets of exercises is a matter of motivation and responsibility.