How to make shoes slide for dancing
10 Ways How To Make Shoes More Slippery For Dancing – Dancewear Tips
Nobody wants their shoes to be slippery unless you are dancing, in which case you would like your shoes to be more slippery, and I will discuss further in the article why.
Dancing in shoes that move smoothly and effortlessly can make your experience worthwhile the investment.
Regular shoes have lots of friction with the floor, making your dancing much harder.
If you don’t want to invest in a pair of dance shoes, there are many ways to make your regular shoes more slippery for dancing with these simple hacks discussed in this article.
10 Ways How To Make Shoes More Slippery For Dancing
- Suede sole kits
You can get suede sole kits online. This kit will come with a suede sheet that you will cut into a small piece and apply on the sole of your shoe.
- Gaffer tape
Gaffer tape is a heavy cotton cloth pressure-sensitive tape with strong adhesive and tensile properties. Not to be confused with duck tape, gaffer tape differs in the composition of both the backing, which is made from fabric as opposed to vinyl or other plastics and the adhesive, which is more resistant to heat and more easily removed without damaging the surface to which it adhered.
The advantage of using gaffer tape to make shoes more slippery is that it is only a temporary solution. This means that you can remove it after the dance session and continue using your shoes for walking, and it is a little harder to remove than suede paper.
Here is how to use gaffer tape to make your shoes more slippery for dancing:
- Attach the tape to sole of your shoes.
- Rub the tape over the shoe sole to even out sole sruface and to stick it firmly.
- Cut the tape when you get to the far edge of the shoe and rub it gently against the shoe sole.
- Repeat these steps on the other shoe as well. You can pill of the tape once you are done with dancing.
- Moleskin method
You can purchase moleskin in the first aid part of your nearest pharmacy. Moleskin is also suitable for reducing friction and can help keep your shoes slippery to dance. This solution will make your shoes slippery and is temporary and very inexpensive, only a few dollars.
- Stick on suede soles
Stick on suede soles is an inexpensive and simple way to make your shoes more slippery for dancing. You can purchase stick-on suede soles of the Amazon by clicking here.
Whether you want to turn your regular shoes into dance shoes or replace worn-out suede soles, this is an excellent solution. These stick-on suede soles give you just enough friction to dance efficiently and comfortably on the dance floor.
Just peel off the protective liner from the self-adhesive backing and apply it to your shoes.
The soles are perfectly shaped, so you don’t have to worry about cutting the right shape out of a sheet of suede. These stick-on suede soles are made to fit most women’s shoes, but if you find them a little bit too big, you can cut the excess with scissors.
- Olive oil method
This method can seem a little messy at first but don’t worry; it won’t be.
To implement the olive oil method, you will need to following items: olive oil, paper towel, moist cloth, and rough sandpaper.
Here are the steps to make your shoes more slippery using the olive oil method:
- Clean your shoes well to remove any dirt or debris.
- Next, brush sandpaper against the shoe sole. Make small rough circular motions, and be very careful as these motions can form a pattern on the shoe’s sole.
- Once you are done with step two, add a little bit of olive oil on a paper towel to clean the rubber shelves from the shoes.
- The final step is to put olive oil on the shoe’s sole. Add olive oil to the shoe sole and rub it well with the paper towel. This will make your shoes more slippery for dancing.
Only use olive oil to make your shoes slippery for dancing. Do not use other oils types.
- Sandpaper method
Sandpaper is the simplest method and the most effective. The purpose of the sandpaper method is to reduce the friction between the dance floor and the bottom of your shoes.
Here are the steps to make your shoes more slippery using the sandpaper method:
- Clean your shoes from all dirt and debris. Use a wet paper towel to remove the dirt, especially from the bottom of the shoes.
- Scrub the sole of the shoe by making gentle but firm moves.
- Put your shoes on and find sandy fields where you can train. If this is not possible, you can rub it with a rough surface.
The sandpaper method works by flattening the shoe treads, making them smoother, resulting in slippery shoes for dancing. A downside to this method is that it yields more permanent results, therefore, is irreversible.
- Nail file
The nail file is an excellent choice if you don’t have sandpaper handy or just want to reduce traction on a specific spot of your shoes.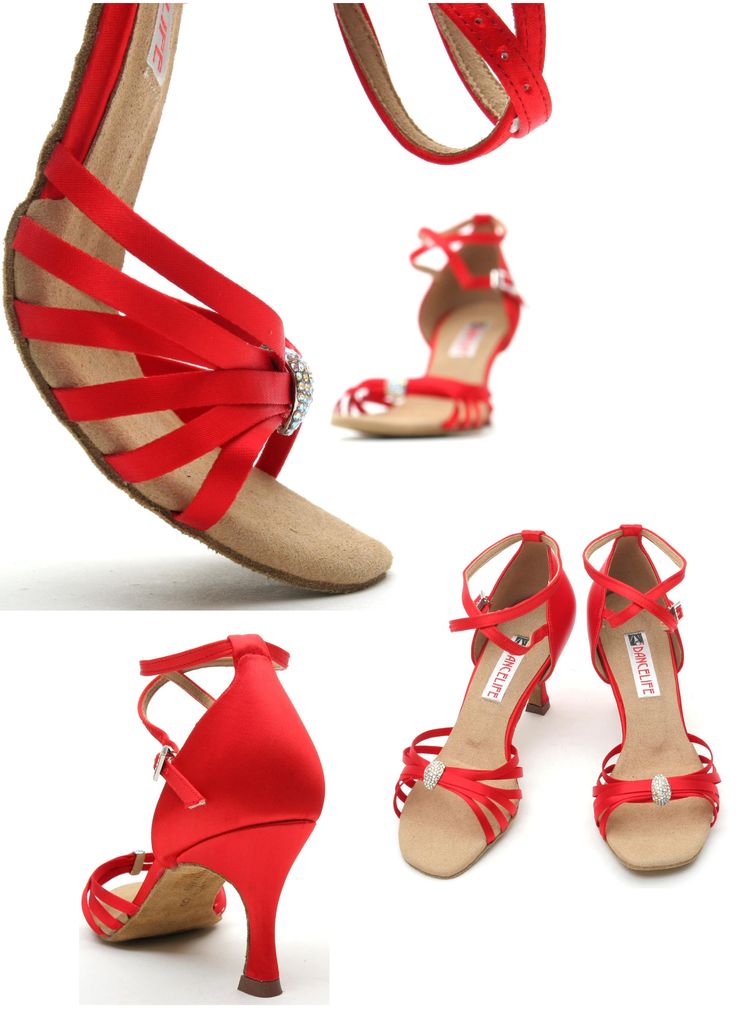
The steps are the same as the sandpaper method, making your shoes more slippery.
- Sandy surfaces
Sandy surfaces are a great choice if you don’t need too much grip taken off. You can walk on a hard surface with sand or rough sediment coating.
- Give your shoes to professional
If you are unsure how to do these steps or do not dare because you are worried that you will ruin your favorite pair, I suggest bringing your shoes to the Shoeman.
This method will cost you more than all these methods I have mentioned before, but it will also give you peace of mind and it will give you better results.
- Purchase dance shoes
I left this option for last if all other options fail. Many people want to alter their regular shoes for dancing because they don’t want to invest in a pair of dance shoes. However, in many cases investing in a good pair of dance shoes is worth it and will pay off in the long run.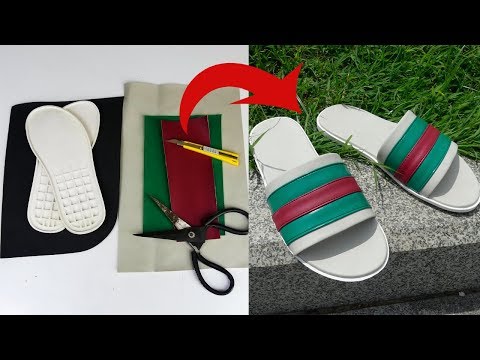
Dance shoes have many other benefits, including slippery soles. For example, Ballroom and Latin dance shoes are flexible, comfortable, and provide enough grip and traction for better performance on the dance floor while providing extra safety.
If you need suggestions on what kind of dance shoes you should buy, please check out this page.
What If I Make My Shoes Too Slippery
Ok, you overdid it, and with all of these techniques, how to make shoes slippery for dancing I have mentioned earlier, and now your shoes are too slippery. So, what now? Can I reverse the damage?
When you are working with these methods to make your shoes slippery, there is always a possibility of going too far.
Luckily, there are a few solutions to reverse the “damage.”
- Use hairspray. Spray the soles with hairspray. This is an old trick but comes in handy now and then. Simply spray the bottom of the shoes with hairspray, let it air dry for a little while, and gently tap it with your fingers to create more texture.
- Traction spray. Traction spray is easy to apply and is not permanent. You can get it off Amazon for a very affordable price. To check it out, click here.
- Grip pad. A grip pad is another temporary solution, which means you can put it on when you are not dancing and take it off when you step on the dance floor. You can get a grip pad off the Amazon by following this link.
Whether you want your shoes to have more grip again to use it for walking or you went overboard on one spot with sandpaper, you can use these options to regain traction.
If you want to learn more about making your shoes less slippery for dancing, please follow this link.
Why Do You Need Shoes To Be Slippery For Dancing
Slippery shoes will help you get better traction on the floor and allow your footwork to be more fluent. The texture of dance floors, such as wooden floors, is designed not to be slippery or too rough.
It means that it is easy for dancers to feel the floor, and they are still slipperier than a regular floor, which allows for more effortless movement in turns and pivots.
There will always be some residue left over from the manufacturing process when purchasing brand-new dance shoes.
Those residues could be finishes and oil that could prevent friction between your feet and the shoes.
The combination of sweat may cause skin irritation, such as the formation of calluses and blisters.
The leading reason dance shoes are not meant to be worn outside the dance floor is that they are too slippery for walking.
What Kind Of Soles Are Good For Dancing
If you have decided to go with my recommendation # 10, which is purchasing dance shoes, I would like to discuss what soles you should be looking for.
I would recommend two types of soles you should be looking for:
- Suede soles
- Leather sole
Suede sole is an excellent choice for Ballroom or Latin dance styles. Suedes soles allow the shoes to glide across the floor with just the right amount of grip. Shoes not intended for dance have a rubber sole to help with grip and durability.
Traction and grip are the last things you want while dancing!
Leather soles glide smoothly on wooden floors, and most dance floors are made from wood. The soles are very flexible that you can bend them both ways where both ends touch each other.
The sole at the ball of the foot has to be smooth so that the dancer can perform pivoting, while the arch (also called shank) connects the heel, and the toe needs to be very stiff and flexible the point of interaction. The shoe sole needs to be smooth and slim but firm, and that’s why the leather sole dance shoes are the best for Argentine tango.
Argentine Tango shoes need to be flexible and allow dancers to pivot. A leather shoe sole comes in handy for pivoting, and a leather sole is the best for pivoting while dancing.
Final Words
Dancing is a fun way to socialize and get exercise, and you need proper footwear to have the whole experience. Your shoes need to be slippery enough so you can slide, glide and spin without having too much friction with the floor. If you don’t want to purchase dance shoes, follow these DIY methods to make your regular shoes slippery for dancing.
Happy dancing!
How To Make Shoes Slippery For Dancing
Is shuffling and dancing your favorite pastime? Then you know you need slippery shoes to wow your fans with your swift moves.
Whether you want the shoes to remain slippery permanently, or you want to use your non-slip shoes for one show and revert them to their original style, we have your back.
Now you can rock your favorite pair of shoes to a friend’s birthday party and hit the dance floor after sticking some materials to make them slippery.
Remember not to walk in slippery shoes since you can easily slide, fall and injure yourself. The procedure of fixing the slippery material and removing it takes only a few minutes.
We will show you how to make shoes slippery in simple steps and with readily available ingredients.
Table of Contents
Using SandpaperIf your shoes have a rubber sole, you can make them slippery in readiness for your dancing or shuffling using sandpaper.
Before you begin the process, remember that this procedure is irreversible. In addition, rubbing shoe soles with sandpaper may weaken them and affect their longevity. Do it on the shoes that you assign purposely for shuffling and dancing. Here are the steps:
- Look for coarse sandpaper that can scrape off textured patterns on your shoe sole.
- Hold your shoe upside down on your left hand. It will be better if you insert your hand in the shoe to make the sole firm. You can do this with your left hand if you are left-handed.
- Rub the sole with the sandpaper in forceful circular motions. Feel the shoe with your palm from time to time to see where you need to apply more force.
- Once the sole is smooth, wipe it with a cloth soaked in olive oil.
-Step-18.jpg/aid1640374-v4-728px-Shuffle-(Dance-Move)-Step-18.jpg) This will remove the sandpaper residues and give the sole a greasy feel. Remove excess olive oils so that the shoe is not too slippery.
This will remove the sandpaper residues and give the sole a greasy feel. Remove excess olive oils so that the shoe is not too slippery. - Repeat this process with your other shoe, and they will be ready for dancing or shuffling.
- Rub the shoes with olive oil anytime you want to use them for your dancing or shuffling sessions.
This works best if the shoes do not have treads. You can use this temporary procedure on your regular shoes for your one-time dancing session.
Suede sticks well on any sole, giving you a wide range of shoes you can use to shuffle or dance. If you notice that the shoes are losing their slipperiness, stick more suede paper to restore them.
Check with your shoe store for the pre-cut suede paper, but if you are a DIY devotee, buy the uncut suede paper to prepare at home.
Remember to work on the shoe with the sole supported to get an even suede paper cover. You will also work on the shoe better if you turn it upside down so that you can easily insect the process.
- Place the suede paper on a flat surface.
- Put the shoe on the suede paper and trace it with a marker pen.
- Lift the shoe and put it aside. Pick the suede paper and cut out the traced shoe with a sharp pair of scissors. However, you can look for ready-made suede paper that is cut to size to avoid cutting it yourself.
- The suede paper has adhesive tape. Peel the tape and fix it on the shoe gradually, checking and straightening out any creases until you cover the entire sole.
- Repeat with the other shoes, and you have your shuffling or dancing shoes ready.
- When you are done and want the shoe to cease being slippery, peel the suede paper. It will not damage your shoe sole.
This is a perfect way of showing off your flashy shoes on the dance floor. It delimits the choice of shoes you can dance or shuffle in and does not damage the features that come with your shoes.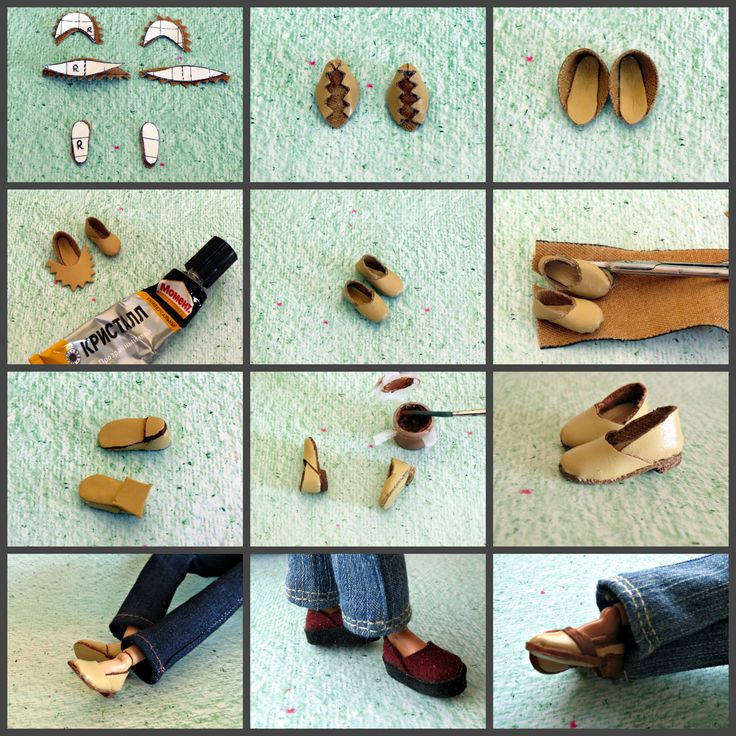
You may not cover all the areas of your shoe with this tape but it is a quick and easy way to make your shoes slippery. You will get better results with this process if the shoe is upside down and the sole is supported from the inside.
If you fail to support the sole, it will cave in to give you an uneven surface. The tape will form groves that will hinder your swiftness when dancing and shuffling. Here is the procedure:
- Attach the tape to one end of the shoe sole.
- Open the tape over the shoe sole slowly. Rub it to even out any creases that you notice and stick it firmly on the shoe sole.
- When you get to the far edge of the shoe, cut the tape and stick it tightly by rubbing it gently onto the shoe sole.
- Do this with your other shoe for a pair of slippery shuffling and dancing shoes. You can peel off the gaffer tape any time you want the shoes to lose their slipperiness.
- Moreover, if the gaffer tape is collapsing and you still want the shoes to be slippery, clean the shoes with the gaffer tape on and leave them to dry.
 Once they are waterless, stick a fresh coat of gaffer tape, and you have them slippery once again.
Conclusion
You can shuffle or dance in any shoes you like even if they are not slippery when you are buying them. You can make shoes slippery for shuffling or dancing using locally available materials and simple procedures.
Some of the procedures are irreversible. If you choose them, ensure you will not need the shoes for any other purpose other than dancing and shuffling. Slippery shoes may cause you to fall and injure yourself.
Some temporary procedures leave the features that come with your shoes intact. These are best when you have a single dancing or shuffling session, like during a birthday party.
Sandpaper, gaffer tape, and suede paper are the common materials you can use to make your shoes slippery for shuffling and dancing.
how to make shoes not slip
Ice is one of the unpleasant and traumatic phenomena of winter. The risk of serious injury from a fall, slipping "out of the blue" is quite high. The problem is exacerbated by sliding shoes, which in some cases become a real disaster. To prevent the negative consequences of walking on ice, you need to take care of your own safety in advance, ideally at the time of buying shoes in a store. Simple recommendations for choosing warm boots or boots for the winter period will help you choose the model that is optimal in terms of safety:
- Presence of an anti-slip tread on the sole with a deep relief pattern. Refuse to buy a pair with a smooth sole.
- Choose models from manufacturers that adapt their products to the conditions of a long winter.
- To keep shoes from getting slippery with the onset of frost, choose models with rubber or polyurethane soles.
- For everyday wear, opt for solid bottoms or heeled designs, eschewing stilettos, pointed toes and platforms that are too high.
How to make shoes not slip with the help of improvised means?
Selection tips are suitable for those who are just going to the store for a new pair of boots.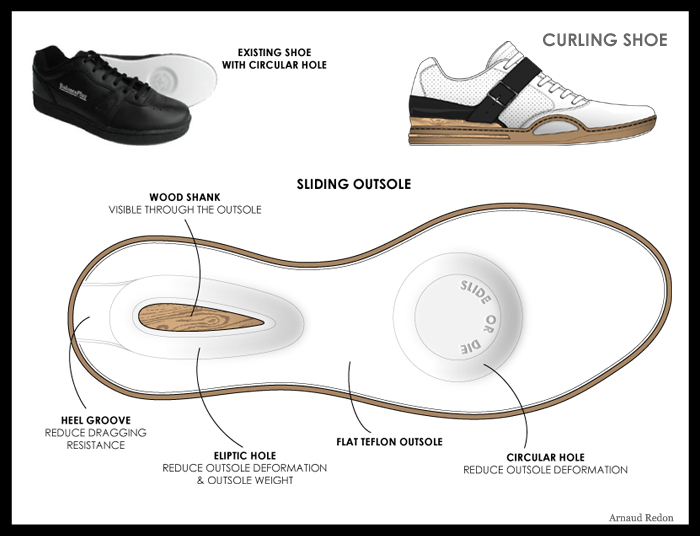 But even for "worn out" boots, there are several ways to keep the shoes from slipping.
The best option is to take winter boots to the master to add rubber or polyurethane overlays to them, creating a relief surface. There are also folk ways to make the sole non-slip:
- Adhesion of fabric adhesive plaster with free pattern - suitable for dry and frosty weather, the material falls off in slush.
- Adhesive dots applied on a dry and clean surface in a random pattern.
- Sticking pieces of sandpaper or using abrasive to rub the surface.
- Sand and glue combination - glue applied to the surface of the sole is sprinkled with sand.
Methods that do not work
The practical application of some methods proves their uselessness. Among the proposed options:
- Hairspray - a layer of varnish is applied to the sole to increase the grip of shoes on asphalt;
- Rubbing the soles with raw potatoes - the starch remaining on the surface is designed to make shoes less slippery;
- Use of a sole grater.

Such recommendations can lead to damage to the shoes, while you still remain the owner of slippery shoes.
Select authorization option
Forgot your password?
Password received during registration
Request code again
What to do to keep shoes from slipping: proven methods
Even the best winter shoes and quality material can gradually start to slip on the ice. In addition, sidewalks in cities are not always well cleaned and it happens that on the way to work or school in the morning you have to run through a thick ice crust. Ice is the most common cause of injuries in winter. What to do to avoid such a fate - we tell in our material.
The right winter clothes should be not only warm, but also stable. This means - the rejection of stiletto heels, only reliable thick and low heels or low soles. The platform is also relatively unstable, and the tread must be clearly embossed to provide good grip and non-slip. The more pronounced it is, the better.
What do the specialized shops offer?
Stores sell special removable anti-slip pads. They are also called ice accesses - this is a neat rubber or metal surface with holders and with small metal spikes.
Be careful - ice access has its own size range, make no mistake with your choice. In retail outlets, there are separately not removable, but adhesive linings.
How can I solve the problem myself?
You can make the overlay yourself. You need to take a plaster of rough material, felt or granular sandpaper and stick it on the bottom of the shoe. Two pieces: one is attached closer to the nose, the second - on the heel. You can glue the adhesive plaster crosswise, this method will save 3-4 days from slipping. The main thing is that the surface is dry before sticking, it is better to additionally degrease.
Do not forget that methods using glue are suitable for a more or less dry winter - with constant contact with water, the plaster, felt and sandpaper will quickly come off.
Some people get by with an even more minimalistic set: glue is applied in a zigzag pattern on the sole and sand is poured. It is worth putting on shoes and going outside after the glue has dried. Sand particles will cling to the ice and will not let you slide.
There are tips on the Web to rub the sole with a grater, make grooves with a soldering iron or screw short screws into it to create a relief, but these are amateur methods. This damages the outsole material, which increases the wear of the product and can create cracks. It is even suggested to melt sand into the sole - heat it up well and put shoes on it - but here, judge for yourself whether you want to spoil your favorite new thing like that.
An unusual option is to take pieces of nylon and set it on fire so that the molten material drips onto the bottom of your shoes, creating a small relief. Craftsmen write that this method works for a very long time. It also comes to suggestions to put socks on top of shoes in order to pass dangerous sections without loss.
What methods will not help to get rid of slip?
Options include spraying the sole with hairspray before going out or rubbing it with half a potato. Sand will stick to the sticky surface and prevent slipping. Those who have tried it speak of white streaks of starch from potatoes and complete ineffectiveness.
How can a shoe repairman help?
Repairmen have their own ways of making boots and boots less slippery.
- Deepen the tread. The method is suitable for products with a thick sole.
- Put iron heels. The only inconvenience is a loud clattering sound when walking.
- Screw in metal screws. The master will do this carefully and over the entire area of \u200b\u200bthe product.
- Install the polyurethane cover. It will not interfere with walking and will not affect the fit of the model on the leg.
How to choose shoes for winter?
In order not to slip, do not buy products with smooth soles and do not go on ice in demi-season models. Be sure to pay attention to the thickness of the heel and the presence of a relief protector. Give preference to products made of polyurethane or rubber. Avoid stilettos, pointy toes, and high platforms.
And choose manufacturers who are famous for their winter models. In this case, additional precautions will not be needed - it will be enough to wash the corrugated surface and thoroughly clean the tread pattern.
To finally prepare for the dangerous period, here are some tips on how to behave in ice.
- Walk carefully on slippery surfaces in small steps.
- If possible, make sure you have something to grab onto if you fall.
- In heavy ice, it is better not to walk wide, but a little, to glide like on skis.
- When walking, do not keep your hands in your pockets, thanks to them you can balance.