How to make lion dance head with a box
A little bit of Everything: DIY Lion Dance Head
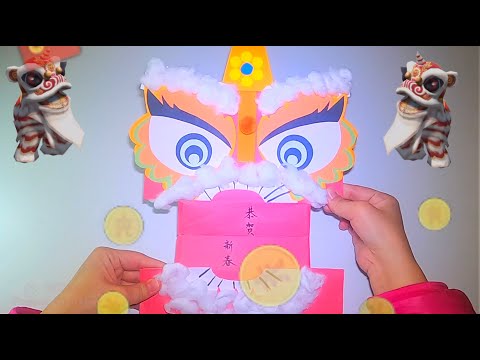
It is still a long way to CNY but I have to share this post. Why i do it? because Jelly had been very obsessed with Lion Dance lately that she demanded I open links in YouTube on lion dance... In order to let her unleashed her passion in lion dance, I made this cute lion head with only a small carton box, small length of cloth, 2 pom poms and a few color papers. Just sharing this idea and it's up to individual's creativity to do it! You can also replace colored paper for the pompoms. There are tones of video on how to DIY your own pompoms by just using cardboard in Youtube...
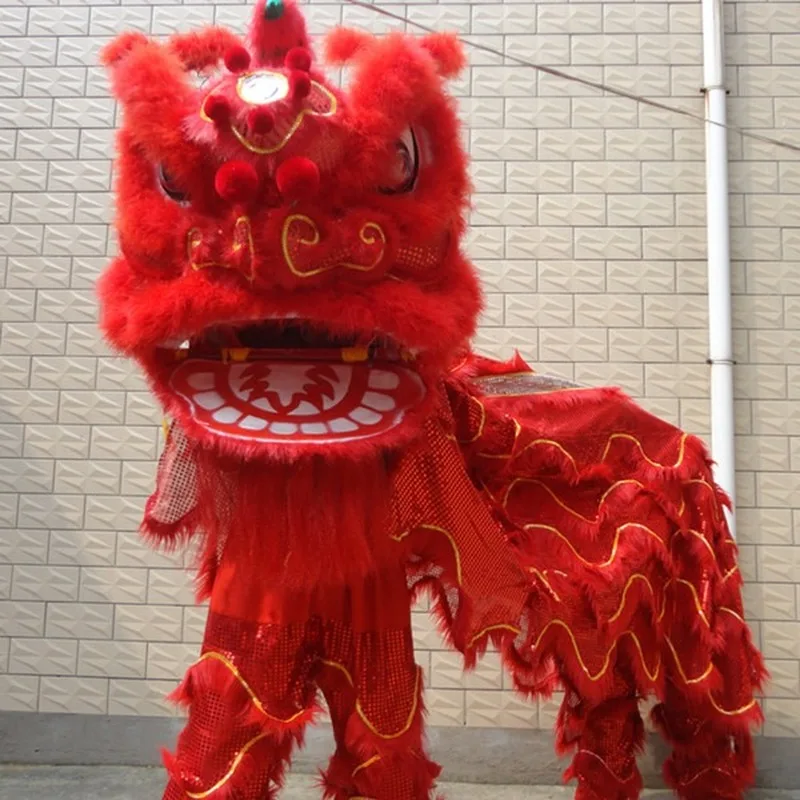
| Chinese Lion Head |
It's just an idea and up to your own creativity to create your very own lion head to let your little one have some fun! Just as you wanted to know how I create this Chinese lion head below are my materials, u can replace and change as how you please. .. 💗 But FYI, I did all the cutting free hand, no template... just make sure when you are doing cutting for anything that is symmetrical (like the eyes or the mustache) you cut them together... Just let your imagination go wild~~
Carton Box - approximate 20 cm(H) X 19.5cm (W) X 19.5cm (L)
Red Cloth - approximate 40cm (W) X 110cm (L)
Color Papers - I choose Red, White , Black and a little brown and yellow
Pom Poms - 2 pcs around 5cm diameter
A little raffia string to tie the mouth together.
Cost of the Lion Head
Cartox Box - FOC, get it from supermarket or order online to receive free carton box... LOL
Cloth - RM3/meter
Color Paper - RM 1 X 5 colors - RM5
Pom Pom from balance yarns that I have.
Raffiah string - get it FOC from tapao drinks from kopi tiam.
Glue - 1 bottle - RM 1.00
Silicone Hot Melt Glue - RM 2 for a packet of 6 - required only 1pc (RM 0.33)
Tools - RM 0.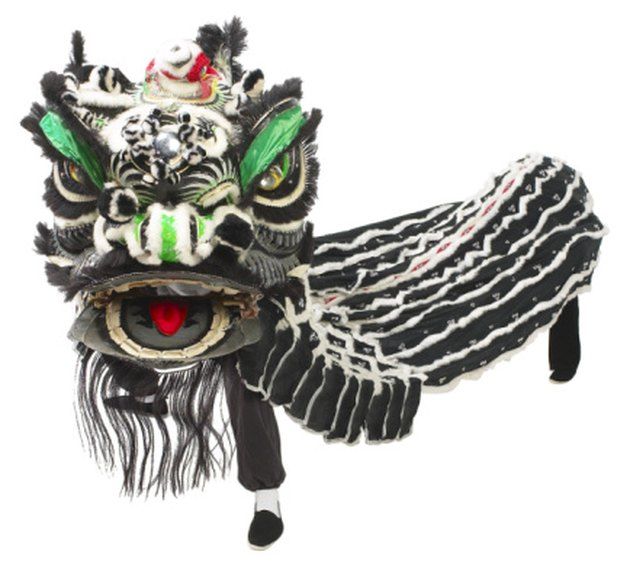 50
50
Total - RM 9.83
Tools
- Sciccors
- Glue
- Stapler & Staples
- Black Tape
- Pen knife
- Puncher
| Small Carton Box and Pom Poms |
1) Stick the side of the carton with tape 2) Glue the whole box with the color you prefer. (I use white paper) 3) Prepare another small carton piece for the lower mouth piece and paste white paper 4) Cut another hole (semi circle) at the carton as the opening for kids to peek through 5) Paste color paper as the mouth (Red or other color you prefer) 6) Puncher the sides of the mouth in order to tie the mouth together later |
1) I paste a red paper as the background for the lion's face and show out it's jaws 2) I use black for the mustache 3) Cut another 5 petal flower with a circle (the yellow paper can replace with aluminium paper) 4) Cut out the Eye shape - preferred to be angry looking, I paste 5 layers over layers for the eyes 5) Paste on the cloth / cape on the lion head. to prevent the cape from coming out. Make sure to check the inside of the carton to check the staples not to stick out which can injured kids. 6) Tie the mouth together with a raffia string (but i stick a few layers of reinforcement ring at the back of the carton to strengthen the board in case of pulling (can replace raffia with cable tie) |
 I use Silicone Hot Melt Glue and later stapler the sides
| Side View |
This is Jelly running around with the Lion Head~! LOL!
| Selfie with my little lion dancer |
| Runnign around the house with her Lion Head! |
Jelly trying to act cute. .. LOL! .. LOL! |
| Jelly Checking the head |
| Standby wearing it |
| Jelly can't wait to run outside! |
| Little Lion Dance |
| Explore the garden |
| Non Stop Running |
| Run Run Run |
Overall Experience:-
It didn't last long with a rough kid but it manages to survive my rough Jelly for 3 days fully playing with it. It is fun watching Jelly running around and jumping with the lion head, at least keep her utilize her energy and keeps her busy...
The price mentioned in this post are as of the date posted, as it may change from time to time.
I don't get paid by this review and all are my humble and honest review.
DIY Kids Chinese New Year's Lion Head
Our kids dancing with their DIY Chinese New Year’s Lion Head. They were too excited and didn’t want to wait for us to cut a hole out in the mouth area on the cardboard box…Excited for the upcoming Chinese New Year’s celebration? Since we’re still in the middle of a pandemic, we won’t be checking out any Chinese New Year’s parades this year…so we decided to make our own DIY Kids Chinese New Year’s Lion Head!
Not familiar with Chinese New Year nor the famous Lion Head dances? A brief history.
Chinese New Year’s, sometimes referred to as the Lunar New Year, is based on the moon, while the Gregorian calendar is based on the sun.
The Chinese zodiac identifies the 12 animals that have a year dedicated to them once every 12 years: Rat, Ox, Tiger, Rabbit, Dragon, Snake, Horse, Goat, Monkey, Rooster, Dog and Pig.
February 12, 2021 marks the beginning of the year of the Ox.
Lots of people from East and Southeastern Asian countries celebrate it – in fact, I read somewhere that 1/4 of the world’s population (25%!) celebrate the Lunar New Year!
It’s a holiday that is supposed to mark the end of cold days and the welcoming of the upcoming spring. It’s a time to spend time with family, pay respects to your ancestors and to celebrate new beginnings.
I am no expert on the Lunar New Year, nor can I tell you what’s “traditional”. What I can tell you is that my siblings and I were fortunate to grew up in the Bay Area and got to celebrate it in a full fledged manner! In Vietnamese, we call it Tet.
As kids, we looked forward to being around family, extended family and friends, delicious & plentiful food, lion dancing, and of course, collecting red envelopes with money inside! We often didn’t understand what all the different rituals were for, but understood a lot of the symbols and rituals were based on attracting luck and good fortune and warding off omens and bad luck.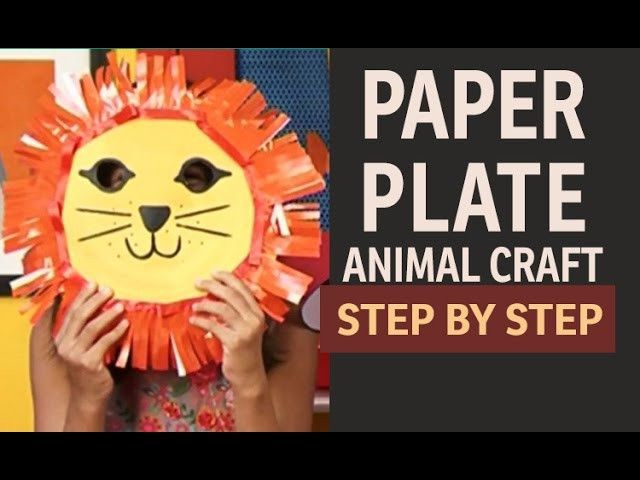
The Lion Dance is performed by two “dancers”. One is the head and front legs and the other person is the hind legs. They dance to loud drumming, cymbals and gongs (and sometimes firecrackers are lit nearby!) and are believed to ward off evil spirits and bring prosperity.
Making your own DIY Kids Chinese New Year’s Lion Head
Both my kids were scared and cried the first time they saw/heard a lion dance due to the loud noise, so a DIY one at home is a great option for young kids who are being introduced to it for the first time. Now on to how to make your own DIY Kids Chinese New Year’s Lion Head!
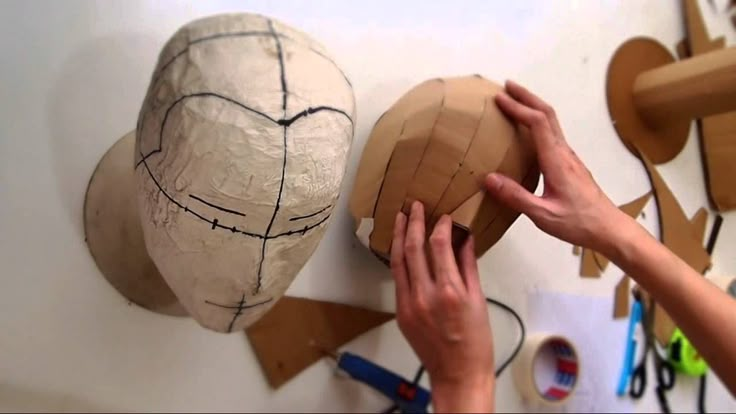
Last year we made red envelopes and egg carton lion head puppets with straws. So making a DIY Kids Chinese New Year’s Lion Head costume this year is on a whole other level… But we’re up for it. We can’t wait to finish it! This is what it looked like after the first day.I tried googling to see if I could find anything but only found this. It wasn’t exactly what I was looking for, nor were the instructions as simple as I would have wanted.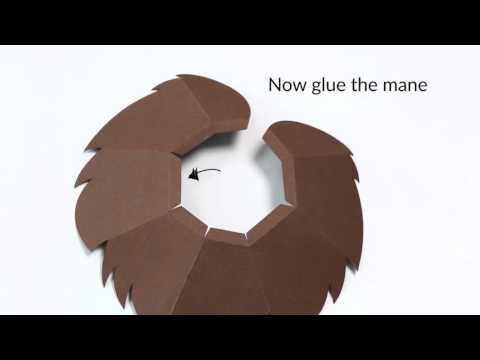
Nonetheless, I was inspired and decided to sketch out some shapes in Procreate, printed them out and voila, shortly thereafter we were attaching them to our DIY Chinese New Year’s Lion Head cardboard box!
We aren’t done with it yet (we’ll post more pictures tomorrow) but I wanted to go ahead and share the print and cut out templates with you now so you can get a head start as Chinese New Year’s is going to start at the end of this week (don’t worry, festivities go on for a couple weeks so you’ll have plenty of time to dance with it!).
FYI – If you were hoping to do this in under 1 hour, this is a forewarning that it WILL take longer (unless you just leave everything white).
We’ve spent about 1.5-2 hours on this so far. The most time consuming is coloring (the kids enjoy doing this) and cutting out the scales since there’s lots of waves (I helped with cutting!). If you aren’t picky, just cut the scales out in the shape of a rectangle without following the curves and it’ll be much faster (Tip cheat move – I started cutting out the curves only on the bottom part of the scale and left the top not as well cut as it’s not as noticeable!).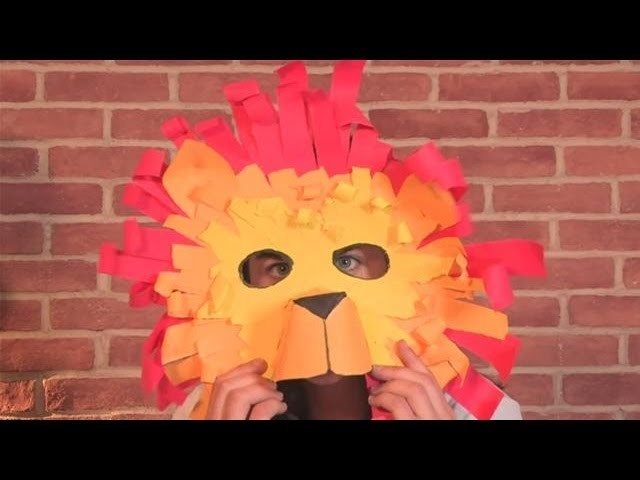
We still need to cut out the mouth opening, finish coloring and adding the scales, add glitter and sequins, pipe cleaners, pom poms and other fun decor. We will post a new photo, likely tomorrow once we’ve completed it (update: see all the new photos we’ve added to the post!)
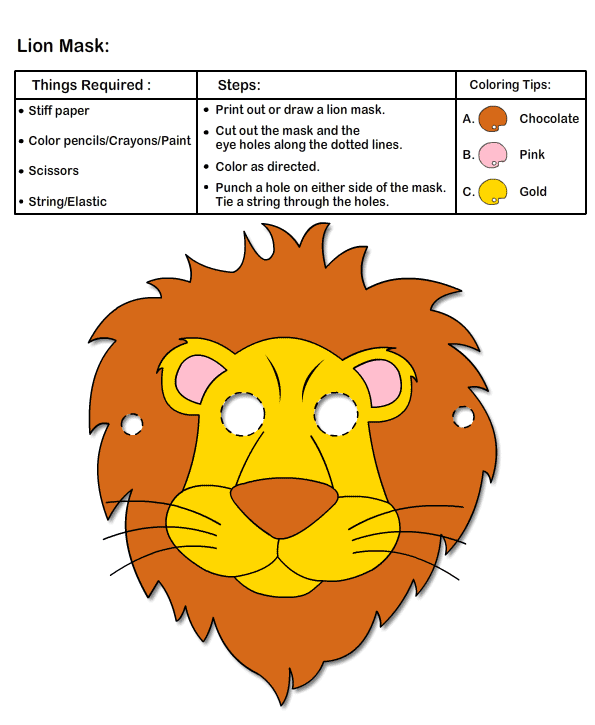
Grab your free print and cut template to make your own DIY Kids Chinese New Year’s Lion Head in the red box below! Includes eyes, nose, mustache, open mouth (2 pieces) and scales. For tips and pointers, see below.
Look around your house for supplies (Check out our blog post on recommended art supplies to have on hand for impromptu creative projects).
- cardboard box (big enough to fit a head and some hands to hold it up, but not too big as it will slide around too much)
- paper (white or colored will do to print out the shapes)
- scissors
- coloring apparatus (paint, crayons, colored paper, whatever you got on hand)
- any fun items like pompoms, pipe cleaners, sequins etc (we think shiny gold and silver pipe cleaners looked amazing!)
- and glue/tape
Feel free to add any other fun elements to make your lion head shine!
Did you have fun making this? Share your photos with us in the comments below and tag us on social media #hellogrowadventures. Enjoy!
Tips and pointers
- Time estimate: 1.5-2 hours one day (to prep, color, cut) and 1-1.5 hours the next day to add all the pizazz you want!
- If you have two kids, use two boxes, one for the front and one for the back. If it’s just one kid, use one box!
- For the headpiece, we recommend cutting off all the extra side pieces of the box, except one (which we used to make the open mouth).
- If you want a hole in the top mouth piece for the kids to see through, I recommend cutting it out before decorating. Once the lion was decorated, the kids didn’t want to wait for me to carefully cut out the hole!
- To make the long body and tail, use printer paper taped together or if you have a roll of craft paper, that would be awesome. We love recycling/upcycling and grabbed a long piece of paper stuffing from an old Amazon package and used that.
- Color the scales and then tape them along the edge of the body/tail. Any colors are fun and welcome though reds and oranges are popular colors during the lunar new year.
 As I mentioned above, no need to cut it so perfectly around the edges.
 - To decorate the long body and tail, we taped on long scraps of paper from the scales we colored and cut out (our paper was brown so the white helps make it pop and match more). Then we taped on long strips of colored paper. No need for it to be perfectly cut. We took scraps of paper from old projects.
- Feel free to use glue to attach pieces but our family is a huge fan of transparent scotch tape (we always have like 10-15 rolls at any given time!) as it’s not as messy as glue. The kids also don’t have to wait as long to start playing with their creations. Besides glitter or heavier items, we used tape for everything else.
- Then we let the kids have at it with glue, glitter and shiny pipe cleaners to decorate the body and tail (we use tape to attach the pipe cleaners).
- For the head, decorate it however the kids want. My son spread glue all over the mouth and threw red glitter everywhere.
 My daughter wanted to make a horn so we just balled up some paper in a form of a cone and wrapped it with gold pipe cleaner and glued it to the head between the eyes.
 - For an added touch, we recommend adding twisted pipe cleaners all along the head and body. We even outlined the nose with gold pipe cleaner and the eyes with silver pipe cleaner and it looked great!
- Find something to play drums on or look up a Chinese lion dancing video clip on YouTube and play it while the kids run around dancing – Have fun!
Yes, please send me the Chinese New Year Lion Head printable! I’ll also get access to the free member resource library.
Don’t worry, we won’t spam you. You can unsubscribe at anytime.
Great, you’re just one step away from the goodies! Check your email and confirm that you allow us into your inbox.
Lion Head Exterior Door Knockers
Which Lion Head Knockers Are Best? Here is the Windowo selection.
Knockers for entrance doors or gates are a special detail that can contribute to the charm of a home. Not everyone knows that the shape of these decorative accessories was not accidental.
In fact, in the past, doors were attributed magical ability to ward off bad luck. Hammers that can scare were considered the most effective for this. So he started using the wildest wild animals as models... and what's the scarier beast than the king of the savannah?
The lion's head door leaf is a mandatory attribute of door handle manufacturers and is always highly valued. That is why we wanted to make an article on our blog entirely dedicated to this accessory. Read on to find out more.
History of the lion knocker: from the Romans to the present day
Roman period - The exterior door knocker has a very ancient history. It dates back to the time of the Greeks and Romans, when it had a purely practical function: to signal the arrival of guests to the house. At that time there was no electricity, and the doorbell came much later. Over time, the function of the door also became decorative.
Revival. During the Renaissance, many special forms spread. Here we started using the lion head hammer, or with other animals or people. During this period, also took over the magical function of . Cat figures or ferocious faces were believed to keep people with bad intentions at bay.
2020 - Today door leaf has lost its main function, but still remains a beautiful accessory for furnishing the front door.
Let's take a look at some types of lion hammer rings together.
Lion Head Knocker - Pasini
The Brera collection by Linea Calì is a family of bathroom handles with glass inserts . We put it in first place because glass is especially suitable for bathroom interiors. And that is not all. These handles are decorated with stained glass to create a striking modern effect on the door: a truly interesting detail that cannot go unnoticed.
Visit the Pasini lion head door leaflet.
Linea Calì wooden door Lion hammer
In the minds of each of us in the bathroom, there can be no shortage of chrome furnishing accessories. In this case, we like to combine another bathroom handle presented in our online store. The model is called Goccia Mariani Becchetti. The shapes are delicate and soft, with a rounded tip that mimics a drop of water. You can also find an oval rosette option for the most sophisticated taste.
Go to Lion door leaf Linea Calì
Lion knocker for outside door by Galbusera
If you have designer bathroom handles Valli & Valli10 In particular, here you can see the Oberon model. In our opinion, this is an evergreen pen. Thanks to its simple and minimalistic shapes, it fits well into any room in the house, including the bathroom. Oberon is a designer handle designed by the architect Van Duysen, also available in a windowed version.
Open Page with Galbusera Lion Hammer
Handmade Forged Lion Hammer by Galbusera
We have come to one of the most recent collections featured in our online catalogue. The Icon Frosio Bortolo handles are available in white and many other finishes: black, chrome, wood, dark wood, wall look. on the panorama of bathroom handles, a really interesting offer is an icon. Discover all the other colors by clicking on the link below!
Discover the handmade Galbusera lion hammer.
Other names for the lion hammer: picchiotto mallet ...
The outside door knocker has many other popular names. Let's see them together:
- Picchiotto : also another name for the nuthatch, a bird that breaks nuts and acorns to eat them;
- Battaglio : this is also the iron that strikes the bell and makes it ring;
- Mazzapicchio : this is also a wooden mallet used to whirl wine barrels;
- Bussarello .
These are functional names because they contain the basic function of a doorknocker, knocking on a door.
Would you like a lion-shaped knocker? No problem! Our online store Windowo offers a wide selection of Made in Italy handles. Luckily, handle manufacturers are also door manufacturers. This means that in our catalog you can also find many other types of door leaves, with other, more classic shapes, with rings or with other finishes. Just click on the link below:
See all types of door knockers available on Windowo
Products that might interest you
Application lion - 62 photo ideas for applications from paper, cardboard, scrap materials
Everyone knows that children love creativity and applique, one of the most favorite types of it for kids. Also, we note that the kids like animals and making them with their own hands is a special pleasure for them. Therefore, today we decided to tell you how to create the application of the king of beasts.
Initially, we note that all adults often have various boxes of purchased goods and often, they are all thrown away. But this is not worth doing, because with their help, you can make cute crafts. After all, this is cardboard, which is often used in the process of their creation.
Contents
- Cardboard lion appliqué
- Paper lion
- Lion cub with voluminous mane
- Preschool lion appliqué made from cupcake molds
- Photo lion appliqué idea
Cardboard Lion Application
First of all, prepare the necessary materials:
- piece of corrugated cardboard;
- color paper set;
- eyes for crafts;
- marker and brush.
Manufacturing process:
- Initially, we draw the details of the future crafts.
- Cut elements.
- We paint the resulting blanks in yellow. To do this, you can use paints or felt-tip pens.
- Cut orange paper strips 1×4 cm for the mane.
- Glue the strips on the back of the cardboard circle.
- On the front side, glue the pre-prepared antennae, eyes, nose and tongue.
- Take a circle with ears and glue the resulting muzzle to it.
- Draw and cut out the animal's tail.
- We take the rest of the details and glue them on the selected base, in the appropriate sequence.
- Glue the tail and body with the hind legs.
- Place the front paws on top.
- At the location of the head, glue two squares.
- On the squares, glue the head and in the end, draw the claws.
Application templates, you can draw yourself or use ready-made ones posted on the Internet.
Paper lion
Materials needed:
- colored paper;
- glue;
- cardboard;
- scissors;
- marker.
Work steps:
- From orange paper, cut out two squares of the same size.
- We bend the lower corner of one square and turn the workpiece over.
- On both sides, draw lines, retreating from the edge by 1 centimeter.
- We cut strips along the marked border, like a fringe and fluff them.
- With the second square, do the same.
- Take the square where the bent end is and glue it with this end inward to another square.
- Cut out another square element and wrap its corners towards the center, a little short of the exact point.
- Do the same, turn the square over.
- Turn it over again and glue it to the selected base. This will be the body of the lion cub.
- Next, place the head and glue the eyes, nose, mouth and mustache on the muzzle.
- Draw paws and claws with a felt-tip pen.
- Cut out the tail and make a brush like a mane.
- Glue the tail to the body.
At the end of the craft, you can add various elements to it at your discretion.
Lion cub with voluminous mane
You will need:
- orange and yellow colored paper;
- glue;
- scissors;
- marker and pencil;
- colored cardboard.
Step by step instruction:
- On yellow cardboard, draw a head of a lion with ears with a pencil.
- Cut out the part.
- Cut orange paper into long strips 1×1.2 cm wide and cut them into small pieces.
- Fold the ends of the strips and glue them together. We are waiting for some time until the glue dries.
- Glue the resulting elements at a small distance from each other, on the back of the animal's head. Optionally, you can make two tiers for more volume by gluing the strips in a checkerboard pattern.
- On the front side, draw a muzzle and contours of the ears with a felt-tip pen.
- Take yellow paper and draw the body along with the tail.
- Cut out the resulting template.
- We glue the finished muzzle and finish the elements on the tail and paws.
The little king of animals, it turns out very cute and kids like it. With such a craft, you can decorate a child’s room or some of his personal belongings.
Applique lion for preschool children from cupcake molds
Materials needed:
- paper muffin cups - 3 pieces;
- colored cardboard;
- colored paper;
- marker;
- scissors;
- eye blanks;
- glue.
Work steps:
- Cupcake tins to be dyed, two yellow and one orange.
- Cut out the bottom of the yellow mold and glue it into the orange one.
- The edges of the orange form, cut into fringes.
- We take a cardboard base and glue a yellow form on it.
- Next to it, with an overlap, we place the made blank of the head.