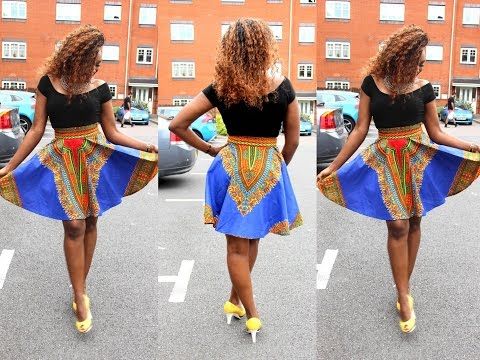
How to make a full circle dance skirt
Full Circle Skirt: Make a Circle Skirt Pattern!
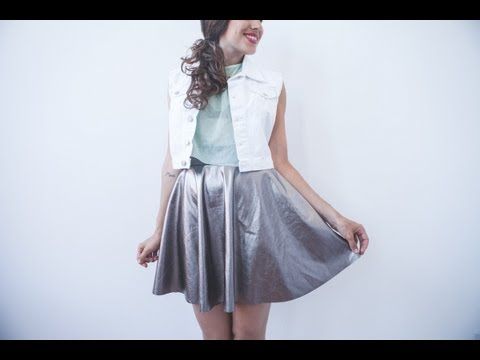
The Full Circle Skirt. We love them right? That fab swooshy noise from the fabric swishing around our legs. Circle skirts are great either long or short, and can be high waisted to define our waist, or sit lower down, resting on our hips.
Circle skirts of all kinds work in so many different fabrics too, so you can make them easily enough in a different fabric for whichever part of the world you happen to be living in! 🙂
A short silk or cotton circle skirt for those sunny days in warmer climates or longer circle skirts of heavier fabric for chilly winter days. A DIY circle skirt is a win either way!
And if you’re a fan or short and flirty circle skirts, then learning how to draft a godet and sew one in can be a great way to make more circle skirts!
But… just how easy is it to make a circle skirt pattern? The answer is VERY, but I also went ahead and made a free circle skirt pattern template too for those how don’t want to try their hand at the maths!
Note: Some of the links in this post are affiliate links, which means I may receive a commission if you make a purchase.
Making a Circle Skirt Pattern
When it comes to making your own circle skirt pattern, you’re going to need two key measurements for the circle skirt math.
Circle Skirt Measurements
- Your waist measurement. This is where you want the skirt waistband to sit on your body.
- Your desired finished length. This is the point where you want the skirt to fall to, on your leg.
You’re going to need to work out which measurement system you’ll be using too. I’m using metric (centimetres) as that’s what I grew up with, but feel free to work in imperial (inches) if that’s your thing!
Then of course, there is also seam allowance to consider. I use 1 cm seam allowance for woven fabrics and 7 mm for knit fabrics. You get to decide on yours, but please be sure to keep it consistent!
To clarify – in the fashion industry, 1cm is standard for wovens, but in the home sewing / dressmaking world, 1.5cm is standard.
What You Need To Make A Full Circle Skirt
- Two tape measures (a good one and a tatty one)
- Pencil (my choice is always a 4H)
- Pattern master / long ruler
- Pattern paper
- Push Pin
- Thread to match your fabric
- A Sewing machine or hand sewing needles
- Paper scissors
- Fabric scissors
- Pins
- An invisible zipper
- A calculator
- Fabric
It is quite unlikely that you will fit a full circle skirt pattern onto fabric that is less than 140cm wide.
Unless you have a wasp waist and plan to have your circle skirt SUPER SHORT! 😉 So be prepared to search for fabric that is wide enough if you plan to cut the skirt in one piece with no seams!)
Now, one thing to remember, this may all seem stupidly complicated when you first read through it, but I promise you, making a circle skirt pattern really isn’t as hard as it seems.
Let’s start with circle skirt pattern maths!
Circle Skirt Formulas
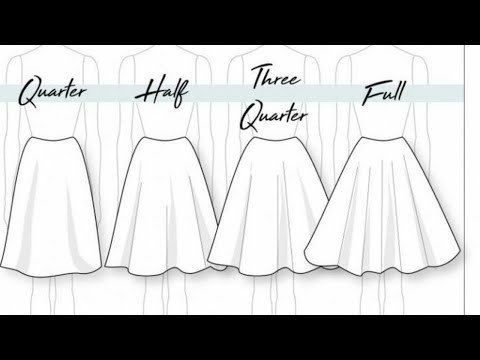
The next section covers the maths involved in drafting a full circle skirt pattern, but if you’re thinking of making:
- Half circle skirt
- Three quarter circle skirt
- ⅓ circle skirt
- Quarter circle skirt
Then go check our the circle skirt formula post I wrote – which has a guide to measurements needed for each circle skirt type!
Circle Skirt Pattern Maths
Yep – you DID read that right. We now have to do math in order to create a pattern for our full circle skirt.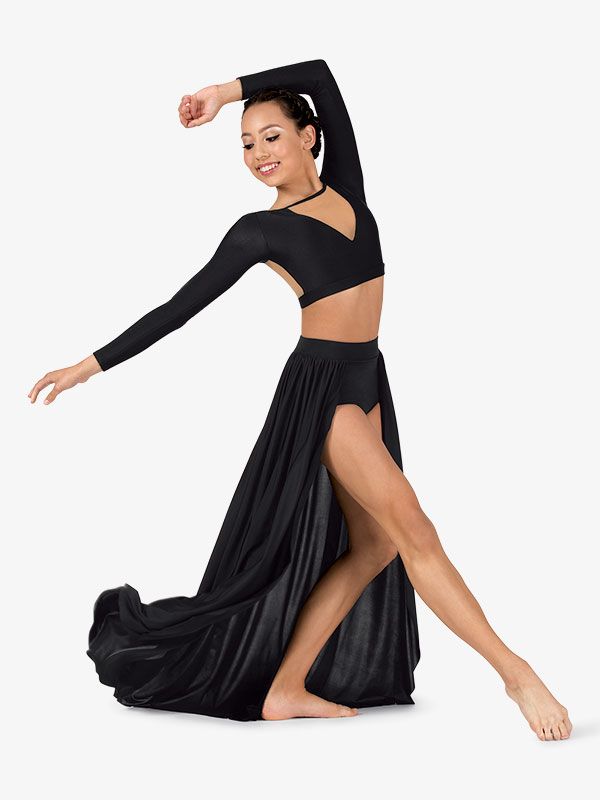 We’re firstly concerned about pi. The Pi symbol looks like this: π and has a numerical value attached to it.
Pi is = 3.141592653589793238462
We will need to use this ‘number’ to work out the radius of our waist. Don’t worry though, we’re going to round it up, to just 3.14!
What is a radius?
To understand radius, we’ll start with the diameter.
The diameter is the measurement from one side of a circle to the other, as a straight line, crossing through the centre.
The image below better shows which part of the circle the diameter is.
The radius then, is half the length of the diameter, from the very centre of the circle to the outer perimeter, as seen in the image below.
And since we’re talking about all things circular, the circumference is the measurement of the circle’s outside edge, the perimeter.
Phew! That wasn’t as complicated as you thought right? 😉
Why Do We Need The Radius?
The reason we need to know the radius when making a circle skirt pattern is so that we know how big a circle we need to cut for our waist.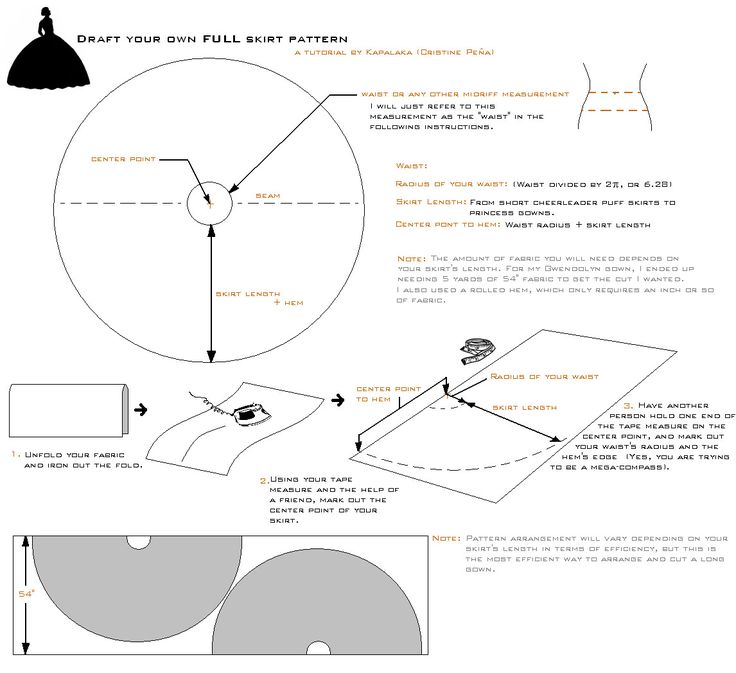 Think of that radius being our waistline on the circle skirt pattern!
Now, the method you use will differ depending on what type of circle skirt you want to make. In this post we are ONLY looking at a full skirt circle pattern. I’ll cover a half circle and 3/4 circle skirt pattern later on! So be sure to check the right section below so that you make the pattern correctly! 🙂
How To Find The Radius
Now, this is where the circle skirt maths gets a little trickier. Grab your calculator and work through the next sections with me, just so that you become familiar with the process of working out the maths for a circle skirt pattern!
Here’s a formula that we use to find the radius:
Circumference (C) divided by pi (π = 3.141592653589793238462) = diameter. And of course, the diameter (D) is the radius (R) x 2!
You then need to also consider the seam allowance amount you will use. When factoring in seam allowance, remember that you need to add seam allowance to the waistline (to attach the facing too) and again to any seams that you have running from the waist to the hem – this wouldn’t apply if you are planning to make the skirt in one piece, but you’d need a very large and wide piece of fabric to achieve that. Most circle skirts have side seams at least.
Full Circle Skirt
A full circle skirt is made up of one entire piece of fabric OR it can be cut as multiple pieces which when stitched together at the seams make a full circle skirt.
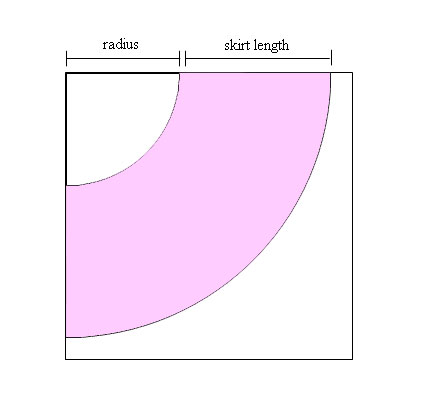
You can see from the image below:
- Bold lines are the ‘stitch lines’ of the circle skirt pattern
- Dotted lines are the edge of the seam allowance, the parts of the circle skirt that get turned under as part of the hem.
This is what your circle skirt pattern will look like when complete, whether as one piece or as sections that are seamed together!
Cut as One Piece (No Seams)
To create a pattern that will be cut as one whole piece you need to follow these steps:
Step 1 – Finding the circle skirt diameter:
- Take your waist measurement = C (this is the spot on your waist that you would like the circle skirt to sit at.)
- My natural waist is 86cm all the way around.
- C ÷ π = D
- Breaking that circle skirt formula down to…
- 86 ÷ 3.14 = 27.38cm
Step 2 – Finding the circle skirt radius:
Now that we have the diameter we can more easily figure out the radius needed for our circle skirt pattern.
- D ÷ 2 = R
- My radius is: 27.38 ÷ 2 = 13.69cm
So the radius of my waistline is 13.69cm which for you imperial peeps is almost 5.5 inches!
As I will be cutting this circle skirt in one whole piece of fabric I will use this measurement only, along with the length of the skirt.
Remembering of course that the length is controlled by the total fabric width!
How do we know how wide the fabric will be?
There’s a rather daft way of cutting out a circle skirt doing the rounds online, which includes folding the fabric over so many times and then cutting as you see fit. That’s a daft thing to do, and not what any pro would do! Why?
When we fold fabric over, that ‘fold’ is adding a little bit extra of fabric that we haven’t accounted for. If we have multiple folds for multiple layers to make it ‘easier and faster’ to cut, we will end up with even more unaccounted fabric. Which means that our skirt will come out bigger than planned, and so won’t actually fit us properly!
In order to make a circle skirt pattern properly, please do the following:
- Measure the width of your chosen fabric NOT including the selvedges. Mine = 137cm
- Now take the diameter (NOT the radius) we came to earlier in Step 1. Mine = 27.38cm
- We then take this amount away from the total width:
137cm – 27.38cm = 109.62cm
Total available fabric width (minus) diameter of my waist = amount remaining
Now this is the amount of fabric remaining for the length of the circle skirt centre front, the length of the centre back and the hem allowance. I’ll go for 50cm finished length!
How Much Seam Allowance And Hem?
My hem allowance would vary depending on the fabric selected but for simpler maths let’s say that it is 2cm so there’s enough for a double turned hem on this circle skirt.
For the seam allowance on the waistline’ i’ll add 1cm so that a faced waistband can be added.
- 2 + 1 = 3cm
- 109.62 – 3 = 106.62cm
Now, let’s divide 106.62 by 2 and we have our finished skirt length and we have: 105.62 / 2 = 53.31cm
This means if I choose to cut my circle skirt as a full circle skirt from just one piece of fabric, the length of the finish skirt cannot be longer than 53.31 centimetres.
Finding The Circle Skirt Length On Your Body
To see how this length works on your body, take your tape measure and measure from your waist (the point on your waist that you measured earlier to get your radius!) and down your body to the finished length. You may find it easier to have someone else do the measuring for you!
Is this long enough for YOU?
If it isn’t, there are things you can do to make the circle skirt longer. You could add banding along the hem to extend the circle skirt length. You could add trimmings. But the key thing to note is that this is the maximum length you will be able to achieve cutting a full circle skirt in one piece of fabric!
Drafting The Full Circle Skirt Pattern As One Piece
Now that we have all the measurements we need, we can get started on drafting the full circle skirt pattern!
- Lay a rather large piece of paper on your work table – it needs to be as wide as the fabric you are going to be using, so if your paper is not as wide as your fabric, be sure to tape some together. As we are making a circle skirt pattern, it would be ideal to have the paper squared.
- Find the centre of this piece of paper and mark it with a cross.
- Draw a line from this centre point with your metre rule, going in both directions, as far along as you can until you reach the papers edge.
- Now, find the centre point that you marked in step 2 and measure the radius amount along this line. My radius was 13.69cm so at this point I will add another mark to the line.
- Now for the fun part. Take your SCRAPPY tape measure and use the push pin to make three small holes in the scrappy tape measure! One at the 1cm line, another at the radius amount line + 1cm. Eg. As my radius is 13.69 + 1cm = 14.69cm. This leaves my radius as the amount in between the two holes. The third hole is the length of the skirt pattern. My finished length is 54cm so I will make this hole at 55cm (54 + 1 = 55).
- We’ve added the 1cm to each number as we are using the 1cm point on the tape measure rather than the 0 point, and need to account for that! 😉
- Place the tape on the paper. Put the push pin through the hole at the 1cm mark and place this at the centre point on the pattern.
- Take up your nice sharp pencil and place the point through the hole on the tape measure at the radius hole.
- VERY CAREFULLY, keep the pin pushed into the pattern paper so that it doesn’t move and bring the tape measure taut using the pencil in the hole.
 Don’t try to stretch it, we want the circle skirt pattern to be consistent, without errors, so that this ‘waistline’ works!
 - Now you get to draw the first circle, maintaining the same even pressure on the tape so that you are creating a perfect circle that should match your waistline!
- Once this is complete, use your good tape measure to check that the circle is consistent in size from the centre point. You could also measure the circumference of this circle by using your tape measure on its edge, and see whether it is close to your waist measurement!
- Next, place the pencil on the second mark on the tape measure and draw the circle skirt hemline, again maintaining an even pressure on the push pin, pencil and tape. Check the measurement from the centre point is consistent.
- The very last job to do is to add seam allowance to the waistline of the circle skirt pattern, and of course the seam allowance to the hem line. You can then cut out your circle skirt pattern! Yay!
I put together this diagram to explain it – I hope it makes sense and helps you to understand all of that in a visual way!
And now…
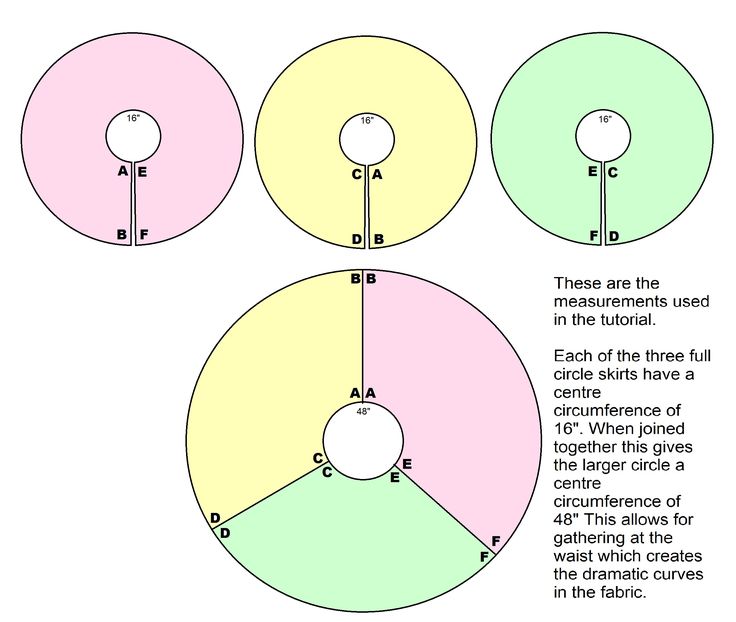
Full Circle Skirt in Sections
If your fabric isn’t wide enough to cut a full circle skirt out in one piece, we will need to cut sections and seam them together.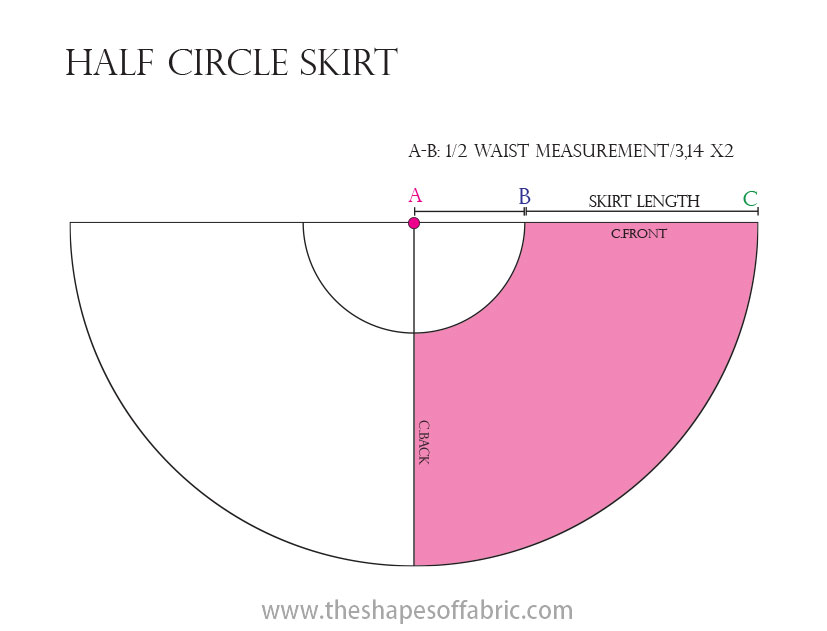
There are several options here but the three simplest would be:
- Cut two half circles which will require two side seams
- Cut one half circle and two quarter circles which will use two side seams and a centre back or centre front seam.
- Cut four quarter circles and have four seams; two side seams, centre front seam and centre back seam.
Phew! Are you still with me?
So, now we get to make our circle skirt longer as we have more fabric width to use! Yay!
For now, I will show you how to make the circle skirt pattern for a full circle skirt made out of two half circles.
A Full Circle Skirt Pattern In Two Halves
The great thing about making your circle skirt in two halves is that you can have the skirt twice as long as when it is cut in one piece, as the fabric width will dictate the length of ‘half’ the circle skirt. Yay!
The problem though, is that you will need to buy twice the amount of fabric however, as you will now need twice the length.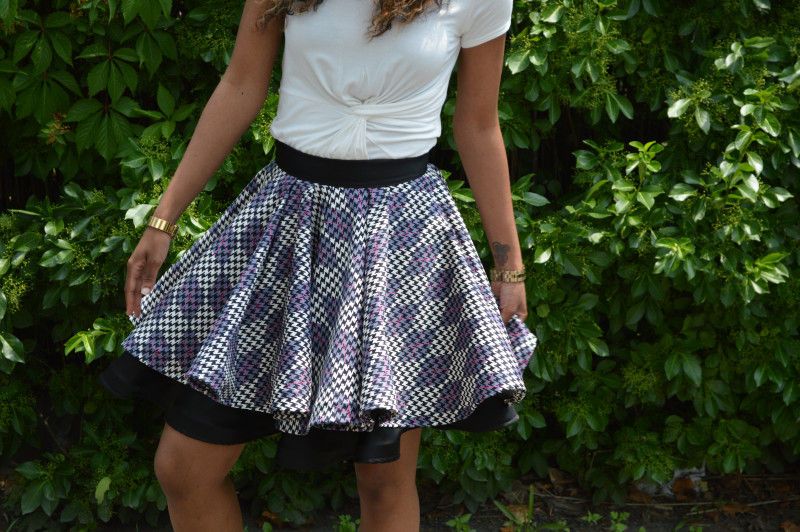
- Draft your circle skirt pattern as before, but this time you can go much longer, as your fabric width will now determine the maximum length of the skirt.
- Fold the pattern PERFECTLY in half down the centre.
- Add your chosen amount of seam allowance, along the straight ‘side seams’ and of course the waistline and hem.
- Place the straight edge of the circle skirt pattern along the selvedge.
- Cut out the pattern piece twice so that you have two semi-circles.
- Think about how you will get into the circle skirt – will you have a side seam zipper? An exposed zipper on the centre front or centre back?
- There should be plenty of fabric left over to create facing pattern sections for the waist line.
- Finally, don’t forget to hem the skirt. You could go for a simple turned hem. A pin hem. Or add on a trim of some sort to snazzy it up even more. Enjoy!
What Not To Do
Things you SHOULD NOT do when making a circle skirt include:
- Don’t choose polyester over cotton just because you dislike ironing.

- Don’t fold a square of fabric in half and then half again and think that’ll do the job. It won’t. Please make the pattern properly. It will last you much much longer! 🙂
- Do NOT mark a line in permanent ink on the fabric ‘by sight’ to make a quarter-circle cut out for your waist.
- PLEASE don’t just ‘fold up a couple of centimetres’ as you sew your hem. It is a CIRCLE – this means the hem will go through straight grain, cross grain and the bias, and so will stretch and be wonky on occasion. You’ll need to hem the circle skirt properly for it to look great!
RELATED CONTENT:
How to make a gathered rectangle skirt
Full Circle Skirt Examples
There are quite a few circle skirts available to buy online, such as these from Vivienne of Holloway and Alice & Olivia.
John Galliano has never been one of my favourite designers, but this collection for Dior in 2011 has some rather fabulous circle skirts contained within.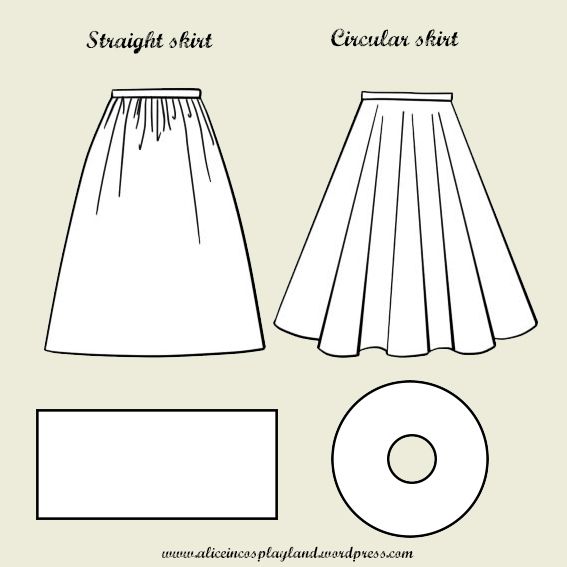
How To Wear Your Circle Skirts
There are different ways to wear your circle skirt of course, depending on the type of fabric you choose to make it in, and the colour and detailing too.
Pair it with a simple silk blouse for the office, a fitted lace tank for something more suited to a night out, dare I say it – A CROP TOP – for something a little more avant-garde, a fitted tailored jacket or a knitted twins et for something a little bit more traditional.
However you decide to wear it, I would love to see photos of the finished piece, and how you choose to style it up!
Eve Tokens
Eve Tokens (aka The Creative Curator) is a fashion designer, creative pattern cutter and sewing pattern designer.
Eve graduated with a 2:1 in Fashion Design from the University of The Creative Arts in the UK, has a BTEC diploma in Creative Pattern Cutting, a Foundation Degree in Art & Design from Wimbledon College of Art and gained extensive experience in the fashion industry by interning and freelancing for London based fashion brands – Hardy Amies, Roland Mouret, Peter Pilotto and others.
As well as running her own small sustainable fashion brand, Eve has more than 25 years experience sewing and making clothes for herself and family members.
Share to Pinterest or Facebook below!
10.1K shares
- Facebook129
How to Draft Circle Skirt Patterns
How to Draft Circle Skirt Patterns for Figure Skating, Dance, and Cosplay
How to Draft Circle Skirt Patterns for Skating, Dance, and Cosplay. Easy instructions - with tool recommendations - to learn this technique
This morning, a reader posted a question to my Facebook Page (Costuming):
"Hi! Skate dress question for you... in the book you illustrate beautifully several options for skirts but don’t go into circle skirts much... unless I missed it. Any suggestions regarding figuring out sizing and how to cut them out?"
I started replying in a comment. After a while, I decided that a wall of text wasn't going to cut it - this requires photos. So, here we are!
Before I get started, a bit of a disclaimer:
This tutorial is going to be for a quick and dirty way to do it, with the most basic equipment possible. Just paper, a ruler, and a pen/marker is all you really NEED to draft a circle skirt.
Much like most things with sewing - and life, I guess - there are optional items you could buy, that will make you life easier.
After the base tutorial, I'll discuss a few of them. Again - TOTALLY not necessary, just nice. If you're going to be doing a lot of costuming, they will be items well worth the investment.
Anyway, let's get to the tutorial!
How to Draft Circle Skirt Patterns
Before You Get Started
You will need to know:
- The hip circumference (which will be the actual hip measurement of the human, not the pattern (Use hip rather than waist, to allow the wearer to pull it on over the hips)
- How much gathering you want at the waist line of the skirt.
- Desired length of skirt at sides, front, and back (from the waist seam, not the actual waist).
Supplies Needed For Drafting Circle Skirt Patterns
Paper - I like wide craft packing paper (office supply stores), or rosin paper (home improvement stores).
A Long Ruler
A pen or marker
To Draft The Pattern
Multiply the hip measurement by whatever factor you want for the gathering.
For instance, if you want the gathering to be such that you have twice the fabric as the actual hip, multiply by 2. For 50% more fullness than if actual hip size, multiply by 1.5, etc etc.
Then, take that number and divide that by 3.14 - that gives you your diameter. Divide by 2, there's your radius.
As you're not likely to end up with a number that's nice to work with, feel free to round up to the nearest ¼". For the sake of example, let's say you end up with something that ends up becoming 5", after rounding.
Then, take a large sheet of whatever paper you'll use to pattern - I tend to use really wide craft paper - and decide if you want to pattern with side seams (half circle) or not (full circle).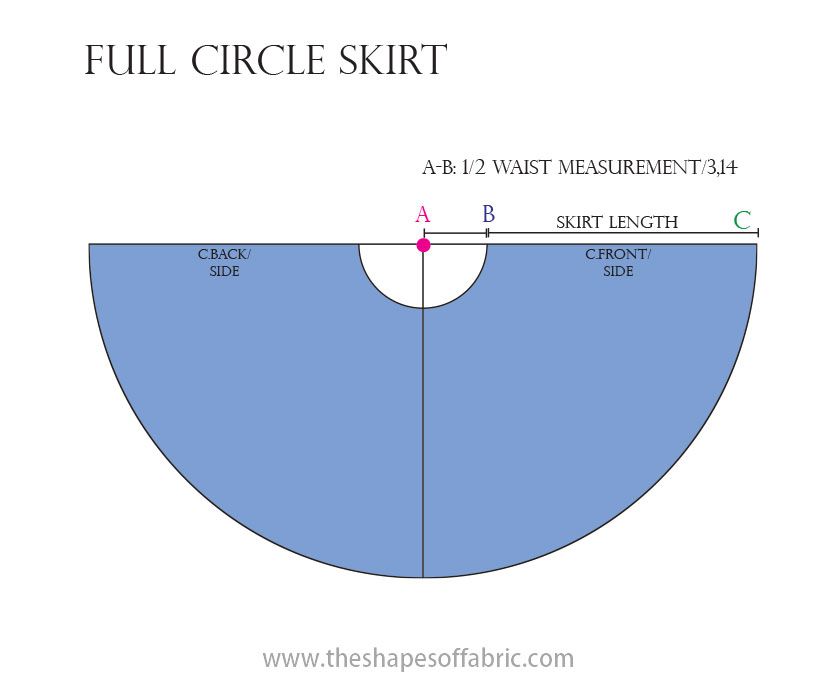
To Draft a Half Circle Pattern
:
Fold the paper in half. The fold is your center line, either front or back - you'll do this one for each.
You're likely going to need to square one edge, from that fold, to work on. To do so, draw a line that is 90 degrees from the fold, as pictured.
While I like to use a square rule for this - as pictured - you can always use a squared edge of something else to get that line started - even a piece of paper:
Once you have the line drawn, cut through both layers of paper, trimming the raw edge off the end. This new raw edge will become your side seam:
Measure out the radius measurement (5", in this example) from the point of the fold, to both the folded edge and the raw edge:
You can measure out further points in between, as well - can temporarily fold the folded edge to meet the raw edge, unfold, and use that line as another guide to measure along.
For the side with the two raw edges, I find it best to fold each layer in to the center, individually.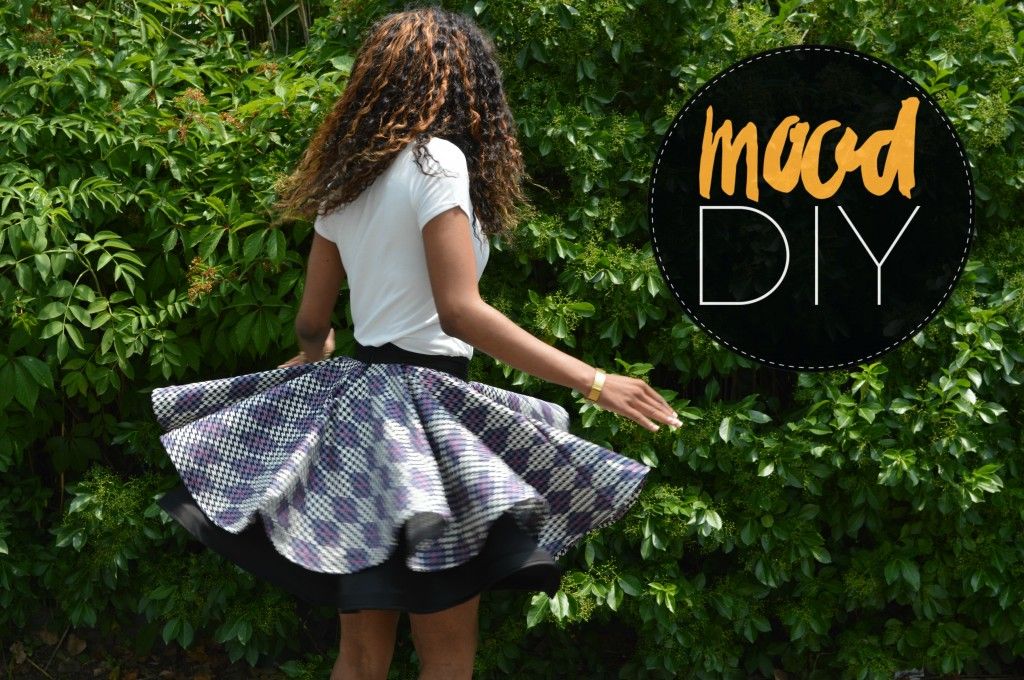
Connect all the dots in a smooth curve, this is now your waist line:
Then, starting at the curve you drew, measure out from that circle and mark the side seam length along the raw edge, and the center front or back measurement along the fold:
If these are the same, you can do the same as you did for the waist line - fold it in half one or more times, use the lines as guide on where to measure - always out from the waist line, not the folded center point.
If you're doing a longer center measurement, you can do all the folds, but there will be more math involved.
For the fold that connected the center fold to the side seams - that is, the line halfway between the fold and the raw edges - mark a measurement that is halfway between the side and center measurements.
So, if your side seam is 10 and your center is 15, this would be 12.5* Whatever number you come up with, mark that number next to the mark for the measurement, to keep track.
Then, mark other halfway points the same way. The fold line halfway between that first halfway point and the raw side edge will be the difference between those numbers - so in this case, 11.25.
The one between the drawn midpoint and the folded center would be 13.75 in this example, etc.
When you've got that all sorted, connect the marks with a smooth curve:
Carefully cut the pattern out - through both layers of paper - and that's a half circle pattern.
Repeat the process for the other half circle pattern needed, if that center measurement is different.
To Draft a Full Circle Pattern:
Two ways you can do it, and which you pick will depend on the width of the paper you’re working with, and the length of the skirt you’re drafting.
1. Do the above directions, for both front and back. Mark “front” and “back”, tape them together.
This works best if you’re going to be doing a dance length dress, or if your paper isn’t wide enough to accommodate whatever you are doing.
Also, this is the easier option if you’re dealing with center front and center back that are different measurements, IMHO.
2. If your paper is plenty wide to accommodate, you can do it all as one piece.
Start by folding the paper in half, long edge to long edge. This will be your center line, front and back. You can mark it as such - to keep track - if you like.
Then, fold the fold over itself, dividing the paper in half again. This will form your side lines. Again, feel free to mark them at this point.
As pictured below, the edge closest to the bottom of the image is folded, and the fold extending up from it is the side line:
At this point, feel free to make as many interim -m and equal - folds as you’d like. The longer the skirt seam, the more folds will be helpful (as the distance between marks gets further in between, the further out you go from the center point.)
Whatever you're folding should be in half, and if there's anything corresponding to that area that hasn't been folded in half, it should be.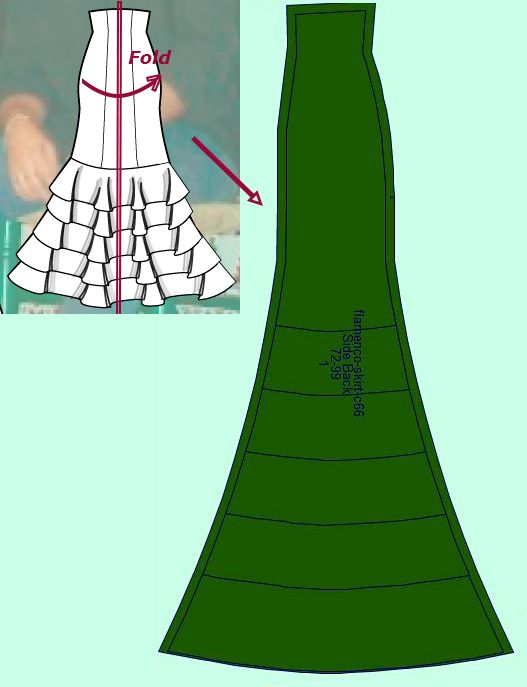
The goal is to end up with equally spaced lines. If you appear to be missing any, make whatever fold needed to add it in.
Once you’ve folded as many times as you’d like, unfold til you’re back to that very first fold. Have that center line fold laid out in front of you, across your work surface.
Decide which side (out from the center point) will be the front of the skirt, and which will be the back - this is really only necessary if you have measurements that differ - and mark them as such.
Start by marking your radius measurement out from that center point, along the fold lines.
Connect them all with a smooth curved line. This is now your waistline:
From there, measure your center front measurement out towards the front side of the paper, on that part of the drawn waist line. Measure the center front back out from what will be the center back waist.
Then, measure the side measurement from the point of the waist line centered between the other two folds, out from there (ie: directly out in front of you. )
Now, if this is an actual circle of a circle skirt - ie: side, center front, and center back measurements are all the same - you can go ahead and measure that distance out from the waist line, along all the folds. Connect all the marks with a nice smooth line.
If your circle skirt has different measurements for side and center front / center back:
For the fold line that is exactly halfway between the center fold and the side line, mark a measurement that is halfway between the side and center front measurements.
So, if your side seam is 10" and your center front 15"*, this would be 12.5". Whatever number you come up with, mark that number next to the mark for the measurement, to keep track.
Then, mark other halfway points on THAT part of the skirt (between side line and the same way. The fold line halfway between that first halfway point and the side line will be the difference between those numbers - so in this case, 11.25".
The one between the drawn midpoint and the folded center would be 13.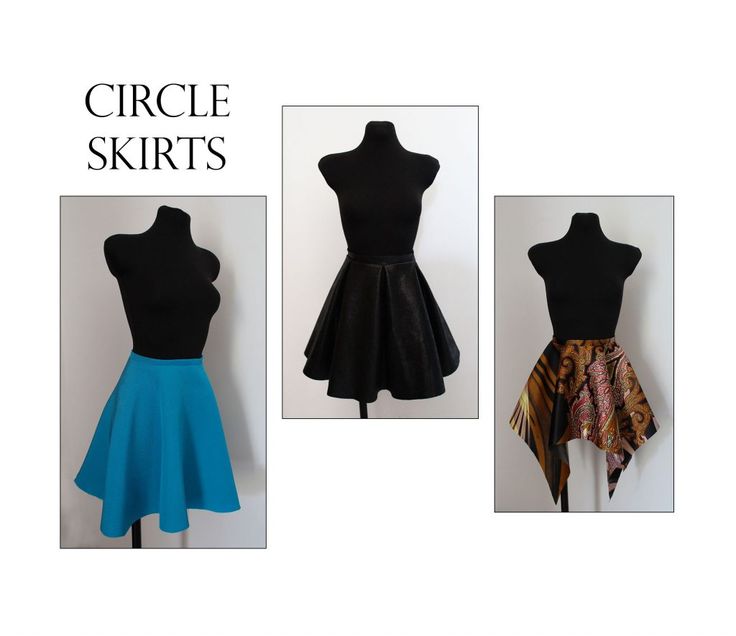 75" in this example, etc:
Each time you are finding the halfway point between numbers, make sure you’re marking that distance on the fold line that is halfway between the two lines that provided the measurements you’re averaging from.
Once you’re done filling in all the lines on the front quarter of the dress pattern (The front half of the pattern, as you see it), repeat for the back half.
Connect all the points with a smooth, curved line, then carefully cut the pattern out, through both layers of paper.
* These measurements are random and - for most dresses - completely nonsensical. I just wanted to use nice, easy numbers to math with, it's early in the morning 🙂
Important Note on Cutting the Fabric:
Whether or not you’re doing different measurements for the centers / sides, you’ll want to know where those points fall, when you cut the fabric.
If it’s all the same length - sides, center front, center back - you can mark the center points and the side points of the cut fabric with pins - this will be at the waistline, as the hem doesn't really need to be divided/marked out**.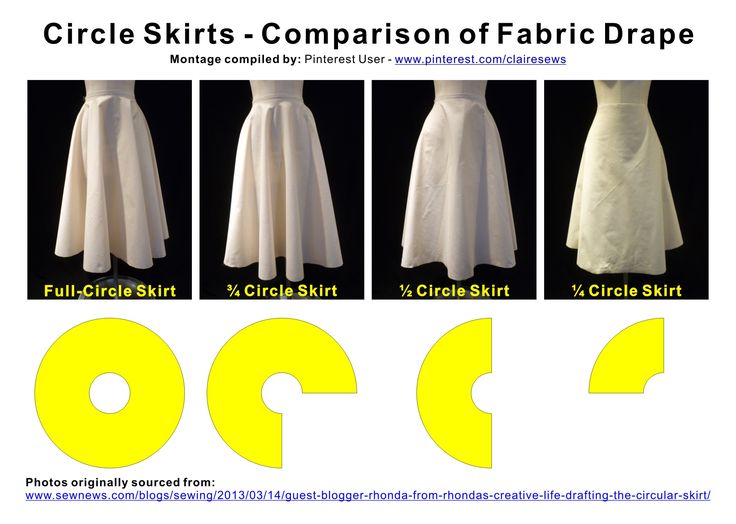
This will help you evenly distribute the fullness when attaching your skirt.
If you have different lengths, you’ll make your life a lot easier if you not only mark the points with pins, but also label them.
I like to keep painters tape on hand for this, marking “center front”, “center back”, “side”, and “side” right next to the pins, as soon as the fabric is cut.
This is especially important when working with slithery, annoying fabrics like chiffon.
** Unless you need center/side points of the hem marked for a design element you're adding to the skirt, such as applique. In that case, I recommend marking the points on the hem with TAPE, not pins. Pins are far more likely to come out, when you're dealing with the fullness of the hem edge fabric!
Hope this helps!
Additional Product Recommendations
So, as I stated at the start, there are some products that make you life easier, or just make pattern drafting a bit easier / cleaner / more fun.
Square Rule
You can go small with this - for convenience and/or budget - or larger. Larger is great for when you're dealing with dance length skirts.
Here are two great examples of the type I like - the first is smaller (usually for leather work and such), the second is bigger, and usually used for home improvement projects.
Flexible Curve Ruler
This item is usually used by engineers, but it's GREAT for the sewing room. I have two sizes, a short one (about 12"), and a longer one (about 36"). You can bend and curve these to come up with a nice, rounded edge to join the points, then use it to trace that line. It's a lot nicer than connecting the points manually, and allows not only for doing so with fewer interim points, but to do more abstract joins. Want to scallop the edges, but still follow the averaged curve? This is the toy for you!
Listing from shortest to longest:
French Curves
This is more for general pattern making - especially applique design - but I figure I'll mention it here, while I'm thinking of it.
I am personally not great at freehand drawing curves, so these are great to work with. These come in sets of various styles, but basically similar.
To be honest, I usually just buy based on aesthetic - I personally like transparent, and lean towards blue or green.
Here are a few different sets. The last one is a bit different, as a smaller version of some of the fashion curve rules I use. I have one of that type of set, and one like the first 5 examples shown:
Fashion Rulers
So this again is something not as applicable to circle skirts specifically, but very topical - also, the sets usually have a bit of overlap with some of the above items, so it's good to buy them together to avoid double purchasing something you don't necessarily need multiples of.
Full disclosure: The set I use is an expensive, aluminum set that I bought a couple decades ago - and I have no idea where from. It looks a lot like the last example listed here.
So, these are very similar, but not *exactly* what I use. If anything ever happens to my aluminum set, I'll be buying one of these as replacements!
I'm hard on my tools sometimes, so I'd be going for aluminum again - but I get a ton of use out of them, and - like I said - they've already lasted me a couple of decades at this point.
If you're a home user - rather than a business- I think the plastic would be a great budget option!
I think that's it! I hope the tutorial and tool recommendations help you out!
Also, if you have any requests for future tutorials, feel free to leave a comment below!
Share the Love!
Be sure to take some pics of your handiwork! If you Instagram it, be sure to tag me - @OverlordMarie - or post it to My Facebook Page - so I can cheer you on!
Also, be sure to follow me on Pinterest, and subscribe to my Youtube Channel and free monthly email, so you never miss out on any of my nonsense.
Well, the published nonsense, anyway!
PrintHow to Draft Circle Skirt Patterns
How to Draft Circle Skirt Patterns for Skating, Dance, and Cosplay.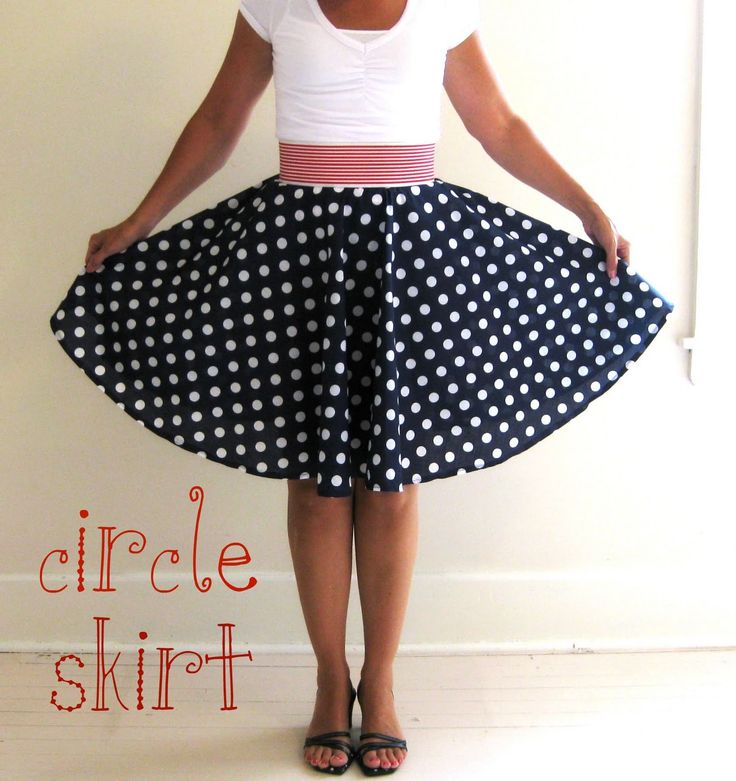 Easy instructions - with tool recommendations - to learn this technique
Prep Time5 mins
Active Time10 mins
Total Time15 mins
Keyword: circle skirt, how to draft a circle skirt, how to draft a pattern, how to make a circle skirt, pattern drafting
Yield: 1 Pattern
Author: Marie
Cost: $5
A Long Ruler
A pen or marker
- Paper Craft or Rosin Paper
Before You Get Started
You will need to know:
- The hip circumference (which will be the actual hip measurement of the human, not the pattern (Use hip rather than waist, to allow the wearer to pull it on over the hips)
- How much gathering you want at the waist line of the skirt.
- Desired length of skirt at sides, front, and back (from the waist seam, not the actual waist).
To Draft The Pattern
Multiply the hip measurement by whatever factor you want for the gathering.
For instance, if you want the gathering to be such that you have twice the fabric as the actual hip, multiply by 2. For 50% more fullness than if actual hip size, multiply by 1.5, etc etc.
Then, take that number and divide that by 3.14 - that gives you your diameter. Divide by 2, there's your radius.
As you're not likely to end up with a number that's nice to work with, feel free to round up to the nearest ¼". For the sake of example, let's say you end up with something that ends up becoming 5", after rounding.
Then, take a large sheet of whatever paper you'll use to pattern - I tend to use really wide craft paper - and decide if you want to pattern with side seams (half circle) or not (full circle).
To Draft a Half Circle Pattern
Fold the paper in half. The fold is your center line, either front or back - you'll do this one for each.
You're likely going to need to square one edge, from that fold, to work on.
 To do so, draw a line that is 90 degrees from the fold, as pictured.
Once you have the line drawn, cut through both layers of paper, trimming the raw edge off the end. This new raw edge will become your side seam:
Measure out the radius measurement (5", in this example) from the point of the fold, to both the folded edge and the raw edge:
You can measure out further points in between, as well - can temporarily fold the folded edge to meet the raw edge, unfold, and use that line as another guide to measure along.
For the side with the two raw edges, I find it best to fold each layer in to the center, individually.
Connect all the dots in a smooth curve, this is now your waist line.
Then, starting at the curve you drew, measure out from that circle and mark the side seam length along the raw edge, and the center front or back measurement along the fold:
If these are the same, you can do the same as you did for the waist line - fold it in half one or more times, use the lines as guide on where to measure - always out from the waist line, not the folded center point.
If you're doing a longer center measurement, you can do all the folds, but there will be more math involved.
For the fold that connected the center fold to the side seams - that is, the line halfway between the fold and the raw edges - mark a measurement that is halfway between the side and center measurements.
So, if your side seam is 10 and your center is 15, this would be 12.5* Whatever number you come up with, mark that number next to the mark for the measurement, to keep track.
Then, mark other halfway points the same way. The fold line halfway between that first halfway point and the raw side edge will be the difference between those numbers - so in this case, 11.25.
The one between the drawn midpoint and the folded center would be 13.75 in this example, etc.
When you've got that all sorted, connect the marks with a smooth curve:
Carefully cut the pattern out - through both layers of paper - and that's a half circle pattern.
Repeat the process for the other half circle pattern needed, if that center measurement is different.
To Draft a Full Circle Pattern:
Two ways you can do it, and which you pick will depend on the width of the paper you’re working with, and the length of the skirt you’re drafting.
Do the above directions, for both front and back. Mark “front” and “back”, tape them together.
This works best if you’re going to be doing a dance length dress, or if your paper isn’t wide enough to accommodate whatever you are doing.
Also, this is the easier option if you’re dealing with center front and center back that are different measurements, IMHO.
If your paper is plenty wide to accommodate, you can do it all as one piece.
Start by folding the paper in half, long edge to long edge. This will be your center line, front and back. You can mark it as such - to keep track - if you like.
Then, fold the fold over itself, dividing the paper in half again. This will form your side lines. Again, feel free to mark them at this point.
As pictured below, the edge closest to the bottom of the image is folded, and the fold extending up from it is the side line:
At this point, feel free to make as many interim -m and equal - folds as you’d like. The longer the skirt seam, the more folds will be helpful (as the distance between marks gets further in between, the further out you go from the center point.)
Whatever you're folding should be in half, and if there's anything corresponding to that area that hasn't been folded in half, it should be.
The goal is to end up with equally spaced lines. If you appear to be missing any, make whatever fold needed to add it in.
Once you’ve folded as many times as you’d like, unfold til you’re back to that very first fold. Have that center line fold laid out in front of you, across your work surface.

Decide which side (out from the center point) will be the front of the skirt, and which will be the back - this is really only necessary if you have measurements that differ - and mark them as such.
Start by marking your radius measurement out from that center point, along the fold lines.
Connect them all with a smooth curved line. This is now your waistline:
From there, measure your center front measurement out towards the front side of the paper, on that part of the drawn waist line. Measure the center front back out from what will be the center back waist.
Then, measure the side measurement from the point of the waist line centered between the other two folds, out from there (ie: directly out in front of you.)
Now, if this is an actual circle of a circle skirt - ie: side, center front, and center back measurements are all the same - you can go ahead and measure that distance out from the waist line, along all the folds.
Connect all the marks with a nice smooth line.
If your circle skirt has different measurements for side and center front / center back:
For the fold line that is exactly halfway between the center fold and the side line, mark a measurement that is halfway between the side and center front measurements.
So, if your side seam is 10" and your center front 15"*, this would be 12.5". Whatever number you come up with, mark that number next to the mark for the measurement, to keep track.
Then, mark other halfway points on THAT part of the skirt (between side line and the same way. The fold line halfway between that first halfway point and the side line will be the difference between those numbers - so in this case, 11.25".
The one between the drawn midpoint and the folded center would be 13.75" in this example, etc:
Each time you are finding the halfway point between numbers, make sure you’re marking that distance on the fold line that is halfway between the two lines that provided the measurements you’re averaging from.
Once you’re done filling in all the lines on the front quarter of the dress pattern (The front half of the pattern, as you see it), repeat for the back half.
Connect all the points with a smooth, curved line, then carefully cut the pattern out, through both layers of paper.
* These measurements are random and - for most dresses - completely nonsensical. I just wanted to use nice, easy numbers to math with, it's early in the morning 🙂
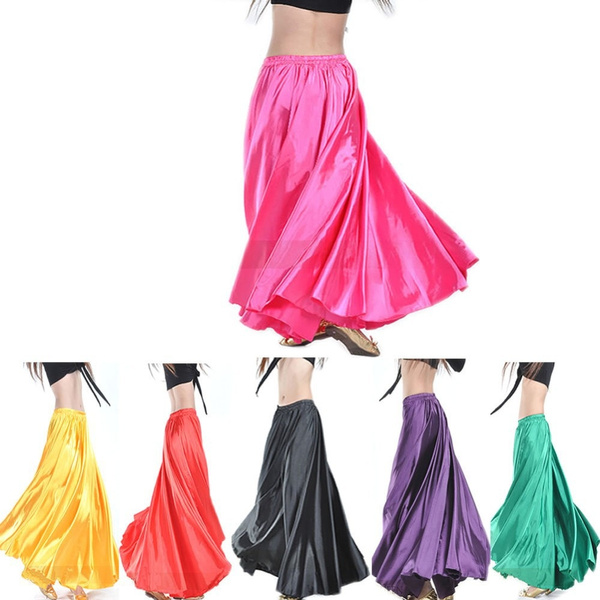
How to choose the right skirt for dancing
How to choose the right skirt for dancing
Dancing is an unusually feminine activity. Especially if it's ballroom dancing - Latin American or European, it can also be salsa, bachata, solo latin, hustle or zouk. It doesn't matter what dance you do. Excellent mood, increased tone and a lot of new acquaintances are guaranteed to you. It is enough to go to just a few classes, and you will learn the basic movements. But the most important rule for you is to be beautiful. It largely depends on what kind of dance clothes you choose.
What dance skirts are for
The right dance skirt will effectively emphasize your beauty, femininity and body lines. When choosing skirts, you can use a combination with dance tops. So your image will constantly change.
A variety of materials, cuts and colors lead to a unique style without restrictions of freedom and comfortable movements. You will emphasize your own attractiveness and see how your emotions will intensify during the dance, as you will be pleased with your reflection in the mirror. If you like yourself, then others around you will certainly feel it.
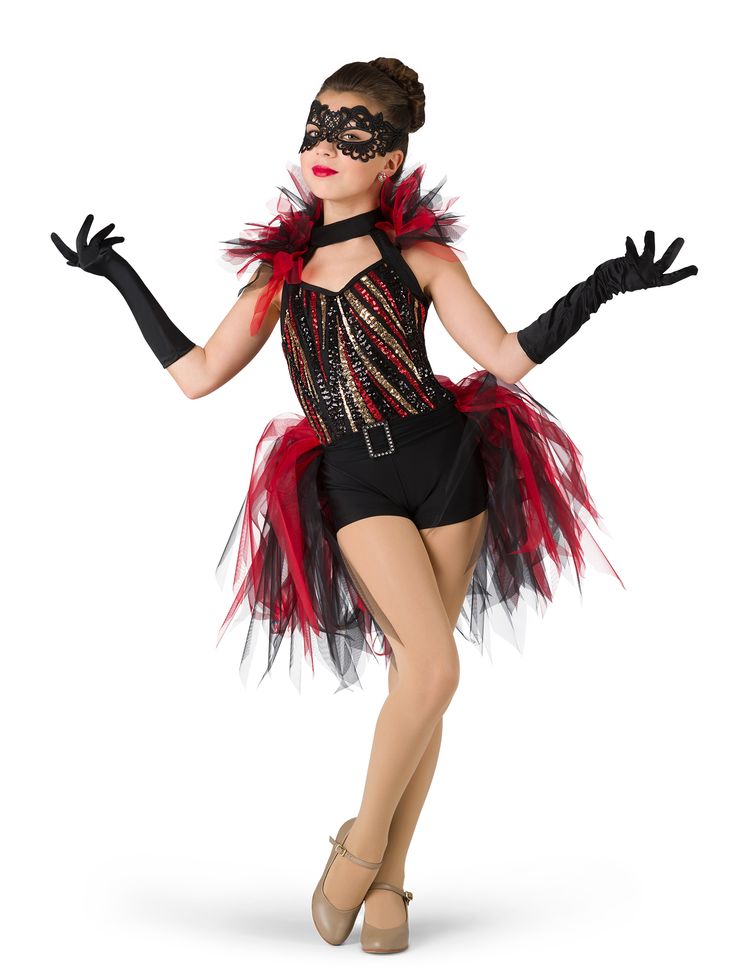
Latin Skirts
If you are a fan of Latin dance and are actively involved in the dance, experimentation is what you need. Latin dance skirt will allow you to create a unique look, depending on the situation:
- extremely short skirt, fitting the hips and including just a couple of ruffles on the regiline, gives pomp;
- A below-the-knee skirt with a high slit at the back will help create a strict classic look.
 In addition to being very stylish, you will be completely free to move and always attract attention.
For Latin dance classes, you can purchase special skirts of the following varieties:
- An asymmetrical cut skirt made of multi-colored materials will look very impressive;
- skirts decorated with fringes will look no less impressive, which will add volume to movements;
- classic dance skirt made of one material will appear more diverse with a bright belt and embellishment. It can be a lush flower that will transform your image. For example, a gode skirt made of solid material looks great with red wedges, and you will be remembered for a long time.
When choosing clothes for dancing in the Komilfo online store, it is best to make a choice in favor of several models. We recommend that you purchase several skirts, such as a very short skirt or a very long one with adjustable length. You can choose a very simple skirt for training for every day, as well as extremely stylish, bright and noticeable. In the latter, for example, there may be a "tail". It can be a movable "sun" skirt in order to shine at parties.
European dance skirts
If you prefer European dancing, then your dance skirt should certainly be luxurious. In the Komilfo online store you can buy dancewear, ranging from simple knitted skirts with sophisticated elegance to more complex ones that harmoniously combine knitwear with lace.
This may be a skirt with slits, as well as numerous puffy flounces. Skirts with wedges effectively expand from top to bottom. As for the length, it can be up to the ankle and completely cover the shoes. The designs of the skirts are aimed at ensuring that the dances are unique, memorable and please, first of all, you.
The material from which the dance skirt is made is usually jersey combined with mesh, guipure or beautiful trim in the form of satin ribbons. Knitwear skirts are very practical, easy to wash and dry.
When you dance, you open up your body in a completely different way and try different looks.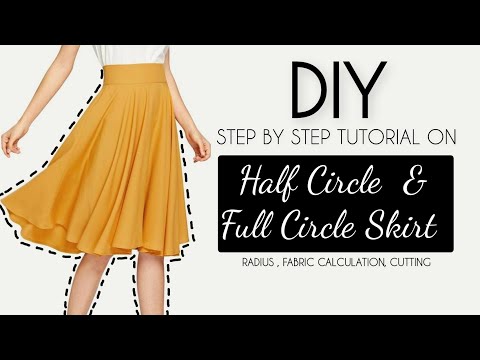 You definitely need to be nicely dressed. To do this, the catalog contains various skirts that are not only interesting and practical, but also very beautiful.
Komilfo, a well-known dance store in Moscow, will help you make your choice. You just have to experiment with the style, colors and length and be different every day. If you've always been a fan of classic style, it's time to change your look and opt for something a little more daring. This will help you experience completely different emotions and experience the art of dance in a new way.
Read the book "Someone else's wedding" online in full📖 — Tatyana Shevchenko — MyBook.
Two people were walking along the shore, not knowing where
Their footprints in the sand, footprints in the sand were washed away by water.
I don’t remember anything about these people,
I remember only heat, heat from your palm ...
Larisa Valina
Unexpected acquaintance is an unexpected acquaintance
Chapter 1
Summer came somehow at once: after a cold spring rain, the thermometer jumped to thirty degrees, and only by the still flowering trees and lush herbs could one understand: it had just begun .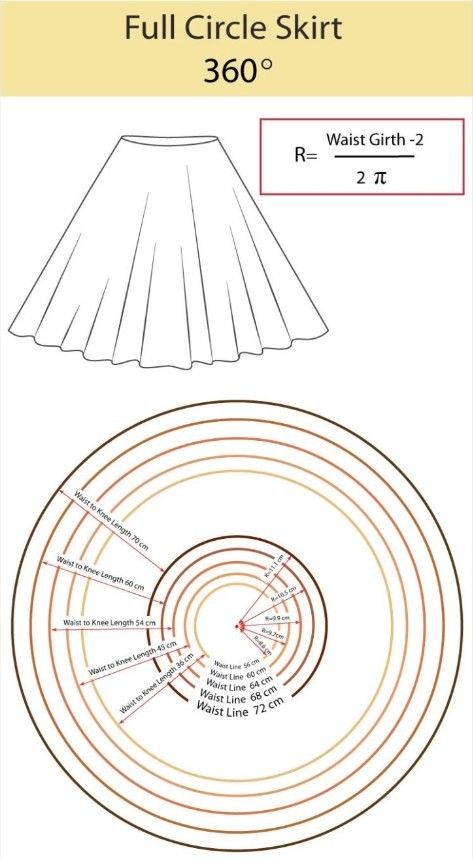 ..
..
Nastya was going to the village to attend her cousin's wedding and was glad that she didn't have to carry a whole suitcase of warm clothes with her, as usual at this time of the year.
She carefully selected the best things in her wardrobe, bought a bunch of cosmetics and packed them all into a small travel bag. Then she went to the hairdresser, which she did very rarely and, using all her services, came out of there some kind of new and damn attractive. And she also had to inform her friends about her unexpected departure.
The four of them were friends, but Masha, a classmate, was the closest to Nastya. Both no longer remember how they became friends. They had their little secrets, they almost never parted with each other.
Vika and Lena were a year younger and they had their own interests, as well as their own secrets that neither Masha nor Nastya knew about, but when they got together, each brought something of his own, new, to this friendship, special, and there was no end to their inventions.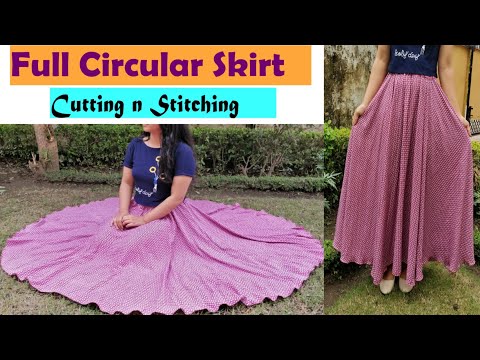
Sometimes, of course, petty quarrels or disagreements arose between friends, but, fixed by time, their friendship was taken for granted by them, was not subject to any laws, and none of them even had the thought that they could when - whether to leave ...
* * *
– Hello.
- Hello. You're alone?
- It seems to be so, - Nastya jokingly looked around.
– Why are you so beautiful? Something happened?
- It happened.
Going to the kitchen, where they usually drank coffee and chatted, Masha stopped halfway:
– Good or bad?
- For me - good - Oksana is getting married.
- For whom?
- For the guy, of course, - Nastya laughed.
- When?
- Tomorrow.
– So are you leaving today?
- Yes. There will be a youth party tomorrow, and the day after tomorrow there will be a wedding itself.
- Wait, wait, you didn't tell us anything, but you yourself...
- But you only found out yesterday. In the evening they brought a telegram: “We invite you to the wedding on the 6th. Oksana, Ivan.
– Do you know him?
- From where?
- You were there last summer - who did Oksanka meet?
- With Dima.
- What about this Ivan, where did he come from?
- I have no idea. I'll be back, and then I'll tell you.
Masha was fussing around the stove, preparing coffee.
- Damn it! You are leaving us again!
- Masha, I won't be long, just for one or two weeks, I need to visit my grandfather along the way.
- Wow! - for half a month!
- First of all, I'm on vacation.
- Great, - put in Masha.
- And secondly, - I won’t stay there for a long time, - the wedding will end, and he’ll take Oksana home, and what will I do there without her? They are on their honeymoon after all. Nastya sat down at the table, where all the sweets that were in the house were already standing: cookies, condensed milk, jam, honey, poppy seed buns - Masha had a terrible sweet tooth.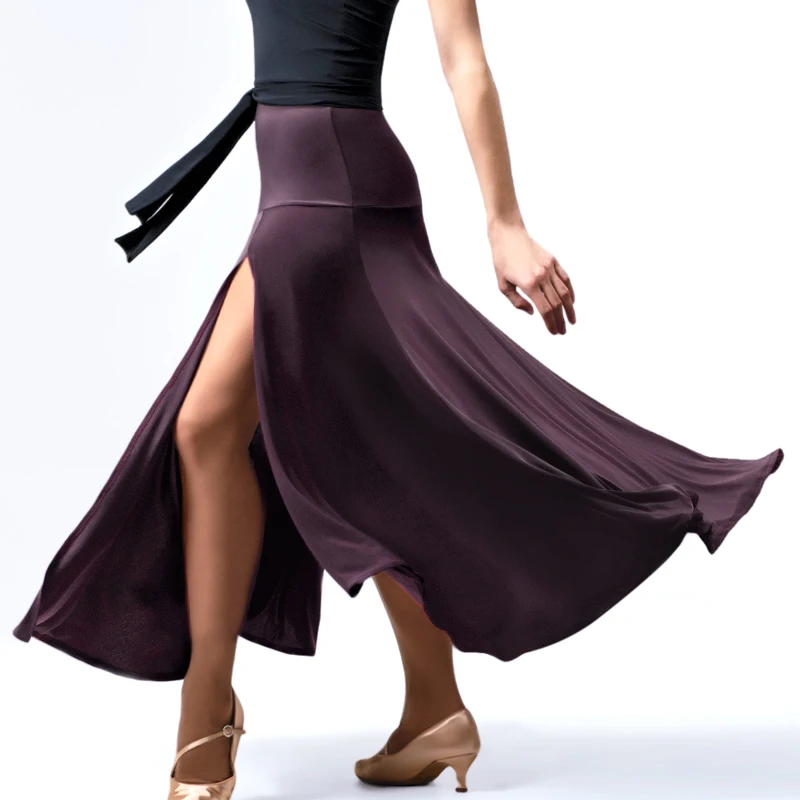
- How is she - without your knowledge?
- Did you have to go, first evaluate the candidacy?
- Why not? Yes, look there for the company, too, for someone - don’t jump out, - Masha poured coffee into cups.
“You’ve been telling me this every year since I was fourteen,” Nastya was offended.
- Okay, just kidding.
- Masha, well, who to marry? You know - there is no one, and it is not expected.
– Who knows, who knows… Train as usual?
- Yes, around 11 p.m.
- Well, I'll have to see you off. Let's just meet at the train station, okay?
- You don't have to come, but we met before leaving.
- How? - Masha was offended, frozen with a cup in her hand, - this is an age-old tradition, - how can we break it? At ten for everyone to be. Don't be late.
- All right, Mash, I'll go - there's still plenty to do. Until the evening.
* * *
Nastya opened the door of her apartment, "communal improved
layouts, ”she called her that because only one neighbor lived with them, and she was always on business trips.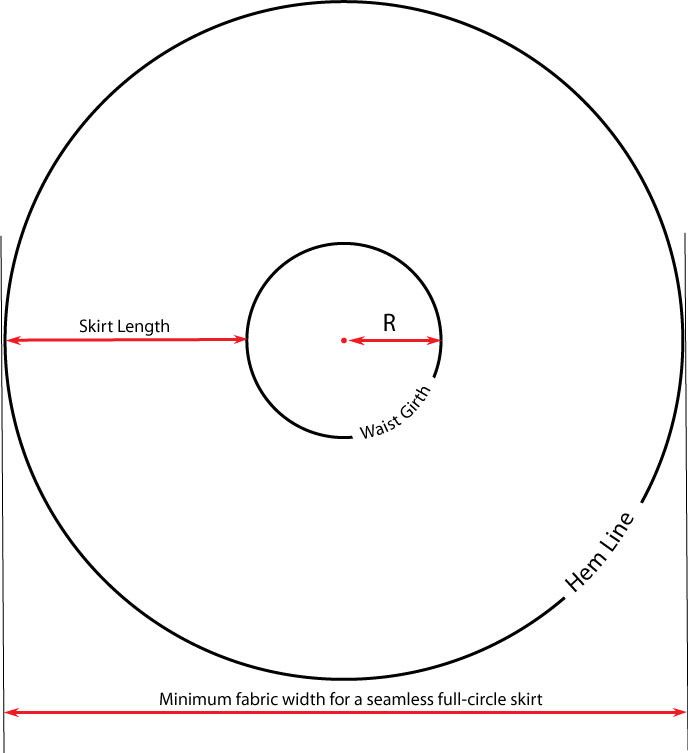 Liza, the brother's wife, was feeding the baby.
Are you going? she asked in a whisper so as not to disturb Artyomkin's refectory half-asleep.
. - Of course.
- Well, that's right - the day after tomorrow it won't be so interesting there.
“I missed those places,” Nastya sighed, looking into the drawers and chest of drawers, afraid to forget something very important.
“Maybe you can find a groom there,” the daughter-in-law smiled slyly.
- Why are you all set to do the same thing: get married, get married - there is no other topic, or what?
- This is life, Nastya, remember how you fell in love with Sergei - how much fire you had! You're beautiful when you fall in love.
- And he, at this love ... He laughed and that's it, - Nastya answered sharply and, after thinking, added:
- Or maybe it's me - a fool, that I fell in love with such an idiot?
- No, Nastya, you are not a fool - there is no price for this feeling.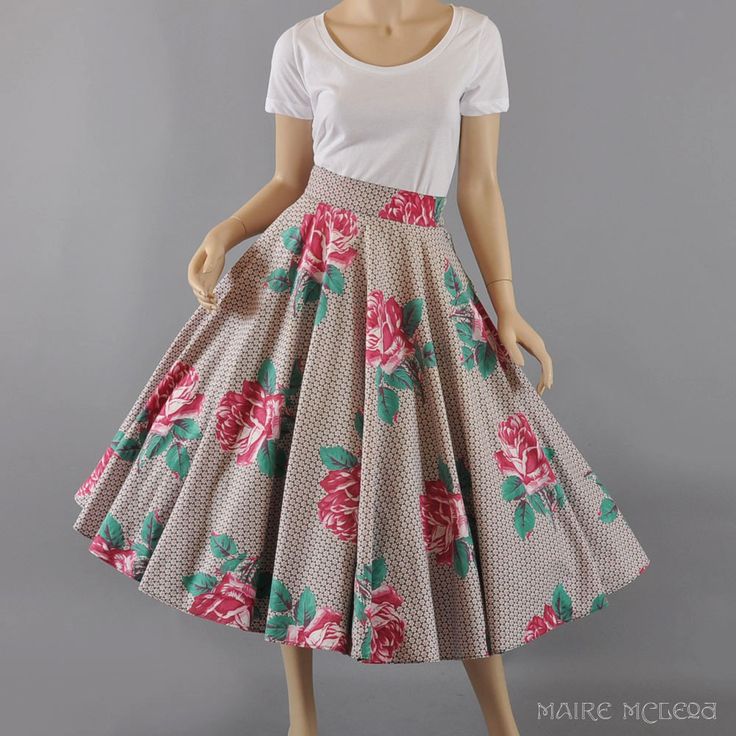 Yes, and it is not given to everyone. Nastya interrupted her:
“Let's not talk about him,” tired.
She did not like to remember her first failed love. Always
neatly and stylishly dressed, clean-shaven, he made an extraordinary impression on Nastya, she saw in him a rich, outstanding personality and for three years gradually watched him, dreaming of a meeting. And then one day, apparently noticing her interest in him, he made an appointment with her. Distraught with happiness, she rushed to meet him. And so, walking in the park, at the first opportunity, he brazenly and unceremoniously reached under her skirt.
Nastya experienced both shock and disgust, which turned into deep disappointment.
This was her first bitter lesson in dealing with a man. Overcoming pain and
shame, she said, jerking his hands away sharply:
“If you went with me just for this, you can turn back.” Sergey, without saying a word, turned around and calmly walked along the path towards the city, as if he remembered that he forgot something very important and decided to return.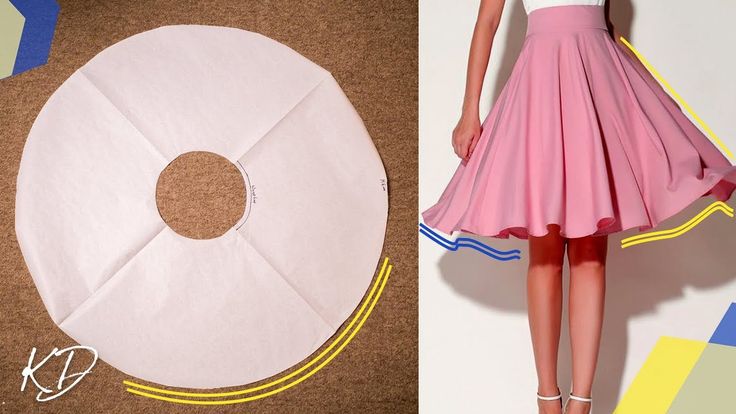 At some point, pride took over, Nastya wanted to shout: “Wait, don’t leave, I beg you!” But all of a sudden all these feelings - feelings of resentment, shame, abandonment - rolled down from her immaculate, pure soul, like dew from a leaf washed by her, and she, leaning against a tree, looked after him for a long time, enjoying the thought that she had won, destroyed him. The one who had such a high opinion of himself.
After standing until he disappeared somewhere in the greenery of the park, she slowly walked home, going over what happened in her memory, but neither love nor resentment was there anymore...
Despite the bitterness of memories, her soul, born to love, again was filled with sweet anticipation of a miracle: from the upcoming party, exciting nightingale trills by the river, dancing until dawn. It seemed to her that it was there, at this wedding, that something very important and exciting should happen in her life...
* * *
The girls, as usual, went around the station building and headed for the summer cafe.
– What shall we drink? – asked Nastya.
“And there is,” Vika added.
- So, Lena drawled dreamily, - of course - Pepsi, ice cream, Vika, what else?
- And also cakes, chocolate and a bottle of champagne, - Vika answered quickly.
Nastya turned to a young waitress:
- Everything that was ordered for us. She glided merrily past the tables to the bar—they didn't have many customers like that—and quickly returned with a full tray.
The girls were sitting at the table, so different, each of them was waiting for her own, unique, not like the others - a fate that they dreamed of as something secret and beautiful. Their cloudless thoughts could not then be overshadowed by the utterly simple, sometimes cruel, and sometimes completely opposite to their dreams - reality. This is exactly what made youth beautiful - the opportunity to choose your destiny according to your taste, to reshape it a thousand times in a new way, without thinking that it might turn out to be completely different . ..
..
- For the bride! - solemnly - Vika said loudly, referring to Nastya. Everyone raised their glasses.
“Be quiet, they’ll still think it’s me, the bride,” Nastya interrupted her in a whisper and added: “For us!”
While the girls were emptying the vases with cakes and ice cream, finishing their champagne, they announced the arrival of the train, but no one paid attention to it, and only when people rushed from the next table towards the platform, picking up their bags and suitcases on the go, Nastya understood , is her train.
The car was standing right in front of the alley from which they came out. Masha threw herself, as always, on Nastya's neck, her eyes shone with tears:
- When will you be back?
- Masha, honestly, as soon as the wedding is over, go straight home.
Lena threw a couple of playful phrases, the train started moving.
All night long Nastya slept to the monotonous clatter of train wheels, and early in the morning she was already at the station, from which she still had about an hour to get by bus to the village.
Leaving the carriage, she inhaled with excitement and joy the crystal-clear, painfully familiar aroma of childhood.
She was nineteen, she was still ahead, she greedily absorbed life, dreamed of the future, lived easily, naturally, rejoicing in everything in the world, rejoicing in life itself, finding in it exactly what she wanted to find. And even now an ordinary trip to the countryside seemed to her the most wonderful rest and could not be compared for her with any of the Canaries ...
* * *
A small, dusty bus was patiently waiting for passengers. As soon as everyone was seated in their seats, he slowly began to pick up speed, picking up smoking men at the entrance as he went. Nastya clung to the window, behind which stretched endless fields of winter, gardens, unmowed meadows. The open windows smelled of the greenery of grain that had not yet poured.
She was thinking about the trip, trying to imagine her fiancé, thinking about how many relatives she would see today, from almost all corners of Russia, imagined how she would look in her delicate peach dress, how they would dance, then, probably , they will go to the river to listen to the nightingales…
In general, she dreamed of happiness, love, about what every nineteen-year-old girl dreams of.
Climbing heavily up the hillock, the bus stopped. Nastya saw Oksana's house, lost in the white and pink flowering gardens. Leaving the bus, she went down the path and, from a distance, she saw that preparations for the upcoming celebration were already underway in the yard: the men hastily
knocked together benches, made sheds, Women cleaned vegetables, gutted
poultry. All around was the pre-wedding fuss.
8
- And here is another guest - well, hello. Grandmother kissed Nastya, took her around the yard, and she barely had time to greet, kiss relatives who had arrived yesterday
.
– Where is mother? asked Polina Ivanovna suddenly.
– She will arrive tomorrow – they didn’t let her go from work.
- Ksyusha went to get her wedding dress, it will be at four o'clock. And you go, take a rest from the road, I suppose you are tired?
- No, grandma, I'm not tired, but I'm going to the house - I need to sort things out.
The familiar smell of the daubed floor, the clinking of the deadbolt, instantly took her back to her childhood. Nastya's heart skipped a beat. Nothing has changed here: the same furniture, the huge clock on the wall, chiming the exact time, the same quivering feeling that she experienced every time she came here. It was as if she was returning to a parallel world, which for some time lived her ordinary life without her. And here she is again in him, at the same time in which she left him last time ...
The clock struck eleven. The next bus isn't until fourteen, which means she still has time to wander around familiar places.
Having changed into a short cotton dressing gown, Nastya went down to the river gardens. Having plucked several branches of lilac, she carefully placed them on the edge of a mine crater that exploded here many years after the war and claimed the life of her older cousin, Vitya. He was then about seven...
* * *
The mine was sticking out of the ground. Adult guys, noticing her, were afraid themselves
go up to her and persuaded the kids:
“Break it, there are a lot of different toys,” they lied, and
scattered around the abandoned garden away from the mine ...
Antonina Ivanovna was weeding the garden when an ominously familiar sound swept over the village the explosion of a shell, echoing in every heart of the one who caught the war. The chopper fell out of her hands, she screamed and rushed into the abandoned garden. My heart ached, fluttered, ached.
Small
legs in black pants and small brown shoes. Vitya's shoes ... Antonina Ivanovna leaned against a tree, slid down it to the ground and lost consciousness.
* * *
Nastya wandered around the garden for a long time. She was grateful to God for that eternal, unshakable, which stretches like a thin thread through our whole life - this is nature itself, which provides us with happiness, despite our life problems, hardships and difficulties, always feel its stability. Everything in it went on as usual: summer gave way to autumn, winter to spring, and every time we, somewhere internally, intuitively, thanked nature for not letting us forget the past, instilling confidence in the future, bringing into our lives feeling of security, stability of this world.
* * *
Approaching the house, Nastya saw that there was no one in the yard: having set up tables, benches and sheds, the men dispersed in all directions. Their voices were heard somewhere behind the summer kitchen, in the garden or at the main gate under the spreading willows. Women rested in the summer house, in the house, or busied themselves in the kitchen.
In the middle of the yard, half-turning towards her, stood a tall, blond-haired young man, with his arms crossed over his chest, slightly swaying on his feet, obviously thinking about something.
Nastya creaked the gate, he turned around and…
They stood silently for a minute, eye to eye. Nastya looked at the stranger with genuine, frank interest: it seemed that nature gathered all the best that it was capable of and created this person.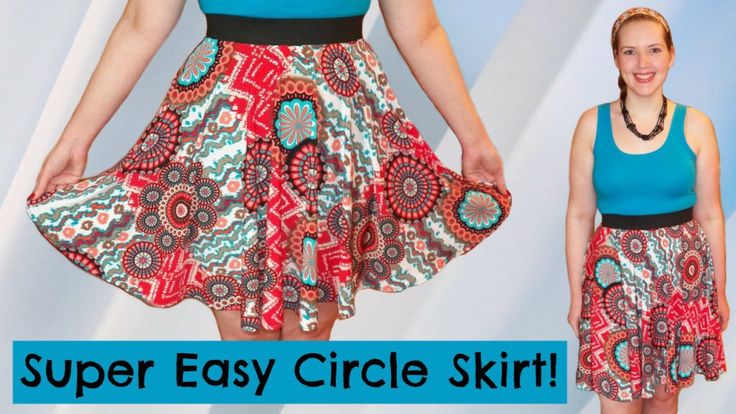 On the face there was not a single line, feature, fold that would be wrong, superfluous on this expressive, aristocratic and, at the same time, courageous face. She had never met such an impeccable
beautiful person. His eyes seemed to Nastya so familiar, dear, that for a second she even thought that she had met him somewhere before, but no, she could never forget this deep, penetrating look.
She read somewhere that this happens: “When your dear face suddenly flashes in the crowd, and now, if you don’t take a step towards each other, you don’t call out to him, then fate will separate you with a crowd of people scurrying between you, you will be lost forever and for a long time, and maybe for the rest of your life, you will remember each other, each continuing your own path ... ”,
- The path of a lonely wanderer, and it doesn’t matter if you have a family, children, - the sad feeling of loneliness will always be to stand behind you, like a silent reproach to your weakness, indecision, which crossed out that one - your life, to which you now simply have no right .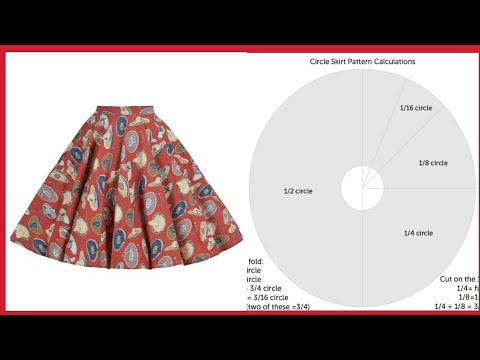 ..
..
Nastya at once turned his idea of female beauty and of a woman in general upside down.
At the gate stood a girl of about eighteen, with still childish, sweet features, but, despite her youth, she could sense spiritual strength, a rich inner world, reflected in her bottomless, almost black, eyes.
Once upon a time, in his youth, when fairy tales and erotic fantasies mixed in him into one gamut of sharp, not yet experienced, boyish feelings, he dreamed of just such a woman. But over the years and the gradual acquisition of experience, to his deep disappointment, he began to understand that life itself and women in general are much simpler than his indefatigable fantasies. But here she is, from that very fairy tale, from his youthful dreams, so earthly, so real ...
They all looked and looked at each other, unable to tear their eyes away. Finally, Nastya, blushing slightly, went to the summer kitchen, hoping to see her sister there. As she passed, she greeted him quietly.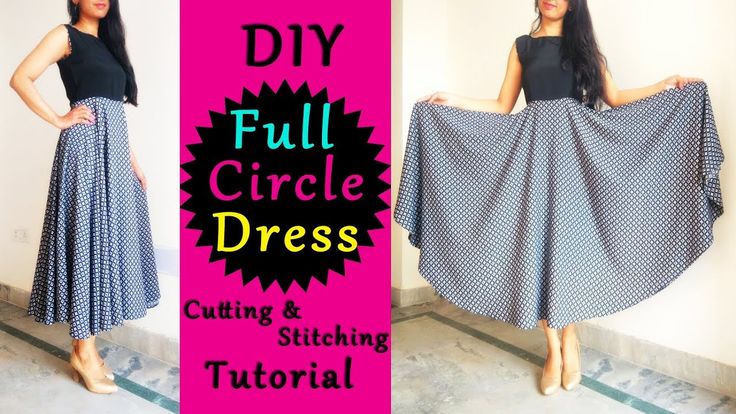 The young man, absentmindedly answering the greeting, followed her with his eyes to the door, inhaling deeply the aroma of her delicate perfume.
Entering the passage, Nastya collapsed on a bench in complete darkness, her heart pounding furiously: “Lord, what is the matter with me? Does it really happen? But what a familiar face! That's enough," she tried to force herself to stop trembling. The door from the kitchen suddenly opened, and Oksana was standing on the threshold with freshly washed hair, hastily rolled up with a towel, from under which wet wheat strands of long hair were stubbornly knocked out.
– Why are you here in the dark? What happened to you? She even forgot to say hello to her sister when she saw her pale face.
Nothing. Heat, probably. Nastya got up and went to her sister.
- I'm so glad to see you! The sisters hugged tightly. Both tall, slender, beautiful, the girls were still so different: Oksana - calm,
gray-eyed, fair-haired Russian beauty, unhurried in her movements,
words, deeds - she inspired a sense of calm and solidity.