How to install a sprung dance floor
Sprung Dance Floors: The Ultimate Guide
By Joseph Reinke, Owner of Dance Equipment International
Whether you want to build a dance studio, update your existing dance studio, build a new sports gym, or open any other medical/sports facility, chances are your largest investment is going to be flooring. This ultimate guide to sprung dance floors will help you make the best decision for your facility.
Table of Contents
1) The Evolution of Sprung Dance Floors
2) 2 Most Important Aspects of Sprung Dance Floors
3) Floor Cleaning & Maintenance
4) What installers need to know about sprung dance floors
5) Questions To Answer Before Purchasing A Sprung Dance Floor
6) Conclusion
Historically, the choice of performance flooring surface for theatre & dance was between a wooden floor and linoleum. That’s right, people use to dance on linoleum.
The industry began to realize that dancing on wood with no give or linoleum was not a good thing. Therefore, new developments began. The biggest desire was to create a floor with “give.”
Numerous types of floor were also needed because of different forms of dancing: Ballroom Dancing, Ballet, theater performances, etc. Thus, hardwood floors were developed and installed many different ways.
The solution at the time was a system of flooring that used metal springs, coils, sleepers or a basket weave system. Then a hardwood floor was laid on top of this system. This was a better solution than what previously existed but had many flaws:
- This type of sprung flooring was installed many different ways, was labor intensive, and very costly.
- Some of these types of sprung flooring proved to be far too “bouncy” for ballet, contemporary artistic dance, and other types of dance and performance.
- Not only were the floors to bouncy but they also had hard spots.
 A hard spot is essentially locations on floor where it was less “bouncy” than other spots. The hard spots occur where the wood planks under the flooring cross each other. Can you imagine jumping from a “bouncy” spot (flaw number 2 above) and landing on a hard spot.
Although the early variations of sprung dance floors were flawed, they led to two positives. First, they were extremely popular. Thus, illustrating the need for innovation. Second, companies saw the demand for semi-sprung floors which led to companies continuing to invest and innovate.
Over recent years, modern floor construction methods were developed. These modern construction methods removed the bouncy or trampoline effect of the early sprung flooring systems.
The modern day well-designed sprung dance floor techniques better suite the performance needs of dancers, athletes, and theatre performance for today standards.
Today, Sprung dance floors have a number of names: Floating Floors, Suspended Floors, Sprung Flooring, Resilience Floors, Free Floating Floors.
There are two primary reasons to invest your time and money in buying the right sprung dance floor: Injury prevention and performance.
Injury PreventionMedical professionals, from MDs to Physical Therapist, that specialize in dance and athletic injuries have established a link between the quality of the flooring and injuries. A sports sprung floor for dancers and athletes, with a degree of resilience is strongly recommended.
The design of the sprung floor is what reduces the impact on joints, muscles, overall stress on the body. One safety certification you should look for are DIN standards.
DIN standards were developed in Germany and are recognized worldwide as one of the best methods for evaluating sprung floors. The standards were developed to test shock absorption, resilience, surface friction, impact, and surface stability.
DIN standards are used by manufacturers to ensure the performance of the sprung floor has the greatest degree of safety.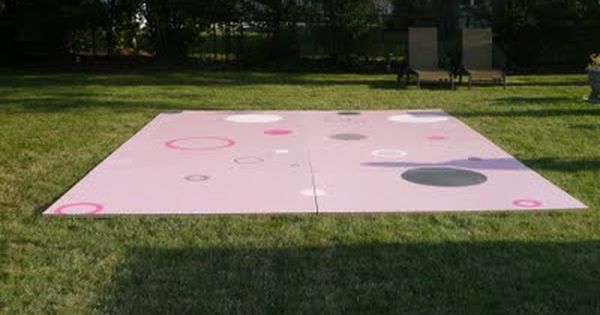 You can think of DIN standards as your cheat sheet to finding a sprung floor that measures up to your safety standards and needs.
Performance is a key factor in sprung dance floors. It is directly related to the surface of the floor.
Performance of a sprung dance floor has several key factors. One important factor is proper resilience or progressive shock absorbency. This helps to lessen the impact, by providing progressive shock absorbency, for the demands on the floor as well as other higher impact routines of the dance style or venues being performed. That is why Din Standards are provided by the manufactures to show this design feature.
Another factor is the performance surface of the sprung dance floor. The floor should have a degree of traction, that allows the performer to fully and artistically express movements without the fear of slipping or falling. Proper foot stability is essential to reduce foot roll-over and other injuries.
As previously mentioned, some performers will decide to roll out vinyl dance flooring over the hardwood surface. If you don’t, then the sprung wood dance floor should have some degree of traction provided in the finish. Most have a polyurethane finish or a sport lacquer finish. For example, Dance Equipment International Elite Springflex dance floor has a polyurethane finish. The Oak Flex and Maple Flex Sprung Dance Floors have a sport lacquer finish.
The finish seals the hardwood for superior durability and helps provide a safe traction coating. These types of finish also make the maintenance and cleaning of the floor easier and more hygienic. In short, the type of finish is an important factor in the performance of your floor.
Maintenance and cleaning sprung dance floors is fairly simple. However, it is a must if you want to protect your investment. Cleaning your floor will make sure it remains functional and beautiful throughout the floor’s lifetime.
How often you clean the floor primarily depends on the amount of usage. Keeping the floor free of dirt, dust, oils and debris is most important. Doing so helps prevent injuries from falling, slipping, losing, traction, etc.
Regular maintenance should include sweeping, using a dust mop, or using a vacuum cleaner. This should be done daily, 2-3 times a week, or once a week depending on traffic. This will keep the dust and dirt down to a minimal.
Oils from bodies and sweat cannot always be seen on the wooden floor surfaces. However, they are present. Weekly cleaning recommended.
To clean the floor Bona Kemi hardwood floor cleaner is Dance Equipment International’s recommendation. Lightly spray the dust mop head with the cleaner and wipe the entire floor surface. You may also spray a light mist directly on the floor. However, only use a light mist and dry it immediately with a dry mop.
Never allow liquid to sit on the wood flooring. Water should never be used to clean a wood sprung dance floor. If a janitorial service is used, make sure they are aware of the correct way and product to use on the wood flooring. Liquid getting into a seam is not good on any wooden floors or the sub floor underneath. Try to dry it immediately.
As previously mentioned, we have recommended Bona Kemi for years. If you choose a different cleaner, make sure it contains no wax or oil soap. These products will trap dirt and grime and eventually leave your hardwood floor dull in appearance, slippery, or sticky. Wax build up will also make the recoating of you floor more difficult. Again, never use wax or water in cleaning hardwood flooring.
Flooring installers, flooring stores, architects, or people installing their own sprung dance floor need to know what the general use of the floor will consist of. It is important to determine every style of dance or activity that will be performed on sprung dance floor.
Sometimes we are given the total square footage of the sprung floor location. That is OK if you are looking for a rough estimate of costs. However, the layout of the room is absent. Therefore, the way the floor will need to be laid may not be as accurate.
The best way to get an accurate estimate is to provide the linear feet by width and length. That helps give us the proper measurements and an accurate cost estimate. Also, you should lay the planks of wood running the long length of the room. Approximate square footage does not provide this useful information.
If the room is a perfect rectangle or square the length & width measurement in linear feet should be close to an accurate measurement. Some larger jobs, new construction, or remodels will provide architectural drawings that provide technical and specific measurements of the facilities.
If architectural drawings are not available, you can simply make your own drawing. On a piece of paper make a simple drawing of the room with any measurement of obstacles or any cut-out in measurement of linear feet. Include the doorways and any openings to another room or hallway. Also include areas that will line-up against carpet.
Any open edge of flooring or doorway may require a ramp or lip-over reducer (also called a transition edge). These measurements are needed to help provide your finished edges.
Sprung dance floors can go over concrete. It is important the existing concrete slab is level. Most concrete does have a certain amount of moisture. Therefore, polyethylene goes down on the cement as a moisture barrier before the sprung dance floor is installed. Polyethylene is a plastic film.
Generally you do not need to remove the existing floor. Sprung Dance Floors can go over vinyl flooring and some types of low pile carpets.
When shopping for selection of products and cost estimates, we can help select the proper sprung dance floor, the material you will need, and the necessary tools. Online technical information and telephone support is available from the beginning to the completion of the sprung dance floor installation.
This list is from Dance Equipment International. It includes questions that we are asked on a daily basis. These questions are from studio owners, home owners, designer architects, builders, flooring contractors, etc. They will help you and give you a place to start.
What Location Will The Dance Floor Be Used In?
You need to know the size of the area as this will help you get estimates in costs. More importantly, you need to know the type of location, i.e. is the building an industrial building, commercial building, or a residence.
The type of location is important because you need to know various factors such as sub-flooring, moisture, and temperature. Answering this question will help with picking the right floor and the proper way to install the floor. This in the long run will save you money because the floor will last longer.
What Are You Using The Floor For?
Ballet, jazz, tap, modern, ballroom, irish, flamenco, clogging, aerobics, exercise, martial arts, multi-purpose, etc….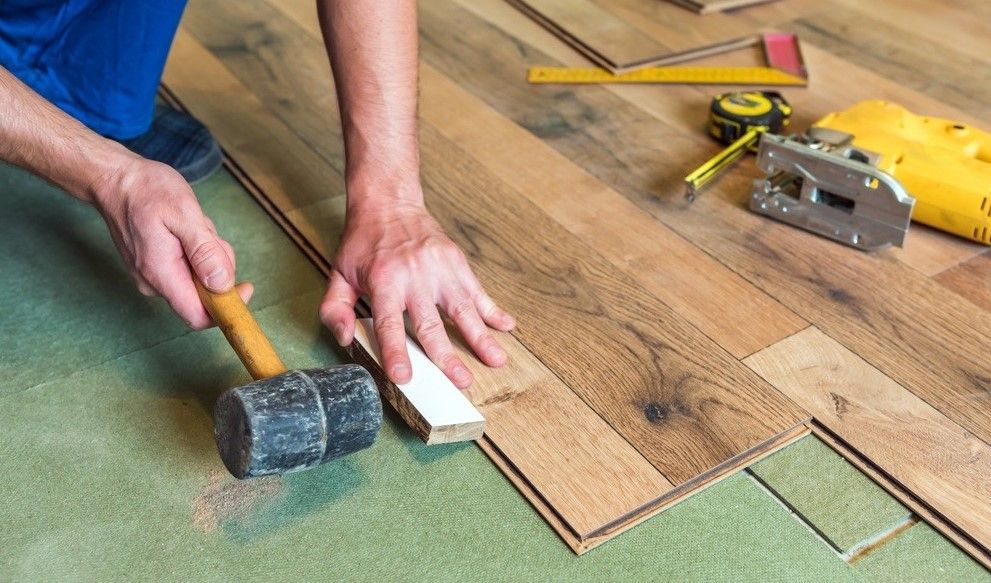
Different types of dance require different types of sprung floors. Some will want to dance directly on a finished floor. Others will want to dance on Marley flooring. Knowing this can save you a lot of money.
For example, sprung floors provide the optimal flooring to lay Marley on top of. However, if you are using Marley flooring all the time, you can save money by getting an unfinished sprung sub floor instead of a finished floor. Want more information on Marley flooring. Click here for our Ultimate Guide to Marley Flooring (Coming Soon!!!).
Who Is Using The Floor?
Different teachers will have different needs and opinions. We definitely recommend consulting your instructors before buying your sprung floor.
In addition, students and professionals will have different requirements for their venues. Also, will the dancer or performer be wearing hard shoes ,tap shoes, soft shoes, be barefooted, using athletic shoes, etc…
Do You Need Sprung Floors For General Stage Use?
For general stage use, you’ll want to know how interchangeable the floor is with different venues.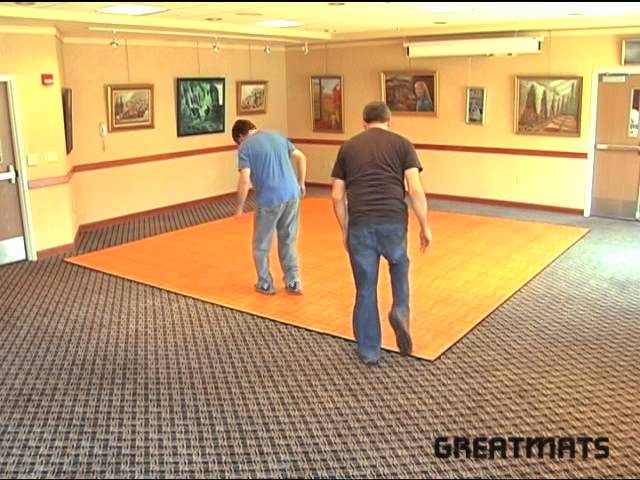 A solid wood surface sprung floor is perfect for general stage use often times seen with theaters, Churches, schools, auditoriums, etc…
The primary reason is that damage often occurs to floors being used for general stage use. Solid wood sprung dance floors can be sanded, refinished, or rescreened time and time again. This helps preserve your investment and longevity of the floor.
Is It New Construction Or Renovation?
All sprung floors can go into new construction. Specifications can be done according to the specifications outlined by the designer, owner builder, architect, etc…
Some sprung floors in renovations need to be low profile (the thickness of the wood) depending on the existing building. What kind of floor is currently in the facilities and the condition of the existing floor helps determine what needs to happen before installing your sprung floor.
For example, is the floor cement? If so, you should always have a moisture barrier before laying the floor.
If the area is humid you may want to do a moisture test called a calcium chloride test.
You’ll also want to determine if the existing floor is level, if there are holes in the existing floor, and if there is exposure to extreme heat.
Commercial Or Residential Purpose?
Are you instlling the sprung floor in a basement, first floor, second floor, etc…? This is extremely important because of moisture and humidity.
In commercial properties for dance studios or sports usage, the landlord may be responsible for the cost of the flooring or in the sharing of costs.
Also, shipping costs vary tremendously if going to a residence versus going to a commercial property.
Do you own or rent the facility…or are you a school?
Whether you own or rent is extremely important. For example, if you rent you may want a removable sprung floor.
This also applies to schools. If you decide to change spaces (classrooms or multi-use rooms) or build a new building you may want to move the floor with it.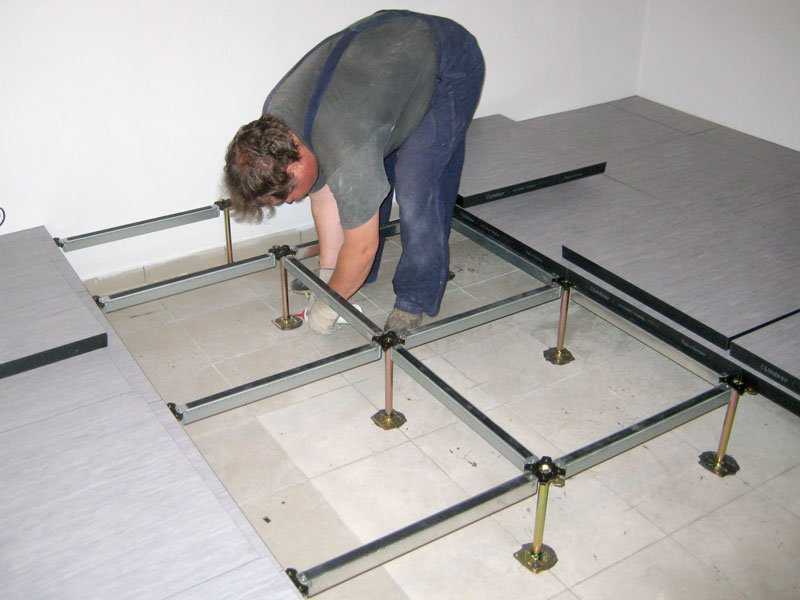
Know Your Measurements
Having the actual linear foot measurement, such as 20’ x 30’), helps ensure the sprung floor will fit the space in the best way possible. In most installations, the sprung floor should run parallel with the longest wall.
Providing square footage instead of 20’ x 30 is OK as long as the square footage is extremely accurate.
Whether you are a dance studio, school facilities, athletic facility, etc. your main investment will be your sprung dance floor. You want to make sure your investment will last, has been tested, approved, and meets or exceed the industry standards.
The most important thing you will want to know is that your sprung floor provides resilience and the proper friction for the dance style or venue being performed. Dance can be extremely taxing on the bodies tendons, joints, bones and muscles. Sprung dance floors are designed to help lessen impact. It is necessary to provide a safe environment for your dancers, teachers and studio owners.
Dance Equipment International has provided service and support to Dance Studios, Schools and Universities, Parks and Recreation, Community Centers. Churches, Theatre and Auditorium Stages, Fitness Clubs and Gyms, Private Residence, Hospitals and Physical Therapy services, Architects and Flooring Contractors. We want our experience and years of being in business to help answer your questions. Our company wants to have an understanding of your needs and priorities to help you select the best flooring system for you and safety in your work environment.
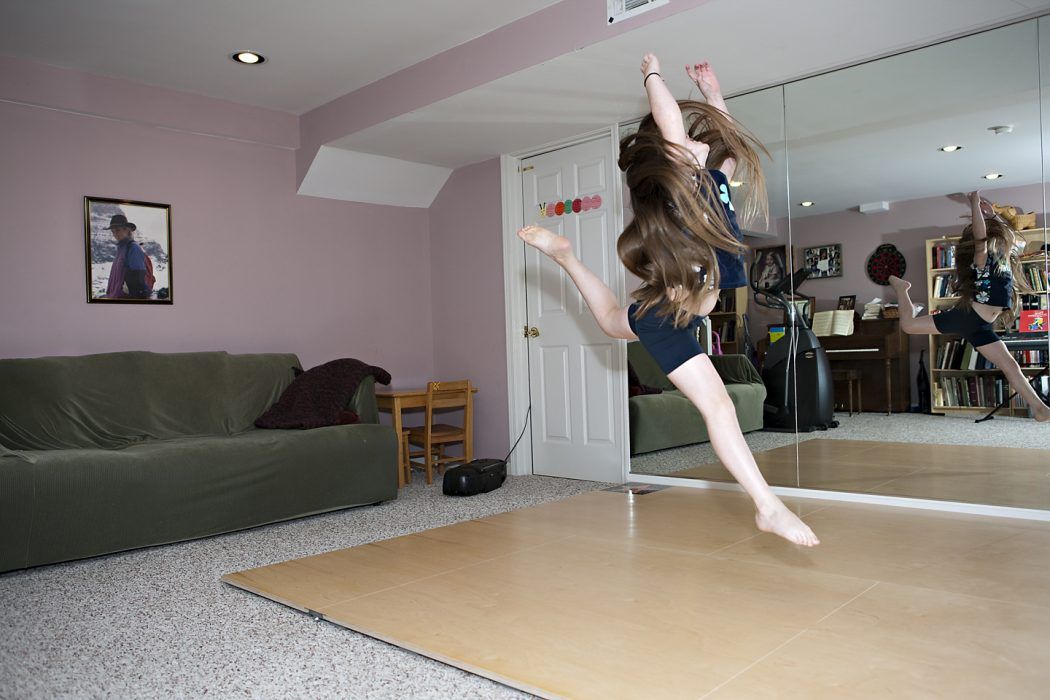
How to Build Your Own Studio or At-Home Dance Floor
A proper dance floor system used to be an expensive and complicated project. No more. We are talking about a real professional floating wood sub-floor and marley floor surface with a taping or adhesive system, for as little as $3.50–$4.00 per square foot.
Do it yourself does involve time and effort for which you are rewarded by saving money.![]()
Let’s first start out with a list of materials:
- If you are starting with a clean level concrete slab, you will need a vapor barrier, which can be liquid or visquin (clear vinyl sheeting) and water proof tape. If you have VCT tile or glued commercial carpet there is no need for a vapor barrier.
- Two layers of underlayment grade plywood, each a ½ inch thick. The bottom layer should be B/C, meaning that neither side has been sanded. The top layer should be A/C, meaning the top side is sanded smooth. Underlayment plywood does not have any knot holes or vacancies between the laminations.
- One inch counter sink deck screws. Nails are a no-no.
- Ardex Featherlite or Feather Finish filler for the screw holes.
- Foam blocks or foam cubes.
- Transition for doorway to access the raised dance floor system.
- (Optional) Vented Cove Base.
- Marley type flooring.
- Tape or adhesive.
That’s it. All products are available at Stagestep except the plywood, screws and Ardex.
Tools Needed:
- Circular saw with wood blade
- Power screw driver
- Matte knife
- Sander
Tips:
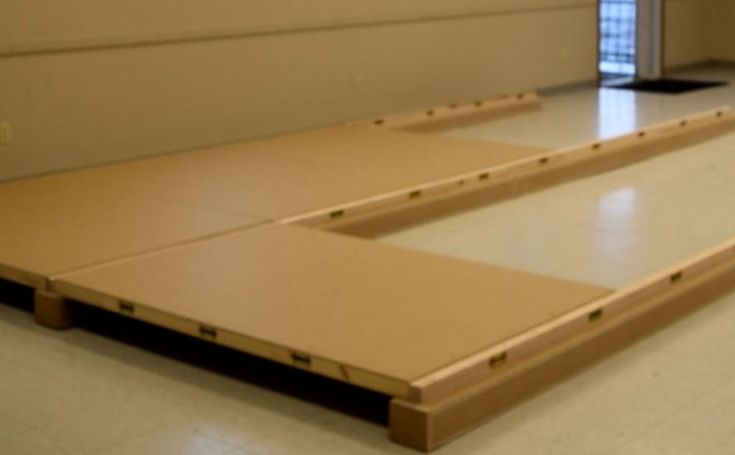
The bottom layer of plywood should be cut when necessary to stagger the seams. Boards should be 1/2 inch from the walls. Glue or peel and stick foam blocks or cubes to the plywood. 52 Blocks or 100 Cubes per 4 x 8 panel. See directions online, of placement of foam at Stagestep.com. Download installation guide. See page 33.
Flip all boards over so the foam blocks or cubes are in contact with the concrete or vapor barrier.
If the bottom ply runs North/South, the top ply should run East/West. Top ply should be cut where necessary to stagger the seams. Counter sink the screws using between 75-100 screws per 4 x 8 ply panel. Fill countersunk screws with a filler such as Ardex Featherlite or Feather Finish, Do not apply filler to the seams.
The following day, level the top layer of ply by sanding the filler smooth to the surface. Vacuum or sweep the subfloor
You are now ready to install your floor surface.
Installing your Marley Floor
There are five ways you can install your roll out marley. But first, there are a few things you need to do prior to the install.
- All rolled flooring needs to be stored standing up prior to installation, or else, if lying down they could develop roll set(floor has waves in it when rolled out)
- Roll out your flooring lose and let it acclimate to room temperature. This could take 24 hours.
- Make sure the subfloor has been swept or vacuumed before installing the floor.
Installation methods:
Temporary
Temporary installation of the floor from a few hours to a couple of weeks is primarily used for touring shows, conventions, competitions and in situations where the floor has to be pulled up and re-installed frequently.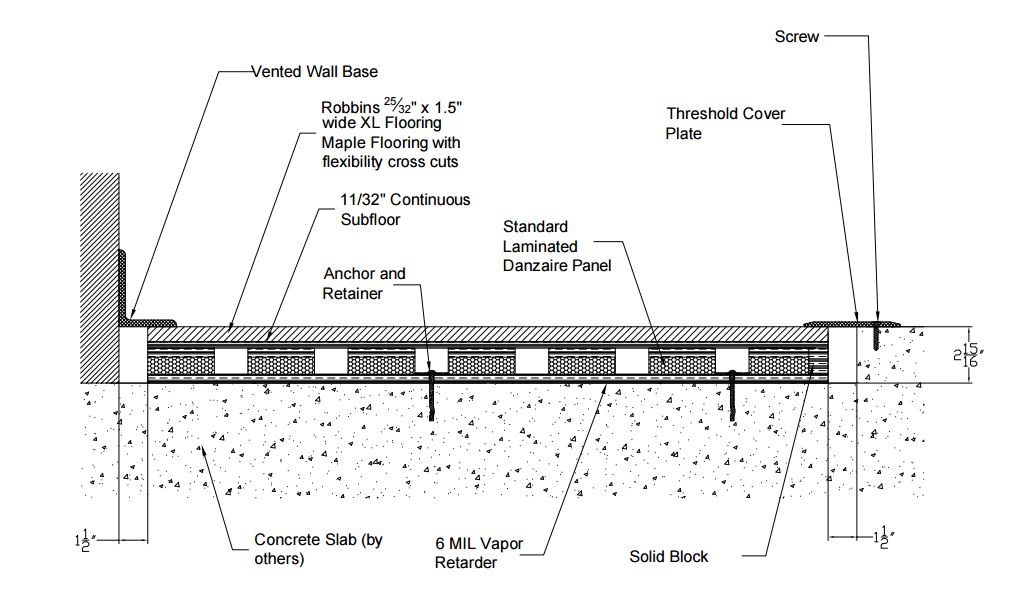
Use top surface tape only. Seams should be separated by 1/16 of an inch before taping. Tape should be applied to all seams and circumference of the floor. Tape comes in two types, vinyl and cloth and in two widths, 1.5 inch or 2 inch. Your preference.
Tape residue should be removed prior to re-application with Wipeout Plus.
Semi-Permanent—One to three years.
2 inch double-faced tape and top tape.
This method has been around for many years. The double-faced tape is installed around the perimeter of each roll and down the middle of each roll.
The floor is rolled out and trimmed in place. Then one roll is rolled ½ way back up, employing a 4 inch tube (all floors are shipping with floors rolled around a tube so do not throw them away).
Apply the tape and peel off the top protective coating and roll your floor over the tape. Continue the process until all floors have been installed with the double-faced tape.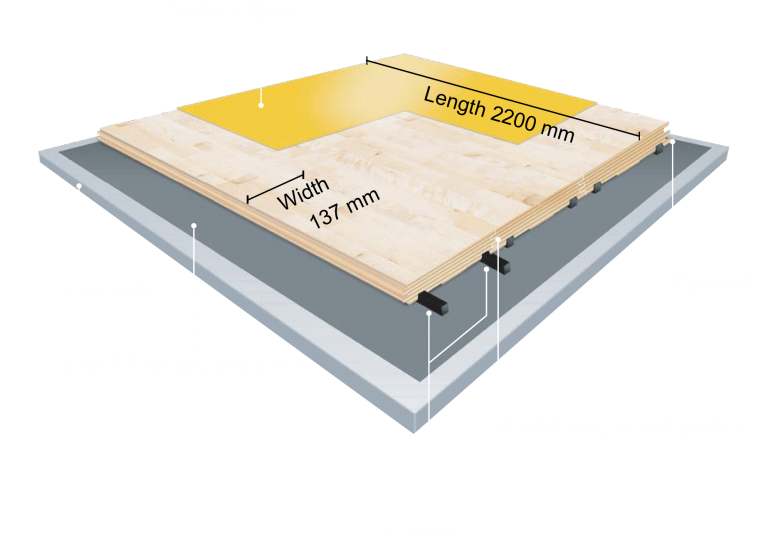 Top tape all seams and around the circumference of the room. Remember to leave a 1/2 inch gap between the floor and the end of the subfloor to accommodate the top tape.
Semi-permanent Long Term—Three to four years.
Utilizing 4 inch installation double-faced tape, install the exact same way as 2 inch double-faced tape. However, In this case, all seams are tight and no top tape is needed. Therefore all flooring should be flush to the sub-floor.
Long Term Semi-Permanent.
Stagestep offers a unique installation product called ReUseIt. It is a sticky netting that utilizes suction to hold the floor to the subfloor indefinitely. Just peel up your floor to remove. Leaves no residue.
ReUseIt is installed over the entire subfloor prior to rolling out your floor. Install is perpendicular to how your floor is running.
ReUseIt comes in rolls 39 inches wide and 268 feet long.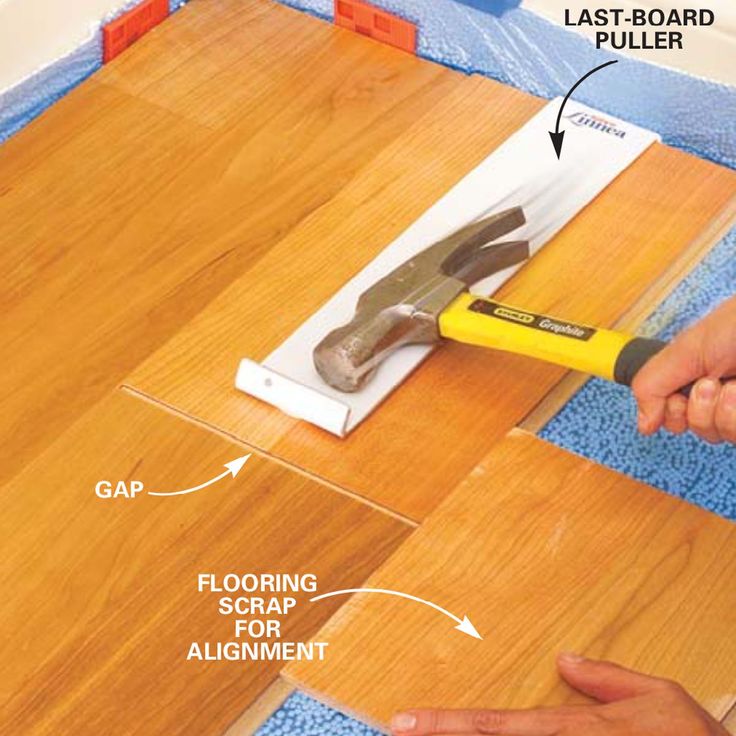 One person walking backwards unspooling the netting while a second person with broom in hand pushed it onto the subfloor. Cut roll when you get to a wall and repeat, going edge to edge with the previously applied ReUseIt.
Roll out your floor, running in the opposite direction of the ReUseIt. Match seams and trim to fit the room. Utilizing the 4 inch tube that came with the flooring, roll flooring ½ way back up. Peel protective top sheet of ReUseIt running across the width of the floor exposing 39 inch by 6.58 feet of ReUseIt (width of a roll of flooring) . Roll floor out over exposed ReUseIt and repeat until install is complete.
A 75-150 pound roller is sometimes used to smooth out and further secure the flooring. No top tape needed.
Permanent
Permanent installation requires adhesive and a professional crew to do the job. If you have never glued down a floor, do not make this your first project.
Do-it-yourself soundproofing of an apartment from and to
Noise is a rather abstract concept.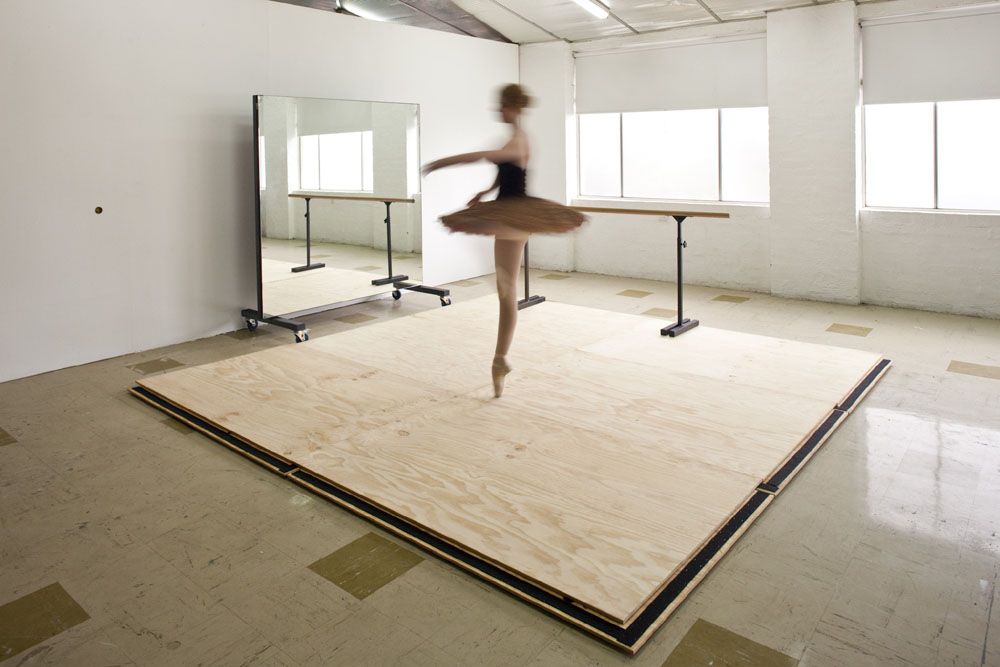 But it may well spoil the mood and well-being. Those who live in apartment buildings located on the noisy streets of megacities are especially aware of this issue. The noise of the street or the sounds of the entrance are quite capable of absorbing high-quality windows and modern reliable doors. Sounds, deliberately or not deliberately emanating from neighbors, sewers, ventilation or elevators, can ruin life. But getting rid of them is very problematic. nine0003
Research was carried out in 2017. They demonstrated that the noise is very disturbing for many Russians. It affects 60% of residents of multi-apartment buildings.
I had an idea to write this article. After you read it, you will learn how to create comfort and silence in your apartment. You can create a calm and very quiet place with your own hands. Here you will completely relax, you will not be distracted, scold the children playing under your windows, or express everything that you have boiled over to excessively noisy neighbors.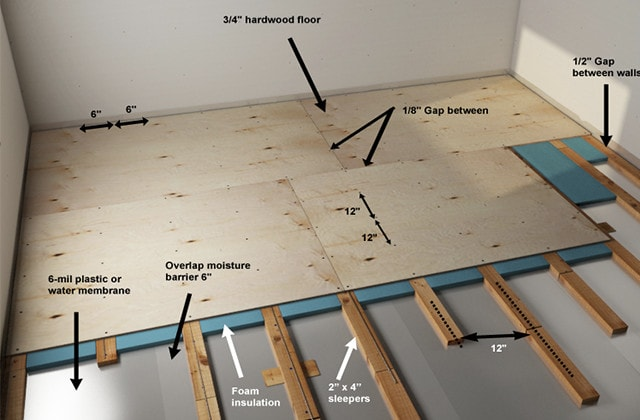 In this article we will talk about how to create high-quality sound insulation of the ceiling, floor and walls. nine0003
All questions will be answered by our article:
- why it is necessary to create sound insulation;
- what materials should be purchased;
- which suitable design to choose for floor, wall and ceiling;
- how to talk to builders in order to get what you want.
Why there is noise in multi-storey buildings
There are two types of noise in multi-storey buildings:
- Airborne . He penetrates the apartment through the walls, floor, ceiling. If there are outlets and cracks in the room, the noise increases significantly. It all depends on how thick the barrier is in the path of sound. It can stop or partially penetrate the room. Airborne noise is loud speech, barking dogs, playing musical instruments.
- Impact . It appears during mechanical action on the ceiling and floor.
 It spreads through them. Airborne may well turn into impact noise. This happens when vibration occurs, from loud music, for example. Traditionally, such noises occur in high-rise buildings from the heating system, elevator and ventilation. nine0014
 - Structural . Such noise propagates through the partitions. It is capable of covering long distances. An example - a drill working on the fifth floor will be quite audible on the first. But the sound of the instrument that falls will only be heard by the neighbors who live below the floor.
Houses cannot be used if they do not comply with the rules and regulations. Do not forget that soundproofing is one of the norms of the sanitary condition of the building. In practice, this is exactly what happens. But there is one “but”, even several. First, wear and tear of materials in old buildings is possible. Second: at present, apartments in new buildings are often offered without repairs. This suggests that they lack soundproofing.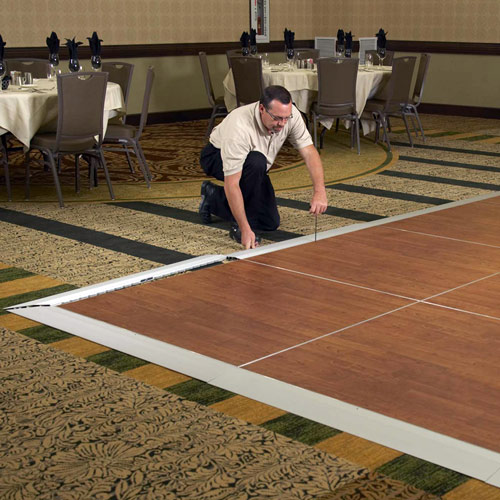 This issue must be resolved by the landlord. nine0003
How soundproofing works
Soundproofing is needed in order to minimize the sounds that enter the apartment. For this, soundproof and sound-absorbing modern materials are produced. In order to achieve an excellent effect, not one layer is provided, but several. Also important is the installation technique and the use of proper fasteners.
Does good sound insulation consist of several layers?
A person who does not know the subtleties of building construction, but can think logically, understands well that in order to reduce noise, an obstacle is needed. It is important that it be heavy and thick. In order to create good sound insulation, not one layer is required, but several. But the materials must be different. This thesis can be explained by a typical example. To reduce the penetrating sounds into the room by half, thicker walls are required in a brick house. Then it turns out that in order to increase the sound insulation by a factor of four, it is necessary to build a wall that will be exactly four times thicker. The prospect is quite tempting, but very expensive. To create excellent insulation, layers of loose and dense materials alternate. nine0003
For example, a brick wall with high-density soundproofing properties is perfectly complemented by a provided layer of material that absorbs sound well. For this, ideally, a sufficiently loose material with pores is suitable. Very often, in the construction of buildings, mineral wool is used in this role. Its structure is porous. It consists of hairs of small thickness, which are randomly arranged. It makes it possible to reduce the intensity of noise. In order to check how cotton wool works, it is necessary to compare earplugs made from classic cotton wool and from a material that resembles mineral wool in terms of characteristics. The difference is very noticeable. nine0003
Related materials
Very important for sound insulation. Additional special materials - tape provided for the floor, hangers, sealant. In practice, it turned out that in the process of soundproofing, it is necessary to use sealant (Vibrosil Sealant, SoundGuard Seal 310) and tape (Vibrostack M-100, SoundGuard Tape, SoundGuard Band Rubber). If this is neglected, the efficiency will decrease by about 40%.
Sealants are used to create noise insulation. Over time, they do not freeze. Traditional silicone is not suitable in this case. And all this is because when it hardens, it will transmit sounds through the floor, walls, ceiling to the structure. This will significantly reduce the effect. nine0003
The tape is designed to separate the structure from walls, floors and ceilings. The structure to be mounted must not touch the partitions. Otherwise, acoustic bridges will be created. This will reduce the effect.
Hangers (for example, Vibroflex hangers) are used to fasten frame-type soundproofing elements. So they are used for mounting a profile for drywall. In this case, traditional direct-type suspensions will not work. They are capable of transmitting vibration. It is best to use special vibration suspensions called "Ultrakusik". They are used to reduce noise by a quarter compared to conventional designs. nine0003
How to install.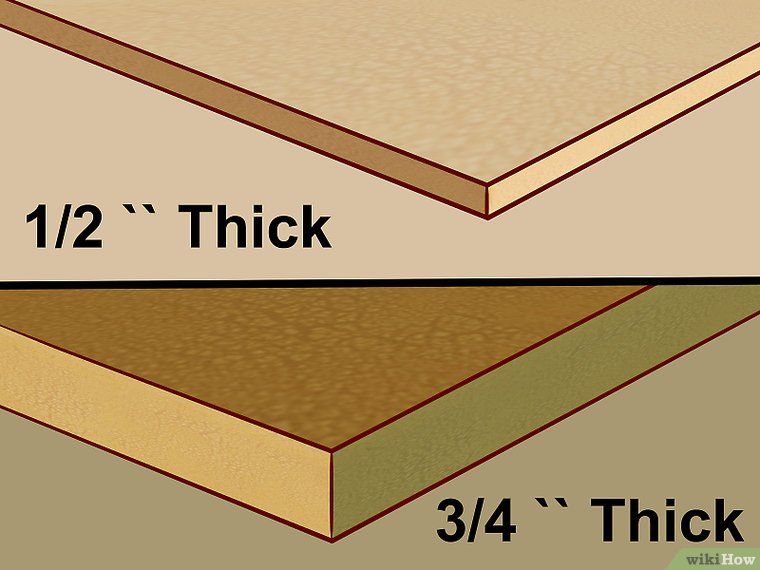 Technology Features
It is important to perform sound insulation responsibly. It is required to calculate all steps forward. if mistakes are made during installation, they will be problematic or impossible to eliminate in the future. A super-material that has been installed incorrectly will definitely not be useful.
Before installing the soundproofing coating on the ceiling and walls, it is required to first resolve such an issue as wiring. The wires will be closed. You also need to figure out how to place sockets and fixtures. nine0079
The acoustic cover can be installed in several ways. The design, which is made of drywall and mineral wool, is a way to reduce the noise level by 2/3. But this method of installation is costly and complicated. Anyone can install them. It's simple enough. The kit comes with the materials you will need. The details are already measured and clearly cut. The chance of error is reduced to a minimum. The best solution for the ceiling is modern high-quality, reliable and durable ZIPS boards. It is quite difficult to install soundproofing when creating a floor. In this case, a screed is created at the end. This is a layer of cement and sand. All of the above solutions have the ability to install yourself and not make a mistake. nine0003
Is it worth soundproofing the ceiling? It all depends on which neighbors live upstairs. If the floor insulation is poorly done, the ceiling will have to be soundproofed. If you are moving into a new home, it is quite difficult to predict exactly how events will develop. In this case, in any case, you need to soundproof the ceiling. This will save you from noise: dogs barking, talking, music. But at the same time, you will not be saved from the trampling and other shock noises. In order to avoid shock noises in your apartment, neighbors should install soundproofing on the floor in the apartment. That's why it's worth asking if they won't do it. If so, you may not soundproof the ceiling. It is important that the soundproofing layer of the ceiling is at least 2 cm maximum 7.5 cm. In order to eliminate 80% of the noise, ZIPS panels are used. They are used not only for ceilings, but also for walls made of aerated concrete, brick and concrete. In order to make high-quality soundproofing of the ceiling, it must be done everywhere. The only exception can be a dressing room and a bathroom. nine0003
Super walls that can keep the sounds of a party outside the apartment
In order to provide excellent sound insulation, it is worth considering it on the walls that border the apartments in the neighborhood. The facade walls do not receive much noise. Noise isolation is almost the same as for the ceiling. These are ZIPS panels, as well as mineral materials.
Dance floor and no problems with neighbors
It is important to soundproof the floor. You can get rid of the shock noises that neighbors make. The design is made of sound-absorbing material and reinforced type ties. The best solution is Schumanet 100 Hydro. When creating a high-quality screed, this material will reduce noise by 50%. Also, the combination of a mineral plate and a screed will reduce the number of sounds penetrating into the apartment by 60%. In the process of arranging sound insulation, it must be taken into account that the apartment will decrease in height. nine0003
Work should be entrusted to specialists. This installation requires skill. It is also worth checking that there is no contact between the screed and the wall. If this is neglected, your efforts will be nullified.
We provide installation services for soundproofing materials. You can consult about the cost of materials and the cost of work by calling: +7 (495) 532-58-72, +7 (916) 451-88-40.
Vibration will be transferred from the walls to the soundproofing structure. In order to avoid this, all joints are carefully treated with sealant. Soundproofing tape is provided on the walls. It is best if the screed is 6 cm thick.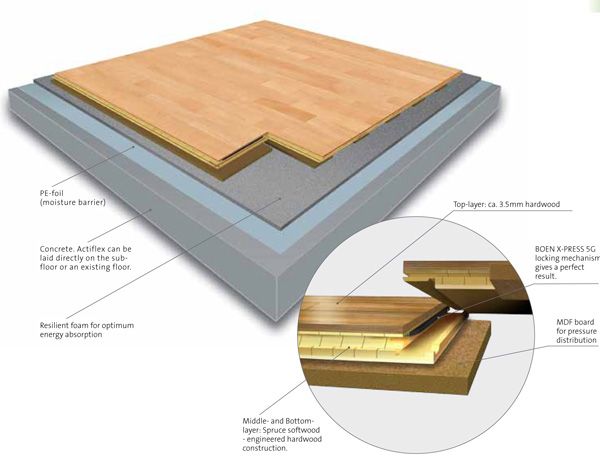 It all depends on the specific project. nine0003
How to choose a project for soundproofing. Criteria
It is important to choose the right project for you. To do this, you need to answer five important questions:
- Where should silence reign in the apartment?
You will be able to decide where exactly to install the soundproofing structure: on the ceiling, walls or on the floor.
- How much space can you donate?
If the ceilings in the apartment are very low, you should not choose a frame solution. 10-15 cm can be critical.
- Who will carry out the installation?
If desired, pre-sets can be installed. Ready-made solutions can be found on our website. In order to arrange frame structures and perform soundproofing of the floor, it is worth contacting specialists. It is also necessary to use the services of an electrician.
- What is the budget?
Don't skimp on soundproofing. You can not spare money for materials. This is impractical and very risky. It is likely that all repairs will be nullified. That is why before you start a project, you should first calculate all the costs.
- Is sound insulation included in the design of the room?
There are a number of design solutions that can absolutely destroy the soundproofing effect. An example is the placement of a large number of spotlights in the ceiling structure. In this case, there will be no soundproofing effect. nine0003
Now you can safely soundproof your apartment.
You can consult about the cost of materials and the cost of work by phone: +7 (495) 532-58-72, +7 (916) 451-88-40
Restaurants with a dance floor on Industrial Street - Krasnodar
1 place and 7 more nearby
- restaurants with a dance floor - establishments in the city of Krasnodar;
- we have found 1 restaurant for you on Promyshlennaya Street;
- restaurants with a dance floor - addresses on the map, user reviews with ratings and photos.
 nine0014
-
institution features
-
Delivery restaurants
- metro area
-
Price
-
Rating
- There are promotions
- Online appointment
- Business lunch nine0014
- Live music
- Hookah
- parking
- Delivery
- Without hookah
- Next to me
- around the clock
- Open now
- Will be open for 2 more hours
- With reviews
- With photo nine0014
- Rating 4+
- Street: Industrial
- Sorting DefaultBy price ➚By price ➘Best firstBy distance
-
0Other filters
- Learn more
- How to dance with someone in a wheelchair

- How to do the pony dance step
- How street dance started

- How old is faith from dancing dolls

- How to do popping dance moves
- How do i live without you dance remix

- How to praise a dance performance

- How much are poles for pole dancing

- How to start learning dance at home

- How to do a pitch in dance
- How to do the floss dance instructions

