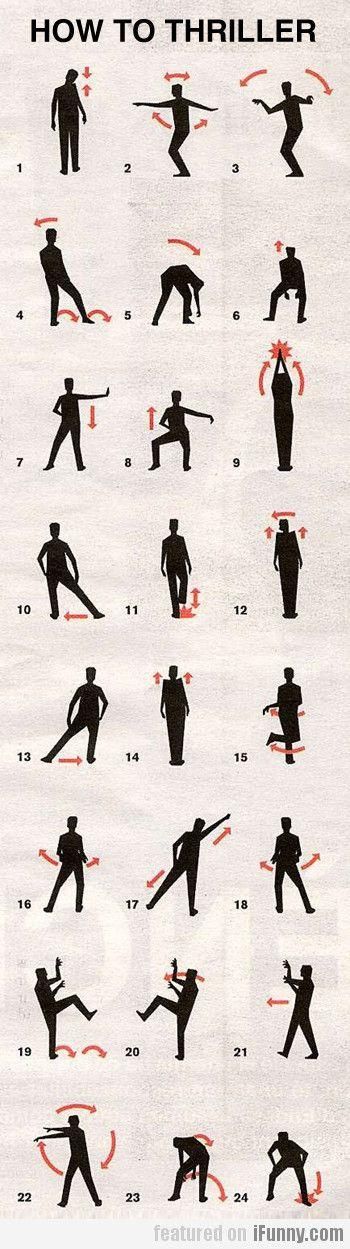
How to do line dance steps
How to Line Dance | Beginner’s Guide for 2023
Learning how to line dance is a fun endeavor for you and a friend or group of friends. According to Stanford University, “the health benefits of dancing include stress reduction, increased cognitive acuity and the ability to ward off the onset of Alzheimer’s disease and dementia.” Along with lifting moods, easing anxiety and improving balance and flexibility, it’s just plain fun! You don’t even need a partner.
Movies like Sweet Home Alabama, Cool Runnings, Thelma and Louise and even Shrek Forever After feature the fun of learning how to line dance. Who wouldn’t want to get in on this social and energetic dance movement?
So what is line dancing and how do beginners get started? From stepping left to turning right, to staying in your own row, learning how to line dance can appear to be an intimidating concept to master. We’ve compiled an introduction to learning how to line dance that includes its basic steps and what it's all about to help you get on the right foot (pun intended)!
Jump to Section
- Line Dancing Lessons
- What is Line Dancing?
- Five Basic Line Dance Steps
- Popular Line Dances
- Line Dance Songs
Line Dancing Lessons
Dance Classes
Line dancing for beginners is easy when you book classes with professional dancers. With dance classes in NYC, dance classes Las Vegas or dance classes in Colorado Springs, you can join a group of like-minded beginners for a fun and energetic evening as you learn how to line dance.
Not ready to show off your skills? You can also sign up for online dance classes to attend from the comfort of your own living room. Check out dance classes near you to find the perfect class to learn how to line dance at your own comfort level.
Social Settings
Another way to learn how to line dance is to jump right in there — figuratively and literally! Bars, dance clubs and group gathering places across the country are one of the best ways to learn how to line dance. Line dancing is even done at weddings. While Texas and Tennessee offer a plethora of dance halls, you’ll find places all over the U.S. to learn how to line dance. Here are a few:
- Wildhorse Saloon in Nashville, Tennessee
- The Grizzly Rose in Denver, Colorado
- Billy Bob’s in Fort Worth, Texas
- Ponderosa Lounge and Grill in Portland, Oregon
- Robert’s Western World in Nashville, Tennessee
- Cowboy Country Saloon in Long Beach, California
- The Bowery in Myrtle Beach, South Carolina
- Pop’s Tavern in Baltimore, Maryland
- Gilley’s Saloon in Las Vegas, Nevada (Sound familiar? The original Gilley’s was in Pasadena, Texas and the film site for Urban Cowboy.
 )
) - Coyote Joe’s in Charlotte, North Carolina
via Canva
What is Line Dancing?
Line dancing involves synchronized movements done in unison to choreographed steps. Dancers line up in rows facing in the same direction (though it can also be done facing each other). Each movement (whether it’s a step, hip movement or a wobble) is timed to the music.
Line Dancing History
Line dancing may seem like a fairly new dance, but it goes back to the 1920s with the Shim Sham. In fact, African, Native American and European cultures have histories of dance styles like line dancing. New generations add movements, steps, songs and style to add on to the genre, making learning how to line dance an ever-evolving sport.
Country Line Dancing
The style became more mainstream and widely popular in 1992 with Billy Ray Cyrus’ “Achy Breaky Heart.” Everybody and their brother wanted to learn how to line dance to country music! The song filled up country line dance saloons and bars with cowboy hat, boot and denim-wearing dancers of all ages.
This is probably the scene most visualize when they think of line dancing. And, while it has evolved from traditional country line dances like square, round and folk, the wonderful thing about the genre is that anybody can learn how to line dance.
Line dancing has millions of combinations of steps, combined with walls, so this is one dance where you can grow skills and movements the more you practice learning how to line dance.
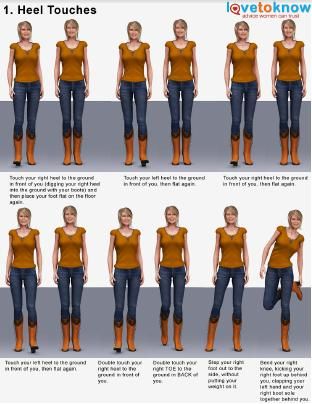
Steps and Touches
As you get started learning how to line dance, the most important aspect is figuring out steps. A step is when you change your weight. A touch is when you don’t change the weight (this is mainly used to change directions).
Put basically, there’s a step for each beat in 4/4 time (four steps over four music beats). To time your steps, count from one to eight or do a count of 1, 2, 3, 4 – 1, 2, 3, 4.
Walls
When learning how to line dance, keep in mind that formations have either one, two or four walls. A wall refers to the direction that the dancers are facing (think of it like they’re forming a wall/barrier). With one and two wall versions, dancers are always facing the front and back walls.
One-wall means everyone faces the same direction when performing steps. Two-wall is when, at the end of each dance sequence, everyone turns 180 degrees. Then, they begin again facing the back.
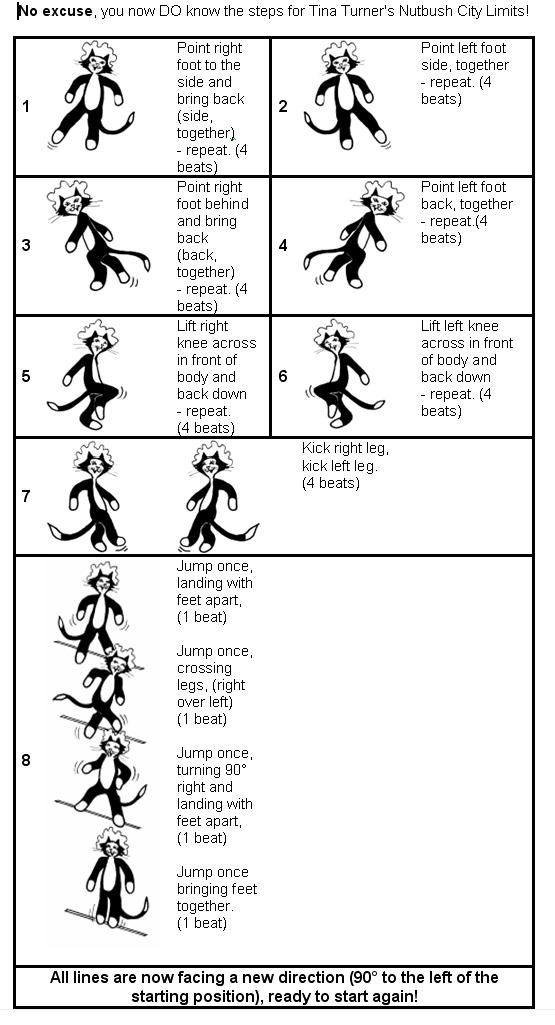
Four-wall is the most difficult, especially when you’re just beginning to learn how to line dance. At the end of the steps, everyone turns 90 degrees and proceeds facing one of the side walls.
Throughout the dance, dancers finish and start again by facing a new wall. When you’re first learning how to line dance, it’s best to stick to the basics and add on as you get accustomed.
via CanvaFive Basic Line Dance Steps
While it’s seen as a group effort, you can learn how to line dance alone, which makes it terrific for line dancing for beginners to practice right at home. You just have to learn some basic counting, combined with the steps and you’re ready to go. Accurate timing and the proper foot placement are the key things to remember when you learn how to line dance.
So, what are the five basic steps in line dancing and how do you do them? By becoming familiar with the five basic line dance step names listed below, you'll have a great headstart for your first official line dancing lesson.
1. Grapevine
The grapevine is a continuous traveling step that goes to the side with crossing behind and/or in front. It involves a three count move to either side. On the fourth count, you have the option of a brush, kick or scoot.
2. Weave
A weave is the same as a grapevine but with four counts.
3. Scoot
A scoot, as the name implies, is a slide of the weighted foot in a forward, backward or sideways motion. The opposite leg is raised with a bent knee. A scoot can also be done with weight on both feet.
4. Brush
A brush is when the free leg swings forward or back as the sole of the foot brushes the floor.
5. Kick
A kick is a leg lift movement in any direction. Don’t completely straighten the knee.
via CanvaPopular Line Dances
When it comes to learning how to line dance as a beginner, it is best to start with some of the easiest line dances. You may be familiar with popular dances, such as the Cupid Shuffle or the Electric Slide, which often play at weddings or other dance events. You can learn how to line dance these hit numbers in no time!
The Cupid Shuffle
The Cupid Shuffle is one of the easiest line dances for beginners learning how to line dance for the first time. The song tells you just what to do! “To the right, to the right, to the right…to the left, to the left, to the left...“
- Take eight side steps to the right (last step is a touch step)
- Next take eight counts to the left
- Then eight heel steps in place
- Last, do eight counts of stepping in place and turn ¼ to the left
- You’ll now be facing a different wall and you’ll then repeat the same steps
Cowboy Boogie
- Take a grapevine step (step to the side, step behind, step to the side) to the right
- Do a hitch (knee up) move at the end
- Repeat this same step and hitch to the left
- Next, a step forward with a hitch
- Another step forward and hitch
- Step back for three counts with a hitch at the end
- Then “boogie” with hips (this means to do a small hip movement forward and back)
- Then turn ¼ to face new wall
- Repeat steps facing the new wall
Line Dance Songs
There are a variety of different choreographed songs within the line dancing genre. Not all songs are performed to the same steps, which may make it more difficult, but certainly gives it a unique advantage and lots of fun steps to learn.
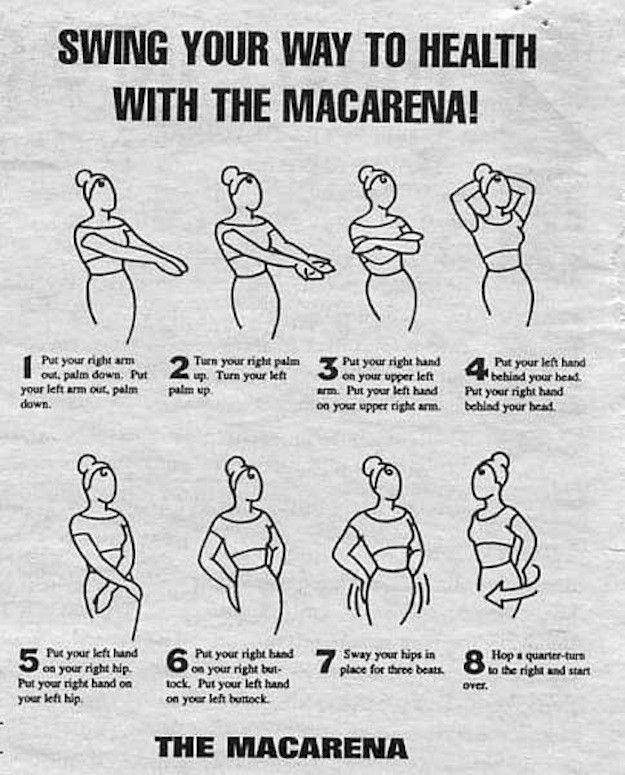
Steps are usually choreographed to a specific song, which then becomes the name of that routine. Some popular ones include: The Stroll, the Cowboy Boogie, the Electric Slide, the Achy Breaky Heart, the Macarena, the Cha-Cha Slide, the Cupid Shuffle and the Wobble.
When learning how to line dance for beginners, try “Two-Step” (by Laura Bell Bundy featuring Colt Ford). This is not to be confused with the two-step partner dance.
The Electric Slide and Cowboy Hustle (done to Vince Gill’s “What the Cowgirls Do”) are beginner line dances to try. “Watermelon Crawl” (Tracy Byrd), “My Maria” (Brooks & Dunn), “Cha Cha Caliente” (Jennifer Lopez) and "Rockin’ the Wagon Wheel" (Darius Rucker) are more on the beginner-moving-into-immediate side.
Popular Line Dance Songs
- “Boot Scootin’ Boogie” (Brooks & Dunn)
- “Achy Breaky Heart” (Billy Ray Cyrus)
- “Watermelon Crawl” (Tracy Byrd)
- “Any Man of Mine” (Shania Twain)
- “Man! I Feel Like a Woman!” (Shania Twain)
- “Macarena” (Los Del Rio)
- “The Loco-Motion” (Little Eva)
- “Gangnam Style” (PSI)
- “Old Town Road” (Lil Nas X featuring Billy Ray Cyrus)
- “Cupid Shuffle” (Cupid)
- Electric Slide (done to the song “Electric Boogie” by Bunny Wailer)
- “Hoedown Throwdown” (Miley Cyrus)
When it comes to learning how to line dance, the best piece of advice is to just have a good time. You don’t even have to be a country music fan with all the pop, salsa and jazz-inspired line dances out there! Once you’ve gotten the steps down, you can put your own spin on what you do in between. Add some funky hip, torso or hand movements to shake it up!
Whether you’re learning how to line dance by taking line dancing lessons or joining a dance at a club, party, wedding reception or other event, you’ll be among like-minded dance enthusiasts as you learn how to line dance. You’ll be line dancing like a pro in no time!
For even more creative ideas and inspiration, check out other experiences happening on Classpop!
Related Articles
A Beginner's Guide to Bachata DancingA Beginner's Guide to Cumbia Dancing
How to Belly Dance (With Confidence!)
How to Slow Dance With Style
How to Salsa Dance Beginner’s Guide
How to Swing Dance: A Beginner’s Guide
53 Line Dancing Steps You Need to Know! – Country Dancing Tonight
The Slappin' Leather Line Dance
Please enable JavaScript
The Slappin' Leather Line Dance
When you are a beginner and just starting to line dance the focus is really on taking a lesson and learning your first line dance and then over time adding a next one and a next one.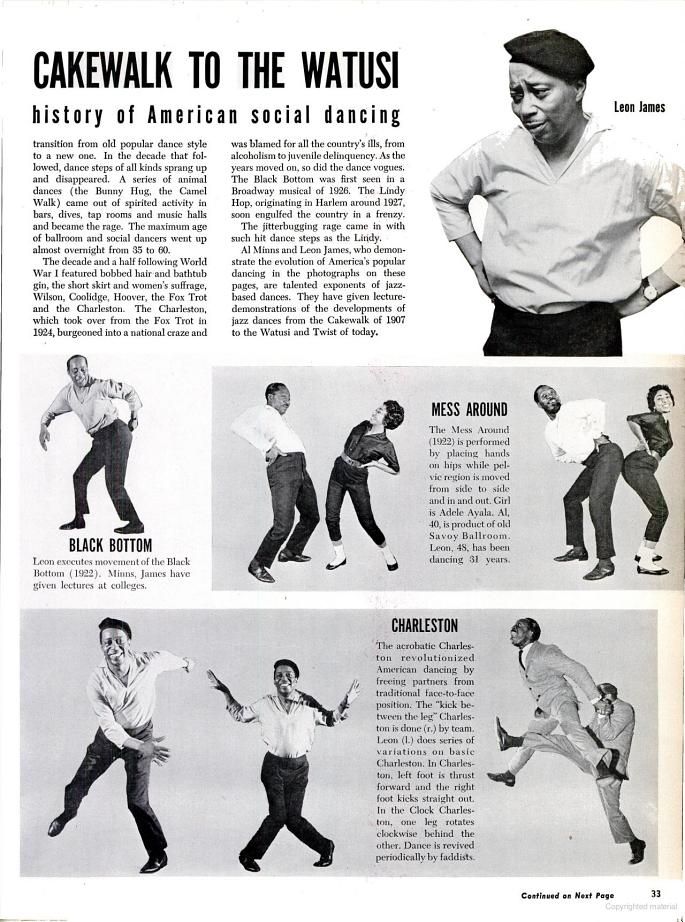
Naturally, it is best to first start with some beginner-level dances. I can’t remember the first line dance I learned, but I know that the Electric Slide was one of the first. Now my friends might laugh at me for not knowing it already or even finding it a challenge at first. But honestly, it was! I was just so new to line dancing or any kind of dancing to choreography so it was just a challenge.
But here’s the main point I want to make today and the good news! Over time as I stayed with it, I realized there’s a collection of basic steps that make up all the line dances!
Line dances utilize common steps, but just order them and combine them in different ways. This was an aha moment for me cause now as I got used to something like a “kick, ball change” when I heard that in the next lesson, I could say “well I know that part!”
So, basically, as you learn more line dances, you’ll become acquainted with more of the common steps that make up all line dances. This makes learning a whole new line dance go faster and faster, since, in a way you already know it! A new line dance is just a new original grouping and ordering of common steps to fit how a choreographer designs a dance.
But why wait to come across all these different steps?
Following are 53 of the common line dance steps that are found over and over again in line dances. Check out my list below! See the descriptions and watch some of the videos to reinforce your mastery of them. Then you’ll be even more prepared to take on the next line dance lesson, be it a beginner, intermediate, or even advanced level dance!
1. Apple Jacks
2. Brush
3. Bump
4. Charleston
5. Chassé
6. Chug
7. Coaster Step
8. Cross
9. Cross Shuffle
10. Cross Walk
11. Fan
12. Flick
13. Grapevine
14. Heel Fan
15. Heel Grind
16. Heel Jack
17. Heel Split
18. Heel Strut
19. Hitch
20. Hold
21. Hook
22. Hop
23. Jazz Box
24. K-Step
25. Kick-Ball Change
26. Lock Step
27. Lindy Step
28. Mambo Step
29. Monterey
30. Pivot Turn
31. Point
32. Rock Step
33. Rocking Chair
34. Rolling Vine
35. Sailor Step
36. Sailor Turn
37. Scissor Step
38. Shuffle
39. Side Rock
40. Side Shuffle
41. Side Together, Side Touch
42. Skate Step
43. Slide
44. Step
45. Step Turn
46. Stomp
47. Sweep
48. Swivel
49. Toe Strut
50. Triple Step
51. Twinkle Step
52. Weave
53. Wizard Steps
After thinking about some of the most common line dance steps and many “need to knows,” I boiled it down to a list of 53!
I do want to credit D.S. Russell’s book “Pocket Guide to Line Dancing Terminology” for help in gathering all these. In their book, there are actually a total of 85 different line dance steps mentioned. In addition to this, there are interspersed throughout about 10 additional line dance terms with thorough definitions. So please do pick up this book to have as a handy guide! Super cheap too!
1. Apple Jacks
So, to begin with we have a pretty tricky and difficult step! So, much so that I’ve included a video here to help you through it. The step consists of taking a toe out to the side as the other heel comes into the instep. This forms a “V.” Practice this by moving your right toe out to the right as the opposite heel also swivels to the right. Swivel opposite toe & heel to the left to go the other way.
https://youtu.be/LskS5V_KkwAVideo can’t be loaded because JavaScript is disabled: How To Do Applejacks (https://youtu.be/LskS5V_KkwA)
2. Brush
This is a very common and pretty easy step to add to your arsenal! It is just what you think! Just lift a foot and lightly kick, but brush the ball of your foot across the floor as you do so. This is also referred to as a “scuff.”
3. Bump
This another pretty easy and common step! It is also known as a “hip bump” because that what it’s all about. For a right hip bump, adjusting the weight to your right foot and then bump your hip out to the right, same thing for the left!
4. Charleston
To perform a Charleston Step, in line dance: bring your right foot forward and touch, and then touch back, then touch your left toe back and then step forward onto your left foot. But here’s another video just to help out! Here Robert Royston demonstrates it but he also goes further to describe the Heel Swivel Charleston, the Lindy Charleston, and Side-By-Side Charlestons. These last 3 get pretty fancy!
https://youtu.be/dYZVpoF_xi0Video can’t be loaded because JavaScript is disabled: How to Do the Charleston | Line Dancing (https://youtu.be/dYZVpoF_xi0)
5. Chassé
This is a triple-step but done to the side, so also known as a “Side-Shuffle. ”
”
It is pronounced as “Shaw-Say.” The Chassé, Shuffle, Side-Shuffle, and Triple-Step are all Triple-Step line dance steps and have in common that they are 3 dance steps in 2 beats of music. This is counted as “One-&-Two, Three-&-Four”…etc. This is an important concept, see the video at the end of this post by Patti Leathers as she does a great job explaining this and how it is important in line dance.
To do a Chassé, you can think “side-together-side”… step right foot to the side, bring left foot next to the right foot, and then another right step out to the side. (Same thing for going to the left). Just remember to move the 2nd step quickly on the “&” beat.
back to top6. Chug
This is just lifting up one knee while hopping forward on the other leg. Obviously can be performed with either knee/leg. This is similar to the Hitch, but the Hitch doesn’t include the hop.
7. Coaster Step
(R) Step back (L) step back together with the right foot, (R) step forward. This is a triple step “One-&-Two” “back, together, forward” meaning you are dancing 3 steps in 2 beats of music (which is known as syncopation). This can be done with the left foot as well.
8. Cross
With the right or left foot, stepping in front and crossing the other foot.
Crossing Shuffle – this is the same thing, but then a shuffle step of both feet still ending with the L or R foot crossed and in front of the other foot.
Behind, Side Cross – this is when you step behind on foot (going either way). the R or L foot first steps behind the other foot then after the one step with the other foot the first foot steps across and in front
9. Cross Shuffle
Already just mentioned above! But also know just as a “Cross Shuffle. ” But, to say it a little differently: like any shuffle or triple step, it is 3 steps to 2 beats of music and in this case is stepping in front of and crossing the other foot, a quick step with the other foot, and then the first cross-step repeated again. I’ve seen this done when the dance has you moving at a diagonal.
10. Cross Walk
This is a stylized walk forward also know as a “Prissy Walk.”
back to top11. Fan
There are “Heel Fans” (mentioned below) or “Toe Fans.”
For the Heel Fan, with the toe stationary, you just rotate or swivel the heel outward. I imagine typically both will swivel out at the same time.
For the Toe Fan, with the heel stationary, you just rotate or swivel the toe outward. And, again I think it’s typical for both to swivel out at the same time.
12. Flick
A Flick is basically just kicking (or flicking) either foot backward. You would raise you foot and bend the knee.
13. Grapevine
Grapevines are a way to travel to the right or left using four counts
To do a grapevine to the right, start with weight on your left foot, step to your right with your right foot (1)
then left foot steps behind (2)
right foot steps to the side (3)
and bring your left foot back to just touch (4)
It’s common (like in the Electric Slide) then to do a 2nd grapevine back to your left. Having just touched your left foot, your weight is still on your right foot, a grapevine to the left is now just the opposite. Step to the side with your left, step behind with your right, step again to the left, and touch with your right.
A grapevine can alternatively be done with a brush (or scuff) as the 4th step instead of just the touch.
14. Heel Fan
As mentioned above under just “Fan” this is swiveling or rotating out your heel(s) with your toe(s) stationary.
15. Heel Grind
A Heel Grind is performed by putting your heel out in front and then with toe turned in a little turn toe out to the side.
16. Heel Jack
A Heel Jack is just putting your heel out in front and tapping your heel on the ground. But the video below shows how it might typically fit in with other steps, in the case shown, a grapevine.
https://youtu.be/8U_sCBj0OpgVideo can’t be loaded because JavaScript is disabled: Heel Jack (https://youtu.be/8U_sCBj0Opg)
17. Heel Split
With the weight on the balls of your feel swivel your heel out, away from each other and then swivel them back together!
18. Heel Strut
This is very simple! A Heel Strut is basically walking, but you start with what is a Heel Jack; tapping your heel out in front of you, and then completing a step. Just looks like a more dramatic step and also takes up 2 beats of music to complete.
https://youtu.be/fQSEfZ3NmGkVideo can’t be loaded because JavaScript is disabled: Linedance basic steps: Heel Strut (WB hun) (https://youtu.be/fQSEfZ3NmGk)
19.
 Hitch
HitchPulling your knee up (can happen after a walk forward or backward).
20. Hold
This is obviously the easiest “step” on this list. This just means “freeze” stop for a designated amount of beats in the music. Usually just one, but possibly more depending on the choreography of the line dance.
back to top21. Hook
A Hook step is bending the knee of one leg and then crossing it in the air in front of and just below the other knee. A common line dance where you’ll see this is Slappin’ Leather, with which you’ll often see people slap the side of their boots as they do this. Also in Slappin’ Leather, you’ll notice you can hook in front of or behind the other leg. Notice Cindy in the video tapping her foot in both instances.
https://youtu.be/aFyOaX5Pr4gVideo can’t be loaded because JavaScript is disabled: Slapping Leather (Line Dance) – Demo & Teach (https://youtu.be/aFyOaX5Pr4g)
22.
 Hop
HopThis is what it sounds like: a tiny hop forward with one foot and then you’ll bring the other foot together with the first step. These are quick steps, so it would include a 1/2 beat as in “&-One.”
23. Jazz Box
A Jazz Box, also known as a Box Step is a way to basically make a box or a square with your steps.
You begin with crossing over your right foot in front of your left (first corner of the box)
Now step back a little with your left foot (2nd corner of the box)
Then return your right foot back next to your left foot (3rd corner of the box)
Lastly, cross over your left foot in front of your right foot (4th corner of the box).
This would be a Right Jazz Box, but to do a Left one, just start with the left foot crossing over the right.
https://youtu.be/aO0w30RmdQsVideo can’t be loaded because JavaScript is disabled: Jazz Box – Right & Left (https://youtu.be/aO0w30RmdQs)
A good, quick demonstration of the basic Jazz Box.
24. K-Step
The K-Step is a little like the Jazz Box, in that we’re sort of drawing something on the floor with our steps. In this case we draw a “K.” It is performed by stepping out at an angle with the right foot, then bringing the left foot to the right foot for a touch, then step back with the left foot, bring the right foot to the left foot, then step back with the right foot, again diagonally. Step touch the left foot again to the right foot and then return it. Below is a quick demonstration video of the K-Step.
https://youtu.be/i1rjIRnbgkUVideo can’t be loaded because JavaScript is disabled: Line Dance Moves #17 – Learn the The K-Step (https://youtu.be/i1rjIRnbgkU)
A quick demonstration of the K-Step.25. Kick-Ball Change
A Kick-Ball Change is super common in line dances and a good beginner step to be familiar with. It is performed by a low kick of the right foot forward, then return and step weight on the ball of the right foot. Then change weight back to the left foot.
So, hopefully, that’s clear! I remember when I first started line dancing I kept hearing the teachers shout out “Kick-Ball Change!” I had no idea what they were talking about! But it’s just a kick and then shifting your weight from the right ball of your foot back to the left.
back to top26. Lock Step
A Lock Step is like a shuffle step, but you step forward and step behind the first step. Then you stop your first foot out again. I’ve seen this done straight forward or at a diagonal, like in the line dance “Dirt On My Boots.”
TIP: Don’t lock your foot too tightly behind the other, as you could cause your self to trip!
27. Lindy Step
A Lindy Step is a side shuffle step, but then with an added back cross rock step. Or also described as a Chassé with the added rock step. Below is a quick video demonstration of a Lindy Step. I’ve also added below a video of a line dance that incorporates a Lindy Step. This is a group of my friends that have been line dancing in a park lately.
https://youtu.be/SkbY7oMuuMkVideo can’t be loaded because JavaScript is disabled: Lindy Step tutorial (4 counts) (https://youtu.be/SkbY7oMuuMk)
A quick demo of the Lindy Step.https://youtu.be/r5bYJmPKyh5Video can’t be loaded because JavaScript is disabled: Amarillo by morning (https://youtu.be/r5bYJmPKyh5)
Here’s a line dance that has a Lindy Step in it. Amarillo by Morning. That’s me in the front with the hat & black mask by the way! See if you can notice the Lindy Step!28. Mambo Step
Can be done 4 ways:
With weight on your left foot, (R) rock forward and back (the “and” is just returning weight to your left foot without moving it)
With weight on your right foot, (L) rock forward and back
With weight on your left foot, (R) rock back and forward
With weight on your right foot, (L) rock back and forward
You can also do the Mambo step to the side to the right or to the left & the different kinds of Mambo steps at times are combined together.
29. Monterey
The Monterey Step is a series of point & step moves with a 1/4 or 1/2 turn thrown in. Think point, turn (or spin), point, step together. Here’s a slower breakdown:
1. Point the toe of your right foot to the right side
2. As you pull your right foot back to the left foot, pivot 1/4 turn or 1/2 turn (spin) on the ball of your left foot and step down on your right foot, next to left foot.
3. Point toe of your left foot to the left side
4. Pull left foot in and step next to right foot (together)*
*Thanks DS Russel for your “Pocket Guide to Line Dance Terminology, A Guide for Beginners”
The below video and other videos seem to just demonstrate this with a 1/4 turn, I tried doing it with a 1/2 turn, (more of spin) and its possible, you just need to really crank and get that momentum going a little stronger.
https://youtu.be/JkHKtlTutKYVideo can’t be loaded because JavaScript is disabled: Learning Line Dance Steps – The Monterey (https://youtu. be/JkHKtlTutKY)
30. Pivot Turn
A Pivot Turn can be a 1/4 turn or 1/2 turn, even occasionally a 3/4 turn.
1. Step forward and with weight on the balls of both feet…
2. Keeping both feet on the floor, and using the ball of the forward foot as a “pusher,” pivot 1/2 or 1/4 shifting your weight onto the other foot.
The interesting thing to note about this is that whichever foot takes the forward step to begin this there is only one direction you can turn and still keep both feet on the ground! If you step forward first on your right foot, you can only pivot to the left. If with the left, you can only pivot to the right. Try it! You’ll see this is actually a very simple and natural move and easy to do when part of a line dance.
back to top31. Point
This is an easy one! Just touch the toe of one foot out to the side, but don’t put weight on it, just touch the toe to the floor. Obviously, there’s pointing a toe to the right or to the left.
32. Rock Step
A Rock Step is just stepping forward (R or L) and then shifting weight back to the other foot. This gives you a rocking chair feeling.
33. Rocking Chair
This is really just two Rock Steps combined to fully give you that rocking chair feeling! But the second one is a step back and then recovering forward. See Gail Eaton’s video below at 13:00 for a good explanation and demonstration of it.
34. Rolling Vine
A Rolling Vine is just a Grapevine, but you add a spin while you’re doing the Vine. You basically add two 1/2 turns while you’re doing the grapevine.
Here’s a good clear break down of the steps to roll right:
1. Step right foot to right side with toes pointing to the right turning you 1/4 turn to the right.
2. Step left foot forward with the toes to the left foot pointing to the back wall (when you pick up your right foot you should now be facing the back wall).
3. Continuing to turn to the right, step back on the right foot, making a final 1/2 turn to bring your body back to the starting wall.
This can be done the same way to the left.
https://youtu.be/3JpSfIhhSW4Video can’t be loaded because JavaScript is disabled: Rolling Vine or Rolling grape Vine (https://youtu.be/3JpSfIhhSW4)
Here’s a good demonstration of the Rolling Vine (also known as a Rolling Grapevine).35. Sailor Step
A Sailor Step is a 3 count combo of steps that consists of a backward cross step (like the 2nd part of a weave), and then two more steps: just the first, stepping out, and then the other also steps out to sort of untangle the first cross (an “out-out”).
When performed there is a drunken stagger feel to it, hence the name “sailor” like a drunken sailor! I think there’s an excellent example of this fitting a song with the “I’m getting drunk on a plane” line dance. Also, see Gail Eaton’s video below at 41:00 for a great demonstration of Sailor Steps.
36. Sailor Turn
A Sailor Turn is the Sailor Step mentioned above, but now add a 1/4 turn to it. You do the 1/4 turn part as you finish or on the “out-out” part. The video below covers all Sailor Steps, but see 2:27 in the video for the Turning Sailor Step (or Sailor Turn). Kari does a great job breaking down all things Sailor Step and makes it pretty easy!
https://youtu.be/5h3zyUwdV3MVideo can’t be loaded because JavaScript is disabled: Sailor Steps & Turning Sailor Steps – How To Do Sailors – Line Dance (https://youtu.be/5h3zyUwdV3M)
37. Scissor Step
This involves another cross. First with either foot rock step to the side, recover and then step in front & across the other foot.
38. Shuffle
The Shuffle step is also known as a “Triple Step” or “Chassé.” So, as you come across those in my list you’ll see the same instruction! This is just 3 steps, but the key is that it is done with syncopation. That is, the 2nd step is taken quickly on the “and” beat or 1/2 beat. What this means is that it is 3 steps in 2 counts of music. “One-&-Two, Three-&-Four, Five-&-Six, Seven-&Eight”
I’ve included a few videos at the very end from good instructors out there which go over some of these basic steps. See the 2nd one for the shuffle. Patti Leathers goes over 10 steps and the Shuffle is the first one she covers!
39. Side Rock
Side Rock – A Side Rock Step is really the same as a Rock Step, but you just step to the side and shift weight back to the other foot. So, again it gives you that rocking chair feeling, but you’re just rocking sideways.
40. Side Shuffle
A Side Shuffle is another triple step. (3 steps in two beats of music). Step right foot to the right, then quickly bring the left foot next to the right foot and step the right foot to the right again. This is the same for either right of left.
41. Side Together, Side Touch
This similar to a Grapevine in that it is a way to travel to the left or right in 4 counts. It’s done alternatively to the Grapevine because it’s just easier. Instead of stepping behind on the 2nd count, you just follow for another sidestep bringing both feet together. Then a 2nd side step (left or right foot depending on which way your’e traveling) and then touch.
42. Skate Step
A Skate Step or Skater’s Step is just a step (R or L) diagonally to resemble the movement a skater makes.
43. Slide
A Slide is just a side step, lighter dragging or sliding your foot out to the side and then bringing your other foot to join it, but not transferring your weight on it (until, perhaps the choreography says so!).
44. Step
Place foot on the floor and shift weight to it. (Most obvious and easy thing in line dancing!)
45.
 Step Turn
The Step Turn is really the same thing as a Pivot Turn, so scroll back up or click here to see the instructions for it.
back to top46. Stomp
Just what it sounds like! A Stomp is one step and uses just one beat. Just stomp your foot down in place. Generally, letting your heel hit first is the loudest and most satisfying way to do it.
But here’s a step that you might just want to be careful with since it might not be great for your knee! And if your dancing on a hard floor that doesn’t have much give to it, especially be careful. You can always just step down lightly while everyone else stomps noisily.
47. Sweep
A Sweep is performed by your foot tracing a semi-circular pattern on the floor as you cross it in front of (or behind) the other foot.
48. Swivel
A Swivel seems like a cousin of Apple Jacks to me, but easier to do! With the weight on the ball of both feet, swing out your heels (in either direction). Then lean back on your heels to sing out your toes (in either direction). Then shift your weight back to the balls of your feet. You can use Swivels to move across the floor if the dance calls for it.
49. Toe Strut
A Toe Strut is just digging you toe into the floor and then without lifting your toe, dropping you foot onto the floor.
50. Triple Step
As mentioned in several places throughout this list a Triple Step is three steps in two beats of the music. Also known as Shuffle Step. A step and then a 2nd quick step before the third step (“One-&-Two, Three-&-Four, etc.).
back to top51. Twinkle Step
As we get to the end of the list here, there’s been a lot of simple steps mentioned, but not the Twinkle Step! The Twinkle Step is 3 counts and it used when the beat of the music calls for a Waltz tempo.
1. Cross your left foot over the right and put your weight on it.
2. Step right foot the right side.
3. Step left foot next to right foot.
In the video below the instructor refers to it as a 6 count step. I think it is just because she is doing two sequences on the pattern, first to the left, then to the right.
https://youtu.be/-wCHKq_yI0IVideo can’t be loaded because JavaScript is disabled: Twinkle Step – Line Dance Step Instructions (https://youtu.be/-wCHKq_yI0I)
52. Weave
This is a 4 count combo of steps and is accomplished by first crossing over one foot in front of the other (1) side step away from the crossed over step (2) crossing over the first foot again by behind this time (3), then the other foot stepping to the side (4)
53. Wizard Steps
Wizard Steps are really just Lock Steps, but putting two together of alternating directions starting with R or L foot crossing behind and then the other will step behind the opposite (for help with this and a good demonstration see 44:00 in the Gail Eaton Video below).
Some Great YouTube Video Lessons of Some Important Line Dance Steps
In conclusion, I’ve included some of the YouTube videos I found that don’t focus on any specific line dance, but just teach you the names of so steps and how to do them. These are from some popular teachers out there, but it’s great to just have the steps broken down!
Gail Eaton’s video below gives a great demonstration of a lot of these steps. Watch this and follow her. Gail goes beyond just teaching some steps,but then combines some of them together which really is the essence or secret of line dancing! Line dance choreography is just the combining of steps that often we may already know!
It cracked my up how she said that usually at a line dance lesson “the steps are taught first.” Well, I never experienced that really. Seems like, at least at the bars, you are just thrown into learning the line dances themselves. Well, at least there’s these videos.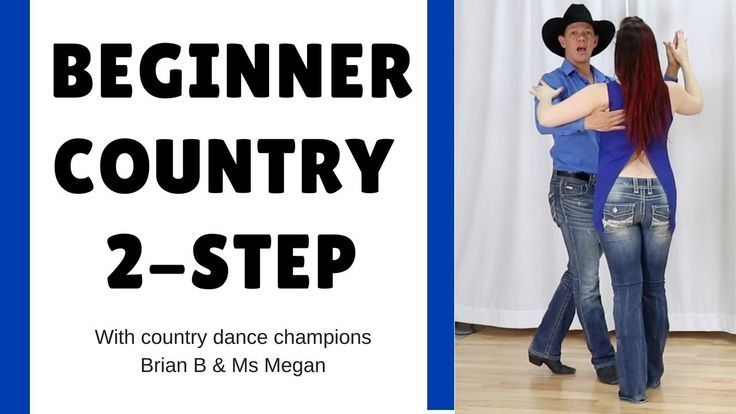
https://youtu.be/nHUpmmHRZr8Video can’t be loaded because JavaScript is disabled: Linedance Steps, Video contains 47 common steps used to create a scripted Dance (https://youtu.be/nHUpmmHRZr8)
Next are a couple of Patti Leather’s videos where she goes over some basic line dancing steps. The first one covers the concept of triples really well along with Coasters and Sailors. Then the second one goes through 10 common line dance steps.
These are just really clear and helpful lessons especially if you are a beginner at line dance. I love how she says to start shuffling around your house and to always have music on!
https://youtu.be/M_6YIP38MSIVideo can’t be loaded because JavaScript is disabled: Basic Steps: Triples (shuffles), Coasters, Sailors (https://youtu.be/M_6YIP38MSI)
https://youtu.be/BOyITcqCrLIVideo can’t be loaded because JavaScript is disabled: Top Ten Steps Part 1 (https://youtu.be/BOyITcqCrLI)
So, further in conclusion, I hope this list is great help as a quickly scannable list of some of the main line dance steps out there that probably thousands of line dance choreography used and mixes up to create their dances. Learn some or all of these steps and you’ll be very prepared for any line dance lesson.
Levels and ethics of line dances
About the main elements of line dances.
Dear ladies! In the previous article, we learned with you that line dances are dances with an ancient history. Dance - uniting different styles of music and providing an opportunity to express yourself without a partner. But before diving into the beautiful world of dance, I'll tell you about the levels of line dancing and the etiquette that real dancers follow.
As in any other styles, both in dances and in linear ones, there are levels, levels that allow you to evaluate the knowledge of a dancer and, accordingly, choose one or another type of dance, so to speak, to create a balance between the dancer and the dance.
And so, the first level in line dancing is called beginners. The very first level, when the dance uses the simplest movements, no syncopated steps, breaks in the melody, or any complex elements. Dancers learn the so-called elementary steps, which help them feel comfortable, help them feel the rhythm and, ultimately, help them perform dance movements in a balanced way.
Beginner/Intermediate - the second level of line dancing, in which dancers perform simple dances, but using hand and body movements, as well as facial expressions, to express feelings and emotions.
Intermediate - third level. The dance becomes more difficult. Dancers begin to use different variations of the same dance, syncopated movements, breaks in rhythm, pauses and delays.
Intermediate/progressive - fourth level. Dancers begin to perform complex dances, use syncopated dance steps, breaks in rhythm, body weight transfer, unusual positions, stretches. The dance begins to divide into parts - A, B, C (sequences).
And the last level is progressive. The most difficult level is the execution of complicated steps, their combination, the use of a non-standard score. The dance does not end, the steps throughout the song are not repeated. Only the dancer himself knows when to finish a set of elements and move on to another. At this level, the dancer uses the movement of the hands, the movement of the body to a large extent, and also expresses his individual style and features of plasticity. Dancers of this level feel comfortable and free in their performance and movement.
Whatever level a dancer is at, they always follow or try to follow the etiquette of line dancing. I will introduce you to him.
In order for the whole team to harmoniously merge in rhythm, do not ever stand in dance lines in order to talk. Step aside if you want to share the news with a friend.
Important to remember! What a dance floor for one and all. Try to share it with those around you in such a way as to preserve the main concept of line dance - the line. If the room is crowded with dancers, try to make your steps a little smaller so as not to disturb others.
Don't ever stop if the music is already playing to start teaching someone or explain steps.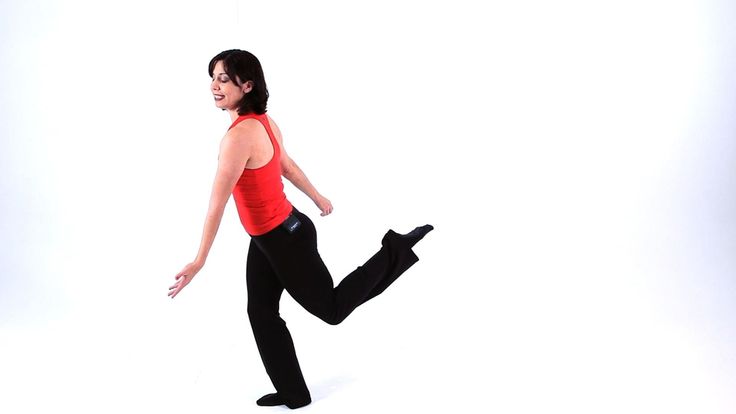 Find a free spot and continue your story. But remember that you should not move away from the dance floor between the dance lines, it is better to bypass them. If the music has already started, never run to the middle of the line, because all the dancers have already found their place and you can interfere with them.
And most importantly - smile, rejoice and be proud of yourself and what you do.
And so dear ladies, you are ready for classes! But how to make it look harmonious on the dance floor? Here are my nine tips for you:
1. Smile - try to feel free and dance with joy. The expression of your face is very important, as it gives the dance a special expressiveness.
2. Eyes must look forward - do not look down or at your feet while dancing.
3. Posture - do not slouch and chest forward. Imagine that the chest is the center of your body and let it guide your body while all other parts work.
4. Movement of the hands - there are seven positions of the hands. In line dancing, the most important thing is to let your hands move to the rhythm and style of the dance.
5. Dance on the floor - keep your balance. Think about the strength of your energy, centering it down, as if pressing your steps into the floor.
6. Follow the rhythm - listen to the music and try to feel it.
7. Practice, practice - knowing the steps will help you spend more time perfecting your style. Don't look for too many variations on a dance you already know, as it can ruin everything.
8. Gain experience - ask your friends for advice if you feel insecure while dancing.
9. And once again - REJOY!
Today with you we found out how to correctly determine your level in dance, learned the main principles of line dance etiquette and what will help make our dance more expressive. But this is all theory. Shall we get to practice? It's all very simple, isn't it? I'm ready to dance, are you?
Dance sport Latina exercises
Basic principles of body work in latina. Posture and coordination in dancing.
Latin training process. Specialized exercises
Rules for the construction of choreography and dance scheme
Latin American dance program
Samba (Latin American dance program)
Cha-cha-cha (Latin American dance program)
Rumba (Latin American dance program)
Paso doble (Latin American dance program) 9005 Jive (Latin American Dance Program)
Exemplary Team Dance Sports Club Ajax
Fundamentals of Dance Sport
(sport ballroom dance)
- Each dance is special and the character of each dance must be conveyed by the characteristics of the movements. You need a dance soul, you need to live the dance, tell your story through the dance.
- The partner should enjoy dancing, and the partner should enjoy dancing with her and leading the couple. It is necessary to observe the gender component - the separation of the principles of the dance of the partner and the partner.
 The partner goes to the parquet in order to show the partner. It is important to dance not next to each other, but to dance interacting in pairs!
 - The main competition now is showing more contrasts per unit of time and the ability to present it, as well as show interaction in a couple.
- Talent Persistence Purposefulness - key success factors
- It is necessary to constantly perform exercises to pump muscles and develop and practice the necessary key skills.
- Only skills reinforce knowledge! It is necessary to do all dance training exercises honestly for yourself first of all.
- It is necessary to give specific tasks to practice the action for the dancers! The dancer needs to keep a diary, with tasks and an assessment of progress. Be aware of your dancing! Practice must be conscious and effective.
- Natural movement. Natural movement with maximum control of body parts and engagement of all muscle groups.
 It is important to be able to perform elements of any complexity with a beautiful posture freely, without clamping, with a sense of weight.
 - Continuous movement. Permanent movement - either movement on the parquet, or body action movement of body parts in place. Continuous smooth movement without "stops", they must be excluded, except for special lines conceived according to the choreography. The dancer is never static, there is always stretching and stretching going on.
- Coordination, isolation, body axis. Volumetric, non-planar movement required. 3-D volume and natural movement through insulation and stretching. Any quick action must be done on the exhale.
- Timeliness and clarity of body weight transfer. It is imperative to monitor the timely transfer of body weight from one leg to the other leg. 2 types of weight transfer - first transfer of own weight, then synchronous transfer in pairs. It is necessary to feel the weight (the force of pressure on the floor).
 Weight can be felt in any part of the body separately (weight of the shoulder blade, weight of the thigh, etc.). It is necessary to find the optimal combination of relaxation and lowering the weight on the foot, with quick collection and movement.
How the body works.
5 main blocks (floors) of the building
Feet
The foot is responsible for the rhythm. Ringing stop work. Clear work to the floor and to the beat. Control and dance ups and downs.
Knees
Beating forward and backward, bending and straightening, lifting and lowering.
Hip part - rotation and figure eight. Rib part - Presentation part
Hip part of the body
It is important to control and remove blockage in the hips (sacrum forward).
We remove the arch in the back (excessive lardos), there should be a long back.
The center must be removed and drawn into the lower back.
Actions rotation and figure eight in the hip part of the body.
Rib part of the body
Stretching and "press line" of the sides of the body
Presentation part of the body (chest, shoulder blades, arms, shoulders, neck, head)
Stretching the upper part of the body, creating volume.
Neck without clamping, head position perfectly level, without ups and downs.
Chin line parallel to the floor line.
2 centers of the dancer's body
Lower center (lower torso, located just below the center of the lower part of the ribs - between the waist and ribs)
- Center of gravity, control of body weight. It is always necessary to be in the sensation of a retracted center. Performs the function of depreciation, reduction, rotation (rotation) and displacement (translation). The upper center is responsible for initiating movement.
Upper center (main upper torso, located in the chest area)
Referral center. When moving and rotating, the top center always comes first, then the bottom one in sequence. Like steering wheel and wheels. Responsible for the initiation of movement, the function of rotation (rotation) and displacement (translation)
Isolation of body parts and posture in Latin
3D dance: stretching in 3 planes: Frontal left and right. Sogital - twisting of the hips and body in rotational directions.
Correct posture of the body - keep the axis of the body.
Dancing posture
Main problems:
- Hunched shoulders
- Head and neck forward
- Shoulder blades exposed collapsed abdomen and lower back
2 types of posture:
Classical and Latin American (the body is slightly forward over the toes, the pelvis behind the heels - a diagonal line is created)
Principles of the legs, feet. Steps, movement, movement. 5 phase steps.
- 5 phases of the stride:
4. Extend - lengthening, stretching the free leg at the back. It is located on the extreme toe
5. Recover - recovery - the leg free from weight is bent at the knee.
Backstroke: 3 stages - leg in front with a natural turn of the toe, bending the leg at the knee and building a straight perpendicular line from the toe to the knee, slight tilt of the body forward, bringing the leg back to collect the knees, pushing out from the supporting leg. Emphasis on the knee - tends forward and is fixed for a moment. Knee work, repulsion, attack.
How the hands work
The hands help to make a coordinated movement, show beautiful lines, complete the meaning of the dance for judges and spectators.
The main principle of the work of the hands: The hands repeat the work of the body with a greater amplitude and a slight delay - the continuation of the work of the body, except for staging moments! Avoid ventilators. It is necessary to combine the work of the hands with the work of the body. Brushes must always be kept in good shape.
- Shoulder, shoulder, elbow, hand control. Removal is slow with an accent in the final position.
- Closed and open hand position. If the hand goes from the center, then the palm immediately goes to the open position, if it goes up along the central axis of the body, then it goes to the closed position and then goes to the open position.
- 2 types of arm joints - elbow-rib, elbow-elbow. The shoulder is the highest part, when the arm is extended to the side.
- Working out the interaction of the work of the arms, legs of the body according to the accounts.
- Charged hands (work with an accent). Twisting of the arms (from the elbow to the elbow, feeling twisted in opposite directions)
- Rotation of the hips and opening of the costal part of the sides, arms in the sides in good shape.
- 2 positions: parallel to the floor and slightly below shoulder level, set slightly forward so that the hands can be seen with peripheral vision.

- Hand: fingers in good shape, as close as possible, index finger slightly prominent. Girls can create any brush design.
- Arm extension: to the side - 3 stages - side, forward, down; Up and through the semicircle down; arms to the sides, hands in the field of lateral vision, elbows not behind the back (maintain volume, “balloons” under the armpits)
- Bringing the arm to the side: in turn, the elbow, wrist, hand. Back: turn the brush, break the elbow, lead to the lower center.
- Turning back with shoulders: shoulders, elbow, wrist, hand. Back: soften the elbow, turn the shoulders, return the brush to the center.
- Bringing the arm up: start the movement of the hand, a slight turn in the shoulders, a screw movement of the arm, then back.
Principles of positions and interaction in pairs
Gradual and gradual development of lead in pairs!
There should be no isolated dancing. Partner "passenger", partner "Driver".
Types of dribbles:
- Physical dribble - when the partner indicates the direction of movement to the partner, stops. The work of the hand, the correct distribution of weight and the interaction of partners together.
- Shape guide (with preservation of shape and lines).
- Permissive maintenance. For example, Delay - tightening and stretching between partners and counterbalance, then high-speed movement.
- Case management. Interaction at a distance, without physical contact.
The dribble must always be up to the step (to the count).
Trust of partners. No need to take too much initiative.
- Body weight always with a feeling of pressure on the floor.
- When moving backward - first the legs, weight and position of the body are slightly ahead, then we bring the body.
Exemplary team of the ajax dance and sport club
Exercises and training methods in the Latin American Dancesport program
Warm-up, warm-up, training exercises for parts of the body in Latin
Warm-up, warm-up
The main task is to consistently warm up: feet and Achilles tendon, knee joint, hip joint, spine.
Warm up should consist of 3-6 exercises for different muscle groups.
Exercises to work upper body center:
shoulders, neck, head, chest, back, posture. Body Setting Methods
Body Setting:
Shoulders up and in a stretched free position. Slowly, we increase the action down, even position in the back. Hold down 8 counts, relax 8 counts
- Exercise for the shoulder blades: move the shoulders forward, the shoulder blades are apart, then vice versa, the shoulders back, bring the shoulder blades together, then neutral tension - the shoulder blades are apart, the back is even, there is no additional tension in the body. For 4 counts forward-neutral-back. The opposite method.
- Head and neck. With expander or rubber band behind the neck and try to move it back for several counts with tension, alternating with relaxation.
 Same with the back of the head. It is recommended to do 4 eights.
 - Chin rest , put the hand under the neck and place the chin.
- Competition for who has the longest neck , with the condition that the distance between the earlobes and shoulders is the same, without inclination. We stretch 4 eights and rest.
- Pull down exercise of the band down through the neck to control the top and pressure down.
- Chicken. The lower part of the shell body, hands on the belt, raise the upper part of the shell with the crown, stretch shaking the head and body, 8 counts.
- Champion point. Put your hand on the upper part of the sternum and raise your palm up, while your shoulders tend to go down, lower your hands. For 8 accounts.
- We move the walls and ceiling. We spread our arms, shoulders in a flat position, legs shoulder-width apart, arms apart to the sides or up until straightened, fixation in a flat position.
 We move apart for 8 accounts and stand for 8 accounts.
 - Move the floor by force. Press down with your hands, pull the top of the head up, press for 8 counts, hold the position for 8 counts
- Place the object on the center of the head and move with the object.
- Chest movement isolated to the sides
- Chest rotation isolated. 1-2 melodies, with alternation.
- Side dribble - combination of rotation and offset.
- Positioning and body work, can be done against a wall . We raise and lower our hands up, the shoulders are open shoulder-width apart, we retract the center, we remove the deflection in the lower back, it is possible to the wall, on the same line of the heel, hamstrings, buttocks, lower back, shoulder blades, back of the head.
- Exercise for the correct feeling of the upper and lower center - samba move at the barre.
 Shoulders and top center remain strictly parallel to the machine.
 - Bounce with the leg out and fixing the position of the central balance for 3 counts (in the center position). We hold ourselves on the joint of the thumb, big toe, foot pad.
- Exercises with a stick or a light object in front of in front of you in your arms and on your elbows hold on straight arms with lowered shoulders: shifts, latin square, ronde, bounce step.
- Presentation Exercise - Crossing the arms behind the head and doing the action in this position
- Shoulder Exercises
- Shoulders up and in a stretched free position. Slowly, we increase the action down, even position in the back. Hold down 8 counts, relax 8 counts
- Rotational movement (rotation) of the shoulders (head and bottom straight). 3-4 beats.
- Turning the shoulders, then the head, return to the neutral position and then to the other side. 3-4 reps per side. Next, add a turn with the head.
- Neck and head exercises
- Hands behind the neck and head and impact, pressure back for 8 counts and rest 8 counts.
- Chin, put the palm of your hand and put your chin on the shelf. The chin line is parallel to the floor line.
- The neck should be stretched primarily in the occiput. Competition who has a longer neck, with the condition that the distance between the earlobes and shoulders is the same, without tilt.
- Turning the head to the sides for 8 counts. Stretched, but not tense neck, head level. 3-4 repetitions. Beware of individual mistakes! Double sharp turn of the head on 1 and 2. It is necessary to adjust the focus when turning the head.
- Chest Exercises (Main Torso)
- Work forward backwards with the chest (upper center of "gravity"). Hands "take a point", the shoulders are motionless.
- Work with the upper center to the sides. We use the shoulder blades to push the opposite side.
- Work with the upper center at 8 points of the hall (forward, to the sides, diagonally).
- arms to the side and make shifts of the upper part of the body, then we try to make translation only with the chest.
- Chest rotation. More expressive with partners.
- a combination of shifts of 8 accounts - to the sides, back and forth, circle, figure eight.
Hip exercises
- Natural figure eight in the thighs without and with body weight transfer. Figure eight on two legs with transfer to the supporting leg, figure eight on toes, figure eight with a change in height. Figure eight in samba with bounce and transfer of body weight from foot to foot to the sides and back and forth. Reversible figure eights at the hips.
- - Leg raise with bent knee, out to the side, back, return.
It is important to control and remove blockage in the hips (sacrum forward). We remove the arch in the back (excessive lardos), there should be a long back. The center must be removed and drawn into the lower back
- Swallow center exercise. We move the hips a little forward, with the palm (stick) we press on the waist line in the center of the body. The center should "eat" the palm. 8 accounts.
- Exercise with band . We place the elastic band under the booty and press the stretched elastic band up, you can do it with a stretched elastic band in your hands under the booty.
Exercises for the work of the arms, hands
- Circular movements of the hand with control of the shoulder (like scooping movements). Eights in hands on outstretched arms. Circular movements with a brush at the bottom.
- Turning the shoulders and bringing the arm back (then forward). The right hand is brought out from the left shoulder and is in line with the left shoulder.
- Hands in turn to the sides, back, forward, up. Minimum 2 melodies.
- Progressive method of moving the arm to the side elbow - arm, hand and back.
- The movement of the arm is a continuation of the movement of the shoulder. working out the lines of continuation of the body forward and backward. Rotation of the shoulder - elbow - wrist - hand - turned the hand and arm - bent and returned. The arm cannot be brought back without turning the shoulders. When bringing the arm up, a screw movement of the arm is used.
- Exercise mill. Rotation of the arms in a circle with a turn of the body and shoulders.
- The arm movement method is a continuation of the shoulder movement. Articulation of the arms to the sides, forward and backward with the rotation of the shoulder, upward with the screw with the rotation of the shoulders.
Exercises for the work of the legs, feet
- Change of foot and legs - pull the knees and feet forward, gently lower into the supporting leg, be sure to pass through 2 gathered legs (near the knee and ankle).
 You can train at the machine.
 - Leg forward and backward when collected, the knee is pulled forward and up. Necessarily without clearance through the gathered legs in the brush position, turn the foot at the free leg, pull back - straighten the knee, strong stretched inverted foot, raise the hip, the free leg clearly controls the floor and presses on it, then swing back, knee through the knee and forward
- Exercise with a yoga block in the center of the crown , on the centers and feet, lift the foot one by one, make a change, bring the leg out, rond with the foot forward to the side back.
- Pelvis rotations on the ball of the foot , shoulders parallel to the barre, knee straight.
- External and internal twists of the machine - leg extension, knee extension, body weight transfer, knee collection and further, light heel of the supporting leg during rotation, concentration on the twist part.

- Hip Twist at barre - leg behind, diagonally with bent knee and back. You can work with an object on the toe of the free leg (a sheet of paper, a disk, etc.)
- Exercise Latin Square - pulled in the stomach, lowered the shoulders, pull the ribs up, light heels, open the hands keeping the volume forward and in front of you, moved weight on skating leg, leg forward (knee out, leg straight out, push, weight transfer, leg collection, lowered into line press, leg out to the side, weight transfer, pushing action, leg collection, soft change through the balls of the foot and strong legs , moving the leg back ... Clearly determine the weight and from which leg to which we are moving, transferring the weight of the body from the supporting leg, The upper body should not be ahead of step
- Floor pressure exercise . Go through a routine or circuit with relaxation and a sense of pressure and lowering the weight into the foot.
Exemplary team dance and sports club ajax
Rules for constructing choreography and dance variations
It is necessary to create a rhythmic pattern in the dance (playing with counting and rhythm and accents)
It is necessary to change rhythmic patterns during the performance of the composition
use shifting emphasis on accounts.
There must be pauses with lines (poses). No need to just run on the floor.
Change of emphasis - a change of emphasis from one part of the body to another is required using insulation.
Change of movement geometry is required during song execution.
Geometry of movement along the parquet
Samba and paso doble in a circle - for example, starting from the long side - the center of the hall, then diagonally again to another corner
Geometry inside the pair
Linear. Together and in parallel. When dancing in parallel, it is necessary only in perfect synchronization and no more than 1-3 measures.
Rotational
With rotation of one of the partners.
Dancing outside of a pair, no more than 6 measures.
3 types of guiding - coming and going freehand, framed, shoulder or body.
To be used to memorize the pair by judges and spectators. But only one in variation.
It is recommended to use the change of pitch (levels) in the dance.
The procedure for working out dance routines and patterns:
- determining the direction of each element and movement as a whole
- analysis of elements and patterns by counting
- analysis of technique, slowly counting by 8, half tempo, tempo.
It is not necessary to completely copy the coach or the dance you are learning, it is important to practice effectively, following the basic rules.
BASIC is a template and basis from which we build and use in interpretations.