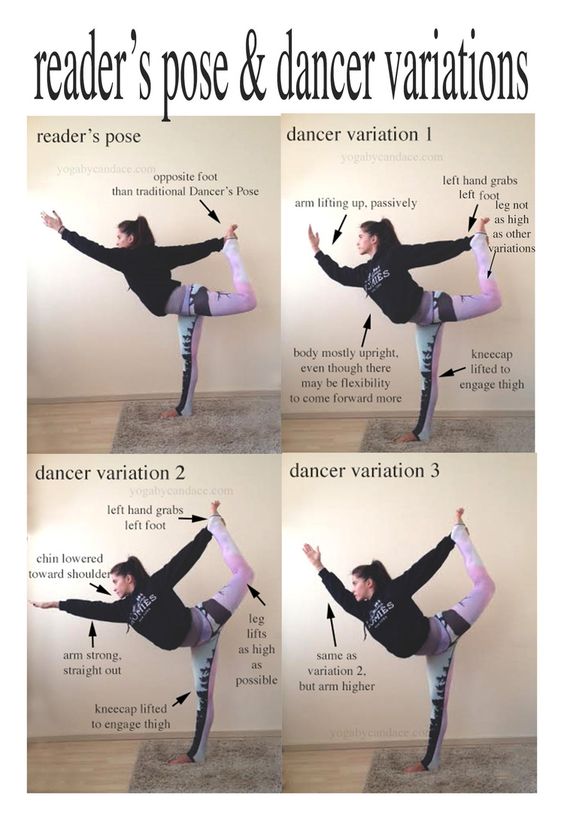
How to do dancer pose in yoga
How to Natarajasana or Lord of the Dance Pose
Table of Contents
- Sanskrit
- Pose basics
- How to
- Beginner tips
- Variations
- Why we love this pose
- Preparatory and counter poses
- Anatomy
- Bios
Get full access to Outside Learn, our online education hub featuring in-depth yoga, fitness, & nutrition courses, when you sign up for Outside+.
Natarajasana (Dancer Pose or Lord of the Dance Pose) is a deep backbend that requires patience, focus, and persistence. The pose is named after the Hindu god Shiva Nataraja, King of the Dance, who finds bliss in the midst of destruction. Like its namesake, Lord of the Dance Pose embodies finding steadying calm within.
In preparation for Natarajasana, stretch your shoulders, chest, hips, and inner thighs in the same manner in which they will be challenged in this pose. Practice balancing poses such as Vrksasana (Tree Pose) and stretches like Gomukhasana (Cow Face Pose).
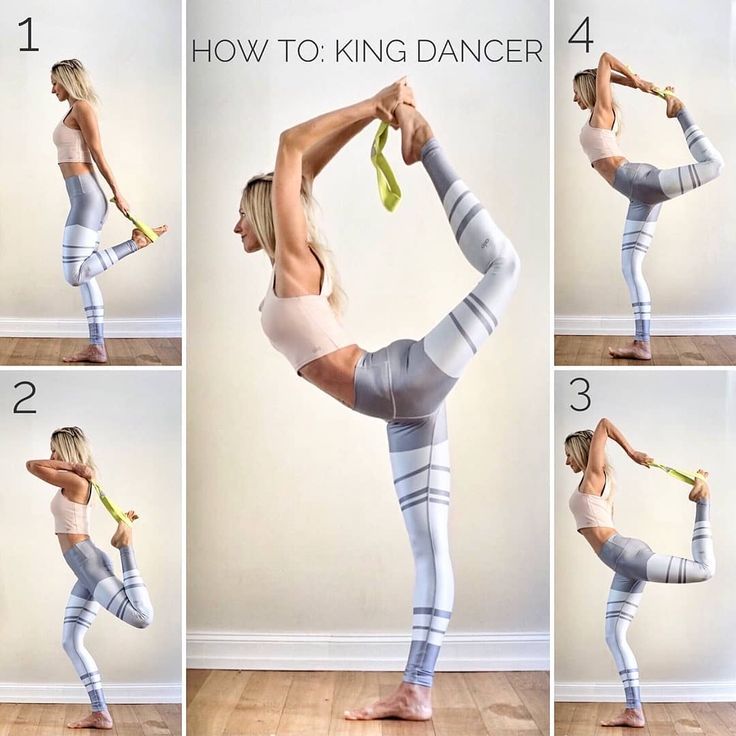
As you stand on each leg in Dancer Pose, you’ll strengthen your ankles and begin to correct any muscle imbalances you might have in your legs, hips, and glutes. You can use a strap to achieve greater access to Dancer Pose, and to keep your hips squared toward the front of the mat and your lifted knee in life with your hip rather than splayed out to the side.
Section divider
SanskritNatarajasana (not-ah-raj-AHS-anna)
nata = actor, dancer, mime
raja = king
Section divider
Dancer Pose basics
Other names: Lord of the Dance Pose, King Dancer Pose
Pose type: Standing Balance, Backbend
Targets: Lower Body
Benefits: Dancer Pose improves balance and focus, posture, postural awareness, and body awareness. It can boost energy and fight fatigue, and help build confidence and empowerment.
Other Dancer perks:
- Strengthens your core and back muscles, and stretches your chest and shoulders
- Stretches the front of your hip (hip flexor), front on your thigh (quadriceps), and ankle
- On the standing leg, it strengthens the front of your hip (hip flexor), your thigh (while also stretching the back of your thigh/hamstring), shin, and ankle.
- On the lifted leg, it strengthens your glutes and back of your thigh (hamstring).
Section divider
How to
Video loading...
- Stand in Tadasana (Mountain Pose) facing the front of the mat. Notice the symmetry of your pelvis and your torso.
- Press down through your big toe mounds and lift your inner arches. Rotate your inner thighs toward the wall behind and release your tailbone down.
- Lift your sternum away from your navel and soften your front ribs.
- Bend your right knee and bring your right heel toward your backside. Reach back with your right hand to clasp your ankle. Ideally, you will reach from the inside so that your palm faces the right and your shoulder is in external rotation.
- Bring your right knee alongside your left knee. Pause and observe which of the elements from Tadasana have been lost. To bring your body back into symmetry, press down with your left big toe mound, draw your left outer hip into the midline, and bring the right side of your pelvis and chest forward in line with your left.
- Maintain the symmetry in your body as you start to press your right thigh back and up. Lead with your inner thigh and press your right big toe mound away from you. Simultaneously reach your left arm forward and up, leading with your inner upper arm.
- Reach your sternum away from your navel to maintain the lift of your chest while you extend back and up with your right thigh. Keep your right knee in toward the midline rather than splay it out to the side.
- Hold for 5-10 breaths, then release back to Tadasana.
- Repeat on the other side.
Section divider
Beginner tip
Many beginners, when lifting the leg, tend to cramp in the back of the thigh. To avoid this, keep the ankle of your raised foot flexed (that is, draw the top of your foot toward the shin.)
Explore the pose
Practice Dancer Pose near the end of the standing portion of your practice to ensure that you have spent plenty of time opening your heart, hips, and legs for optimal mobility and balance. Also, this helps avoid injury.
You can move even further into this pose by grasping your raised foot with your opposite-side hand by bending your elbow and reaching for the inside of your raised foot.
Section divider
Variations
Photo: Andrew Clark; Clothing: CaliaDancer Pose holding onto a chair
For balance and stability, hold on to the back of a chair.
Dancer Pose at a wall
Stand facing the wall and rest one hand it wall and grab the opposite foot with your free hand. Your knee should face downward to stretch the front of your thigh (quadriceps). If you cannot reach your foot, use a strap to extend your reach.
Photo: Andrew Clark; Clothing: CaliaDancer Pose with a strap
If you cannot reach your foot, place a strap around the top of your right foot and bring the strap over your same-side shoulder and hold it with your right hand. Bring your left hand to that hip or extend it forward and start to lean toward the wall in front of you as you gently press your foot toward the wall behind you.
Section divider
Why we love this pose
“I was never a dancer but in this pose, I feel graceful and long,” says Tracy Middleton, Yoga Journal‘s brand director. “Natarajasana is all about balance: You’re simultaneously kicking and reaching.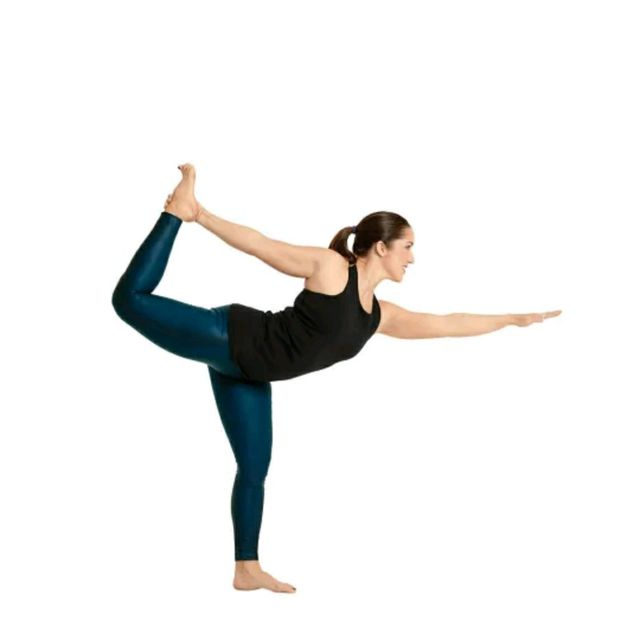 It’s a balance of effort and ease that requires all of your attention. Some days I fall out of the pose, others I’m steady and strong. It’s a good reminder that as it is in yoga, it is in life. Every day is a new chance to find balance.”
Section divider
Preparatory and counter poses
When preparing your body for Natarajasana, you want to challenge it in the same exact fashion. Include poses that move your body in the same shape as Dancer Pose demands, deconstructing it body part by body part. Focus especially on poses that stretch your quadriceps, front of your hips (hip flexors), and shoulders.
Preparatory Poses
Anjenayasana (Low Lunge)
Humble Warrior
Virasana (Hero Pose)
Virabhadrasana III (Warrior Pose III)
Ardha Chandra Chapasana
Dhanurasana (Bow Pose)
Eka Pada Rajakapotasana (One-Legged King Pigeon Pose)
Ustrasana (Camel Pose)
Gomukhasana (Cow Face Pose)
Counter poses
Uttanasana (Standing Forward Bend)
Adho Mukha Svanasana (Downward-Facing Dog Pose)
Balasana (Child’s Pose)
Section divider
AnatomyNatarajasana presents the challenges of combining a backbend with a one-legged balancing pose. Understanding these two elements provide a starting point for achieving this advanced posture. Deconstruct the pose into its component parts to separate out certain difficult aspects: distinguish the backbending from the balancing. Become proficient at each of these, and then combine them.
Begin with the backbending component. The ability to deeply extend your hip and leg is a prerequisite to Natarajasana. Accordingly, stretch the psoas and its synergists, the pectineus, adductors longus and brevis, and sartorius in other poses first, then apply this to backbending poses, such as Urdhva Dhanurasana (Wheel Pose) and Ustrasana (Camel Pose).
Next, fine-tune your balance by practicing poses such as Vrksasana (Tree Pose) and Utthita Hasta Pandangusthasana (Extended Hand-to-Big-Toe Pose). Finally, reconstruct the pose into the classical asana. Remember that each part of the process benefits you. Each part is yoga.
In the drawings below, pink muscles are stretching and blue muscles are contracting. The shade of the color represents the force of the stretch and the force of contraction. Darker = stronger.
In the standing leg, the quadriceps straighten your knee and the tensor fascia lata synergizes this action, in addition to stabilizing the knee joint from the outside. The hip abductors—which includes the tensor fascia lata as well as the gluteus medius—automatically engage when you stand on one leg. This balances your pelvis by pulling on the origins of these muscles at the iliac crest. If the adductors are weak, your pelvis sags over to the side of the leg that is in the air. Remember that primary stability originates from the pelvis.
To lift your back leg, the hamstrings and gluteus maximus combine to lift it. Squeeze the buttocks and tuck the tailbone during this phase. Later you will relax the hamstrings and engage their antagonists (the quadriceps) to deepen the arch. Your knee will tend to drift out to the side as you lift your leg. Counter this by engaging the adductor magnus to draw your thigh toward the midline. This will also synergize the action of the gluteus maximus in extending your hip.
Arch your back by contracting the erector spinae and quadratus lumborum. Engage these muscles slightly more on your lifted leg. The standing-leg gluteux maximus also contracts to assist you in balancing.
(Illustration: Chris Macivor)On your lifted leg, engage the quadriceps to deepen the arch of your back. Note how contracting these muscles straightens your knee and lifts your torso.
Use your entire arm and shoulder to lift your foot by straightening your arm. Contract the triceps to do this.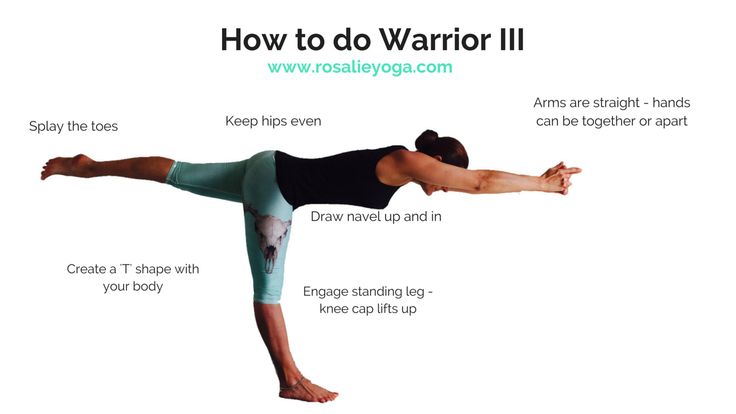 The posterior deltoid will synergize the infraspinatus and teres minor in externally rotating the shoulder. Your entire front body stretches in Dancer Pose.
Excerpted and adapted with permission from The Key Poses of Yoga and Anatomy for Backbends and Twists by Ray Long.
Put Lord of the Dance Pose Into Practice
An Accessible Yoga Sequence for Practicing Lord of the Dance Pose
Props to Help You Explore Lord of the Dance With More Flexibility and Honesty
10 Yoga Poses to Help Prevent Dead Butt Syndrome
Section divider
About our contributors
Teacher and model Natasha Rizopoulos is a senior teacher at Down Under Yoga in Boston, where she offers classes and leads 200- and 300-hour teacher trainings. A dedicated Ashtanga practitioner for many years, she became equally as captivated by the precision of the Iyengar system. These two traditions inform her teaching and her dynamic, anatomy-based vinyasa system Align Your Flow. For more information, visit natasharizopoulos.com.
Ray Long is an orthopedic surgeon and the founder of Bandha Yoga, a popular series of yoga anatomy books, and the Daily Bandha, which provides tips and techniques for teaching and practicing safe alignment. Ray graduated from the University of Michigan Medical School and pursued post-graduate training at Cornell University, McGill University, the University of Montreal, and the Florida Orthopedic Institute. He has studied hatha yoga for over 20 years, training extensively with B.K.S. Iyengar and other leading yoga masters, and teaches anatomy workshops at yoga studios around the country.
3 Delicious + Healthy Vegetarian Ayurvedic Thanksgiving Recipes
Get full access to Outside Learn, our online education hub featuring in-depth yoga, fitness, & nutrition courses, when you sign up for Outside+.
Ayurvedic chef Talya Lutzker shares her favorite recipes for a divine vegetarian Thanksgiving Day meal.
As we all know, Thanksgiving’s purpose and meaning reaches far beyond food. A celebration of gratitude, dinner is the reason we gather around the same table, at the same time, and savor the company of those that we love and call family. But turkey does not have to be the centerpiece for all tables. In fact, it’s becoming more and more common to try alternatives to the traditional Thanksgiving fowl. Today I want to share some super-satisfying vegan and vegetarian alternatives to the traditional Thanksgiving meal. It’s good to get that holiday feeling without the bird!
See also How to an Ayurvedic Cook a Holiday Feast (+ 6 recipes to do it)
When planning your Thanksgiving menu in accordance with Ayurvedic medicine, it noteworthy to mention that food combining should factor in as a major consideration. Meat and starches don’t mix easily in the gut. So you want to be strategic in your meal planning and find foods that go well together, digestively speaking. If you stick with all vegetables and plant-sourced proteins, you’re good to go. My vegetarian Thanksgiving menu this year looks something like this:
Organic Eggnog, spiked or virgin
Brussels Sprouts with Crispy Crumbled Baked Tempeh
Beautiful Roasted Beet Salad
Simple Baked Sweet Potatoes with Coconut Butter and Chia Seeds
Quinoa Pancakes with Creamy Saffron Sauce
Flourless Pecan Pie
Organic eggnog starts off the holiday, yet to spike or not to spike is the question. Since eggnog is typically made with dairy-sourced heavy cream—or a rich vegan cream, like coconut milk— eggnog is a specifically nourishing apertif. The “spiking” will stimulate appetites a bit more than those who choose the eggnog virgin-style. But either way, one teaspoon of ground ginger root powder (per 16 ounces of eggnog) can be added to enhance eggnog’s digestibility.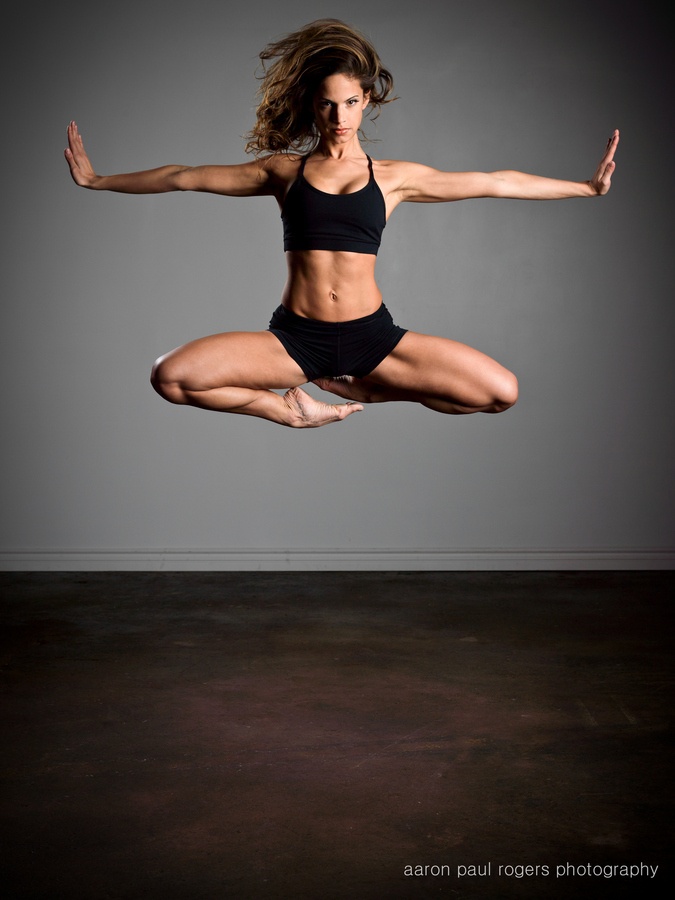 I like to spike mine with a bit of brandy, bourbon or dark rum. Use about one tablespoon of alcohol per 8-ounce glass of eggnog.
See also Wonder if you’re a pata, vata, or kapha? Take our dosha quiz to find out
Brussels sprouts are a classic Thanksgiving side dish, plus they have the Ayurvedic benefit of being seasonally appropriate and great for the colon. Pairing them with crispy baked tempeh is a wonderful vegan alternative to bacon, and makes the whole recipe light, a fact that benefits kapha, the heaviest of the three Ayurvedic constitutions. Since overeating tends to be everyone’s problem at the holidays, reducing kapha-increasing foods at Thanksgiving (i.e. foods that are especially heavy, dense, and cool) yields positive post-meal results for all. Brussels sprouts, cabbage, and most salads lighten the total caloric load of a Thanksgiving meal, so pepper your menu with them handsomely.
That’s where my Roasted Beet Salad comes in handy (see the recipe below), as well as a dish as casual as Simple Baked Sweet Potatoes with Coconut Butter and Chia Seeds. Bake scored whole sweet potatoes at 375 degrees for 45 minutes, or until the flesh is easily pierced with a fork. Cook one for each guest. Try the white-fleshed variety for a change, they are rich in potassium and their purple skins are delicious when baked. Make one long cut down the center of each sweet potato and fill with a couple tablespoons of fatty acid-rich coconut butter and a tablespoon of whole, nutrient-dense chia seeds. Trust me: It’s sweet-and-savory perfection.
Because they are gluten-free and high in protein, Quinoa Pancakes are an almost effortless crowd-pleaser. They are delicious with just a bit of flaxseed oil or ghee and a dash of salty spice. Or you can do something much more holiday-elegant and top each one with a dollop of Creamy Saffron Sauce. Saffron is a deeply cherished spice around the world. In Ayurvedic medicine, which uses saffron widely, it is revered as a sattvic (balancing and purifying) blood-tonifying herb that also possesses antioxidant properties.
Last on the menu is a flourless Pecan Pie. Why flourless? It’s yet another of my personal methods to lighten the weight of the meal. A whole-nut crust that doesn’t require baking is the lightest way to go, although almost all desserts will increase kapha, so enjoy sparingly and when you are still hungry.
I hope you truly have much to be grateful for this Thanksgiving. Here are a few of my favorites to get you started. Namaste!
RECIPE #1:
Roasted Beet SaladPreparation Time: 50 minutes
Yield: Serves 4
6 medium purple beets
6 medium golden beets
2 medium carrots
3 T coconut oil, melted
2 tsp Celtic Sea or Himalyayan salt
1 T fresh thyme leaves or 2 tsp dried thyme
1/8 C fresh-squeezed orange or lemon juice
2 tsp apple cider or ume plum vinegar
2 T fresh basil leaves, minced
2 T cold-pressed olive oil
3 C fresh arugula leaves, packed
1/4 C raw pine nuts
1/2 C feta or blue cheese, crumbled (optional)
1/2 tsp ground black pepper
Directions:
Preheat the oven to 400 degrees. Cover two cookie sheets with parchment paper and set aside. Scrub the beets and carrots well. Remove any obvious blemishes from the roots but leave most of the skins on if you can. Slice the beets and carrots into 1/4”-thick moons and half-moons. Put into a large mixing bowl. Melt the coconut oil over low heat on the stove or by placing your jar of coconut oil into a shallow bowl of very hot water. Pour the melted coconut oil over the beets, stir in the salt and thyme and toss. Spread the coated beets in a single layer onto the two cookie sheets. Bake for 15 minutes. Give the beets a quick stir and rotate the pans in the oven. Bake for another 15 to 20 minutes, until the beets are fork-tender. Remove from the oven.
Meanwhile (while the beets are cooking), stir together the orange juice, apple cider vinegar, fresh basil and olive oil in a small bowl. Set aside. Place a skillet over medium-low heat and add the pine nuts. Toast them until they are fragrant and just barely turning a golden brown, about 5 minutes.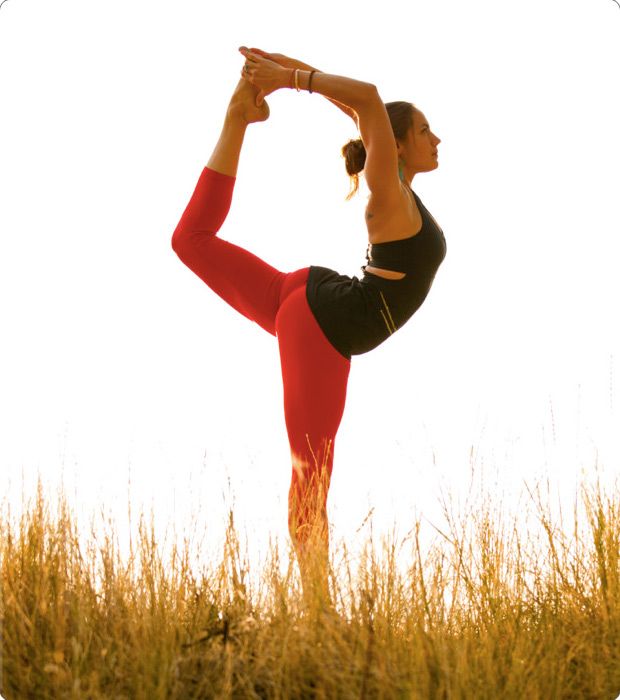 Remove from heat. Return the roasted beets to a large mixing bowl. Toss with the dressing. Serve over a bed of arugula and top with the toasted pine nuts, optional feta cheese and black pepper.
RECIPE #2:
Creamy Saffron SaucePreparation Time: 20 minutes
Yield: About 1/2 Cup
1 C shallots, peeled and minced
1 C vegetable broth
2 T apple cider vinegar
Two healthy pinches of saffron
1/4 C organic heavy cream, egg nog or coconut milk
2/3 C cold (refrigerated) ghee or coconut oil
2 T fresh lemon juice
1 1/2 tsp Celtic Sea or Himalyayan salt
1 teaspoon fresh ground black pepper
Directions:
Place the shallots, vegetable broth and apple cider vinegar in a medium stockpot over medium-high heat. Bring to a boil and cook down the shallots until the entire mixture is reduced to about 1/4 Cup. Reduce the heat to medium-low, add the saffron, cream, and refrigerated ghee.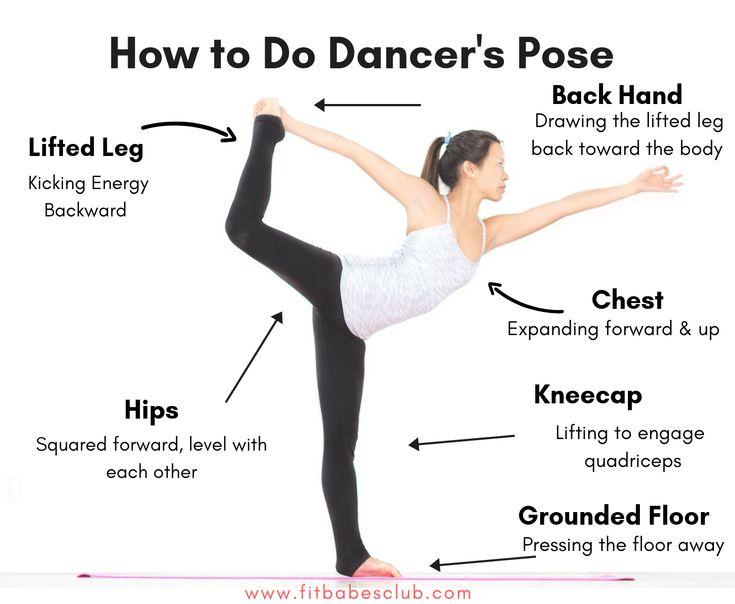 Use a wire whisk to fully incorporate the ghee into the mix. Then add the lemon juice, salt and pepper. Season to taste and blend the sauce until smooth. Serve over baked fish, Quinoa Pancakes or brown rice. A recipe for Quinoa Pancakes can be found in my cookbook, The Ayurvedic Vegan Kitchen.
RECIPE #3:
Flourless Pecan PiePreparation Time: About 45 minutes, plus refrigeration time
Yield: One 9-inch Pie
Crust:
1 C raw walnuts
1/2 cup raw pecans
2 T shredded unsweetened coconut
1 tsp. ground dried ginger root
1 pinch mineral-rich salt
1 1/4 C Medjool dates, pitted and roughly chopped
Filling:
1 C Medjool dates, pitted
1 C organic raisins
4 whole dried plums (or prunes), pitted
3 C purified water
1/2 C reserved soak-water from dates, raisins, and prunes
1 cup raw whole pecans, plus 1/4 C reserved for decorating
1/8 C maple syrup, brown rice syrup or coconut nectar
1 T vanilla
1/8 teaspoon mineral-rich salt
2 tsp ground cinnamon
1 tsp nutmeg, ground fresh if possible
1/2 tsp ground cardamom
Dash of black pepper
Directions:
For the filling, soak the dates and raisins in 3 cups of purified water for 30 minutes.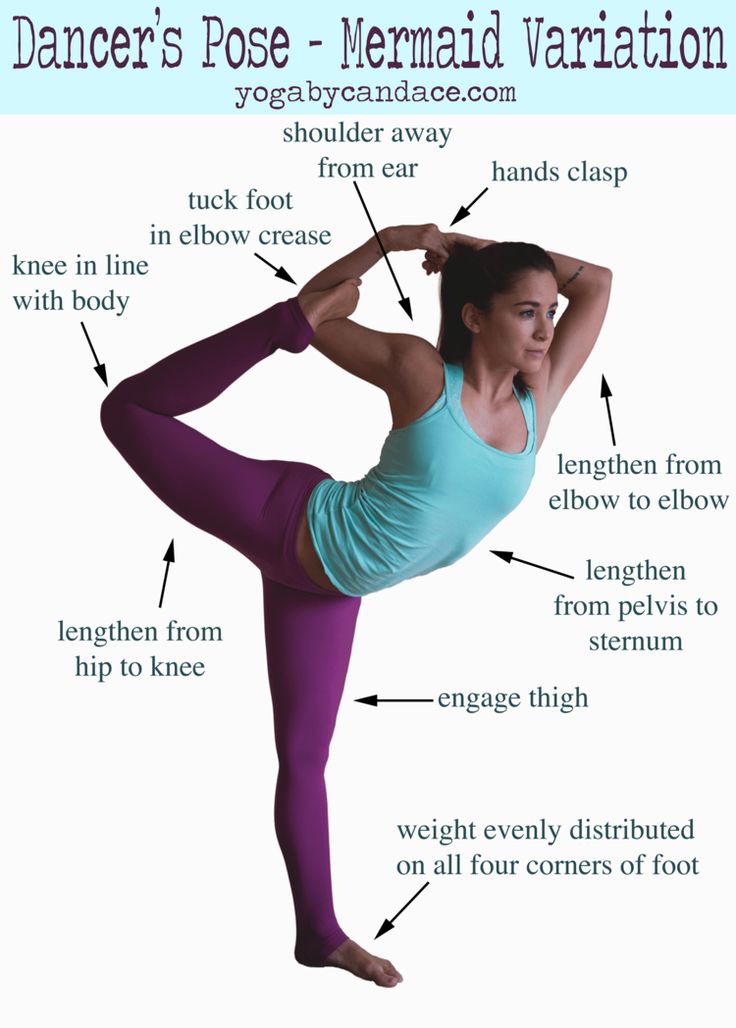 Meanwhile, combine the crust ingredients in a food processor and pulse until you have a sticky mass. Press the crust dough into the bottom of a coconut oil-greased 9-inch pie or springform pan. Refrigerate while you make the filling. Now add 1 cup of the pecans, the maple syrup, vanilla, salt, and spices to the food processor. Drain the dates, raisins and prunes, reserving at least 1/2 cup of the soak water*. Add to the food processor with the other ingredients and pulse on high for about 30 seconds, pausing occasionally to scrape down the sides of the blender. Taste for sweetness and spice. Pour the pie filling into the crust, cover and refrigerate for 2 hours before serving. Decorate with the remaining whole raw pecans.
Talya Lutzker is a Certified Ayurvedic Practitioner, nutritionist, chef, and yoga teacher, and the founder of Talya’s Kitchen. Her latest cookbook is The Ayurvedic Vegan Kitchen. Learn more at TalyasKitchen.com.
Want more Ayurvedic holiday recipes? Cook these:
Warm Kale, Apple & Roasted Root Vegetable Salad with Turmeric Vinaigrette
Gingery Pumpkin Bisque with Maple Syrup
Spicy Hot Chai
Whipped Potatoes
Seared Tofu Cutlets or Chicken Breasts Over Wild Mushrooms, with Creamy Sage & Green-Peppercorn Sauce
Roasted Brussel Sprouts with Pickled Red Onions
technique with photo and video
Asanas in yoga often have conventional meanings. These include Natarajasana. In classical yoga, it is called "pose of the god of dance" , since it is involved in the god Shiva, who combined the God of death and the God of dance at once. She is among the most beautiful and active poses. You can practice regardless of age. In Sanskrit, the word "nata" means "dancer" and "raja" means "king."
Contents
- Technique
- Benefit
- Video
- Contraindications
Technique
- Initial position – Tadasana. The feet are firmly planted on the mat.
- Emphasize on the right leg.
- Pull the head of the femoral bone of the right leg into the joint, draw in the knees.
- Concentrate on maintaining balance.
- If balance is lost at the beginning of the asana, then you need to stop and concentrate. Take your left foot back, bend and lift your leg up. nine0012
- Turn the palm of the left hand to the outside, take it back and grab the left foot.

- Extend the leg with the foot back to the level until the thigh and the floor are parallel to each other. Retract the ankle from the outside and pull towards the lower leg.
- Keeping balance, turn the left shoulder outward, raise the elbow up.
- Raise the front of the pelvis towards the diaphragm, stretching the lower spine, bringing the coccyx down. nine0012
- Rotate the left thigh to the inside, align the upper part of the pelvis.
- Keeping your balance in this stance, raise your right hand up, put it behind your head and grab your left foot. Lower the shoulders down and turn outward, open the chest. At the same time, stretch your left leg back.
- Maintain the pose for about half a minute, then move it to the opposite side.
Practice for preparation:
- downward facing dog;
- dove pose;
- monkey king asana;
- bow pose;
- Virabhadrasana in all variations;
- Virasana.
Benefits
The asana can be performed if there are diseases of the kidneys, lungs, or a curvature of posture. For the last point, it can be practiced at any age.
The pose stretches and opens the chest and shoulders, makes the hips, groin and abdomen longer, strengthens the legs, increases blood flow to the pelvic organs, calms the nerves, trains the vestibular apparatus and normalizes the balance of hormones. nine0007
Legendary meditation course free of charge
Recommended! The most popular meditation course for beginners in Russian. More than 100 thousand people have already learned to meditate. Try it yourself. More.
Video
Watch these videos to clearly see how to perform the pose of the king of dancers:
Contraindications
Asana performance is prohibited when:
- high or low blood pressure; nine0012
- injuries of the spine, hips, legs, knee joints;
- carpal tunnel syndrome ;
- exacerbated diseases of the kidneys or lungs.
Equipment
Asana classes will be much more pleasant, useful and effective if you have good equipment:
- yoga mat - for the safe performance of asanas;
- bolsters and rollers - to keep the body comfortable while exercising;
- yoga clothes - comfort and aesthetics are also important for regular practice.
Where to buy
High-quality equipment for every taste can be purchased in the following online stores:
- Yoga-Store
- 4YOGA
- Indiastyle (only clothing)
How to perform the pile yoga
Verywell / Ben GoldsteinAlso known as : Dance Pose, Dancing Shiva Pose
Goals : Legs, Core, Balance
Level : Intermediate
The most advanced yoga postures often require a combination of complex skills. The King Dancer Pose ( Natarajasana ) requires strong balance, intense backbends and open shoulders, all of which take time to develop.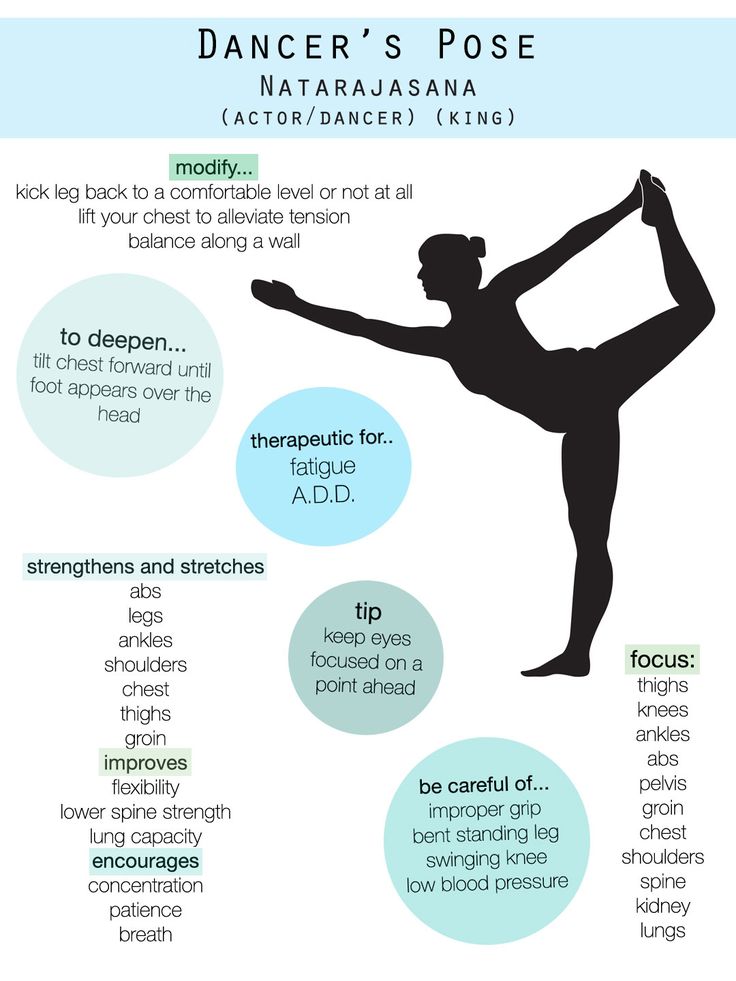
In the backbend sequence, King Dancer Pose will be towards the end, and you can follow it with Standing Half Backbend (Ardha Uttanasana) as the counter pose. nine0007
Watch now: How to Improve Balance with Dancer's Pose
Benefits of Using GPR
King Dancer's Pose strengthens the legs, improves balance and core strength, and stretches the shoulders. It opens up the hip flexors (lumbar muscles) as opposed to tight hips that develop from sitting for too long.
Improved core balance and strength helps with many daily activities and sports. You will also need good attention and concentration for this posture, and practice helps to train these abilities. nine0007
Step by Step Instructions
Begin by standing upright in mountain pose ( Tadasana ) with weight evenly distributed on both feet.
- Shift your weight onto your right leg. Bend your left knee to lift your left leg off the floor. Keep your left knee pressed into the midline throughout this pose.
- Grasp the instep of the left leg with your left hand. Your big toe rests on the sole of your foot and points in the direction of your toes.
- Raise your right hand straight up to the ceiling. nine0012
- Raise your left leg behind you, pushing your torso forward as a counterweight. Remember that your left knee should not be splayed out to the side. Your right hand will also move forward.
- Kick your left foot hard into your left arm to lift your leg higher and deepen the backbend. Keep your left toes active.
- Fix your gaze ( Drishti ) on something that is not moving so as not to lose your balance.
- Hold for 5 to 10 breaths. nine0012
- Continue kicking with your left foot against your left arm to get back up. Lower your left leg back in line with your right. Repeat the pose on the other side.
Common Mistakes
You need a good base for the King Dancer, so be sure to place your toes on your skating foot. Your knee should be slightly soft, not blocked, overly extended, or overly bent. You must engage your quads (muscles at the front of your thigh) to keep your pivot knee soft. nine0007
Keep your hips straight and your knees in line with your hips so you don't have rotation that distorts alignment.
Modifications and Variations
Take this posture step by step, stopping as needed. As you progress, make adjustments to move forward.
Modification needed?
Stand next to a wall so that you can reach your balance if necessary.
If you find it difficult to lift or reach your shin, you can use the strap to help you. nine0007
Ready for a challenge?
When you feel very comfortable in the posture as described above, start working on the following variations:
- Insert your left foot into the crook of your left elbow. Raise your right hand up and behind your back to tie it with your left hand. It's almost like a standing mermaid pose.