How to build a dance floor at home
How to Build a Dance Floor
Home / Latest Posts / Life / Party Ideas / How to Build a Dance Floor
By: Leigh Anne Wilkes
This tutorial will show you how to build a dance floor using 2 x 2’s and sheets of plywood. So easy and less expensive than renting one.
I shared with you in a previous Wedding Carnival post the story of our dance floor. When we decided to book a live band for the Wedding Carnival I thought we needed a dance floor. My husband did not. We have a large backyard and plenty of grass and he thought dancing on the grass would be just fine.
I am not easily dissuaded or discouraged.
I got on line and immediately started pricing dance floors from rental companies. They are not cheap, between $700-800 for the size we needed. It wasn’t in the budget so I decided I needed to get creative.
To make a somewhat long, 5 month long story short, I had a dance floor and then I didn’t have a dance floor, I had a dance floor and then I didn’t. In fact I thought I had a dance floor until the Sunday before the Wedding Carnival. It fell through – five days before the event.
Remember I am not easily discouraged so I decided we were going to build a dance floor. Or rather my daughter Cali and her friend Hannah were going to build me a dance floor (with some help from dad of course.)
By this time I had totally broken Jim down and he agreed so we headed to Home Depot on Monday night (the Wedding Carnival was Friday).
Dance Floor Supplies
- 6 sheets of 1/2″ plywood
- 30 eight foot long 2 x 3’s – cut 18 of them into two 45″ pieces (you will have pieces leftover) This will leave 12 of the boards 8 ‘ long. They cut them for free for you at Home Depot.
- Nails and hammer
- Floor Paint and supplies for painting
- Painters Tape
- 6 Mending plates to join the pieces together
How Big is the Dance Floor?
The dance floor measured 12 x 16 and was created out of 6 sections that were 4 x 8 which is the size of a sheet of plywood.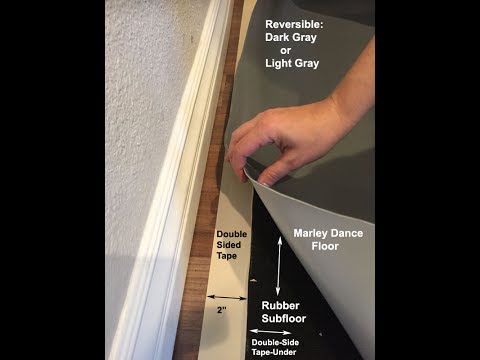
How to Build A Dance Floor
The whole neighborhood got involved or enjoyed watching the process taking place out in front of our house.
The above photo is about how involved Tessa got – she held a hammer for a photo but she was working full time so we need to cut her some slack.
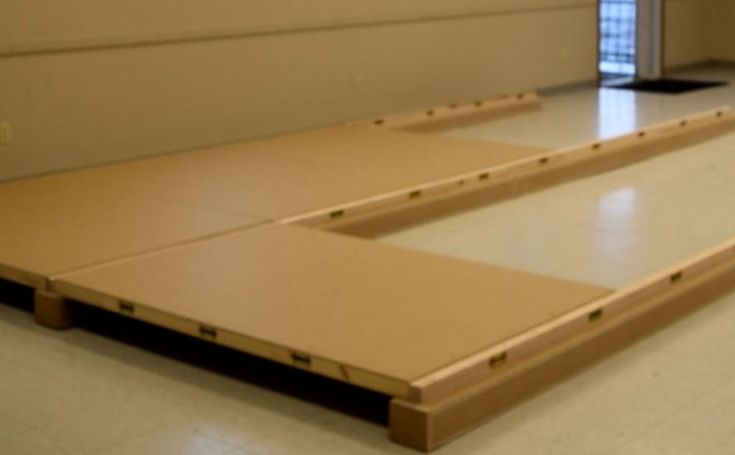
- Create 6 frames from the 2 x 3’s that measure 4′ x 8′.
- Add four support pieces to each frame
- Nail a sheet of plywood to the top of each frame. Nail it down along the edges and across the support pieces.
- The moms got involved in this step of the process. Had to bring in the big muscles!
How to Paint a Dance Floor
The next step was the painting process. I decided that I wanted the floor to be checker board to go along with the carnival theme so I purchased black and white floor paint. We primed the boards first and then added a coat of white paint to each section.
Yes, I sat in a chair and watched it dry! I like watching paint dry.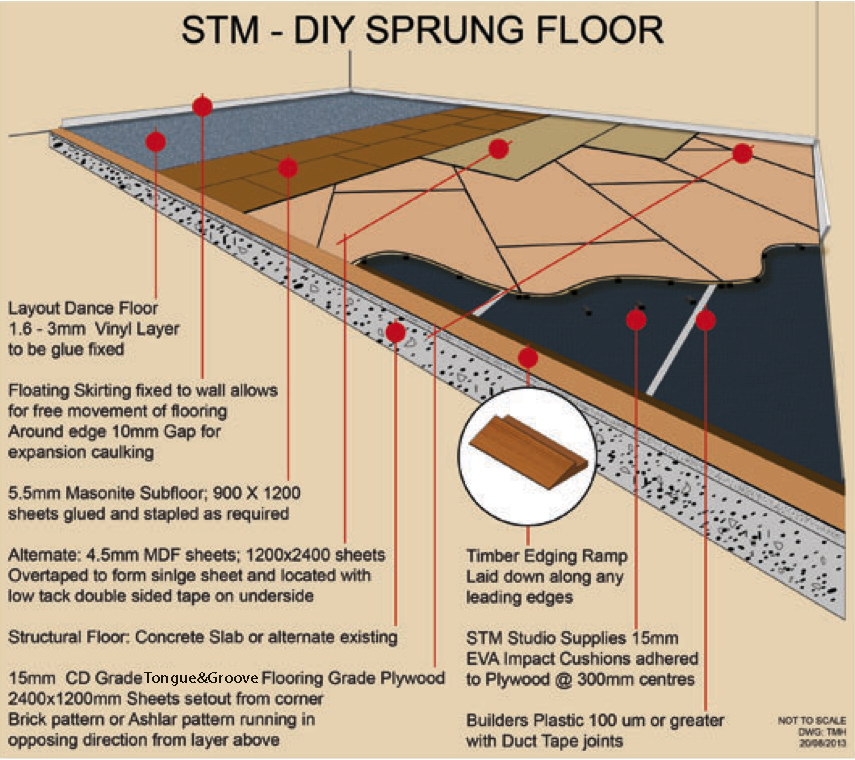
After it was dry, the girls used blue painters tape to tape off the squares. The squares measured 24″ x 24″ so each 4 x 8 section had 2 x 4 squares.
Using small foam rollers the girls rolled the black paint into the taped off squares.
We waited for the paint to dry, removed the tape and we had a dance floor!
Finally, we numbered the pieces so that we knew how to put it back together once we moved it into the backyard.
The mending pieces were hammered into to hold the pieces together.
How Much Does It Cost to Build a Dance Floor
Total Cost of Dance Floor (including paint but not including labor) Approx. $300.00.
It was perfect and it was a wonderful addition to our carnival and YES, we needed a dance floor. Even my husband admits that now. It added such a fun element to the carnival and really got people dancing.
Who wouldn’t want to dance on a black and white checkerboard dance floor!!!
Reader Interactions
How to Build Your Own Studio or At-Home Dance Floor
A proper dance floor system used to be an expensive and complicated project.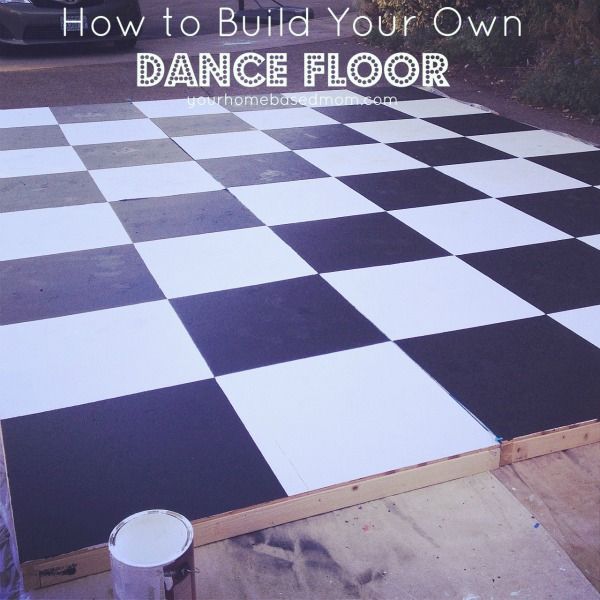 No more. We are talking about a real professional floating wood sub-floor and marley floor surface with a taping or adhesive system, for as little as $3.50–$4.00 per square foot.
Do it yourself does involve time and effort for which you are rewarded by saving money.
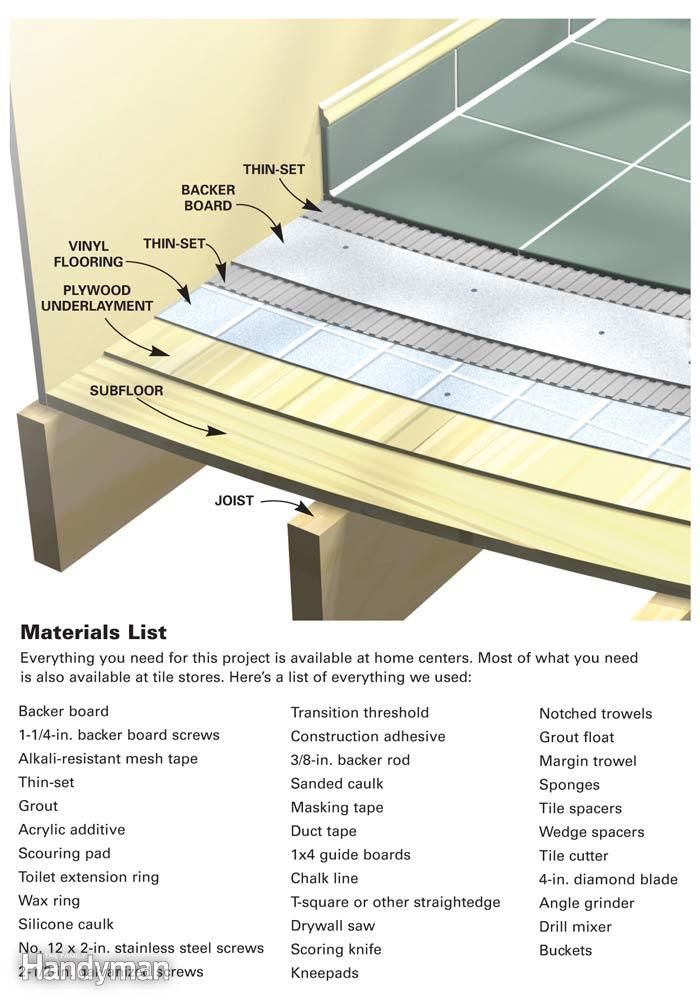
Let’s first start out with a list of materials:
- If you are starting with a clean level concrete slab, you will need a vapor barrier, which can be liquid or visquin (clear vinyl sheeting) and water proof tape. If you have VCT tile or glued commercial carpet there is no need for a vapor barrier.
- Two layers of underlayment grade plywood, each a ½ inch thick. The bottom layer should be B/C, meaning that neither side has been sanded. The top layer should be A/C, meaning the top side is sanded smooth. Underlayment plywood does not have any knot holes or vacancies between the laminations.
- One inch counter sink deck screws. Nails are a no-no.
- Ardex Featherlite or Feather Finish filler for the screw holes.
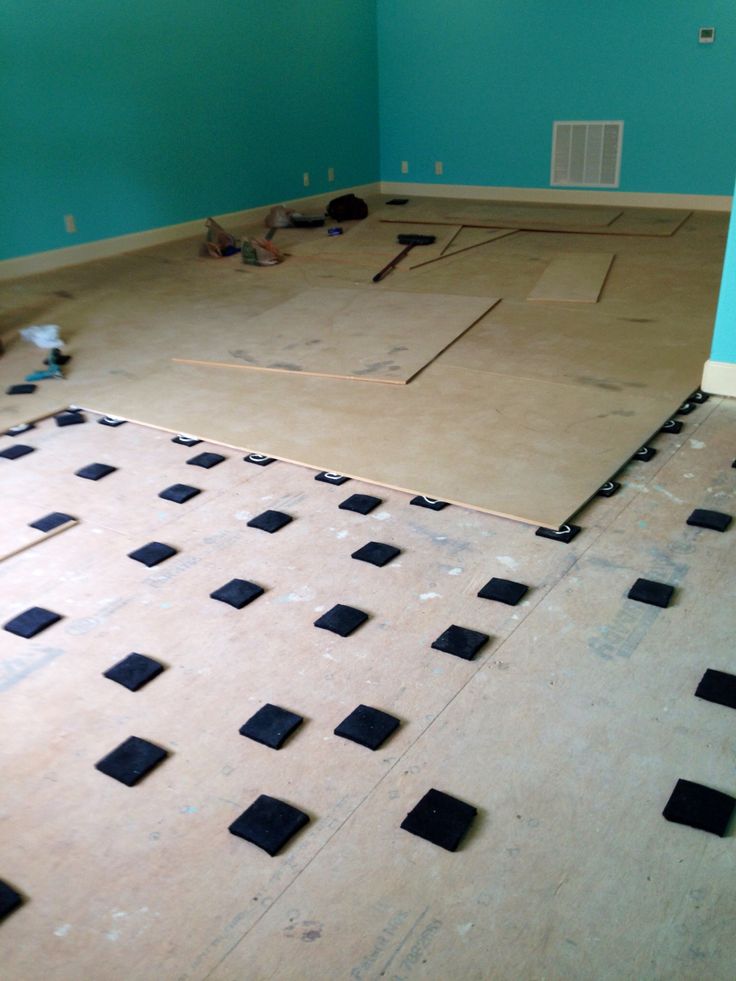
- Foam blocks or foam cubes.
- Transition for doorway to access the raised dance floor system.
- (Optional) Vented Cove Base.
- Marley type flooring.
- Tape or adhesive.
That’s it. All products are available at Stagestep except the plywood, screws and Ardex.
Tools Needed:
- Circular saw with wood blade
- Power screw driver
- Matte knife
- Sander
Tips:
The bottom layer of plywood should be cut when necessary to stagger the seams. Boards should be 1/2 inch from the walls. Glue or peel and stick foam blocks or cubes to the plywood. 52 Blocks or 100 Cubes per 4 x 8 panel. See directions online, of placement of foam at Stagestep.com. Download installation guide. See page 33.
Flip all boards over so the foam blocks or cubes are in contact with the concrete or vapor barrier.
If the bottom ply runs North/South, the top ply should run East/West.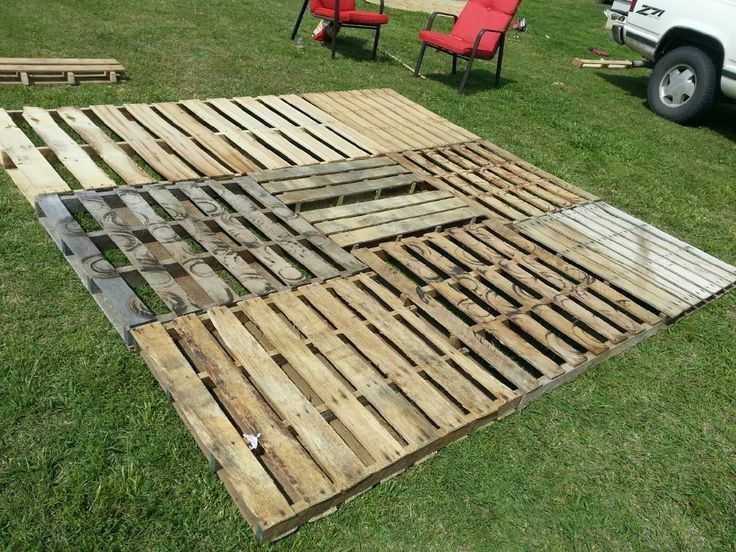 Top ply should be cut where necessary to stagger the seams. Counter sink the screws using between 75-100 screws per 4 x 8 ply panel. Fill countersunk screws with a filler such as Ardex Featherlite or Feather Finish, Do not apply filler to the seams.
The following day, level the top layer of ply by sanding the filler smooth to the surface. Vacuum or sweep the subfloor
You are now ready to install your floor surface.
Installing your Marley Floor
There are five ways you can install your roll out marley. But first, there are a few things you need to do prior to the install.
- All rolled flooring needs to be stored standing up prior to installation, or else, if lying down they could develop roll set(floor has waves in it when rolled out)
- Roll out your flooring lose and let it acclimate to room temperature. This could take 24 hours.
- Make sure the subfloor has been swept or vacuumed before installing the floor.
Installation methods:
Temporary
Temporary installation of the floor from a few hours to a couple of weeks is primarily used for touring shows, conventions, competitions and in situations where the floor has to be pulled up and re-installed frequently.
Use top surface tape only. Seams should be separated by 1/16 of an inch before taping. Tape should be applied to all seams and circumference of the floor. Tape comes in two types, vinyl and cloth and in two widths, 1.5 inch or 2 inch. Your preference.
Tape residue should be removed prior to re-application with Wipeout Plus.
Semi-Permanent—One to three years.
2 inch double-faced tape and top tape.
This method has been around for many years. The double-faced tape is installed around the perimeter of each roll and down the middle of each roll.
The floor is rolled out and trimmed in place. Then one roll is rolled ½ way back up, employing a 4 inch tube (all floors are shipping with floors rolled around a tube so do not throw them away).
Apply the tape and peel off the top protective coating and roll your floor over the tape. Continue the process until all floors have been installed with the double-faced tape. Top tape all seams and around the circumference of the room. Remember to leave a 1/2 inch gap between the floor and the end of the subfloor to accommodate the top tape.
Semi-permanent Long Term—Three to four years.
Utilizing 4 inch installation double-faced tape, install the exact same way as 2 inch double-faced tape. However, In this case, all seams are tight and no top tape is needed. Therefore all flooring should be flush to the sub-floor.
Long Term Semi-Permanent.
Stagestep offers a unique installation product called ReUseIt. It is a sticky netting that utilizes suction to hold the floor to the subfloor indefinitely. Just peel up your floor to remove. Leaves no residue.
ReUseIt is installed over the entire subfloor prior to rolling out your floor. Install is perpendicular to how your floor is running.
ReUseIt comes in rolls 39 inches wide and 268 feet long. One person walking backwards unspooling the netting while a second person with broom in hand pushed it onto the subfloor. Cut roll when you get to a wall and repeat, going edge to edge with the previously applied ReUseIt.
Roll out your floor, running in the opposite direction of the ReUseIt. Match seams and trim to fit the room. Utilizing the 4 inch tube that came with the flooring, roll flooring ½ way back up. Peel protective top sheet of ReUseIt running across the width of the floor exposing 39 inch by 6.58 feet of ReUseIt (width of a roll of flooring) . Roll floor out over exposed ReUseIt and repeat until install is complete.
A 75-150 pound roller is sometimes used to smooth out and further secure the flooring. No top tape needed.
Permanent
Permanent installation requires adhesive and a professional crew to do the job. If you have never glued down a floor, do not make this your first project.
how to dance the chorus? — Tsimes
something in Hebrew
July 11, 2022
Read: 5 min
Hora is a circle dance that traditional Jewish weddings and bar mitzvahs cannot do without. Together with the organizer of ceremonies Ezra Bookman figure out how to light up the dance floor and make even the most boring relatives start dancing
Famous choreographer Anna Halprin writes: the strength and fast pace of the dance eventually take over."
These circle dances, found in cultures all over the world, make us feel like we are part of a larger whole: "we will be driven by a common spirit."
Instead, most of the choirs Ezra has attended are more like a nine-minute obligatory "Jewish thing" before the "real music" plays. No one expects much from this part, and therefore they pay less attention to it. Everyone just moves on autopilot until a hierarchy inevitably builds up: close family and friends dance in the center, and everyone else tries unsuccessfully to circle around them until they give up. After that, they just stand on the sidelines, watching awkwardly as the wedding band mispronounces "l'chaim" into the microphone.
It's not just that people don't want to participate, but that their desire to follow certain rules interferes with the exuberant, spontaneous, free expression that lies at the heart of a good choir.
Here are seven tips from professional ceremony organizer Ezra Bookman to help you dance an unforgettable chorus.
Create an open space
Have you ever been stuck in a hora circle, moving so slowly that it was more like Zen meditation to the sound of a clarinet?
Hora requires movement and dynamics, and movement therefore requires space.
The large dance floor is ideal. But if you don't have one, try making the inner circle small so that more other circles can be placed around it.
Organize a group of applause
There are always guests who do not want to dance, but at the same time want to feel involved in the common cause. It turns out that as a result of these spiritual throwings, they occupy a precious dance area around the circle. Assign them a clear role so they can feel their contribution without dancing—turn them into a cheering squad. Have them support a wide outer perimeter at the edge of the dance floor and clap their hands. It will be a kind of “bench”, like in basketball, where you can rest until you are ready to return to the dance.
Appoint Chora Hypers
Assign a couple of your most passionate friends or relatives to be choir hypers—in other words, leaders who will turn on the crowd. Their task is to help lead the circles, support the declining energy and pull people out (by mutual agreement).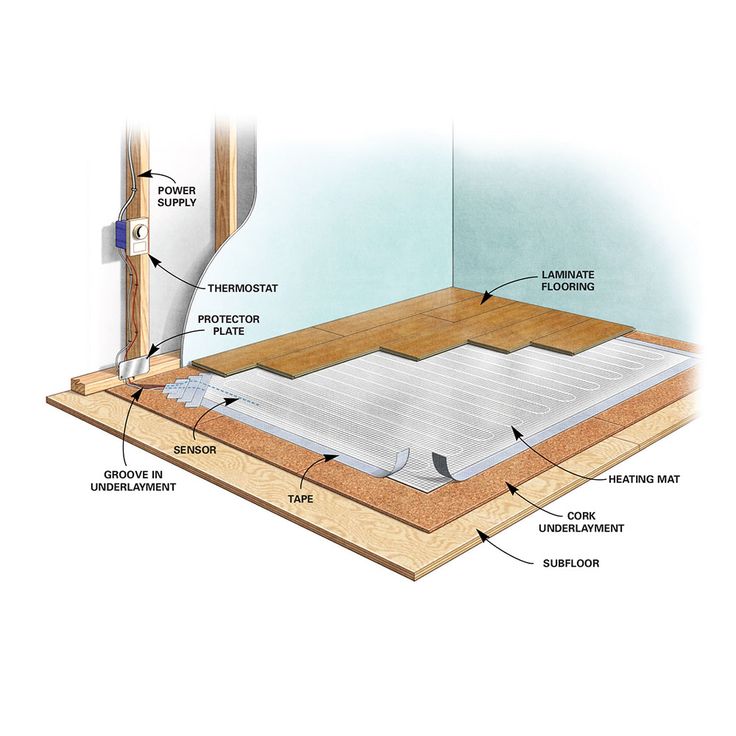 Their enthusiasm will help motivate people and make the hora stronger, better, faster, more powerful.
One, one, baby, it's trance
Ask a DJ or guest band to play longer than usual. Circular dances are immersed in a trance. So bring them to the boiling point: let them start to seem delusional and repetitive. Believe me, on the other side is freedom.
Mini circles
How not to get bored with all these circles? For a burst of energy, create mini-circles of two to six people around the dance floor. Let them disappear and then appear.
It will be quite a chance to enjoy the special relationship between small groups of friends and relatives in a big circle.
My brother's wedding had at least five simultaneous rounds of the choir.
Chair lift - culmination
Remember: don't finish too early. Circles are a prelude that builds up more and more tension. As the couple rises into the air, the crowd will break down and explode in euphoric release. If the chairs are set up too soon, there will be nothing to look forward to and the energy will quickly dissipate. If you want to have multiple climaxes, get the couple up first, then the parents and siblings in a later round, and maybe the grandparents and little kids at the end when everyone needs a laugh and a new energy boost.
Head of the choir
Most wedding DJs and bands have seen hundreds of choirs and are indifferent to them. They carry out all the steps, making sure that everything is finished by the time the salad is served. Instead, pass the microphone (literally) to one person from your wedding company whom you have chosen to be the head of the choir. Ask him to take the stage, invite people to the dance floor, give compliments into the microphone and direct the movement when necessary.
Bonus: real klezmer
It goes without saying that not a wedding cover band, but a real live klezmer will make the choir much better.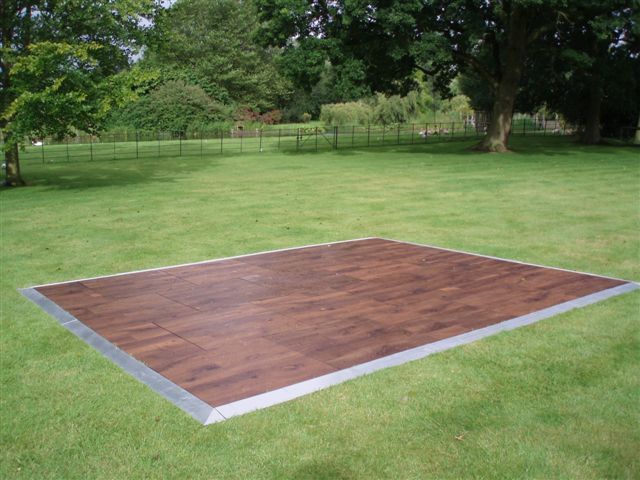 The main thing is to keep spinning in the dance, and the rest will follow.
Translated by Sonya Nazarova
Houses in Minecraft 1.15.2 / Minecraft Inside
Add a map to the site
On this map you can see a ten-story apartment building. The house has two entrances. There are four apartments per floor, there is an elevator. On the technical (eleventh) floor there is an entrance to the elevator / attic space. Above is the exit to the roof of the house.
Somewhere in Central Russia, there is a small village of Luzhensky, located on the Luzhonka River. In the village you can find many village houses with elaborate interiors and exteriors. You can also come across a small wheat field, a food stall, a rural cafe-bar and a small gas station. In the direction of the village there is a picturesque lake Kryukovo. The map is perfect for filming TV shows or machinima, or just enjoying nature and countryside views
On this map you will see a house on a hill.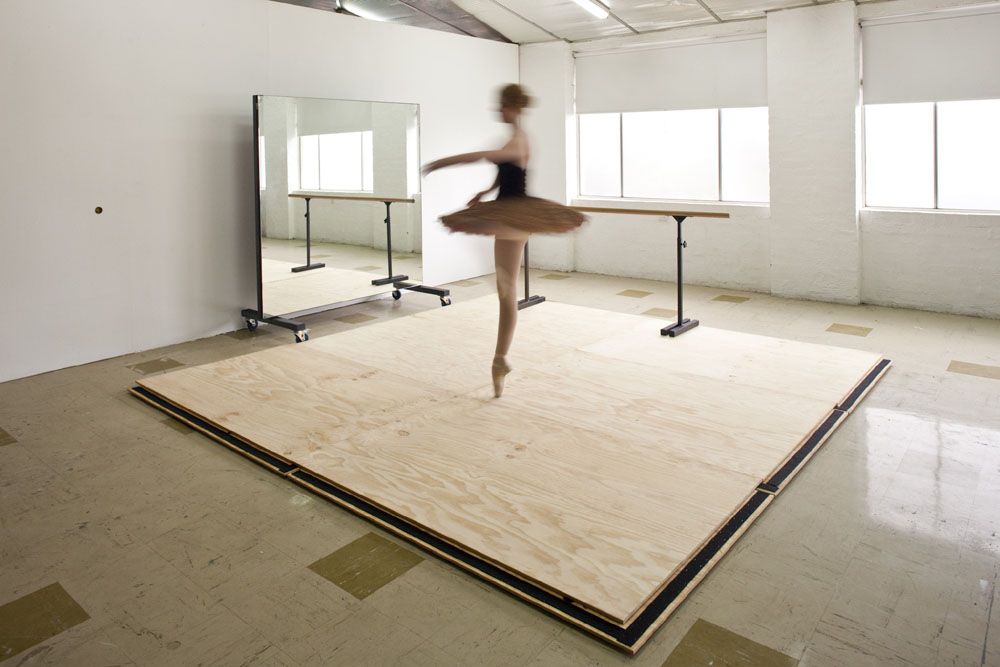 The house has an attic, a garden, as well as an ascent to this hill. The room and attic are quite atmospherically built, as is the house itself.
Hotel with rooms of different price segments! Top three rooms with command blocks, dance floor, concierge and more. Top three duplex penthouses with different designs. This card can be used with friends, I think there will be enough numbers for everyone, because there are more than nine of them.
Beautiful and quite large house, located near the forest and the river. Furnished inside. If it seems to be gloomy from the outside, then when you enter it, you will see bright and colorful shades.
Incredible Scottish mansion 19century, inside which there are as many as five bedrooms and five bathrooms. Around it, the author arranged colorful landscapes, farms and even a winter garden.
You appear in a beautiful field with a breathtaking view of the mountains. And of course, as well as without the Hobbit house itself, it is small but very cozy. You will definitely love this card!
This map shows a large three-storey, beautiful house near the village. Quite spacious and unique.
"Mechanical House from SANK" - a huge project! In addition to the Mechanical House itself, there is a large village on the map, where there is: a castle, a stadium, a nuclear power plant, an airship, a farm, a mansion, a port and many other buildings. The number of mechanisms on the map exceeds 100 pieces, including KB, and some of them stand out for their functionality (battery, video surveillance cameras, cinema, digital clock, etc.). The map also features a monetary system, Easter eggs, and a learning system.
1.8: Added mechanisms for CB, Training Mode, Surveillance Cameras and much more.
SCP-1461 is an English manor house with a series of subterranean levels underneath.