How to access just dance unlimited on switch
How do you activate Just Dance Unlimited?
- 2021-12-09
- 1692
Índice
- How do you activate Just Dance Unlimited?
- How does Just Dance 2020 Unlimited?
- Do you need just dance 2020 for Just Dance Unlimited?
- How do you activate Just Dance Unlimited on PS4?
- Will Just Dance Unlimited 2020 include 2021?
- Can you play Just Dance Unlimited on PS4?
- What do you get with Just Dance Unlimited?
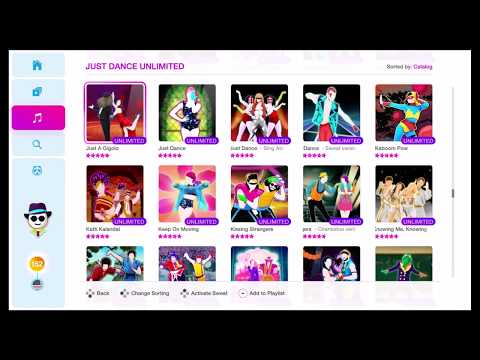
- Can you use Just Dance Unlimited on the Nintendo Switch?
- Why is my Xbox One not playing Just Dance 2020?
How do you activate Just Dance Unlimited?
Launch the Just Dance mode* and complete any three songs from the available choices. After playing these three songs, and if you are online, you will be prompted to unlock your free trial now or later. - Activate your trial to enjoy your 30 days of Just Dance Unlimited right away!
How does Just Dance 2020 Unlimited?
Just Dance Unlimited is a dance-on-demand streaming service that grants you access to a catalogue of tracks, playable for the duration of the service. Any new content added to the Just Dance Unlimited catalogue will be exclusive to the newest edition of the game. ...
Do you need just dance 2020 for Just Dance Unlimited?
You can access your Just Dance Unlimited subscription from any Just Dance title that supports this service. However, this needs to be on the same platform. Note that this new content will be exclusive to the newest edition of the game.
How do you activate Just Dance Unlimited on PS4?
Activating Your 3 Month Just Dance Unlimited Trial
- Create a PSN account.
- Connect the PS4 to the Internet. a. PS4 Settings > Network > Internet Connection. b. ...
- Launch any Just Dance mode. Play & complete any 4 songs from the choices shown.
 This will unlock the Just Dance Unlimited trial.
Will Just Dance Unlimited 2020 include 2021?
With Just Dance Unlimited, get access to a diverse catalogue of more than 600 songs and exclusive new content every month, including international and local artists, along with great updates and community challenges all year long via Just Dance® 2021, and to over 400 songs via Just Dance® 2020, Just Dance® 2019, Just ...
Can you play Just Dance Unlimited on PS4?
1 MONTH FREE TRIAL A free 1-month trail of Just Dance Unlimited is included with every copy of Just Dance 2021 on Nintendo Switch, PS4, PS5, Xbox Series X, Xbox One, and Stadia.
What do you get with Just Dance Unlimited?
- JUST DANCE® UNLIMITED is an online streaming service that grants you unlimited exclusive access to an ever-growing catalog of more than 600 of the best Just Dance songs from yesterday, today, and tomorrow.
 24 Hour, 1 month, 3 month, and 12 month passes are available. Choose the pass that’s right for you and keep the party going!
Can you use Just Dance Unlimited on the Nintendo Switch?
- This pass can be used by any user on the Nintendo Switch console. Just Dance® 2020 is required to use this product.
Why is my Xbox One not playing Just Dance 2020?
- Just Dance 2020's online servers might be discontinued. That is why all online modes were unplayable due to no connection. Please stop spreading misinformation. I urge you to reach out to our Support Team for any trouble you're having with connecting on your Xbox One.
⇐ How do you right align input?
How do you annoy an ESFJ? ⇒
Postagens relacionadas:
Best Exclusive Songs On Just Dance Unlimited
Just Dance 2022 includes over 40 songs out of the box (or digital package). That’s a decent set of songs, but not really a whole all. There is also an online service called Just Dance Unlimited. If players subscribe to it then they can get access to over 700 songs. There’s even a 30-day trial included courtesy of Ubisoft.
RELATED: Beginner Tips For Just Dance 2022 You Need To Know
That is not a typo. Whether players subscribe for a day, month, year, or whatever, every song in that library is theirs to dance to for however long that pass lasts. These songs stretch from the original release in the series to the last entry before Just Dance 2022. There are too many great songs to choose from, but these ten are among the most fun online exclusives that call back to many famous dances, songs, and memes.
10/10 HandClap
“HandClap” by Fitz and the Tantrums is a song that is full of energy. It’s a great track for a workout and it is a good option for co-op opportunities. However, the music video doesn't mirror the song all that much besides the generous amounts of clapping.
Furthetmore, There is an Extreme single dance version online if players want to work their bodies out. That said, it is not for the faint of heart. It is best to first practice with the original song before moving on to the more intense workout.
9/10 Dragonstea Din Tei
“Dragonstea Din Tei” by O-Zone is a classic from the early days of the Internet. This became popular on video-sharing sites before YouTube was a thing in the mid-2000s.
“Dragonstea Din Tei” is just as infectious now as it was back then. The dance routine is choreographed around a trio on an airplane which does call back to the O-Zone music video. It’s a lighter dance that should be another fun one for co-op.
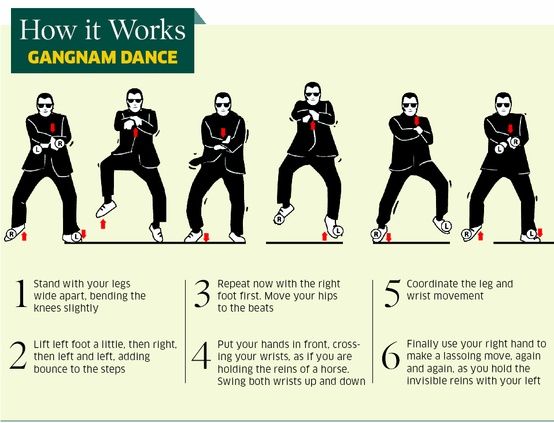
8/10 Gangnam Style
“Gangnam Style” by PSY feels like it exploded on YouTube just yesterday. However, it’s been almost a decade. While PSY’s music videos after “Gangnam Style” have done well, none of them impacted society quite like this track.
RELATED: Things We Did And Didn’t Loved About Just Dance 2022
The good news is that Ubisoft has included a lot of PSY's other singles, including “Gentlemen,” “New Face,” and “Daddy. ” So, when a player and their friend are done with co-op dancing to this classic, check out those other songs online for some surprise fun.
7/10 Ghostbusters
“Ghostbusters” by Ray Parker Jr. should be one of the hottest songs on the service this year. It’s the perfect song to dance to after watching the new film, Ghostbusters: Afterlife.
Admittedly, the routine doesn’t make much sense when compared to any of the movies. It’s also a low-energy affair. Even if that is the case, this theme song should brighten up even the most morbid of parties. Thankfully, the new movie didn't mess this song up.
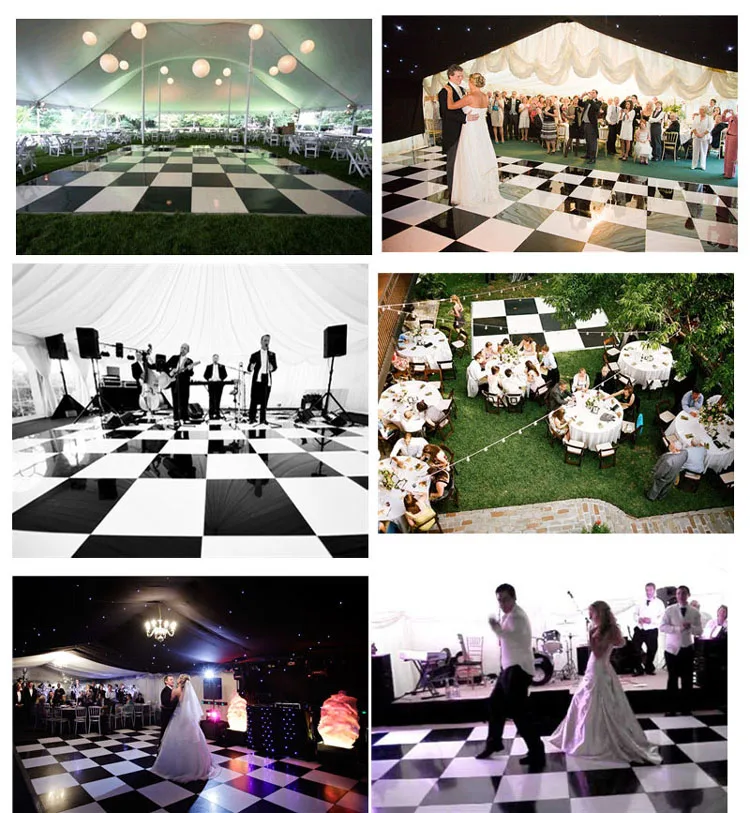
6/10 Macarena
“Macarena” by The Girly Team is a cover of the '90s hit by Los Del Rio. It would have been nice if Ubisoft remastered this track for Just Dance 2022, but the song itself is not a bad cover. The most important thing was getting the dance routine right, which this game does.
It’s one of the easiest dances to remember as it still gets played at weddings and other big parties. Getting a practice session in Just Dance 2022 might be a good idea for couples about to celebrate the big day.
5/10 Never Gonna Give You Up
“Never Gonna Give You Up” by Rick Astley is one of the most famous meme songs connected of all time. Getting “rick-rolled” doesn’t happen that much today but when it does, the punchline can still invoke a few chuckles.
RELATED: Just Dance 2022: Most Fun Songs To Dance To
The routine in Just Dance 2022 has nothing to do with the original video as it is themed around a superhero. It’s an odd choice but it works to get players jamming to an all-time classic. Yes, it is funny but “Never Gonna Give You Up” is also a straight-up banger.
4/10 What Is Love
“What is Love” by Ultraclub 90 is another cover song. It was chosen in replacement of Haddaway's version, but the remix is 90% spot-on. The song is probably known best for its use in Saturday Night Live sketches from the '90s.
Just Dance 2022 acknowledges that legacy because there are two ways to enjoy this song. Players can dance to it, which is fun alone, or they also have the choice of a co-op, sit-down version that mirrors that of the driving portions from the SNL sketches.
3/10 The Final Countdown
“The Final Countdown” by Europe will be forever tied to a show. It’s been used in many movies and TV programs, but one of the most classic instances comes from Arrested Development.
Just Dance 2022’s wrestling duo has nothing to do with that show but it’s still worth mentioning. It would have been funny to see dueling magicians as a callback to Gob and Tony Wonder from Arrested Development, but "The Final Countdown" is still a fun song.
2/10 The Fox
“The Fox” by Ylvis comes from the land of Internet memes as well. Ylvis made a lot of fun songs on YouTube but this was his biggest hit. The routine's video in Just Dance 2022 doesn’t acknowledge much about the song's legacy, but it captures the essence of the lyrics.
The video is in the form of a trio wherein one player is a fox and the other two are backup dancers with fox masks. Kudos to whoever captured dance footage to this while in a full fox costume. That could not have been a pleasant workout.
1/10 Rasputin
“Rasputin” by Boney M. goes back as far as Just Dance 2, which was before the series went multiplatform. It is one of the most high-energy routines the franchise has ever seen. Players should definitely limber up before attempting this song.
“Rasputin” is a great one to dance to on repeat if players really want to burn those calories off fast while listening to a fun song from long ago. It’ll be hard to think about the historical figure the same way ever again.
Just Dance 2022was released on November 4, 2021 and is available on PC, PS4, PS5, Switch, Xbox One, and Xbox Series X.
MORE: Just Dance 2022: The Biggest Fixes The Game Needs
Installing and configuring Windows Hyper-V Server 2019
Zerox Updated: 07/18/2019 Hyper-V Virtualization 146 comments 168,415 Views
The final version of Microsoft's free hypervisor is finally available to the public. I'll show you how to install and configure Microsoft Hyper-V Server 2019 to easily create and manage virtual machines. Traditionally, everything is not as simple and convenient as it could be. Initial preparation for comfortable work is required. nine0008
If you have a desire to learn how to build and maintain highly available and reliable systems, I recommend checking out the online course DevOps Practices and Tools at OTUS. The course is not for beginners, for admission you need to pass an entrance test.
Contents:
- 1 Purposes of this article
- 2 Introduction
- 3 Pros and cons of Hyper-V
- 4 Installing Hyper-V Server 2019
- 5 Installing Hyper-V Server 2019 Management Center 900 90 Hyper-V 2019
- 7 Remotely connect and manage Hyper-V Server 2019 via snap-ins
- 8 Configure virtual switches
- 9 Create virtual machines
- 10 Backup Hyper-V virtual machines
- 11 Easily manage Hyper-V Server 2019 via 5nine Manager
- 12 Conclusion
- 13 Video
Goals of this article
- Describe the features of the free hypervisor Microsoft Hyper-V Server 2019.

- Describe the installation and initial setup process. nine0019
- Show different ways to connect and manage the hypervisor.
- Describe different ways to back up Hyper-V virtual machines.
Introduction
The Hyper-V Server 2019 release story turned out to be unusual and even somewhat dramatic, like all recent releases from Microsoft. Let me explain for those who don't know. The 2019 server itself was released in October 2018 with some critical bugs. I don’t remember the details of the problems, but in the end the release was withdrawn. A month later they released it again and it seems to be successful. nine0008
All versions of the 2019 server could be downloaded from the Microsoft website, except for the free version of Hyper-V. I followed the topic and kept waiting for the iso image with Hyper-V Server 2019 to appear, but it still didn’t exist. Moreover, in the Evaluation Center there was a note that the release is still being postponed, wait, everything will be soon.
And so we waited. On June 15th, I saw the news that Hyper-V Server 2019 was available for download from the Evaluation Center. Went and checked. Indeed it is. An iso image appeared that can be freely downloaded, which I successfully did. nine0008
By the way, the hyper-v 2019 image was circulating on the net, because after the first release back in October 2018, it was available and many people downloaded it. But there were some bugs. From what I've read, people have pointed out that rdp access to the hypervisor was not working. I could not check it, because I simply did not install on the server. Either it was not installed at all, giving an error during the installation process, or then it fell into a blue screen. I do not remember exactly. I did not understand, but put the previous version. As it turned out, not in vain. nine0008
Pros and cons of Hyper-V
Let me tell you a little why I use hyper-v all the time along with other hypervisors (mainly KVM). In general, I like this hypervisor, which is why I decided to carefully consider the issue of installation and initial configuration for further use as needed. The advantages of hyper-v in general and the free version in particular are the following:
- Support for all popular operating systems . There are no compatibility issues, no need to install any drivers or tools separately. Hyper-v support is present in all windows systems, in the Linux kernel, I don’t remember exactly from which version, but all modern systems have it, in the freebsd kernel, starting from the 10th version. That is, you just take the installation disk and put the system on hyper-v, nothing more is required of you. nine0019
- Many different ways to back up virtual machines. These can be simple scripts, free programs, or full-fledged paid versions of large companies specializing in backup software. I pay special attention to this. For me, this is the most significant plus of Hyper-v.
- Standard hypervisor control panel that can be installed on a windows computer. Web access was added to it through the windows admin center.
 I'll tell you more about this later. nine0019
 - Hyper-V Server is based on the popular server system, which is clear and easy to work with. For example, to download or retrieve a file from the hypervisor, you just need to share a folder on it in the standard way, as you do in any windows system.
- Hyper-V can be installed on pseudo-raids, such as the built-in raid controller from intel, or build a soft raid using the Windows OS itself.
- Fully functional free version , though without convenient controls.
- Convenient work with snapshots out of the box. No need to think about file formats like in KVM. There is only one in Hyper-V and it perfectly supports snapshots.
This is my personal opinion based on the experience of working with small and medium-sized companies, where there are no special requirements for the reliability and availability of services. Where multiple servers with virtual machines are used, there is not always a windows domain. Of course, in addition to the pros, there are also disadvantages. The first and main minus for me is the initial setup. You can't just pick up, install Hyper-V Server and start using it. It is necessary to perform some obscure and non-obvious actions on the host and managed machine. Then you will understand what I mean. But having overcome this obstacle, you can safely use a virtual infrastructure based on a free hypervisor from microsoft. nine0008
The second negative is that there is no way to forward USB to a virtual machine. Sometimes this is very inconvenient and forces you to use something else, instead of Hyper-V. I don't understand why Microsoft hasn't been able to fix this for so many years. The request is very relevant and topical, especially with us, where 1C with USB keys is widely used.
Installing Hyper-V Server 2019
You can download the free Hyper-V Server from the microsoft website from a special page with trial versions, where free hypervisors also live - https://www. microsoft.com/en-us/ evalcenter/evaluate-hyper-v-server-2019. Unfortunately, registration is required, but this is standard practice.
I strongly recommend downloading English version of and choosing English during the installation process. This will save you from unnecessary errors, simplify configuration and troubleshooting in the future. Do not be cool about this recommendation, but actually do it.
Next, perform the installation in the standard way, like any other Windows system. Boot from the iso image and follow the installer steps. There are no nuances or problems with installing a hyper-v server, so I will not focus on this. I will pay attention only to the very end of the installation. I got this window:0008
I couldn't do or choose anything. I pressed ctrl+alt+delete and I was prompted to set an administrator password. I did this, the installation completed, the window with the standard management interface loaded:
If you close this window for some reason, you can call it again on the command line using the command sconfig . This completes the installation of Windows Hyper-V server 2019. Let's move on to the settings.
Configuring Hyper-V Server 2019
We immediately perform the initial configuration of Hyper-V Server 2019 through the standard management console:
- Specify a workgroup if you are not satisfied with the standard one.
- Change the server name to something more meaningful and understandable.
- Add another administrator. This must be done in order to have another admin account other than administrator. In the future, I recommend that you perform all settings and connections under this account. nine0019
- We allow remote control, including ping.
- Automatic update is up to you. I usually turn it off and do everything manually.
- I recommend that you immediately check for updates and install them.
- Enable Remote Desktop with all versions of the client.
- Specify network settings. Standard is dhcp, I recommend setting the address statically.
- Adjust the time if the default is not correct.
- Telemetry settings cannot be disabled completely. This is the microsoft. No wonder, given the innovations in the latest versions of the system. nine0019
We quickly ran through the basic settings of hyper-v server 2019. Now we would like to start installing virtual machines right away, but, unfortunately, this cannot be done yet. Probably it is possible somehow through the powershell console, but it's too dreary and complicated. We need to somehow connect to the server using a convenient control panel. So far, only rdp access is available to us, but this is not enough.
We have several options for managing Hyper-V. I will first consider the 2 most convenient of them:
- Install Windows Admin Center to manage the server through a browser.
- Install standard system snap-ins on a Windows 10-based computer to connect to Hyper-V 2019.

And at the very end I'll show you one more. Let's start by installing Windows Admin Center.
Installing Windows Admin Center to manage Hyper-V 2019
The first step is to download the Admin Center from the link - https://docs.microsoft.com/en-us/windows-server/manage/windows-admin-center/understand /windows-admin-center Decide which version to download - trial or stable. I usually put stable. nine0008
Now we need to transfer the downloaded file to the hypervisor and install the control panel. Previously, we allowed connection to Windows Hyper-V Server 2019 via rdp. Let's connect to it to make it convenient to execute commands on the hypervisor itself.
By default, the firewall is enabled on the hypervisor, which blocks external connections. You can either disable it completely and enable it using commands in the console cmd :
netsh advfirewall set currentprofile state off netsh advfirewall set currentprofile state on
Or allow some remote control commands, which will also allow you to transfer files to the hyperview via smb. The following commands need to be entered not in a regular console, but powershell . To do this, type the powershell command in the standard console, which is loaded after connecting via rdp, and then the commands themselves.
powershell Set-NetFirewallRule -DisplayGroup 'Windows Management Instrumentation (WMI)' -Enabled true -PassThru Set-NetFirewallRule -DisplayGroup 'Remote Event Log Management' -Enabled true -PassThru Set-NetFirewallRule -DisplayGroup 'Remote Volume Management' -Enabled true -PassThru
We will need these permissions later when we connect with standard system remains to manage Hyper-V Server 2019.
We go to any hypervisor disk through the usual windows explorer and transfer the downloaded WindowsAdminCenter1904.1.msi installer there. We use the administrator account as authorization.
We return to the hypervisor, go to the C: / Soft folder and run the transferred file.
The Windows Admin Center installer is starting. Everything is simple, you can use default values. I personally put a daw Allow Windows Admin Center to change trusted host settings for this computer and Redirect traffic from HTTP port 80 to HTTPS port . After installation, you can go to the address https://10.20.1.14 in the browser.
Enter your hyper-v server administrator credentials to open the page. We select the only server, enter the administrator data again and connect to the server control panel. Then, I think, you will figure it out yourself. I will not dwell on the description of the functionality of Windows Admin Center. nine0008
In the Virtual machines section, you can create a virtual machine and run it. The only thing, do not forget to download the installation iso image to the hypervisor. You can in the same folder where you downloaded the admin center installer. The only thing I'll stop here. Let's create a virtual switch so that the virtual machine can access the network.
To do this, go to section Virtual switches and click on the button Create .
Specify the name of the switch and its type. Due to the translation of the Admin Center into Russian, it is difficult to capture the essence of the names, so it's better to download the English version. I already installed Russian, so I'll tell you based on it. There are 3 types of switches:
- Personal (private) for communication only between virtual machines, without access to the hypervisor and the network behind it.
- Internal (internal) - almost the same as personal, only the hypervisor can also have access to the switch, but still there is no access to the external network. nine0019
- External (external) is essentially a regular network bridge, which includes the real network interface of the hypervisor. This type of switch is used to access virtual machines to the external network.
In my example, I only have one network interface on the hypervisor. I will create one switch of type External (External).
It turned out like this.
This switch can now be used in virtual machines to access the external network. nine0008
In principle, this is where the configuration of Windows Hyper-V Server 2019 can be completed. If you are satisfied with the functionality of Windows Admin Center, use it. In general, it has everything you need, but I do not like it. Very slow interface, you have to log in twice to connect. It is not always possible for me to open the console of the virtual machine through the browser. There are some errors, freezes.
I prefer to use the classic hypervisor management snap-ins. If you, like me, prefer them, move on to the next way to connect and manage Hyper-V Server 2019. To do this, we need a computer or a virtual machine with Windows 10. You can install it directly on the same hypervisor. Sometimes I do this for convenience. It turns out a standalone hypervisor with everything you need to manage.
Remote connection and management of Hyper-V Server 2019 through snap-ins
We go via rdp to the hypervisor and configure firewall rules, if we haven’t done it before. You can disable it completely via cmd :
netsh advfirewall set currentprofile state off
either allow only what is needed via powershell :
Set-NetFirewallRule -DisplayGroup 'Windows Management Instrumentation (WMI)' -Enabled true -PassThru Set-NetFirewallRule -DisplayGroup 'Remote Event Log Management' -Enabled true -PassThru Set-NetFirewallRule -DisplayGroup 'Remote Volume Management' -Enabled true -PassThru
Now go to the client system. I remind you that in my case this is Windows 10 Enterprise. You need to log into it under an account with the same parameters that was created on the hypervisor. Add the same user and work under it. This is a prerequisite for connecting to the management of the server itself, its services, disk subsystem, etc. To connect only to manage the hyper-v role, it is not necessary to have the same account as the server, at the end I will tell you how to do this. nine0008
First of all, let's create an entry in the file hosts with the name of the hyperv server. In my case, this entry looks like this:
192.168.175.19 hyperv2019
Make sure you are pinging the hypervisor by name from the client machine. We continue to configure the host to connect to hyper-v server 2019. Run cmd as administrator and go to powershell. Run the command:
winrm quickconfig
If, like me, you get an error:
Error code: -2144108183 0x80338169 The WinRM firewall exception will not work because one of the network connections established for this computer is a public one. Change the network connection type to either domain or private and try again.
This means that one of your network connections has the status of public, which is not allowed.
This needs to be fixed. In my case, this network connection was not used and I simply disabled it. If you use it, then you can make it a private network through Parameters .
Once there are no public networks left, run the command again. Should be fine.
winrm quickconfig
Enter the following command to enable remote systems management:
winrm set winrm/config/client '@{TrustedHosts="hyperv2019"}' In this example, hyperv2019 is the name of my hypervisor.
When copying the above command, pay attention to the single and double quotes. They may change when copying/pasting. As a result, you will get an error while executing the command. Edit them manually if necessary. nine0008
Now we need to change one more parameter. Run snap-in dcomcnfg.exe by running this command in cmd. The Component Service Management snap-in opens.
We carry out the sequence of actions indicated in the picture. Next, you need to install the standard hardware for managing hyperv. To do this, go to Control Panel -> Programs -> Turn Windows features on or off . We select there Hyper-V 9 Management Tools0013 and install them. We are waiting for the installation to finish and try to connect to the remote server:
If everything is done correctly, you will connect to the server and you will be able to manage it.
Let me tell you about one more nuance. You can connect to a remote hyper-v server even if you are not running under the same account that has administrative rights on the hypervisor. When connecting, it is possible to enter the parameters of another user. But for this feature to work, you need to perform a number of actions both on the server and on the client. First you need to change one setting in the local policy of the computer. To do this, run the command 9 in cmd0012 gpedit . The Local Computer Policy Management snap-in opens. We follow the path: Computer Configuration -> Administrative Templates -> System -> Passing Credentials -> Allow passing new credentials with "NTLM only" server authentication . Turn it on and add the entry:
wsman/hyperv2019
Next, execute commands in powershell. Don't forget to run the console as administrator:
Set-Item WSMan:\localhost\Client\TrustedHosts -Value "hyperv2019" Enable-WSManCredSSP -Role client -DelegateComputer "hyperv2019"
Now we need to make some changes on the hypervisor itself. We connect to it via rdp, go to cmd, launch powershell and execute the commands:
Enable-PSRemoting Enable-WSManCredSSP -Role server
After that, you can work as a familiar computer user, but at the same time connect to hyper-v server 2019 under a different account and manage it.
The hardest part was done. Now we can freely connect and control the hypervisor. I forgot to mention how to connect to the management of the server itself, that is, how to view the list of disks, services, read logs, etc. This is done very simply. Log in to the computer under the same account that is the administrator on the hypervisor. Launch the standard "Computer Management" snap-in, select the local computer, right-click and select connect to another computer:
Write the server name and connect to it. You have access to all sections of computer management, except for the device manager. For some reason it is not possible to connect to it, an error occurs. I did not understand in detail what was the matter and how to fix it. If I need to look at devices, update a driver, etc., I do it through the Windows Admin Center. If someone knows how to enable access to the device manager through a snap-in, please tell me in a comment. I have not resolved this issue since 2012 version. True, I didn’t try hard, or rather I didn’t try to find a solution at all :)
Configuring virtual switches
Before we start installing the virtual machines, let's prepare the network for them. I will not go into detail about the nuances of networking in hyper-v. This is not the topic of the current story. Let's just create a network bridge for virtual machines. In the management snap-in, select the “Virtual Switch Manager” on the right, select the type “External”. Specify the name of the switch. I recommend giving meaningful names to make it easier to manage later. If this is a bridge to the local network, then name the virtual switch local. nine0008
Save the settings. You will see a warning that network connections will be reset. It's all right, agree. A new virtual network interface will be created with the same settings as the physical one. But there is one important nuance here. If your server received network settings via dhcp, then it will most likely receive a new ip address. Keep this in mind.
Creating virtual machines
We are almost done configuring Windows Hyper-V Server 2019 and ready to start installing virtual machines. You just need to upload the iso image to the hypervisor. Everything is very simple here. We open a remote disk in the explorer on the control machine through the standard feature of windows machines, create an iso folder and load the desired image. nine0008
I also recommend immediately downloading some file manager for easy folder navigation on the hypervisor itself. It's better to use the ported version. You can run this manager through the command line by connecting via rdp.
You are now ready to create the virtual machines. Make some test ones, and then we will learn how to back them up.
Backup of Hyper-V virtual machines
Earlier I already talked about the HVBackup program for backup of virtual machines. It works great with Windows Hyper-V Server 2019this article is completely up to date. For the program to work, you need to install on the hypervisor .Net Framework 3.5 using the powershell command:
Install-WindowsFeature NET-Framework-Core
And then follow the instructions given.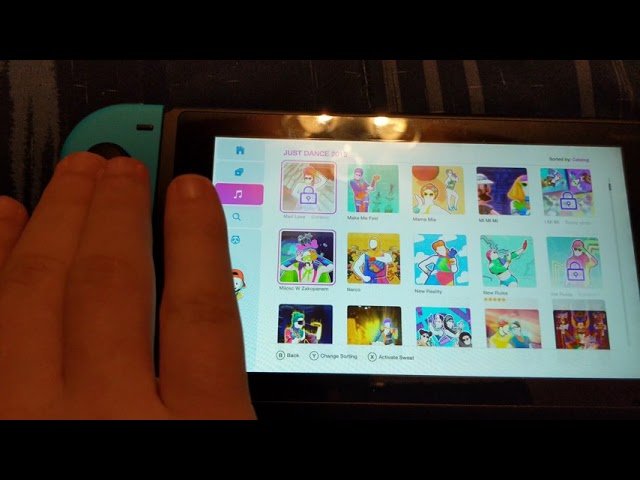 If you don’t want to mess around with the console program, scripts, scheduler, but want to quickly backup a hyper-v virtual machine, you can use the free Veeam Backup & Replication Community Edition program. It allows you to backup up to 10 virtual machines. You can learn more about the functionality and limitations of the free version at the link. nine0008
The program, of course, is monstrous, it weighs a lot, it takes a long time to install, but there are no problems. Everything is configured easily and clearly through the program interface. .Net Framework 4.6 is required for installation. You can install in advance yourself, or the veeam installer will prompt you to do this.
After installation, run the program. Add a new server:
Specify that this is a Standalone Hyper-V server, add credentials and wait for the installation of the necessary components on the hyperv server to finish. After that, you can back up the virtual machine. To do this, select a hypervisor, a virtual machine and either make a backup right away, or create a scheduled task. nine0008
Next, specify various backup parameters, including the location where it will be made. I will not dwell on this in detail. Veeam has excellent documentation and an intuitive interface. An example of a good product. For the fact that it is under Hyper-V, I love the latter. There is a lack of Veeam analog for KVM or Xen.
Easily manage Hyper-V Server 2019 with 5nine Manager
Another way to manage Hyper-V Server 2019 is to use 5nine Cloud Manager Free. I must say right away that I began to describe this method by inertia, since I have been familiar with 5nine products for a long time and I liked them. But what I saw this time, I didn’t really like, but nevertheless, I decided to share with you, as I studied the product. nine0008
Previously, 5nine Manager for managing Hyper-V was different. I talked about it in a separate article. Now this program does not exist at all, but instead 5nine Cloud Manager . It is bulkier and slower. Installation requires sql server. The free edition of express will do. You need to install the server part separately, separately the console for management, separately the agent on the hyper-v server.
Everything has become much more complicated in structure, but in general, if you do not want to bother with the steps described above, then you can try with 5nine. In general, the process is simple and everything is done with the mouse and wizards with clicking next - more - more. To make everything clear, I will tell you step by step. nine0008
- Download and install Microsoft SQL Server Express or hypervisor.
- Download 5nine Cloud Manager. Install the server part of the application on the hypervisor, which works with the sql database, put the console on the control machine to connect to the server part.
- Connect with the console and install a free license, which will be sent to you after registration on the program website. The license is for a year, then I don’t know what to do with it, I will have to renew it or it will work anyway.
 On previous versions of the program, it worked like that, it was not necessary to renew. nine0019
 - Put the console on the hypervisor and now connect directly from the hypervisor via rdp. I didn’t do it right away, because it was impossible to add a license from the hypervisor. An error popped up. Probably due to the fact that the hypervisor is without gui, and the wizard needs it to add a license. Could this be fixed somehow, it would be easier. Previously, everything could be done immediately on the hypervisor.
Now more details and pictures. Download and install Microsoft SQL Server Express on Hyper-V from the Microsoft website. Select the same language as in the hypervisor. Installation will fit default. The installer can be passed in the same way as I showed before, via \\hyperv2019\c$ .
Next, install 5nine Cloud Manager, the server part. In the installer, it is called 5nine Management Service.
The installer will find the base installed locally. As authorization in the database, use the windows system account of the user from whom you installed SQL Server Express. I left all other installer settings default.
Now go to any windows client system that has access to the hypervisor and install the management console there. nine0008
Connect through this console and add the license that should have been sent to you by mail along with a link to download the program.
After you add a license, you can go to the hypervisor, put the console there and connect. After installation, the launch shortcut will be in C:\Users\All Users\Desktop . I ran from there. When run, minimize everything that is open. The authorization window will be in the background. I did not immediately notice this and could not understand why the program does not start. In fact, it works fine on the hypervisor itself, except for connecting to the virtual machine's screen. There will be an error :( And everything else seems to work.
Next, you need to add the hypervisor to the panel and wait until the agent is installed.
After the agent is installed, the hypervisor with virtual machines will appear in the panel.
Of course, everything turned out not as convenient as we would like, but in general the program is functional. All basic actions with virtual machines can be performed in it. It is a pity that you can not get by with only a hypervisor. It would be convenient if everything worked on it.
Conclusion
Tried to consider all the most significant aspects of working with a free hypervisor from Microsoft. You can compare it with the free kvm-based hypervisor proxmox, which I covered in my article installing and configuring proxmox. In proxmox, I like web browser control. You don't need to install anything on your computer. After installation, the hypervisor is immediately ready for use.
In hyper-v, it is convenient that all systems support it without problems. On kvm, for example, in proxmox, after installing windows systems as guest machines, you will need to install drivers from a separate disk, or use ready-made images where they will already be integrated. A trifle, but still not so convenient. nine0008
Any comments on the article, hints or indications of errors will be welcome. It would also be interesting to know which hypervisor you prefer to use and for what reason. What advantages do you see in your choice compared to other hypervisors.
Past Hyper-V articles:
- Installing and configuring Windows Hyper-V Server 2012 R2
- Installing and configuring Windows Hyper-V Server 2016
- Add an iSCSI disk to a Windows Hyper-v 9 server0019
- Installing and configuring apcupsd on Hyper-V Server
Video
So far, I have not mastered the recording and editing of video on the new version. For those who don’t have enough text and really want to watch a video on installing and configuring Hyper-V, I offer a video from the previous version. Almost everything is the same there. At least the basics are correct.
If you have a desire to learn how to build and maintain highly available and reliable systems, I recommend that you take a look online course "Administrator Linux. Professional" in OTUS. You will learn how to professionally configure, manage processes, ensure security, deploy, configure, and maintain networks. Test yourself on the entrance test and see the details of the program in the link.
Did the article help? Subscribe to the author's telegram channel
Announcements of all articles, plus a lot of other useful and interesting information that does not get on the site.
Download pdf
Local Area Connection: Complete Manual from WiFiGid
Hello! This article will be devoted to connecting via local network - from theory to universal instructions for all occasions. I'll try to lay it out at the "dummies" level so that anyone can safely connect their computers to the network and do anything from basic file transfer and co-op games to complex services. Go!
Dear reader! Did you find a bug, did something go wrong, or would you like to share your story? Be sure to write in the comments! nine0008
Contents
- About LAN
- Connection options
- Direct - instructions
- How to connect?
- Windows 7 - enable network discovery
- Windows 7 - configure IP (only for direct connection)
- Via command line
- Creating a shared folder
- Supplement - about the Internet
- About virtual networks
- Ask the author of the article
About a local network
joint resources.
Usually, the ROUTER is the central element of such a network at home. Everyone connects to it (computers, laptops, TVs, phones, tablets, printers, etc. ) and, if necessary, can access each other (games, files, printing, watching movies, etc.). nine0008
This is about the general theory. In practice, the task is reduced to the interaction of two devices. In our article, we will pair two devices based on Windows 7 and Windows 10. By analogy with this, you can scale the network to any reasonable size at home. The main thing is to master the basics.
For seals who are hungry for "here and now" I suggest watching the video:
Connection options
Two of our conditional computers can be connected in two ways:
- Direct – i.e. around all devices. Previously, this was used very often, when there were no funds even for a regular hub, but now the method is fading into the background. Although it is necessary to know this particular option - this is the most difficult case and the basis for everything else.

- Through a router - it's easier, and usually it happens at home.
Directly - instructions
I'll start with the first case, and in the end we will consider the main one. But the theory from the first option will definitely come in handy for resolving possible problems with network settings. nine0008
How to connect?
Two computers can be connected to each other in two ways:
- Using a cable - everything is simple here, we take a twisted pair and connect 2 machines to each other through network cards.
- Using Wi-Fi is a little more complicated, on one we create an access point (for example, on a laptop), and on the other we just connect to it. We have already written in great detail about the process of creating an access point HERE.
i.e. I will not consider the process of connecting the network, these are the topics of separate articles, but I think you have already understood everything from these tips - this is the easiest part. Once connected, the network connection icons should light up:
Note - I took screenshots of the icons after setting them up, they come with the Internet already connected. In your case, when connecting directly, most likely a yellow exclamation mark will be drawn on these icons - this is normal.
Windows 7 - enable network discovery
Now the instruction for the "seven":
- 0019
- Change advanced settings:
- Here we allow general access for the General Profile and turn off password protection (it is not needed in a verified local network, but it will definitely be more trouble). Some build a home network profile on purpose, but for me everything will work fine:
Windows 7 - configure IP (only for direct connection)
After everything is allowed, I suggest setting the correct IP addresses. The whole problem of a direct connection is that no one will distribute addresses to your computers. And they can simply give themselves addresses on different networks, and as a result, they simply cannot see each other. But we don't want to let that happen, do we? nine0008
- At the last stage, we went to the Network Control Center. We go there again, but select the item "Change adapter settings":
- Here we will see all our network adapters - network and wireless. We are looking for the one through which we are currently connected (it will be among those that are lit in blue), right-click on it and select the "Properties" menu item. Next, you need to go through the steps as in the figure below, and I will tell you the theory of these addresses a little later. nine0019
Brief theory of IP addresses here. The IP addresses of all devices must be on the same subnet - no theory, this is when the first three digits out of four match. In my case, I entered 192.168.0.180. So on the second machine, you can enter something like 192.168.0.181. We use the last number without restrictions in the range of 2-254, but if suddenly 2 addresses coincide, the devices simply will not be able to see each other - it's easier to change. In our example, we always leave the mask at 255.255.255.0. We do not touch the gateway and DNS without the need to use the Internet. nine0008
In a familiar network with a router, one of the main tasks of the router is to resolve all conflicts between connected devices and issue the correct network settings. IP, mask, gateway (IP of the device that distributes the Internet - usually a router), DNS (resolution of site names to IP addresses, usually Google's 8.8.8.8).
Windows 7 - Workgroup
For two computers to see each other, they must be in the same workgroup. In the old days, MSHOME was popular, now WORKGROUP. Those. our task is to make sure that it is now installed in WORKGROUP (well, or it just matches on two machines). nine0008
- Right-click on My Computer - Properties
- Look here:
- If so, then proceed to the next section. Otherwise, click on the link "Change settings", then the button "Change", and there we already enter the name of the group:
We use CAPITAL letters of the LATIN alphabet.
Windows 10 - changes
The whole process of connecting to a computer over a local network on a dozen is very similar, but there are slight graphical changes. I will show them in this section. nine0008
- The Network Control Center was renamed to "Network and Internet Settings" - it starts in the same place, through the tray, see the previous section.
- Access to adapters can be obtained through these very "Network and Internet Settings", but by selecting the "Adapter Settings" section:
-
- The working group is in the same place without changes.
 nine0019
i.e. do the same thing, but apply the announced changes.
Through a router
Now you know almost everything about a direct connection. When connecting through a router, everything is the same:
- You just connect to it. It can be by wire, it can be via Wi-Fi - it doesn’t matter at all, it will decide everything for you, as long as there is any connection.
- We also enable network discovery.
- Set the same working group.
- IP usually does not need to be configured (on the settings page, there should be a checkmark for automatic configuration). But if something suddenly goes wrong, you can always kill it with your hands as in the instructions above, and only then return it back. nine0019
i.e. everything is easier and faster with a router, but the main steps will still have to be done in the same way.
Other switches, hubs, switches, communicators are also suitable for connection here.
 At this level, they perform the same task with the router.
 Checking the connection and task
Once you've set up your network, it's time to check it out. Of course, you can look at your task right away, but I will show everything in general terms:
- Through the network environment
- Through the command line
- Creating shared folders
Even with a small practical home network task, in the spirit of transferring files. Go?
Through the network environment
This is where you can easily log in, find other devices on your network, and do basic tasks - view folders, transfer files, connect a printer. But if your computer already sees at least some device here, then everything is fine.
It's easy to check, you need to go to My computer, and then go to the Network:
Here I have already found 3 computers, so everything works. It is here that you can connect to another computer over the local network.

Through the command line
Remember we entered the IP address to configure the network? You can "ping" it through the command line. In our case, the command will be:
ping 192.168.0.180
As you can see, the machine responds via the network, everything works.
Create shared folder
Let's move on to the practical task:
- Create a folder on the desktop:
- Go to its Properties, the Access tab, click first Share, add users to ALL (I have Everyone), after that do not forget to save:
- Next, on the last screen, go to Advanced setup. Check the box next to Share this folder. Click on the Permissions button. Set the checkboxes for our tasks (Full access - both for reading and writing):
- That's it. On another computer, we go to the network environment, find our computer and check for the presence of a folder here:
This is where I end.
 If you have some specific task and something does not work out, write your question in the comments. But only in full form, in literate Russian, with all the background. I won’t play fortune-telling, otherwise I’ll just skip the comment. For sim and finish. Your cool portal WiFiGid and its author Botan. nine0008
 Addition - about the Internet
The article is not about the Internet, but it is worth talking a little about connecting to the Internet in a local network. So theses.
- If there is a router on the network, it must connect itself. For information on how to do this, read the instructions on our website for your specific router model.
- If the Internet is on the computer, and you want to distribute it from it to other devices, then you must first allow it. About this process, and indeed the creation of a point from further distribution, we wrote in THIS ARTICLE. nine0019
About virtual networks
Two remote computers can also be connected to a local network via the Internet.

- The working group is in the same place without changes.