How to make a dance bag with rack
DIY Dance Bag with Rack
Sharing is caring!
1141 shares
- Share
- Tweet
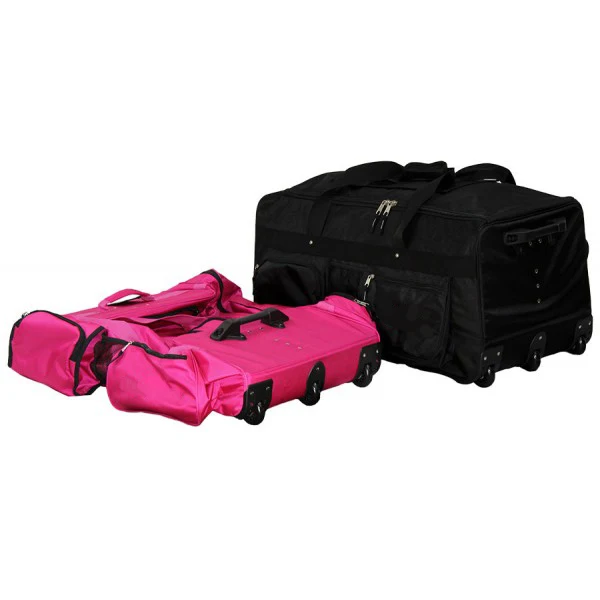
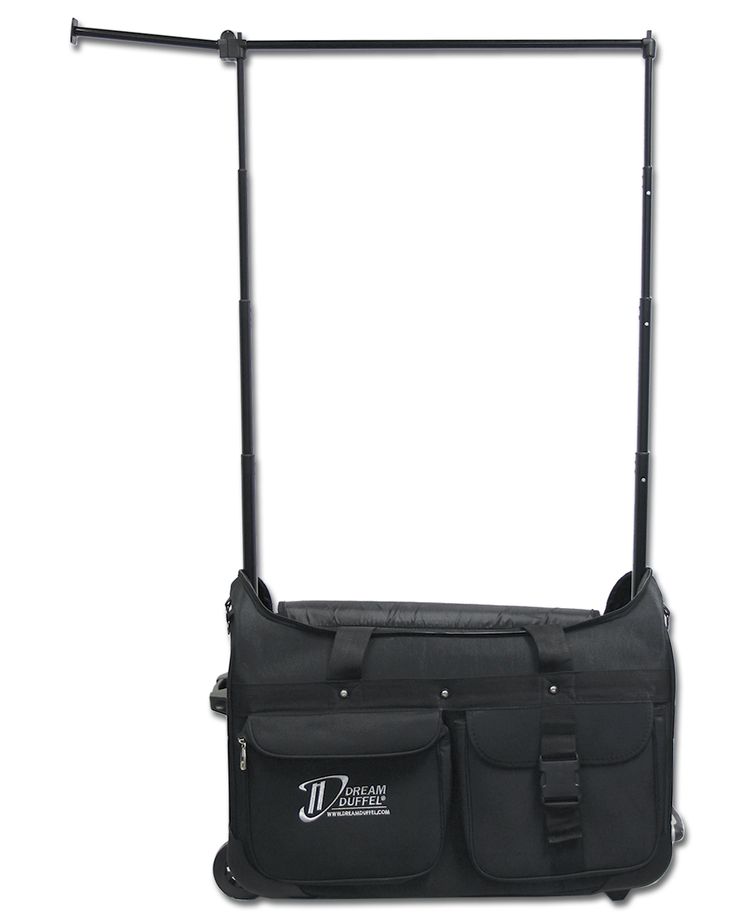
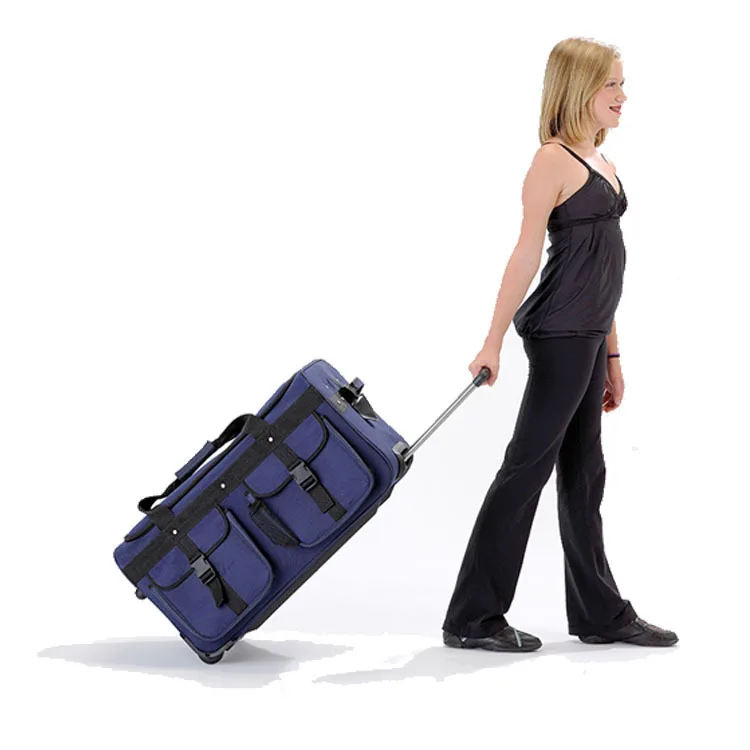
I started taking dance classes when I was 5 years old and I kept dancing all through school and college. Back in those days, we used a laundry basket to keep costumes and accessories together. Times have changed. I have been a dance teacher for about 15 years and the coolest dance bags I’ve seen at competitions and recitals are the big duffle bags that have built-in garment racks. Dream Duffel seems to be the most popular brand, but there are several out there to choose from. The downside to these super-cool bags: the price. The least-expensive Dream Duffel is over $200, and similar style bags on Amazon are at least $100.
Now that my daughter’s class has started competing, I wanted a dance bag with a rack to keep her costumes and accessories organized (and wrinkle-free) backstage, but I didn’t want to make an investment in one of the expensive bags yet. (She’s only 5, she may or may not stick with dance.) So I decided to make one.
Materials:
◦ Rolling suitcase (you could also use a rolling duffel bag, just be sure it has a sturdy base)
◦ 1/2 inch PVC pipe (amount will depend on how big the suitcase is and how tall you want the garment rack)
◦ Six 90° elbow PVC fittings
◦ Two “T” PVC fittings
◦ Four “coupling” fittings
◦ Decorative duct tape
◦ Spray paint
◦ PVC cutters.
◦ Tape measure
For all of the cutting, I highly recommend PVC cutters; they make this project so much easier. You could also use a saw.
To make the base of the garment rack:
Measure the inside of the suitcase. Mine is 23”x17”
Cut two 20.5 lengths of PVC for the long sides (the fittings will take up the rest of that space).
Cut four 6.5 inch lengths for the shorter side. Two for each end.
The base should look like this:
Or refer to this more detailed breakdown if that’s helpful:
Once the pieces are assembled, fit the base inside the suitcase.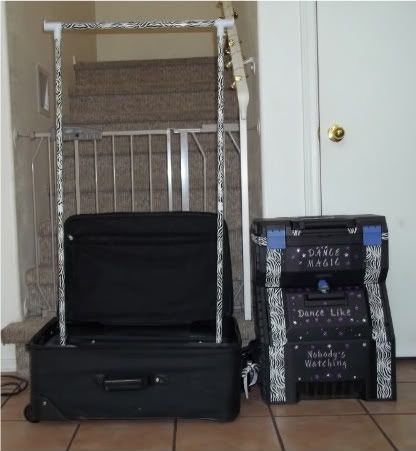 I didn’t do anything to permanently attach this to the suitcase, because I want to be able to remove the base and use the suitcase later.
The upright portion of the garment rack:
Take the four couplings and the two remaining elbow pieces and spray paint them.
While those are drying, cut two 3 inch lengths of PVC, and four 20 inch lengths (these form the two vertical parts of the rack), and one 20.5 length of PVC for the horizontal bar. Again, the lengths will vary depending on the size of your suitcase and how tall you want the garment rack.
Cover the PVC in decorative duct tape. These are the colors I chose for my daughter’s:
Once each length of PVC is covered with tape and the fittings are dry, assemble the rack.
OPTIONAL (BUT HIGHLY RECOMMENDED) STEP:
Once the paint on the fittings is dry, and before assembling the pieces, sand the inside of each fitting. PVC pipe and fittings are designed to fit together snugly. This makes perfect sense for the original intended purpose of these materials (plumbing), but it makes disassembling this rack very difficult.
I used a sanding bit for a power drill for this part, and it worked really well. You could also use a gritty sandpaper for this step. It would take more time, but it would still work.
How to make your own rolling dance bag with garment rack – DIY dance bag instructions
Posted on by parent
After researching different dance bag options, I decided to attempt to make my own.
I debated between a 26″ duffel and a 30″ I went with the 30″. When all my stuff is in the bag, I still have a lot of extra room. So, it may have been overkill. But, I do like that I can fold my garment bags once and have them fit perfectly.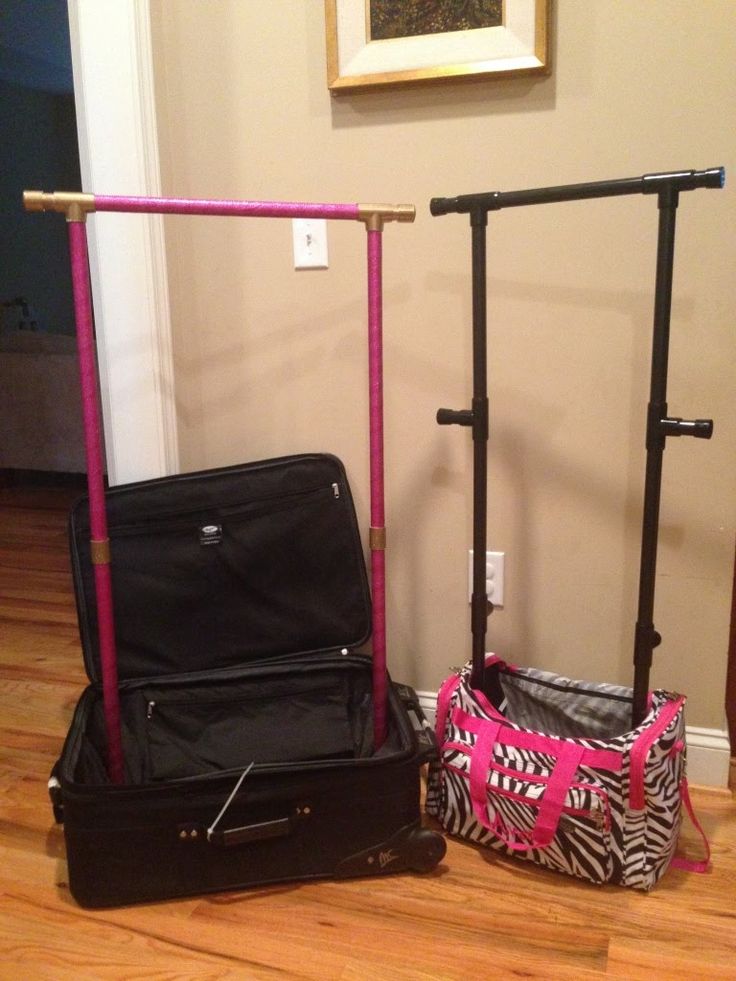
The PVC and connectors cost $13. The bag was $32, and the spray paint cost $3. For a total cost of $48. Compared to the cost of a dream duffel, I thought this was very reasonable. It took me a grand total of about 15 minutes to put together (minus the spray paint)
I bought 2 10 foot pieces of 3/4″ PVC and 1 5 foot piece of 1/2″ PVC.
4 – ½ to ¾ “L” fittings
2 – ¾ “L” fittings
2 – ½ to ¾ “T” fittings
4 – ¾ straight connectors
You could do it all out of 3/4″, but I thought with the 1/2″ it would be easier to slide under the roller handle at the bottom of the duffel.
In the ¾” pipe:
3 – 21” pieces (top and 2 base pieces)
4 – 18” pieces (sides)
2 – 12” pieces (sides inside bag)
In the ½” pipe:
4 – 4” pieces
My husband cut the pipes with a table saw, but you can buy a PVC pipe cutter for around $10. One tip that I figured out too late. After cutting each piece, but BEFORE bringing it inside, blow into the pipe.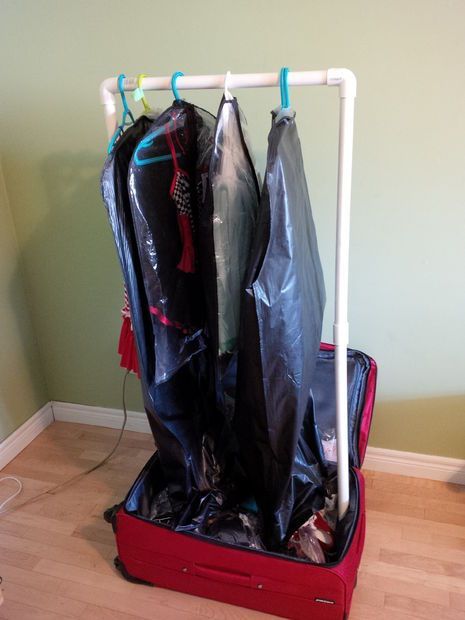 Little shavings of plastic will stick inside the pipe when you cut it and will come out when you start taking apart and reassembling the rack!
I had to fight to get the pieces connected under there. It may have been easier if the 3 21” pieces were a little shorter b/c the bottom of the bag had more give away from the corners. But, once I got them together it fits great and is very secure. Those pieces may also need to be resized based on the bag brand and where the wheel housings, etc are located. I am right up against the wheels.
I was going to zip tie to the handle rails, but it’s in there so tight that I don’t think it’s necessary at all.
It also may have worked better if the 4” pieces were a tiny bit smaller. I’d like to cut holes for the poles to go through so that I can zip the bottom piece. The base pieces pull that bottom fabric really tight, and I’m not sure if I’ll be able to zip it.
One thing that I did differently from others I’ve seen was to add this vertical piece inside the bag. My thinking was to leave this piece connected, and then it will be easier to attach the poles while the costumes are still in the bag so that the connectors don’t get covered by the costumes, etc.
I got the duffel bag here: http://www.amazon.com/Rockland-Luggage-Rolling-Duffle%C2%A0Bag-Camouflage/dp/B003EZXP00
Once I was done I painted the PVC with Krylon Covermaxx paint in Watermelon. I wanted to use Krylon Fusion for Plastic paint, but apparently the Watermelon is discountinued. The only pink in Fusion is Fairytale Pink which is very pale and did not match my bag. Due to time constraints, I did not sand the PVC or seal the paint.
After our first competition last week, the paint is already chipping. I’m either going to try to sand the PVC and repaint, then seal. Or just cover the pipe with duct tape.
Like this:
Like Loading...
Dance rope for handstand OPS0006301 from 664.02 rubles
Vendor code: OPS0006301
Share Postpone item
364 ₽/piece
Choose color: Green
Quantity
Item added to cart
Total amount
- Take customized photos and videos ?
Features
- Vendor code: OPS0006301
Description
Handstand Dance Rope Leg Resistance Split Lower Waist Elastic Yoga Belt
-
Logistics below the market by 20%
-
Official "white" delivery
-
We will finalize and brand the product
-
Goods from the manufacturer without extra charge
-
Over 100,000 products for marketplaces
-
More than 1000 manufacturers from China
- bunk bed
- Animal nail clippers + file
- 12.
 3 Inch Truck Electronic Rear View Mirror Vertical Screen
 - Dog bed
- Rugby ball with pet cotton rope
-
from 165₽
Thermo glass transparent / glass thermo mug
-
from 152₽
Stainless steel thermos 500 ml
-
from 144₽
Thermocup "Bright cup" / Thermocup
-
from 127₽
Thermos "Dude" stainless steel / stainless steel thermos
-
from 169₽
Thermos "Matte"
-
from 9₽
Case and accessories for thermos
By using this website, you agree to our cookie policy
How do I prepare for my first dance lesson? What to bring to dance classes?
Contents
If you are going to visit a dance studio for the first time, it is important to know how to properly prepare for the lesson. To do this, several points must be taken into account. Then you can feel confident and "armed" for dancing.
What to take with you to the dance class
The ideal option is to have a bag or a backpack, which will always contain the necessary things for classes. Then you will be sure that you have taken everything you need with you and have not forgotten anything. What should be put in such a bag?
Clothes
To figure out what clothes are right for you for dance lessons, you need to know for which direction you choose them:
- Tight clothes made of elastic fabric are suitable for ground lessons. It can be leggings, a T-shirt, a T-shirt. Give preference to sports options, without a variety of fasteners, rhinestones, zippers. They can injure you or your partner. Avoid clothes made from low-quality synthetic materials that are poorly breathable and do not absorb moisture. Moreover, the idea of exercising in leatherette leggings should be abandoned. The fit should be medium or high so that the leggings do not slip during active movements.
 Some people are comfortable in shorts, but not all. Bare feet can be damaged by contact with the floor.
 - For active styles like hip hop or contemporary, looser clothing is more suitable. Wide trousers, oversized sweaters, T-shirts several sizes larger will allow you to feel comfortable and fully open up in the dance.
- Leotards (one-piece leotard) are purchased for classical dance styles. The sleeve can be long or short. Leggings are worn under the tights, but of a lower density.
Sign up for a trial lesson
Clothing should not be provocative, exposing those parts of the body that should not be exposed in public. Avoid transparent fabrics, underwear should not shine through. If you are comfortable wearing a top and shorts, make sure they are long enough. Choose clothes based on the temperature in the lesson. Do not dress too lightly if it is cold in the hall and vice versa. If you get hot during the dance, you run the risk of hypothermia while you remain motionless.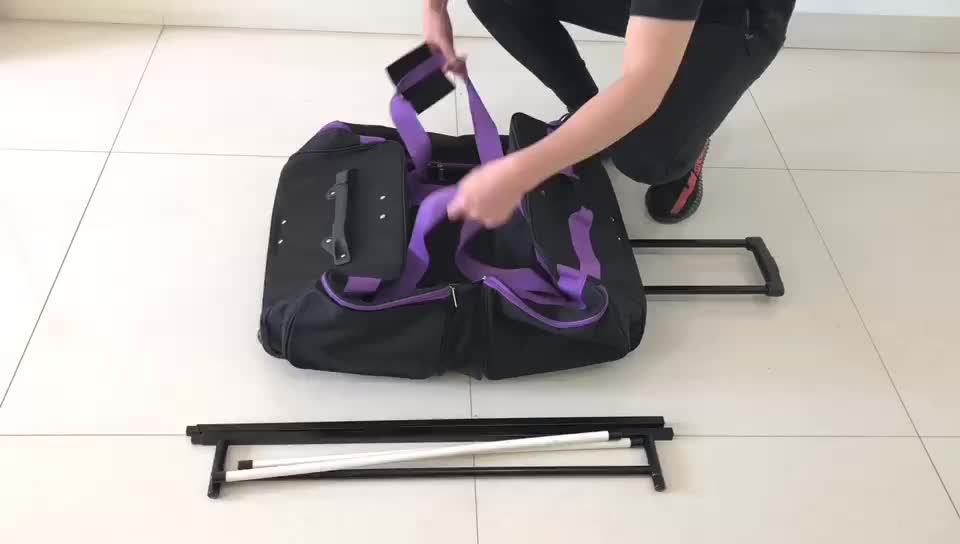
Choose clothes according to your taste, so that it is not only comfortable, but also uplifting, setting you in the right mood.
Footwear
Just as important as clothing. It should also be selected, focusing on the style of dance. For hip hop, stable sneakers or sneakers will be relevant. "Balniks" are recommended to practice in special shoes, as well as those who are fond of step. But oriental and Latin American dances will be more "economical". For them, ordinary shoes are suitable or you can do without them at all.
It is possible to train in socks, if we are talking about the stalls or conteporari. But there is a risk of falling if the floor is too slippery. It will also be difficult to perform some of the tricks. In this case, Czech or half shoes would be ideal.
What else to put in your bag
In addition to clothes, there are a few other things to keep in mind when preparing for dance lessons:
- If you have weak knees and ankles, take care to protect them.
 For this, knee pads and elastic bandages are useful. To protect the lower back from hypothermia, a warming belt is suitable.
 - Weighting agents can be distinguished from additional “equipment”. Whether you need them or not is up to you. They are not suitable for beginner dancers. Weights are for arms and legs. Their weight starts from 0.5 kilograms.
- For those with long hair, rubber bands and hair clips are a must to help them collect. Loose hair is not always comfortable to deal with.
- Be sure to pack a large bottle of water in your bag, as you're bound to get thirsty when you exercise.
- Use a small towel that absorbs moisture well. They make it easy to wash your face.
Don't wear make-up before going to class. In the process of training, there is a risk that the makeup will flow and smear. Also avoid strong-smelling perfumes and deodorants. People around you may not only have a different taste for aromas, but also be allergic to them.