How to do the hip and arm dance
8 Easy Hip-Hop Dance Moves To Start Learning
Learning hip-hop dance moves opens up a world of experiences. It may seem intimidating to take on new dance styles, but rest assured that hip-hop is accessible to all who want to learn it. Once you’ve finished this article on how to learn hip-hop dance moves, you’ll be well on your way to becoming a hip-hop master.
Why is Hip-Hop Dance So Popular?
Hip-hop is often considered the antithesis of the dance stylings of academies and companies. Hip-hop music was invented by African-American dancers in New York City in the late 1960s, gaining popularity throughout the 1970s. African dance styles heavily inspired hip-hop. They both have moves that involve staying low to the ground and dancing to complex rhythms.
African culture and black Americans also invented jazz dance. While jazz dance and hip-hop often blend, hip-hop differs from jazz by being more fluid with the entire body. Pop dance, on the other hand, draws heavy influence from hip-hop, but tends to be more upright and rigid.
8 Easy Hip-Hop Dance Moves
Hip-hop may look intimidating for beginners, but learning just a handful of basic hip hop dance moves can have you dancing like a pro in no time. Here are some tips on how to do hip-hop dance moves.
Popping and Locking
Popping and locking are multi-step dance move that makes even a beginner look like a professional. First, step with your right foot while putting your left arm up. On the next beat, cross both across your body. Once you pull your limbs in, push out with the opposite arm and leg. Let the wrist of the arm in the air circle and drop, or ‘lock’.
To pop, push your arms out forward and move back, as though you are popping yourself back.
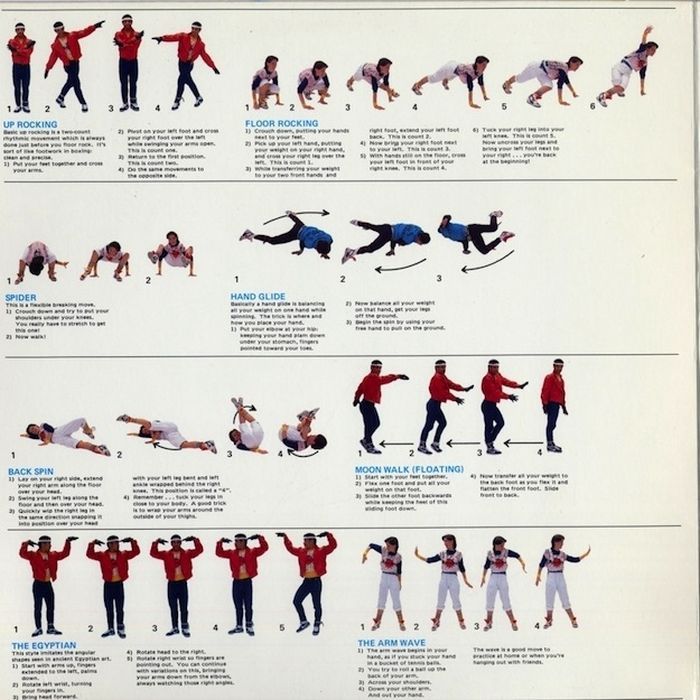
Break Dancing
Break dancing is an entire subgenre of hip-hop, if not its genre of dance entirely, but you can learn the basics in six steps. The most basic hip-hop movement is to helicopter the legs around the body while balancing on one arm.
To do this, get low to the ground, palm on the floor. Pedal your legs in a circular pattern, switching arms to let the legs continue to swing around.
Boogaloo Dance
The Boogaloo dance, inspired by Latin dances, is an exaggerated walk where the arms are swung wide. Step with one leg, swinging the opposite arm back, then pause for a beat. Step forward with the opposite leg, switch the placement of the arms, and once again pause for a beat.
Walk it back, pivot, then do the same on the other side, creating a V pattern.
Social Dances
Social dance covers a wide array of dances, including the Bennington. This version of the Wop may be difficult for beginners, but it’s possible to learn.
Rock the torso back and forth, keeping hands crossed over the groin. Then switch to swinging the arms back and forth, shifting weight from foot to foot. Kick on beat with the off foot before shifting weight back.
Once you’ve mastered these moves, come visit our studio to learn how to elevate your game. Struggling with any of these techniques? We can help you nail your moves and become an incredible hip-hop dancer.
Soulja Boy
To understand the mechanism of this iconic dance, you first need to learn the superman dance move. The superman move mimics the iconic pose of the superhero, with arms pushed towards the sky with clenched fists while you bounce back on your heels.
To dance the Soulja Boy, you incorporate the superman with arm cranks while bouncing back and forth on your heels.
The Moonwalk
The Moonwalk, invented by pop legend Michael Jackson, creates an optical illusion that still amazes decades after its invention. The dancer slides backward on the toes of their shoes while making motions that indicate they are trying to walk forward. This physics-defying dance is sure to dazzle on the dance floor.
The Camel Walk
The Camel Walk is similar to the Moonwalk, except you’re moving forward. Pick up each knee and move forward on the beat, as though you’re a horse (or a camel). Remember to keep your body loose and flow with the movement to get the hip-hop flavor.
The Running Man
The Running Man dance move is one of the simplest on this list. If you’ve ever tried to run in place, you’re already halfway to knowing this move. Run in place, pushing your feet back after they touch the ground. Then you can either swing your arms out on the beat or pull them in.
The Wobble
The Wobble is a perfect example of the fluidity of hip-hop. Lean back and wiggle the shoulders in a modern version of the shimmy. Wobbling looks easy but can take some work to perfect. Take time to learn how to relax enough for the dance to look effortless while maintaining your form.
Body Roll
Body rolls are a hip-hop staple. With this dance move, you remain in place, but undulate your body bit by bit to create a wave motion with your entire body. If you’re going from the bottom up, start with your hips, then back, chest, shoulders, and head. If you’re going top down, go in the opposite order.
How To Start Learning Hip-Hop Dance Moves Quickly
Maybe you’re preparing for an event coming up, like a school dance or a wedding. Maybe you’re just hoping to develop a new skill before the season is over. Whatever the reason, there are plenty of ways to help you learn hip-hop dance moves quickly, whether inside dance studios or out.
Watch Videos Online
If you’re struggling to follow written instructions, then look for videos of people performing the dance moves you want to learn.
Use Mirrors or Record Yourself
Even if you feel confident in your moves, it’s hard to judge your form while dancing. Use mirrors to check that you’re on the right track, or record a video of yourself dancing to watch later.
Practice Daily
Nothing improves without practice. If you want to improve your hip-hop dancing, you’ll need to practice them regularly to keep your skills sharp. Join a dance crew to get down with other people like you.
Sign Up For Classes With On One Studios
The best way to learn to dance is to do it in person with professional teachers. At On One Studios, we have beautiful dance studios and experienced instructors ready to guide you to become the best dancer you can be.
Are You Ready to Elevate Your Hip-Hop Dance Moves?
Hip-hop dancing is popular, accessible, and always evolving. If you’re looking to add hip-hop moves to your repertoire, join us for hip-hop choreography dance classes near you that will help you learn hip-hop quickly while having tons of fun.
Arm Wave Tutorial - Hip hop dance lesson
Here is a great breakdown of how to do an Arm Wave dance move:
Want More? Get Sean’s Course:
5X Hip Hop Course For Beginners
Learn basic hip hop moves with 25 step by step video lessons. This course is broken down into 5 modules that focus on different types of moves: Footwork, Upper Body, Waving, Step Touch and Iconic Moves. You will love this 2+ hours of detailed instruction for beginners.
LEARN MORE & BUY IT (CLICK HERE)
[Transcript]
So to start our arm wave, I put both my arms straight out like this and my arms are locked right now and I’m going to bring them in just a little bit. When we start the arm wave, there’s quite a few different parts just in your hand alone, which we want hit. And waving is all about the details.
So starting with our fingertips, we’ll go fingers or digits and then we’ll point down to knuckles and you can even emphasize this as the fist is kind of high or low. And then we want to go to my wrist. Now, this is one part we really have to pay attention. I’m going to slide this arm down.
My wrist is creating high low than my elbow. So with fingers, knuckles, wrists and my elbow went low, my wrist went high. When I’m going to switch to my elbow where my wave is going to be at the elbow right here, I’m going to be turning my elbow up and then my wrist down flattening my hand out like that where we just call it blade as opposed to open. We’re having a blade hand just for this slope. And so now, my elbow is sticking out. My wrist is low.
So we try again from the top. We got this knuckles, wrist, elbow low, and all I’m doing is turning my elbow. And so right here, I will turn. My elbow sticks out and then my arm and wrist are at the lower level forward.
So as we get this elbow, I’ll stick my other arm back up and I’m going to pop my shoulder and I’m going to go to my right shoulder and pop that. Notice my left arm is straight again.
Now, I’m going to go to the elbow this time. So again, make sure it’s popped out and I’ll switch to my wrist at the higher level. And then I’ll go to my knuckles, my digits and fingertips.
One more slope right down. We got the digits, the knuckles and the wrist. We got the elbow, the shoulder, the shoulder, the elbow, your wrist at a high level, knuckles, fingertips.
So using that same base clap, we’re going to break down our arms like this. And you can do it with me and then you can practice on your own afterwards. So we go boom clap, boom clap, boom clap, boom clap, boom clap, boom clap, boom clap, boom clap, boom clap, boom clap, boom clap, boom clap, boom-boom clap, boom clap, boom clap, boom clap, boom clap, boom-boom clap, boom clap, boom clap, boom-boom clap, boom clap.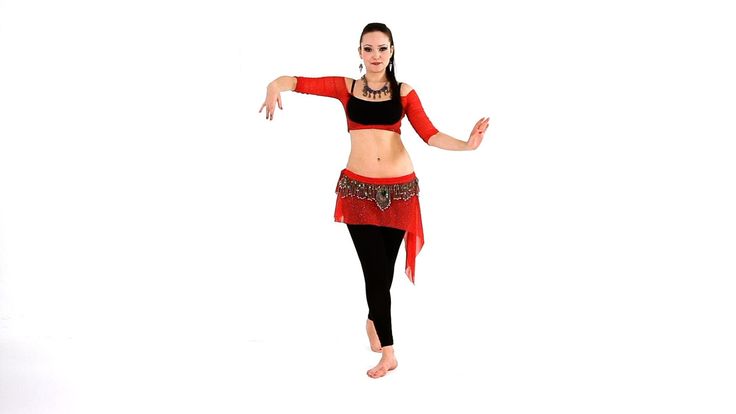
So once you start to break down the steps then you got to go onward. You’re going to try to do a whole wave throughout your body without stopping. All you got to do is keep your mind as the order of the body parts that you’re moving.
Obviously, if I’m on my wrist here, I don’t want to start this elbow, that’s my shoulder, this shoulder out because I’ll be missing my elbow and the shoulder. It’s all about going in sequential order.
So try really slowly left side. Come one. Do it with me, guys. Ready. Set. Go. I’m breaking down each body part in order. You can go as slow as you can to get it.
Why don’t you take a couple of minutes? First, practice with a song using the base clap to break down the steps then give it a shot. Go for it. Follow this video. I’ll see you guys out.
[End of transcript]
Want more?
Hip Hop moves (click here)
Hip movements. Belly dance. Master's Lessons. Advanced level
Hip movements
Starting position: standing on a full foot, legs slightly apart (about the width of the foot) and located on the same line parallel to each other, the body is slightly tilted back, the back is straight, the stomach is relaxed, the arms are lowered along the body, the knees are “soft”.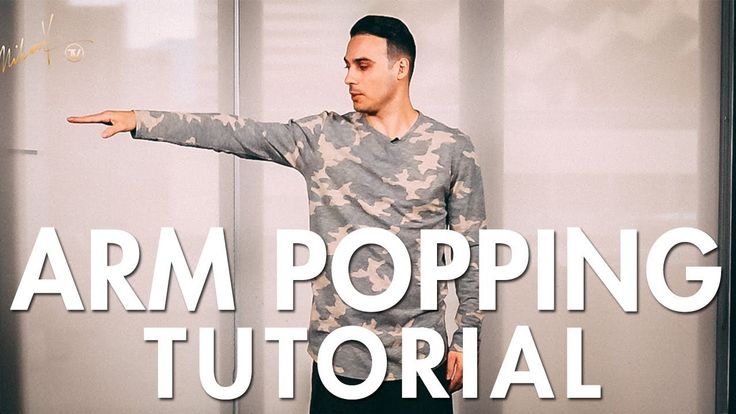
Performing an exercise “Swinging hips back and forth (“inward” and “awayward”)”. We take the buttocks back as much as possible, while we do not deviate back, hands are brought behind the back. Then we draw the buttocks into ourselves as much as possible, and bring our hands forward with a smooth movement. We tighten the hips, sharply reducing the muscles of the buttocks so that the pelvis leans forward and up a little.
Hold this position for a few seconds. Then we take the hips back as far as possible - the legs and body remain motionless - and arch.
We work in the vertical (frontal) plane. Again, we reduce (squeeze) only the muscles of the buttocks so that the pelvis leans forward and up a little ("inward"). Movement of the pelvis forward and up - back and up, emphasis at the farthest point of this movement - again the pelvis "in itself" - again back and up, emphasis, etc.
Try to keep the movement in the frontal plane along the path of the lower arc of the semicircle. Remember your posture: shoulders down, back straight.
Starting position: standing on a full foot, legs slightly apart (about the width of the foot) and located on the same line parallel to each other, the body is slightly tilted back, the back is straight, the stomach is relaxed, the buttocks are tightened, the knees are “soft” and slightly bent, arms to the sides. We perform a rocking chair with the hips.
The rocking chair is performed by alternately straightening the knees: without changing the position of the left leg, we straighten the right leg at the knee, due to which the right thigh is “pushed” up and we sort of pull it under the rib (in this case, the lateral abdominal muscles contract).
While moving, do not tear off the heels and do not shift the center of gravity from foot to foot. The top remains motionless and does not sway during the work of the hips. We make sure that the hips move only up and down, do not take them to the side or back. They should be relaxed - only the knees work. Now we bend the right leg at the knee - we lead the left thigh up.
We continue the alternating movement with one or the other hip, without deflecting the body and keeping the line of the shoulders in the same position - parallel to the floor.
Imagine that you have a bowl of water on your head and your task is not to spill the water. You can also try to put a book on your head during this exercise and try to move so that it does not sway, much less fall.
Execute rocking hips to the sides in three counts: right-left and a little more slowly to the right - slightly slow down the knee extension until the movement starts in the other direction (without a pause in the movement), left-right and slightly slower to the left, slightly slowing down the knee extension until the next movement starts in the other direction. Movements should be smooth, unhurried, but continuous. Simultaneously with the rocking chair, we perform circular movements with the hands. Again we make a rocking chair with our hips to the sides without pauses. At the same time, we raise our hands up, at the same time performing rotations with the wrists along the trajectory of the eight. Repeat the movement with the hips at a fast pace.
If desired, the pace of side rocking with the hips can be increased even more: increasing it gradually and maintaining the rhythm, move on to shaking the hips. When shaking-rocking chair, the pelvis swings due to the work of the muscles of the lower back, the legs become freer. With this shaking, you can learn to walk quite easily. For example, climb on the "half-toes" and try to go forward with shaking, and then back. The faster the hips move, the more they need to relax. But don't forget to work with your hands.
If at first the shaking is good for you, and after a minute or two the muscles begin to “stone” and the shaking rhythm is lost, it doesn’t matter. Stop, shake your legs alternately, relax your muscles and start shaking again. The vibration of the body is given by muscles relaxed at your will, and not by tension.
Performing a rocking chair at a fast pace, we take the pelvis forward, then back and then move in a circle to the left. So we impose movement "rocking hips back and forth" for movement "small circle of the hips in the horizontal plane" plus circular movements of the hands.
We connect the side rocker with the hips pulling with the hips, continuing to perform rotations with the wrists.
Hip pull is a basic element of oriental dance, a movement from the group of slips. It should be done every day during every workout.
Starting position: we stand straight on a full foot (legs are located on the same line), the body is slightly tilted back, the back is straight, the legs are shoulder-width apart, the knees are “soft”, the arms are at the sides. We take the hip as far as possible to the left (without ceasing to perform the rocking chair at the same time), leave the legs and the upper part of the body motionless and transfer the body weight to the left leg. Shoulders, belt line during pulling remain parallel to the floor, knees do not bend. We pull the hips to the right and transfer the weight of the body to the right leg. The hips move to the right and left with maximum amplitude.
Pulling with the hips stretches the lateral muscles, strengthens the muscles of the lower back and abdomen, perfectly tones the muscles of the waist, and also helps to prepare the body for further performance of various oriental movements (in particular, amplitude volumetric eights and rotations).
By sliding your hips, you can move back and forth and right and left.
After pulling with the hips, we move on to another basic movement, simple to perform, but effective and easily combined in dance with other elements, - eights. Let's start with the execution of horizontal eights (movements are performed in a horizontal plane clockwise and counterclockwise).
Horizontal figure eight backwards (“away from you”). While pulling, we lingered for a moment in a position where the left hip was maximally abducted to the left and, accordingly, the weight of the body was on the left leg.
Now we lead the right thigh diagonally forward to the right, turn it as much as possible and begin to outline the first half of the imaginary figure eight - we turn this thigh back.
Next, the left thigh is brought forward (the weight of the body is gradually transferred to the left leg), turns as much as possible (until you see your left buttock out of the corner of your left eye) and begins to outline the second half of the figure eight: to the left until it stops, and then back to the left.
Only the lower part of the body moves. Breathing remains even and smooth, like the movement itself.
You can help yourself a little: when the hips are twisting in one direction, slightly twist the body in the other (so that the hips do not drag it along).
Straight knees, feet that remain parallel, and heels that stay on the floor will help to achieve a smooth, soft and continuous movement. Imagine that you are making your way forward without the help of your hands through some rather dense, viscous substance and, as it were, are raking it with your hips, alternately pushing it to one side or the other.
This exercise increases the elasticity of the ligaments.
Movement "horizontal figure eight forward ("inward")" schematically looks the same as the previous one, only performed in the opposite direction. We take the left thigh back diagonally to the maximum twisted position (in which the chest still remains motionless).
The weight of the body is transferred to the left leg. With a smooth circular motion, we describe half of the eight forward with the left thigh, maximally turning the right thigh back. We transfer the weight of the body to the right leg.
In a circular motion, move the right thigh forward and describe the remaining half of the figure eight. We try to bring the hips forward no less than back. We do not turn our shoulders. They must always look ahead. If you are still not very good at “separating” the top from the bottom, try doing the figure eight with your whole body first. I managed to catch the trajectory - you can move on to fixing the body and start moving only the hips.
Try to bring your hips forward no less than back, then the movement will be smooth and symmetrical. Keep an eye on the upper body: it should remain motionless, but not enslaved, keep the line of the shoulders parallel to the floor line.
When performing the figure eight, the legs should be placed parallel to one another and on the same line, not just for stability or beauty: if you put them in eversion positions (heels together, toes apart), then, involuntarily pinching the buttocks, limit the amplitude of their movement.
Another version of the eights with the hips - vertical eights, or, as they are also figuratively called, "pendulums". The second name of this dance component was not born by chance: remember how the pendulum of the clock moves, describing the lower semicircle of an imaginary circle, like a young crescent turned upside down with “horns”. The oriental dancer reproduces the described trajectory with the help of hip movements in a strictly vertical plane. Vertical eights can be performed, like horizontal ones, in two directions opposite to each other: “away from you” (from top to bottom) and “into yourself” (from bottom to top).
We still stand on a full foot (legs are on the same line and parallel to one another), the body is slightly tilted back, the back is straight, the buttocks are tucked up. But now, to perform the "pendulum", put your feet together. Body weight on the left leg. We tear off the right heel from the floor and raise the thigh as high as possible.
The weight of the body is gradually transferred to the right leg. Further, drawing a quarter of a circle to the right and down, we begin to lower the right thigh, at the same time pushing it as far as possible to the side, that is, to the right. From this extreme side point, we continue to lower the thigh to the lowest point of the circle thanks to the “soft” knee. Body weight on the right leg. We put the heel of the right foot on the floor and lower the right thigh down.
Now we tear off the left heel (knee is relaxed), lift (due to lifting the heel off the floor) the left thigh up (as if leading to the armpit) and push it to the side as far as possible, without deflecting the body in the opposite direction and outlining a rather steep semicircle of the imaginary eights.
Pull the thigh towards you, returning to the starting position. We continue to draw symmetrical circles in a vertical plane. The body should remain motionless, and the line of the shoulders should be parallel to the floor line. Add hand movement to this dance element.
Hands in oriental dance move depending on the nature of the music, and therefore often their movements do not coincide with the movement of the hips: the hands work at least twice as slowly as the hips. If the hips are the rhythm, then the arms are the melody.
From the previous starting position, smoothly proceed to the next movement - step Suher Zaki, or "stilts".
We stand on straight lines, located on the same line parallel to one another on toes, the body is slightly tilted back, the back is straight, arms to the sides. We begin to alternately lower the heels to the floor in three counts. We lower the heel of the left leg - the left thigh goes down, then we raise the heel of the left leg, returning to its original position (on the toes), and lower the heel of the right leg.
Left - right - left - paused for a moment. Right - left - right - lingered for a moment. And so several times in a row in the rhythm of the sounding melody. We do not bend our knees - we only raise our hips. The head is on the same level: the movement occurs mainly only due to the hips. Continuing to perform the movement, alternately tear off the legs from the floor.
And now we “walk” on the spot without delays and stops, but still in time with the melody.
If this movement is performed correctly, you will feel the movement of the oblique muscles of the abdomen.
Performing the following exercise − hip dumps (otherwise - hip-down strikes). Starting position: standing in a half-squat and half-turned to the viewer. The body looks forward, the hips and legs are turned to the side at an angle of 45 °. We put the leg closest to the viewer (mirror) (working in this movement) in front of the one behind, on the toe, and expose its thigh and turn it forward (toward the viewer), as far as the body allows. The back is straight and slightly tilted back, arms are spread apart.
Try to keep your knees together while moving.
So, keep your chest and shoulders straight. We start the movement with the left foot, so we put it on the toe in front of the right, raise the right hand up, take the left hand to the side. Raise the thigh of the working leg up by straightening the knee, then sharply lower (throw) the thigh, again bending the working leg at the knee.
Do not lower the heel to the floor. We do the emphasis while moving down (at its maximum lower point). At the same time, the hands make smooth circular rotational movements. We repeat the movement a few more times, and then change the leg - we become half-turned to the viewer (mirror) with the right hip forward, respectively raise the left hand up, take the right hand to the side and work with the right hip.
If you relax your hips well and bend your leg at the knee, the hip will "fall" by itself.
Let's complicate the main movement "hip drop" with a leg extension, and we get a new movement - "classic key" (thigh drop with leg extension).
Starting position - as in the previous exercise: standing in a half-squat and half-turned to the viewer. The body looks forward, the hips and legs are turned to the side at an angle of 45 °. We put the leg closest to the viewer (working in this movement) in front of the one behind (supporting), on the toe, and expose its thigh and turn it forward (towards the viewer). The back is straight and slightly tilted back, the arms are spread apart (option - the arm of the same name as the supporting leg is raised up).
We perform one reset with the right hip, the emphasis is while moving down (at its lowest point). Raise the right thigh again, and then lower it, while throwing the right leg forward, the toe of the foot stretches forward and down.
Raising the hip up each time, we continue to alternate the impact with the hip down (hip drop) with the hip drop with leg extension. We perform this movement several times, and then change the leg - we work with the left thigh.
"Key" can be performed on weight. In this case, when the leg lunges forward, its toe does not touch the floor, that is, we keep the leg in the air.
We continue to develop the spine and back muscles.
We change the starting position: we stand on a full foot, legs slightly apart (about the width of the foot) and located on the same line parallel to each other. The body is slightly tilted back, the back is straight, the stomach is relaxed, the knees are “soft”, the arms are at the sides, the weight of the body is on the left leg (as in a pull).
Execute semicircle hips.
We take the hips forward - the body deviates back, but the head does not throw back in any case (!) - and take it to the right, outlining (with maximum amplitude) an imaginary semicircle.
Now let's do a full circle.
Hip circle is a movement familiar to each of us since school or even kindergarten times. He was certainly included and is still included in a variety of gymnastic complexes called "hip rotation".
At first, to help you check if your shoulders and upper chest are moving horizontally or vertically during the exercise, you can put your hands on your shoulders.
Combine the semicircle with the hips forward with the semicircle back and perform a full circle with the hips to the left on straight legs. The hips move along all four points: we take them forward (the body leans back, but the head does not throw back), we take them to the left, wrapping the hips, we take them back, transferring the body weight to the right leg, we take them to the right, etc.
While the hips make a circle, the head, shoulders and arms remain at the same level. We repeat the rotation of the hips to the left again, and then we perform a circle in the other direction: right - forward - left - back, trying not to move the upper body and keep the line of the shoulders parallel to the floor line.
This text is an introductory fragment.
Driving mode control information
Driving information When driving a car, the driver receives a huge amount of information, but attention must be focused on the main thing that determines the traffic situation at the moment or interferes with traffic and threatens to run over or
Circle movement adjustment
Adjusting the movement of the circles The speed of movement of the circles depends primarily on the specific gravity of the material from which they are made (foam and cork circles float faster in the wind than wooden ones). The thicker the circle, the faster the movement. At the circle with a thick and
Breast movements
Breast movements Check your posture. Stand up straight, pull in your stomach, slightly push your chest forward, both feet are stable and firmly on the floor, arms are spread apart. We begin to move the chest. Without moving the lower part of the body, with a short movement we raise (push out) the chest
Tilt motion
Tilt movements Let's move on to the quickdraw movements. Starting position: standing straight on a full foot (legs are on the same line), the body is slightly tilted back, the back is straight, legs are shoulder-width apart, knees are “soft”, arms are at the sides. Pull the hips to the right and shift the weight
Walking with cane on shoulder
Walking with a cane on the shoulder Holding the cane on the right shoulder, perform penetration "C grade" with a turn in place around its axis in the direction to the left. Raise the left thigh and leg, bent at the knee, up. Then we lower the thigh down (while the left leg is still
Movement with shawl
Movements with a shawl The dance with a shawl (scarf, veil, handkerchief) is one of the most traditional. A scarf can amazingly transform, decorate the movements of a dancer. Its possibilities are almost limitless, and therefore working with it is a special pleasure. Competently
Travel speed
Travel speed One of the key factors affecting the efficiency of the car is the speed of movement. Everyone knows that the most economical driving mode is driving on a country road in calm weather at a speed of about 80–90 km/h at the highest (in
How the motion sensor
works How is the motion sensor In the middle of the sensor there are receivers of IR light - photocells. The Fresnel lens consists of many small lenses, each of which focuses IR light on the plane of the photocell, and one of them focuses directly on the photocell itself (signal
Motion sensor infrared Camelion
Infrared motion sensor Camelion The motion sensors of the Chinese company Camelion are widely and varied in stores. Economy-class infrared sensors, which were created as energy-saving switches, primarily lighting, although their functions are almost
3.5.6. Motion detectors LX-19B and LX-2000
3.5.6. Motion detectors LX-19B and LX-2000 Infrared motion sensors are commercially available, adapted in shape to wall light switches for flush wiring (Fig. 3.62) LX-19B and LX-2000 (Fig. 3.63) manufactured by the Chinese company Litarc Lighting & Electronic Ltd. Rice. 3.62. Household light switch
3.
 5.8. Setting motion sensors
 3.5.8. Setting motion sensors Sensors are adjusted by potentiometers; usually there are three of them (Fig. 3.69): • to set the sensitivity of the sensor (SENS), the brightness of the IR light is set, to which the sensor must respond; • to set the delay time for switching off the lighting
How to learn to dance twerk - Lifehacker
November 21, 2020 Likbez Sports and fitness
Butt size doesn't matter!
Iya Zorina
Author of Lifehacker, athlete, CCM
Twerk is just a super sexy dance that will pump your plasticity, and at the same time load your abs and back muscles well. To begin with, we will learn a few basic movements, and then we will diversify the dance vocabulary and analyze the main mistakes. And at the end you will find a bonus in the form of a playlist with suitable music.
If you have problems with your lumbar spine, exercise with caution, or better yet, consult your doctor.
Learn how to do basic elements
Booty pop back
Stand with your feet wider than shoulder width, toes slightly apart. Bend your knees and place your hands on your hips, turning them inward with your fingers, bend your lower back.
From this position, twist the pelvis down, and then, due to the deflection in the lower back, return it to its original position. Imagine that you are trying to reach the top of your head with your pelvis.
It is important to fix the upper back and work only on the lower back. You can not strain the gluteal muscles, otherwise the movement will turn out to be clamped.
If difficulties arise, try the lead-in exercise first. Place your hands on your hips so that your middle fingers rest on the protruding bones of the pelvis in front, and your thumbs - behind, closer to the sacrum. Bend your knees, move your pelvis down and then up, controlling the movement with your hands.
When you feel more confident, remove your hands and connect the movement with your knees. When the pelvis goes down, the knees bend, when it rises, they unbend. No need to lock the knees at the extreme point, they should remain slightly bent.
The pelvis moves back not only due to the straightening of the knees. The lower back must work.
Front booty pop
This movement is very similar to the previous one, only the emphasis is on pushing the pelvis forward rather than backward.
Set your feet wide, with your toes slightly out to the sides. You can put your hands on your hips to better feel the tilt. At the same time, bend your knees and sharply move your pelvis forward so that your butt goes down, and then arch your lower back and bring your pelvis back.
The emphasis is on the first phase of the movement, when the butt goes down. It is important at this moment not to pinch the buttocks, but to change the position of the pelvis due to the tension of the abdominal muscles.
Try other twerk moves
Double
This element repeats the usual booty pop, only the movement of the pelvis in it is double: down-down, up-up.
Suffle twerk
Stand with your feet wider than shoulder width. At the same time, turn one leg with your toe and knee out and transfer your weight to the opposite thigh. Then, with a small jump, switch sides.
First try to move slowly to get the point, then speed up. Jump relaxed.
Up down twerk
Arch your lower back and push your pelvis back. On the count of “one”, simultaneously round the lower back, bringing the pelvis forward, bend the knees and bring the shoulders forward. On the count of "two", bend your lower back and take your ass back in a semi-squat.
On the count of three, straighten your knees, round your lower back, and roll your shoulders forward. On the count of four, arch your back in the thoracic region, straightening your shoulders.
It turns out that at the lower point you bend in the lower back, and at the top - in the chest.
Wobble
To feel the movement, start slowly. Place your feet shoulder-width apart, place your palms opposite the pelvis. In turn, touch the palms with one or the other bone of the pelvis. Accelerate gradually.
You can wobble while standing upright or bent over. Practice slowly bending over and back up as you move. Important: you should not pinch, otherwise stiffness will occur and no shaking will work.
Zig zag
Get into a twerk stance, lower your right thigh first, then your left thigh. Then, one by one, lift them up to their original position. At first, perform the elements slowly, with fixation at each point, and then gradually accelerate.
You can do this movement a little higher. In this case, start with a stance on straight legs in an incline. In the same way, lower the right and left hips in turn, bending the knees, and then raise the hips, straightening the legs.
Stripper shake
Rise up on your toes and turn your heels in and out a little.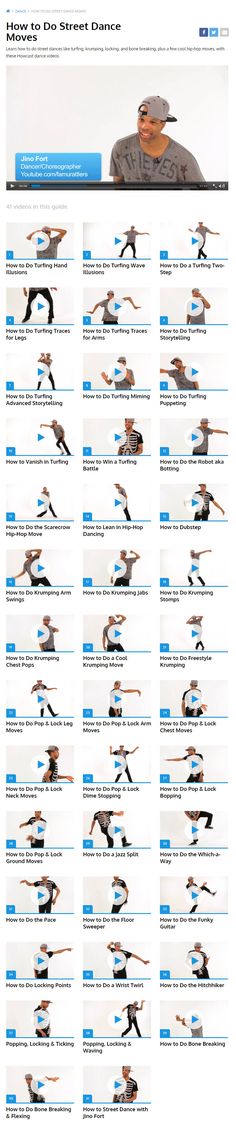 Arch your lower back, try to relax your hips as much as possible.
This element can be performed in a straight position or bent over, moving both legs at once, or one at a time.
Roll
Stand with your feet slightly wider than shoulder width, point your toes forward, tilt your body and rest your hands on your hips. Rotate your pelvis, lowering and raising it as you go.
You can do this either in a bent over position on your hips or standing up.
Happy twerk
Start in a twerk position with your toes pointing forward. Do one regular booty pop in place, then another with the toes and knees turned out to the sides, and then the next one with them returning to a straight position.
Continue turning your toes and knees out and back, tilting your pelvis as you move.
Flash
Stand with your feet shoulder-width apart, rise on your toes. Pull your pelvis back a little. Move quickly from foot to foot, trying to relax your buttocks.
Twist
Raise your right leg to the side, turn it with your toe and knee inward. From this position, simultaneously transfer the weight to the left thigh and turn the raised leg with the toe outward. Return your foot to the floor and repeat on the other side.
Try moving in other positions
Twerk can be danced not only while standing, but also while squatting, on all fours and even upside down on your hands, with your feet resting against the wall. Try different positions - this will help diversify your dance.
Squatting
This is the same booty pop, only squatting. If you don't have enough stretch to move freely in a deep squat, work on your hip mobility first.
Offset to one side
Good stretch is also required for this option. Otherwise, you will not be able to relax and move freely.
On all fours
First practice the standing element to get used to it. Raise one leg on the toe, turning it with the knee outward and at the same time leaning on the opposite thigh. Then smoothly switch sides.
Now place your palms on the floor, arch your lower back, bend your knees and lift your heels off the floor. Perform a familiar movement in a new position.
This is enough to get you started. Try, combine the movements with each other and, if something fails, correct the mistakes.
Understand why you don't succeed
There are three main reasons why instead of twerking you get some bullshit. And the size of the priests has nothing to do with it.
1. You lack flexibility
To twerk well, you must have good mobility in the lumbar spine and hips. If flexibility is lacking, you can improve it by doing stretching exercises.
Choose stretching exercises 🤸🏻♀️
- 50 exercises to stretch the muscles of the whole body
2. You work your upper back and shoulders
All basic movements require arching in the lower back. It is due to the lower spine that you feed the pelvis back and forth. But if during booty pop you bend in the thoracic spine and connect your shoulders, the movement will not look like a twerk.
3. You're too tight
This is probably the biggest beginner's mistake, which results in a tight, wooden pelvic movement instead of sexual shaking.
Don't push yourself too hard, relax your buttocks and thighs, shake off tension from your arms and shoulders. All elements should be carried out easily and without clamps. The best way to relax and feel the movement is to turn on the music.
Pick up the music
We found a cool audio compilation that makes you want to dance to and not stop. The description on YouTube has the names of all the tracks.
And another big selection, this time from Yandex.Music. There are some great tracks too, and some of them are pretty slow paced so you can learn the moves in a relaxed and casual way.