How to dance tinikling steps
Tinikling Folk Dance - Mr. Sickler's Physical Education Website
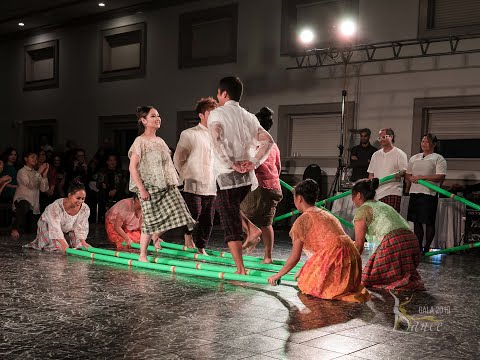
| TINIKLING Tinikling is a traditional Philippine folk dance which originated during the Spanish colonial era.[1] The dance involves two people beating, tapping, and sliding bamboo poles on the ground and against each other in coordination with one or more dancers who step over and in between the poles in a dance. It is traditionally danced to rondalla music, a sort of serenade played by an ensemble of stringed instruments which originated in Spain during the Middle Ages. (Wikipedia) |
What You Need to KnowYou will be assessed on your groups ability to work together, problem solve and perform a 6 Step/8 Count Tinikling Routine. CA Physical Education State Standards
| Unit Learning Materials
Homework Assignments
|

INSTRUCTIONAL VIDEOS
The 5 Steps----There are 5 Steps that your group will be required to learn for your Final Performance. Below are the Instructional Videos for each Step. There is also a pole banging safety video that everyone has to watch.
This is a LONG VIDEO showing both some instructional videos and the performance of the entire dance. This is really helpful when trying to understand what the dance looks like. Click HERE to see the album that has all the videos in it. | Transitions from Step to StepIt is really important to see how steps transition from one to the other, check out these videos showing the transition:
Below is a Version 1 or 2 of Step 3 into 4 and Step 4 into 5. The Version you choose will depend on your Made Up Step 6 move. If the move have the dancers start on the same side, you will use Version 1. If the dances start on opposite side, you will use Version 2
|
All Star Work
| 2019- 2020 All Star Tinikling Dance Performances
| 2019-20 All Star Tinikling Reflection Assignments
|
TinikleIdeas
TinikleIdeasTinikling Ideas
Description of Activity
Tinikling is the most popular and best known dance of the Philippines, receiving acclaim as their national dance.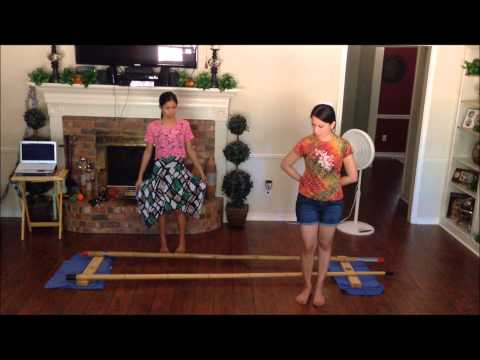 The dance is similar to rope jumping, but instead of a spinning rope, two bamboo poles are hit against raised blocks on the floor and then together. Tinikling actually means "bamboo dance" in English. The dance requires one person to operate each end of the poles, and one or more dancers to move in and out of the poles.
Photo taken by Divine Marcelo 2001 Likha Pilippino Folk Ensemble. Check out their website at www.likha.org/galleries/tinikling.asp.
Origin
Tinikling originated in the Visayan Islands, on the Island of Leyte. Dancers imitate the tikling bird's legendary grace and speed as they walk between grass stems, run over tree branches, or dodge bamboo traps set by rice farmers.
Different stories of tinikling have been passed down through oral histories and folklore. One of the stories of it's origin may or may not be true. The story says that the dance started by the people who worked on the fields and paddies in the Philippines. When the Spaniards conquered the Philippines, the natives were sent to the haciendas. The natives lost control of their land because they were under an economic system that is largely based on rural and agricultural operations of large farmlands administered by caretakers for the King of Spain. The natives had to work all day to please the Spaniards. The people of the Philippines worked in the fields and paddies for almost four hundred years (1500-1898). The people who worked too slowly would be punished. Their punishment was to stand between two bamboo poles cut from the grove. Sometimes, the sticks would have thorns jutting out from their segments. The poles were then clapped together to beat the native's feet. By jumping when the bamboo sticks were apart, the natives tried to escape this cruel form of punishment.
The matrix for the dance was probably laid out when the workers would return home with their feet bruised and bleeding from the punishment. By practicing to escape the bamboo sticks during punishment, tinikling soon became a challenge, an art, and a dance. Now tinikling is performed on certain Sundays in the Philippines. Since it is no longer a punishment, the sticks are smooth and the clapping is gentle.
Photo taken by Divine Marcelo 2001 Likha Pilippino Folk Ensemble. Check out their website at www.likha.org/galleries/tinikling.asp.
Equipment
Tinikling equipment may be bought commercially, but is more economical to supply yourself. The following items work well and are inexpensive:
1. Wooden closet dowels from the local lumber yard (8-18 feet long, depending on number of dancers).
2. Pieces of free 2x4 scrap or inexpensively bought 2x4's may be cut as blocks (approximately 30 inches long).
3. Free carpeting samples may be cut up and glued to the bottom of block ends to protect wood floors and to decrease vibrating of blocks when they are hit.
4. Tape marks may be placed on blocks to approximate the width to separate the poles to hit them on the blocks (14-18 inches apart, depending on size of dancers).
Lead-up Activities
Several preliminary activities help students to master actual tinikling steps. As with learning any activity, it is helpful to break tinikling down into its component parts. Pole clapping and dancing steps may be introduced using the following sequence:
1. Clap to self - Have movers simulate the 4/4 tinikling beat by slapping hands against their thighs for two beats, and then clapping hands together for two beats. The cadence is "down, down, together, together" or "slap, slap, clap, clap."
2. Clap with foursome - With all facing the middle of the foursome, have students slap hands against their thighs for two beats, and then clap hands against their neighbor's hands on either side for two beats.
3. Clap poles with partner without dancers.
SAFETY NOTE: The last 6 inches of each pole should be wrapped with tape to prevent slivers when operating poles. Pole operators need to keep their faces back in case a dancer steps on a pole, springing it into the air. The best positions to ensure this are (a) sitting on floor with legs apart, or (b) crouching down on one knee.
4. Practice basic steps with poles still on floor.
5. When music is introduced, instrumental music has a more defined beat than does music with lyrics.
Types of steps
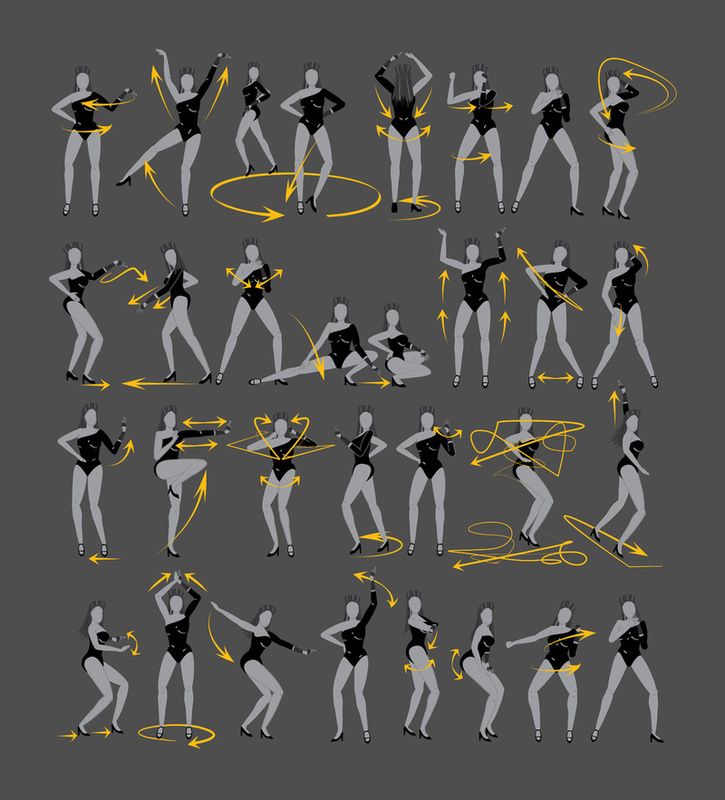
Tinikling dance steps are usually described as combinations of only three basic 4/4 steps: Singles, doubles, and hops. Singles and doubles refer to the number of feet that touch the floor at a time during a given step.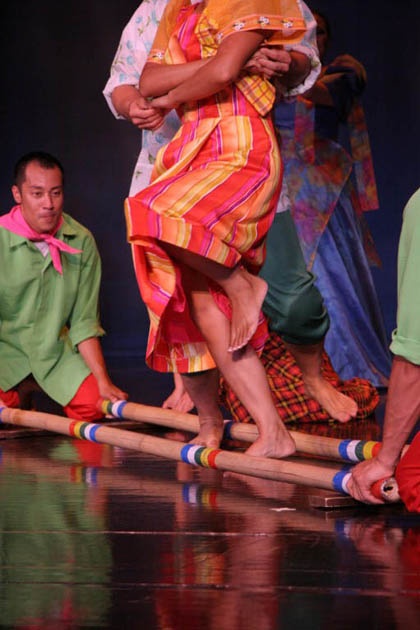 Hops refers to a specific category of singles steps, although sometimes a step involving just one foot at a time actually contains a leap, since the body weight is transfered from one foot to the other foot. The selected steps that follow are described and demonstrated via video according to the specific nature of the steps, rather than simply the number of feet involved:
Descriptions and video clips of doubles steps | |
| Descriptions and video clips of combination steps | |
| Descriptions and video clips of singles steps |
In addition to video clips of steps, the following links provide printer friendly descriptions of groups of steps, along with a tinikling card on which students may chart their progress.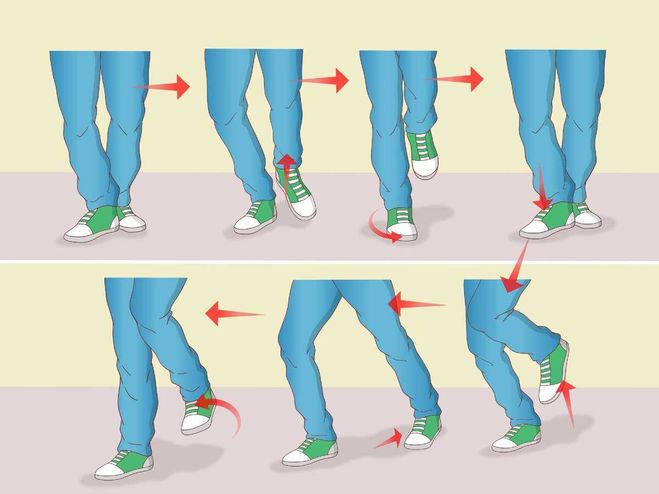 The card may be downloaded and copied on cardstock for use in class. After mastering basic steps, students may sequence steps together into a routine. Each "poster card" contains one of the 13 steps enlarged for posting on the wall. Cards may be copied on cardstock and laminated for long term use. "Pole arrangements" describes alternative ways to position poles, particularly for creating small or large group patterns.
| Steps 1-6 | Steps 7-16 | Tinikling card | Tinikling songs | Pole arrangements |
Additional Challenge
Band jumping is a rhythmic activity that resembles tinikling. The difference is that the "jump bands" are elastic bands that have a loop at each end. Consequently, they are operated by foot, instead of by hand. Those operating the bands put a loop on each foot and create parallel bands which open and close to the beat. Dancers move in and out of the bands using a variety of steps or movements as with the poles. Either jump bands or tinikling poles may be used with 3/4 music, as was originally done, however the 4/4 meter is easier for dancers to follow, and 4/4 music is much more plentiful.
© Steven A. Henkel, 4/06
| Rhythms & dance | Social dance | Creative movement | Fitness | Games |
Home |
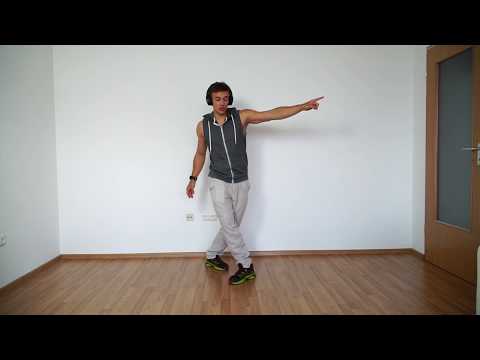
How to learn to dance shuffle - Lifehacker
December 15, 2019LikbezSports and Fitness
Master the basic movements, and then improvise and get high.
Iya Zorina
Author of Lifehacker, athlete, CCM
Share
0This dance style includes a lot of freedom and improvisation. That is why he is so good. You can master the basic movements in a couple of hours, and then complicate them to infinity and combine them with each other, create your own combinations and spy on others.
Dance in sneakers, socks or barefoot, in any outfit, anywhere.
Master the basic movements of the shuffle
In this style, you do all the basic movements with your feet, the hands most often move freely - according to the heart.
Running man
This is the most basic and essential shuffle movement. You can do it in three different ways.
Full foot
The movement begins by bending the knee and lifting one leg. Next, you need to simultaneously put both legs - supporting and raised - at a distance of one step from each other.
The raised leg is placed forward on a full foot, the standing one behind slips back on the ball of the foot and remains on it - the heel is not placed on the floor. The weight is evenly distributed between the two legs.
After that, it remains to return to the starting position. To do this, the front leg slides back, and at the same time, the back leg is pulled up. You find yourself in the starting position and repeat the cycle. The movement itself is soft and springy: do not stick into the floor, keep your legs relaxed.
Heel
This is a lighter and faster running man look that may be needed for some combinations. Here you put your foot not on the whole foot, but on the heel. At the same time, the one standing behind remains on the toe.
On pads
In this variation, the foot is placed forward on the pad. At the same time, the one standing behind also remains on the ball of the foot, and the body leans slightly back.
T‑step
In this movement, one foot constantly makes a “herringbone” - turns the heel in and out - and the second touches the floor and immediately rises back.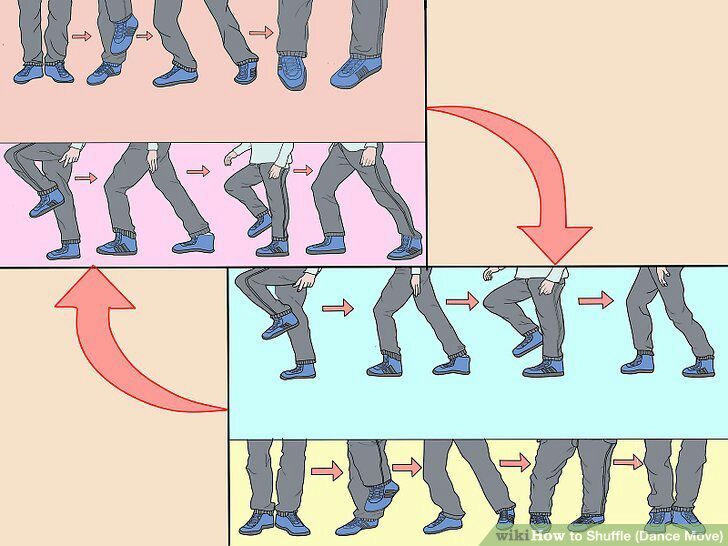
When the heel of the skating leg turns inward, the toe of the other leg touches the floor; when outward, the other leg rises, turning the knee inward.
It turns out two positions: closed - when the legs are wrapped with the knees inward, and one leg is raised, and open - when the legs are turned out with the knees outward, and the toe touches the floor. Practice doing the T-step in both directions: slowly at first, then with acceleration.
Rocking
You jump on one foot, and the other touches the floor in different places: on the side of the supporting leg, across, behind - anywhere you want. You can put your foot on the toe or on the heel - the latter is called a kick. The supporting leg can simply rise low or perform a T-step - move the heel out and in.
Charleston
To begin, you turn your knees and toes inward and lift one leg. Then turn your toes and knees outward, and put your raised leg forward crosswise. Repeat the same with the other leg.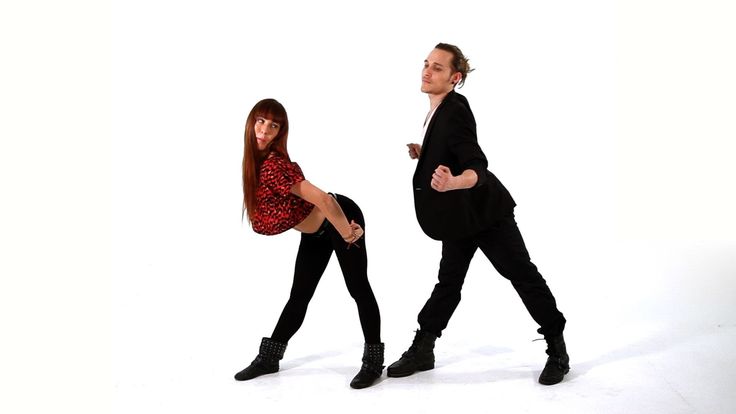
All movement occurs on the balls of the feet, the heels do not fall to the floor. You can move both forward and backward.
Diamond
First you put your feet crosswise with your toes outward with a jump, then you also spread your legs apart with a jump.
Slides
One leg is straight, stands on the whole foot, the other is with a bent knee on the pad. Leaning on the pad, you slip the foot of a straight leg back, as if wiping the sole on the floor.
Immediately after the slip, you turn around. In the turn, the straight leg bends and goes to the pad, and the one that was on the pad, on the contrary, turns on the heel. After that, it remains only to change legs and move in the same way in the other direction.
Scissors
From the starting position - standing with a raised leg, as in Running man - you turn your hips to the side with a jump and put your legs crosswise.
The front foot is on the heel, the back foot is on the ball. Then you jump back to the starting position and do the same on the other side.
Sidekick
From the starting position, you turn your hips to the side with a jump and spread your legs a step apart from each other. The standing foot in front is placed on the heel, the standing one behind remains on the pillow. Then, with a jump, you collect your legs and do the same on the other side.
Try other variations of the basic shuffle movements
You can perform the basic movements in different directions: forward and backward, turning around. This will give you more freedom to improvise.
Variations Running man
Do several times in place and then turn around. You can also try walking this way to the side. Each time the leg will need to be placed slightly crossed in order to slowly move to the side.
Variations T‑step
You can lower your foot on the toe, on the whole foot, touch the floor to the side of the supporting leg or forward and behind it.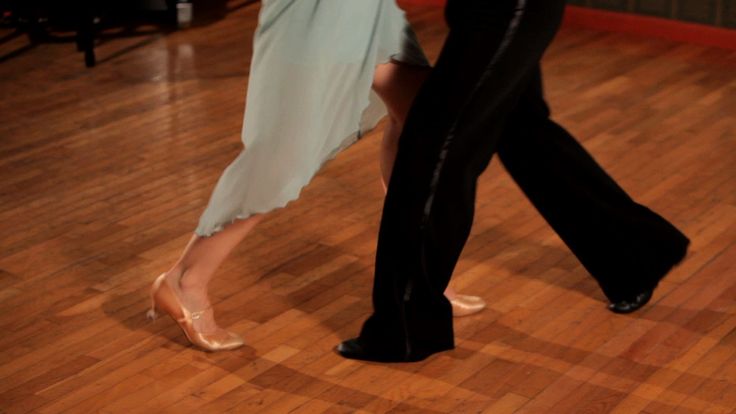
You can also keep the other leg off the floor at all - leave it on the toe and turn the knee in and out.
Variations Diamond
Here one more element is added to the movement – the heel strike. In the starting position, you wrap the toes of the feet and knees inward, and then jump on the heels, turning the socks to the sides.
From this position, without jumping, you turn your toes and knees inward, cross your legs with a jump, turning your feet with your toes outward, and then return to the starting position.
Charleston Variations
After three turns of the Charleston, turn both toes in one direction and then in the other. At the end, you can turn the knee to the side.
Connect familiar shuffle moves
While you lack the skills to move freely and come up with something of your own, learn a few combinations. They contain interesting movements that will replenish your dance vocabulary.
Combination 1
This is a simple combination of two basic movements - Running man and T-step. First take five Running man steps, then four T-steps to the side and repeat the same in the opposite direction.
Combination 2
Another combination of two basic movements. Here you do three Running mans, then one T‑step with a back foot touch, and two front heel touch kicks. The same on the other side.
Combination 3
There are no standard steps here, but there are already familiar Sidekick and transition from heels to toes.
Learn more difficult combinations
We will add some videos with good combinations.
1. Cool video for beginners: movements are repeated in slow motion to make it easier to dance to the music.
2. And here the combination is analyzed step by step in slow motion, dividing it into three parts. Very comfortably. Look for more on this channel, there are several such analyzes.
3. There is no slowdown here, just a great combination. But you already know almost all the movements, so you can figure it out. If something is not clear, watch the video at a speed of 0.25.
Pick up the music and improvise
Surely you have favorite songs to shuffle to. Include them and start with basic movements: just do the Running man and periodically add different elements when you want. Move in different directions, relax and have fun.
If you don't have favorite tracks, try our selection.
I must say that the shuffle is an amazing cardio workout. In just a couple of tracks, you will be out of breath and sweat, like after a run, but you will feel absolutely happy!
What's more, if you have to force yourself to keep going while running, shuffle requires you to have the willpower to stop and not dance.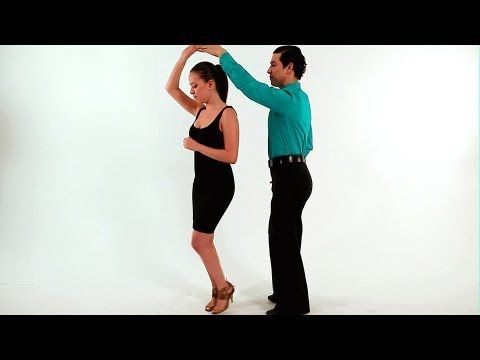 As a bonus - a short video from a beginner after a couple of hours of practice.
Shuffle is cool!
Read also 🕺💃🤸♀️
- Dancing as a sport: choosing the right direction
- Dance and movement therapy: how to know and change yourself through movement
- How to learn to dance: video lessons for those who are not afraid to try
- How to learn street dancing without leaving home
- Zumba is a fun way to lose weight for those who love dancing
*Activity of Meta Platforms Inc. and its social networks Facebook and Instagram are prohibited in the territory of the Russian Federation.
12 life hacks to quickly learn how to dance from Mamita Dance
dances
Author: Pavel Collect
psychologist, salsa and tango teacher
dancing
Author: Pavel Sobiray
psychologist, salsa and tango teacher
At the start, you always want to get a quick result. When it doesn't happen, the hypothesis arises that everything takes time. After a conditionally acceptable time, humility comes to mastering pair dances, which, perhaps, is not given, and I will just do what I learned somehow.
This is the most common story of those who believe that the fact of attending pair dance classes is enough to learn how to dance.
Absolutely not. If you want to really dance well, you have to make an effort outside of the dance class. A good teacher will definitely be needed, but the initiative should be on your side.
1. Listen to music
The most common and accessible advice that is given already in the first lessons. And it definitely works. Music creates a certain atmosphere of the dance and intuitively you want to move to it. It doesn't matter where you listen to music - in the car, on headphones while walking or doing household chores.
An addition that will help you dance better is your active participation in the music.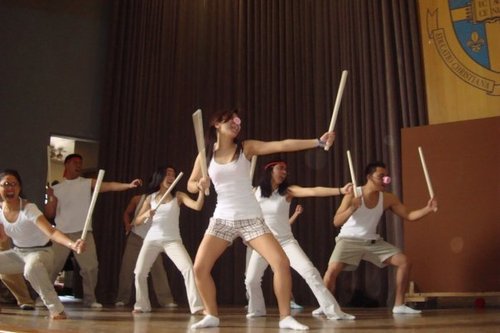 Sing along, dance or simply beat musical accents with any free parts of the body. In the subway, for example, it is enough to tap out bright moments with your fingers, in the car to sing along with sounds, and at home you can jump for pleasure.
2. Watch videos of good dancers
It's complicated, but also obvious. It’s more difficult, because without recommendations from more experienced dancers, unfortunately, it’s not so easy to find a good quality video on the net (I mean not the resolution quality, but the content itself).
Meaningful video viewing is about building an understanding of HOW dancers make a particular impression on a partner or viewer. Technology is at the heart of everything. Understanding how the pros do it is a big step forward.
It is important to distinguish a show from a disco dance, a staged performance from an improvisation, a stylized dance from an authentic one, etc. Ask for recommendations and dance teachers will always throw off a couple of videos of worthy landmarks.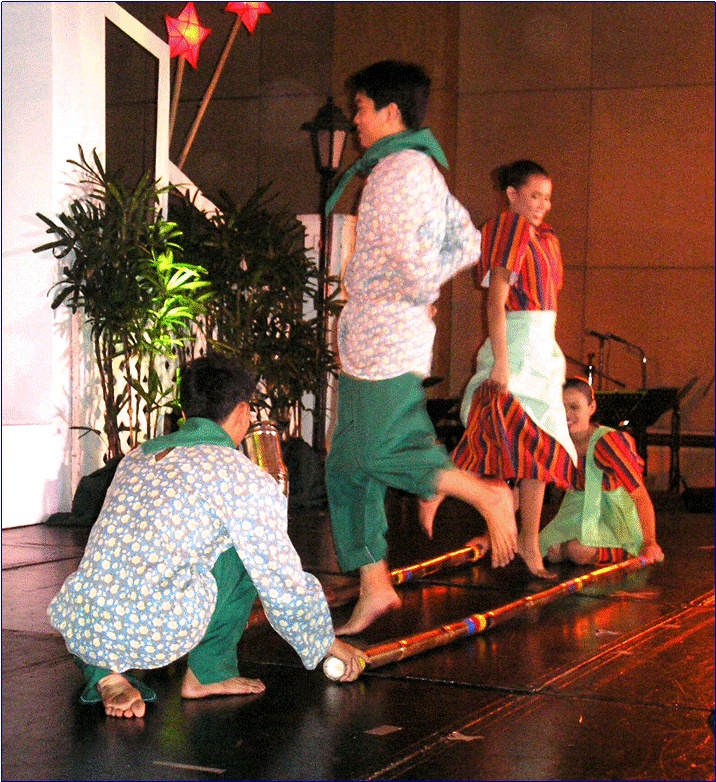
Tango Z. Showreel.
Online modern tango courses
Tango nuevo is the most advanced version of tango. We can quickly learn to dance from zero to a steep level.
| View details |
3. Dance in salsatecas/milongas/discotheques
A very delicate moment when it is worth coming to the first party. From a technical point of view, most students in 1-3 months have a sufficient set of figures and techniques to come and dance calmly. Psychologically, the same moment can be stretched out for an indefinite time. After all, it is imperative to “not lose face”, “learn more figures” and be sure what to do in case “there is an unfamiliar movement”.
In fact, the partygoers don't really care (except for a small layer of non-professional teachers who want to help inexperienced dancers by treating them as customers in the future). It is important to come and try dancing after a month of classes.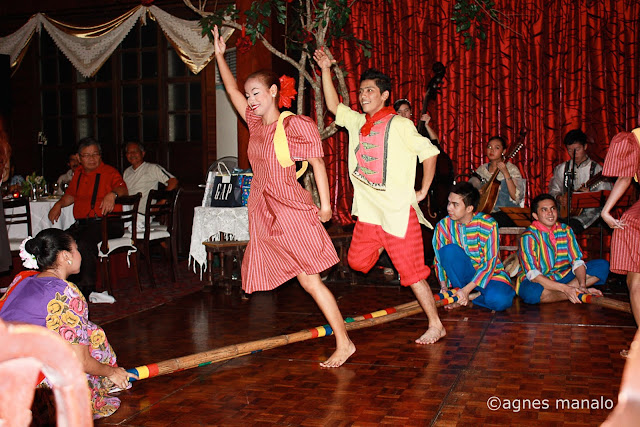 You can only with friends or guys from your group. This will be enough to feel the adrenaline and inspiration from the dance.
4. Dance with partners or partners not of your level
The conventional wisdom that you need to practice in groups of your level does not stand up to the test of experience. Perhaps now your eyes widened in surprise, and you want to meaningfully read the phrase again. Yes, you saw everything correctly: when you dance with a partner of your level, you don’t grow anywhere.
It's important to understand that not only does it work one way and you have to dance with cooler dancers, but it works even more effectively the other way. It is no coincidence that teaching pair dances dramatically raises the level of the teacher himself. You have an endless stream of very beginner dancers.
How it works. A more experienced partner needs to be "stretched". It's easy and obvious. With beginners, you need to take more initiative on yourself, see the general pattern of the dance more widely, turn on and insure more, try to be an example and be more careful. The quality of interaction begins to grow significantly. And wonderful partners too.
Dancing with partners of your level doesn't make you grow. Dance with beginners and more advanced dancers
Dominican Bachata Women's Style Online Course
Want to learn how to hypnotize those around you with the most appetizing part of your body? On the course we will tell you all the secrets.
| Interesting |
5. Learn to dance for a partner and for a partner
Turks and Argentines are one of the best partners in the world. In Russia, partners are highly valued. Why? The answer is simple. In Argentina and Turkey, it is not questionable for men to ask another man to lead in one piece or another and give feedback on the quality of the lead. For them, it will be a great shame to hear moralizing from a partner, or even more so to be known in the community as an insecure partner.
In Russia, due to the constant, often far-fetched, opinion that there are more women in pair dances, partners calmly get up and study their partner's part.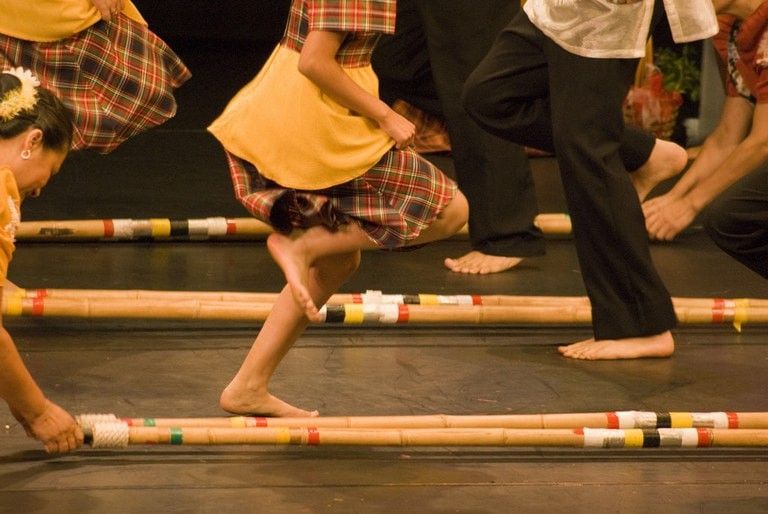 Such partners then grow into very cool dancers and teachers. In no case do this at parties, only in class. Here we are talking only about the learning strategy. At parties, be yourself.
6. Do not memorize the links
Always try to look deeper and understand the through principle and idea of movement. Understanding what and how is done will make it possible to independently generate any sequences and chips.
Human memory is limited and there will always be a moment when something will escape and your repertoire will be limited by the size of RAM.
In Argentine tango, for example, there are seven levels of movement construction that, when mastered, will allow you to make millions of combinations. And how many dance sequences can you really remember? In rueda, more than 150 figures dance in a rare circle. It's hard to keep more in mind.
7. Develop your body
Many years of experience in teaching pair dance shows that as soon as everyone pairs up in a class, any progress in individual style ends.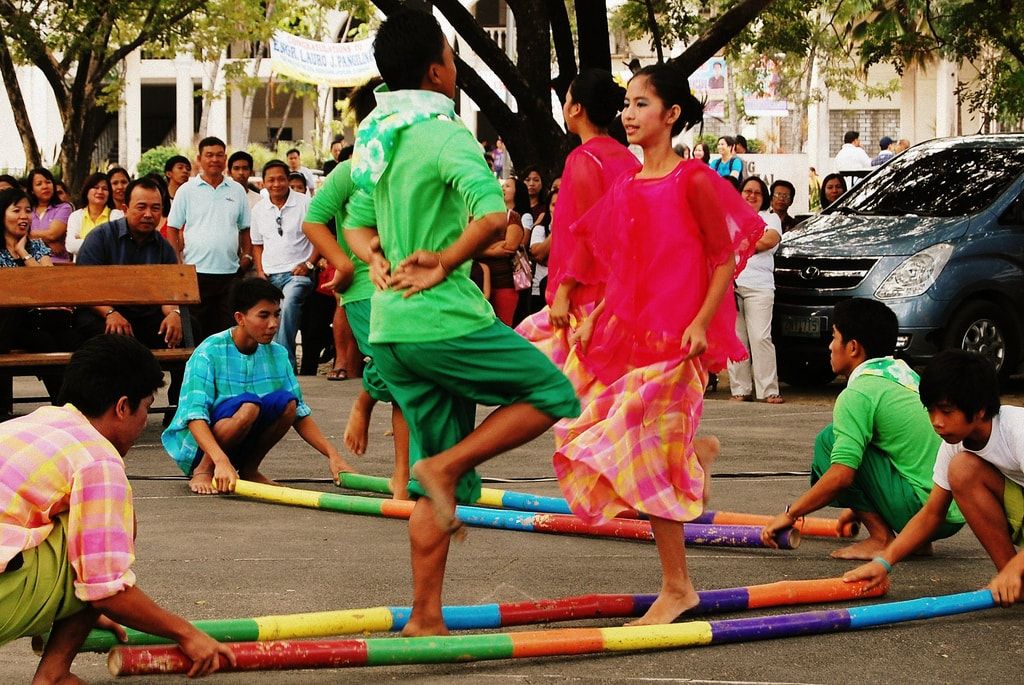 But it is the individual style that distinguishes everyone at the disco: partners change, and style is always with you.
The body as the main instrument of dance must be very plastic, responsive and emotional. Surprisingly, not all pair dance schools have a general physical warm-up. It is vital to tune the body and understand how it works.
You can always train extra and concentrate more on the basic steps, as their true value is as body work. The sequence of steps is, in fact, the simplest thing that can be in pair dancing. The quality of individual performance determines the craftsmanship.
8. Try on the images of inspiring dancers
A psychological life hack for those who have already mastered the steps, but still feel that there is not enough brightness and drive. Most are terribly afraid of being someone else's "clone". Here the action is the same as under the influence of hypnosis - the more you resist, the more you plunge into an altered state of consciousness.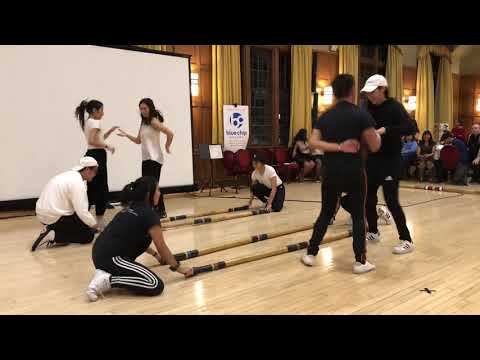
With a high degree of probability, you are already dancing like someone else's "clone". A meaningful fitting of someone else's image is that you mentally take the image of the one who inspires you (inspiration is critical in this case) and "put on" yourself. Then you start dancing and trying to feel in general how it is to be able, for example, to be the best partner or the sexiest partner in a disco. This is much more difficult than it seems. But it works extremely efficiently.
9. Dance to offbeat music
Habitual rhythms keep you tight. Tango salon or speedy timba leave little room for experimentation and fantasy. Pattern dancing is always noticeable and is reserved for beginners.
The truly new is born outside of the usual. Look for places to experiment. If there is no place, organize self-training. The main thing is not to get carried away, because music determines the style. We bring something new to pair dances, rather than trying to change them.
Search, improvise, don't be afraid to go beyond, develop in different directions, be inspired by music atypical for style
10. Try your hand at basic dance directions
dances exist according to their own non-choreographic laws.
This is the deepest delusion, which has turned into a ceiling for the qualitative development of partner dances. After all, all professional dancers, for example, in salsa or bachata, build their ideas on the basic choreographic principles.
Do not think that choreography is only applicable on stage. Any meaningful movement of the body can be choreographic. In general, try classical or modern choreography. Basically, hip-hop can work too.
11. Look for battle sensations
Pair dances return us to an active position of manifestation of our body.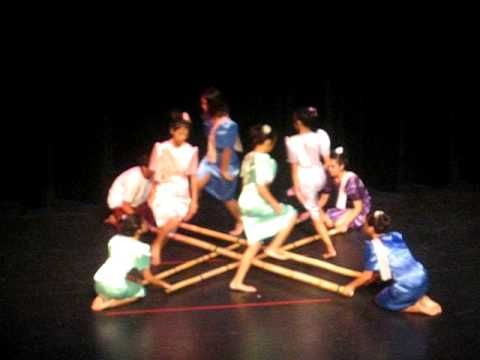 As in the days of our ancient ancestors, we impress the members of the opposite sex by how dexterous, hardy, sexy, etc. we are. Modern laws of the jungle in the entourage of large cities.
If you look around the dance floor, it becomes clear that the majority are clearly herbivores (not in the sense of vegetarians, but in relation to those around them). I am sure that predators are always more interesting in terms of the attractiveness of the image - try to find a counterbalance among herbivores, for example, a cat woman or a lion man.
The conversation is about an internal position, not about aggressiveness. Lability and lack of control are inherent in adolescents, and not in adult self-sufficient people.
Accordingly, even a training or friendly battle gives, on the one hand, practical skills - to make a bright sequence of movements, bring an idea to a climax, show a spectacular feature, on the other hand, develops the psychological basis of the dance - self-confidence, resistance to extraneous attention, self-control and self-control in complex elements.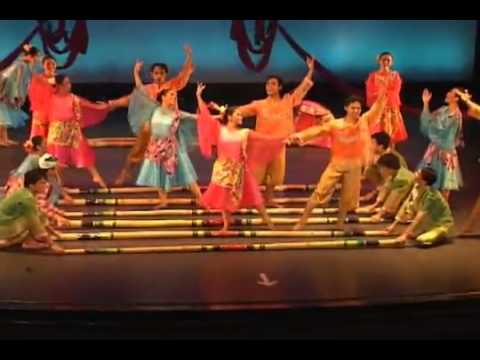
12. Communicate with professionals
The environment shapes the internal position. Basically, real passionaries of the dance community are ready to openly talk, discuss and support the development of dance in every possible way. Universal principles and the ideas they articulate have a much longer and more practical perspective than meets the eye.
Accept that, for example, behind the words "listen to your partner" is not only a beautiful metaphor, but also a practical skill to literally listen to your partner. At the same time, always treat every thought, even the most respected teacher, as a private opinion.
Your skill will lie in finding the scope of the idea even in conflicting opinions. Most often, the contradiction is speculative and the truth lies in the angle of perception or situationality.
Your dancing growth will stop sooner or later. This can happen at the level of three basic steps or years of experience in teaching and show performances.