How to build your own dance floor for wedding
How to Build a Dance Floor
Home / Latest Posts / Life / Party Ideas / How to Build a Dance Floor
By: Leigh Anne Wilkes
This tutorial will show you how to build a dance floor using 2 x 2’s and sheets of plywood. So easy and less expensive than renting one.
I shared with you in a previous Wedding Carnival post the story of our dance floor. When we decided to book a live band for the Wedding Carnival I thought we needed a dance floor. My husband did not. We have a large backyard and plenty of grass and he thought dancing on the grass would be just fine.
I am not easily dissuaded or discouraged.
I got on line and immediately started pricing dance floors from rental companies. They are not cheap, between $700-800 for the size we needed. It wasn’t in the budget so I decided I needed to get creative.
To make a somewhat long, 5 month long story short, I had a dance floor and then I didn’t have a dance floor, I had a dance floor and then I didn’t. In fact I thought I had a dance floor until the Sunday before the Wedding Carnival. It fell through – five days before the event.
Remember I am not easily discouraged so I decided we were going to build a dance floor. Or rather my daughter Cali and her friend Hannah were going to build me a dance floor (with some help from dad of course.)
By this time I had totally broken Jim down and he agreed so we headed to Home Depot on Monday night (the Wedding Carnival was Friday).
Dance Floor Supplies
- 6 sheets of 1/2″ plywood
- 30 eight foot long 2 x 3’s – cut 18 of them into two 45″ pieces (you will have pieces leftover) This will leave 12 of the boards 8 ‘ long. They cut them for free for you at Home Depot.
- Nails and hammer
- Floor Paint and supplies for painting
- Painters Tape
- 6 Mending plates to join the pieces together
How Big is the Dance Floor?
The dance floor measured 12 x 16 and was created out of 6 sections that were 4 x 8 which is the size of a sheet of plywood.
How to Build A Dance Floor
The whole neighborhood got involved or enjoyed watching the process taking place out in front of our house.
The above photo is about how involved Tessa got – she held a hammer for a photo but she was working full time so we need to cut her some slack.
- Create 6 frames from the 2 x 3’s that measure 4′ x 8′.
- Add four support pieces to each frame
- Nail a sheet of plywood to the top of each frame. Nail it down along the edges and across the support pieces.
- The moms got involved in this step of the process. Had to bring in the big muscles!
How to Paint a Dance Floor
The next step was the painting process. I decided that I wanted the floor to be checker board to go along with the carnival theme so I purchased black and white floor paint. We primed the boards first and then added a coat of white paint to each section.
Yes, I sat in a chair and watched it dry! I like watching paint dry.
After it was dry, the girls used blue painters tape to tape off the squares. The squares measured 24″ x 24″ so each 4 x 8 section had 2 x 4 squares.
Using small foam rollers the girls rolled the black paint into the taped off squares.
We waited for the paint to dry, removed the tape and we had a dance floor!
Finally, we numbered the pieces so that we knew how to put it back together once we moved it into the backyard.
The mending pieces were hammered into to hold the pieces together.
How Much Does It Cost to Build a Dance Floor
Total Cost of Dance Floor (including paint but not including labor) Approx. $300.00.
It was perfect and it was a wonderful addition to our carnival and YES, we needed a dance floor. Even my husband admits that now. It added such a fun element to the carnival and really got people dancing.
Who wouldn’t want to dance on a black and white checkerboard dance floor!!!
Reader Interactions
How to make a dance floor for an outdoor wedding
7 perfect ways to create a space for dancing at the reception without breaking the bank.
Whichever outdoor dance floor you create you must also:
- Mark out an area that is for dancing
- Offer guests in heels alternative footwear
- Check the floor is safe, even and on a flat surface
- Don’t blow too much of your budget on renting a floor unless this is a vitally important aspect of your day.
Whether the reception is in a tent, outside on the lawn or on the beach you must decide whether there will be dancing. But as everyone knows, if there’s the right music, people will want to dance. Dancing is, after all, a time-honoured way of celebrating across the world and has been for thousands of years.
So here are some great ways to make a space for dancing without spending too much.
Dancing on the beach or the grass
This is the cheapest option and a popular choice today when weddings are less formal.
There is no point cordoning off a special dancing area for a beach wedding. People will kick off their shoes and just take to the sand once the mood is right. People naturally get closer together when dancing so there will soon be an informal dance area marked out by the first few dancers.
If it’s a rustic wedding or a backyard wedding then many people will be happy to dance on the grass. But it might be a good idea to mark out a space for dancing.
How to mark out a space for dancing
Find an area of level grass and if possible have it cut short the day before. Remember to rake away any grass cuttings. Then hammer in some wooden, metal or strong plastic poles around three sides of this space. Look in hardware stores but also in garden centres for these.
Solar powered lighting for pathway and dance floor by Sursun on AmazonHang lights or lanterns between the poles. Most dancing starts at dusk so it makes sense to use inexpensive colourful lanterns that store the day’s sunlight and automatically come on when it gets dark.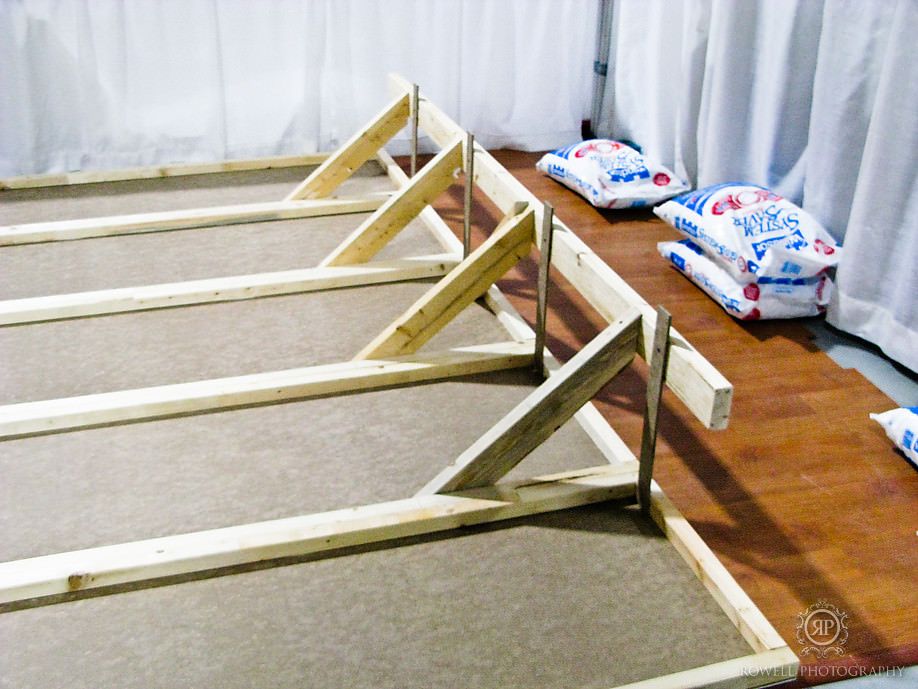
If putting in secure poles is difficult then just plant sun-activated lamps in the grass around three sides of a square. You can use these inexpensive lights to mark out a pathway to the dance area too. See some solar powered lights on Amazon.com here. And some fun flickering lights here on Amazon.co.uk.
What will dancers wear on their feet?
You will need to warn guests in advance that dancing will be on sand or grass. You can’t dance on these surfaces in heels. You can also mention that flip flops will be available for those who don’t fancy going barefoot.
Buy heaps of these in various sizes and pop them in a big basket by the dance area. Pinterest has some lovely ideas for this including cute signage.
Once guests know that dancing will be outside on the open ground they will likely decide to wear more casual and fun attire. Most will decide on sandals or flat shoes too. This will give the right vibe for the celebration and help avoid anyone twisting an ankle on or off the dance floor.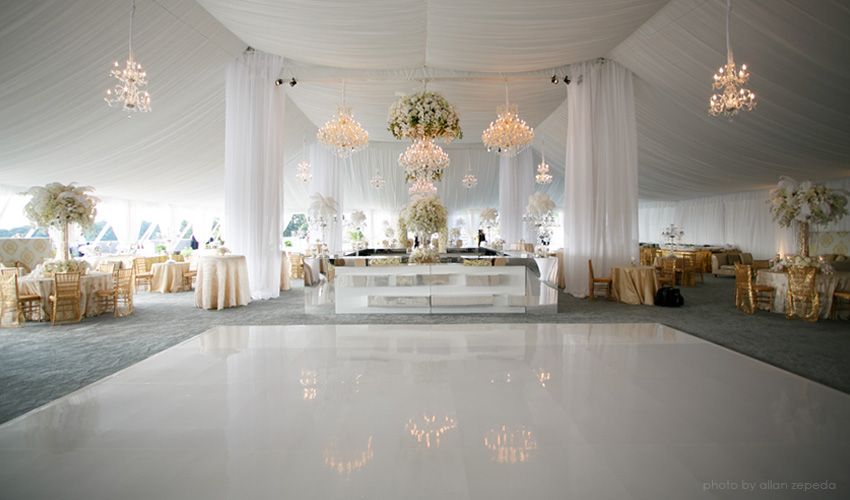
But if barefoot or flip flop dancing is more informal than you want, you’ll need to construct a dance floor.
Make a dance area with carpet
Grass can get wet as the evening draws on so you may prefer to throw a carpet over your external dance area.
Look online for cheap floor coverings made of jute or bamboo. Some cotton or synthetic woven rugs are very inexpensive too. Either get a large area rug or get a length cut off a roll. Be careful not to simply lay several rugs down across the space. Whilst you can use tent pegs (with lights next to them) to secure the outside edges of the carpet, it’s dangerous to do this for the edges where they meet up inside the dance area. Even with flat shoes you will have accidents. And if you don’t secure the covering it will ruck into folds which is even more dangerous.
You should still offer espadrilles or flip flops for dancers wearing heels though people in flat shoes will be fine.
If there is an area of concrete or a deck for example, this will make an excellent base. A wooden deck can be used as it is but a carpet will improve the look of bare concrete and make it more comfortable to dance on, even in shoes.
Whilst solar string lights strung around the carpeted area will look fun, the carpet itself will mark out the dance floor so poles are not essential.
Reuse a dance floor
Lots of people buy a wooden dance floor for their wedding then never use it again. Don’t be content with just scouring the local small ads be proactive and put out a call everywhere for a second hand dance floor. Do this months in advance because you need to attract the attention of couples before their wedding as most will simply discard their floor with all the other detritus from the reception. So ‘book in’ to collect and pay for that expensive floor the couple are considering buying. Your willingness to take it afterwards may push them to buy instead of rent.
For a rustic wedding a DIY wood floor looks perfectBuild a dance floor – full instructions
If you have someone to help you, this option need not be a lengthy task. Just remember to start it well in advance in case you run into any minor problems.
Your floor needs a solid and flat surface fixed to a supporting structure underneath to keep it off the ground. This structure will make the area even. It will look best on concrete or a deck but will also sit happily on short grass.
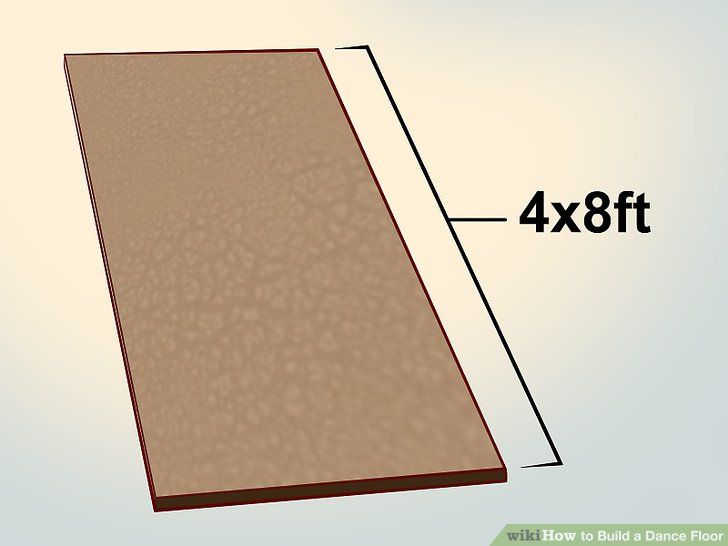
Decide on the size of your finished floor then buy sheets of ½ inch plywood to fit this size. The store will cut them to exact size for you so don’t even consider doing that yourself! Plywood is often sold in 4×8 foot sheets so a floor of 16 x 12 feet can be made just using 6 whole sheets. This is the solid top surface for each of 6 ‘blocks’ which will be put together to make the floor.
For the support underneath you need to create a box structure under each sheet of plywood. You can make these from lengths of 2×2 inch timber. These are often sold in 8 foot lengths. You will need a piece of timber to go around each side of each plywood ‘block’. Then add two more pieces to each block to reinforce them. For each block you will need two pieces of 4 foot timber (2×2 inch) for the short edges plus four pieces of 92 inches each for the long edges ( they are shorter than the side because they need to be screwed or nailed to the timber along each short edge.) Use the two extra lengths of 92 inches to fix across lengthwise inside the block to spread the load when people are dancing.
Explain to the store how you are going to use the 2×2 inch reinforcing timber so the person cutting them knows why some are shorter.
Nail or screw the reinforcing structure together so you have a box shape with two extra struts inside.
Once you have the blocks in position on the lawn nail the plywood on top all around the edges and down the line where the reinforcing struts are.
You can get small mending or fixing metal plates with gripping teeth on them which you can hammer across the joins between the blocks to hold them together. Do this last of all as they will start to come out if you lift or move the floor much.
Ensure the nails on the top surface are very flat against the plywood so nobody catches a heel on one.
Finish the plywood with two coats of floor paint. Then a third coat can be just for decorative effect such as circles or a name. If you want to have a chequerboard effect then use painter’s tape (masking tape) to make the crisscross design and paint alternate squares with the top coat. Use the same tape method to make stripes or other straight-edged designs. You can also buy fun decals then varnish over them.
DIY a simple dance floor
If building a floor looks like too much work you can simply lie a flat board across a flat area of short grass to make a quickie floor.
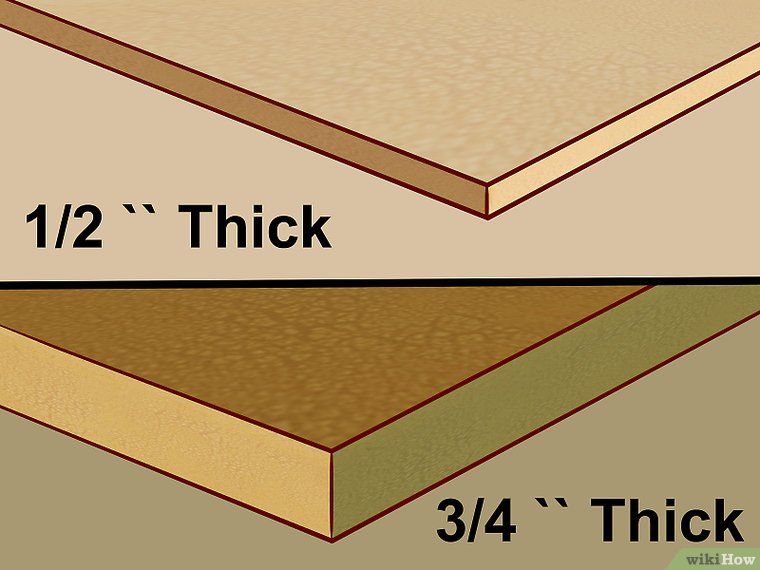
You will need ¾ inch thick MDF which all builders merchants and most hardware stores sell. But be warned, MDF is very heavy so get it delivered.
Never leave wood and never never leave MDF sitting where it can get wet. Buy a tarpaulin or strong waterproof cover, not just a decorator’s roll of thin plastic sheet.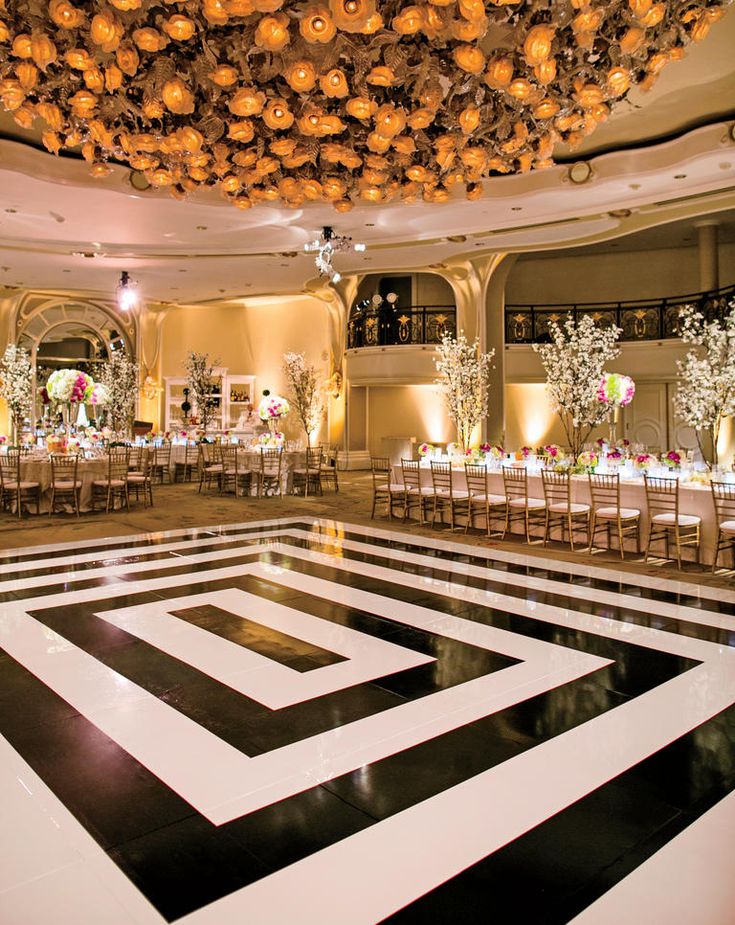 Cover the MDF completely if you cannot keep it indoors until the day.
MDF can be painted or stained and finished with a transparent PVC glaze to help it stay looking good all evening. You can apply gorgeous decals on the super flat surface too.
It won’t last for very long as it will probably get a bit damp from the grass but it is an inexpensive and quick solution. Make sure to use as flat a surface underneath it as you can.
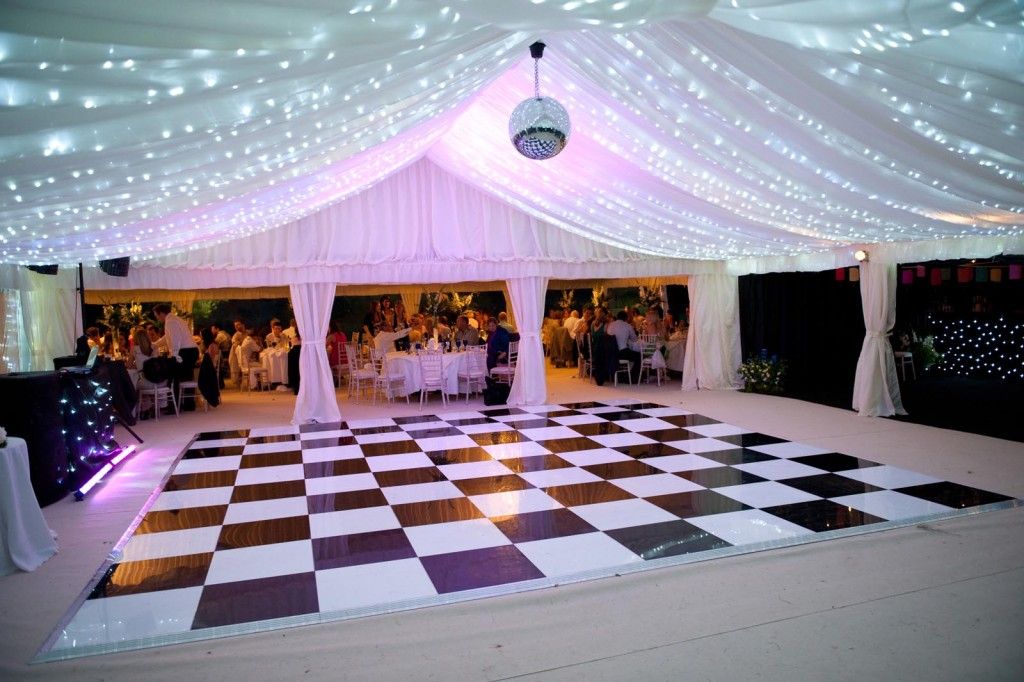
Make a good-looking wood floor for inside a tent or marquee
Your tent may have a plastic sheet as a floor or hessian or just plain grass. Non of these are ideal for dancing in heels. But you can put down a sheet of plywood or MDF and cover it with wood effect laminate. These thin sheets of wood or wood-effect plastic click together to make a solid surface. They will need to be glued or nailed down to the plywood. If the plywood is sitting on a hard surface such as concrete you can put a layer of foam, carpet underlay or carpet under the plywood.
You may find that your tent floor is flat enough for you to lie the laminate straight on top. If you do this you must use heavy duty tape round the edges to stick the dance floor to the tent floor.
Construct a decking area for dancing
This does not need to be well finished at the edges – which is usually the most time-consuming part about creating a garden deck. Just buy boxes of decking that click together and place them on the flattest place you can find. They will be finished, stained and smooth so no need to paint or glaze. You may be able to reuse the blocks for a garden or advertise them for others to use. Here are best rated decking blocks on Amazon.com. And wood decking tiles on Amazon.co.uk.
DIY wedding decorations: hand-made in high esteem!
The idea of decorating a wedding with your own hands is becoming more and more popular among economical and creative brides! And it's not about you taking on your shoulders all the work of a florist-decorator, because in the status of a bride you already have enough worries. But to make a separate decor: decorate chairs for a banquet, make decorations for tables or arrange a photo zone, and even make a wedding wreath yourself if you wish, you can easily. Because you have YesYes , the most inspiring and helpful wedding site.
Handmade wedding decor is not always cheap, but definitely memorable, and if you are pleased with the very idea that you have invested in your holiday not only a piece of your soul, but also literally - labor, then this article is for you!
Why do-it-yourself brides choose
Savings
Undoubtedly, you have every chance to significantly reduce your wedding costs by using ideas and tricks from the Internet in decorating the banquet hall and involving relatives and friends instead of hired help workers!
But don't forget that handmade takes time, often more than you expect.
And you just can't cope with grandiose ideas. That is, by choosing simple ideas or something in which you already have experience, you will enjoy the process, you can be proud of the result and, of course, the money saved, but complex undertakings are likely to lead to additional costs and stress, and also absorb all your free time. time. Save wisely!
Time frame
It may happen that you do not have time to order wedding decor from professionals with a busy schedule, or vice versa, you still have a lot of time before the date of the celebration and you thought, why not do everything yourself. So, before you start planning a trip to the store, we suggest you find out if you really have time to do voluminous and time-consuming things. Make a list of all the things you would like to create for your wedding and then see how long each item will take. Be realistic, overestimate the time it would take in theory. It’s better to leave only those ideas that you can definitely fit into your schedule and that are not difficult to excel at.
If you are determined and ready to give up your free time, then go all the way. Maybe it would be a good idea to arrange a bachelorette party in the format of a handmade master class and call on your girlfriends for help. More fun together!
Pleasure and creativity
In the midst of the stress of wedding planning, it's nice to spend time relaxing and being creative.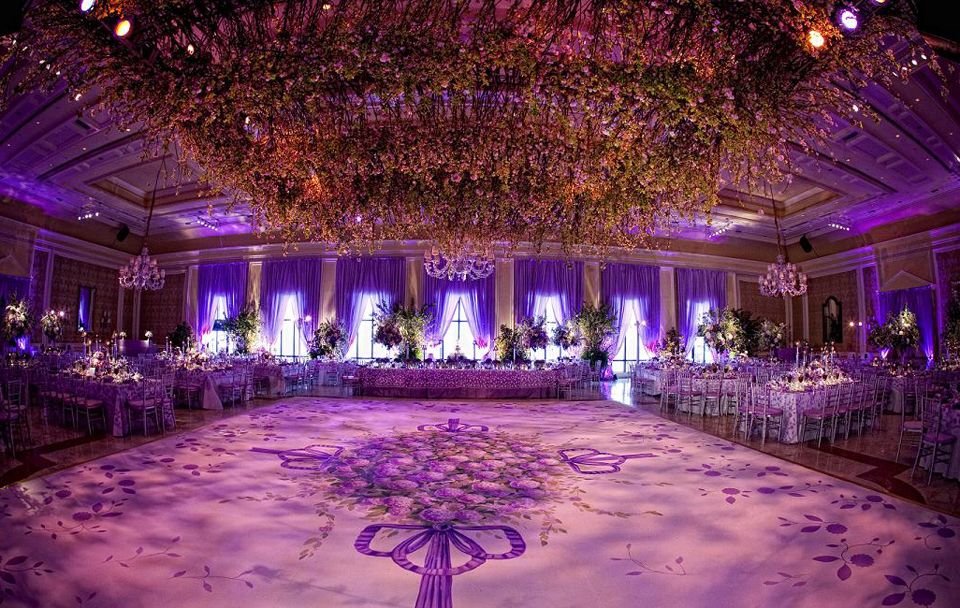 There's something almost therapeutic about the way you take your attention away from all the other wedding chores and stresses while concentrating on one task - decorating the banquet hall while listening to your favorite music or TV series, handwriting wedding invitations, or pouring honey into miniature jars for compliments to guests. The perfect escape from the craziness of everyday life and wedding planning.
After all, doing something with your own hands is not just about saving money! If you're into creative pursuits or have always wanted to learn how to make your own, your wedding could be the perfect opportunity to hone a new skill in floral decoration or icing on your wedding cake, for example.
However, if you're not very creative and decide to take on a few things just because needs , there's a very good chance you won't like it and it will only add tension to your wedding planning.
YesYes advises:
1 Plan ahead and make sure you have the time to implement your wedding ideas with your own hands, and this will not prevent you from continuing your list of must-do wedding things.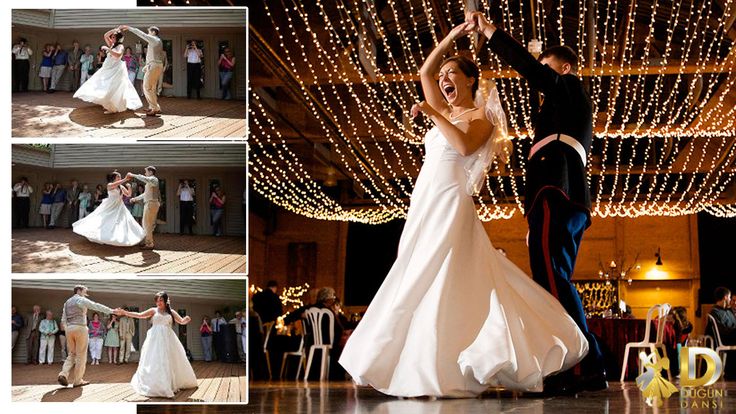
2 Use your abilities! Do you have beautiful handwriting? Hand sign wedding invitations. Do you have to create in the kitchen? Prepare gingerbread as wedding favors. You don't have to be a carpenter, a baker, and a calligrapher. Instead of burdening yourself with tasks you're not skilled in, show off the talents you have.
3 Don't take on everything at once. It may sound impressive to tell your wedding guests that you made your own cake and decorated the tables with flowers and ribbons on the chairs, but if you're too tired to light up the dance floor for your (however beautiful) wedding, it's not worth it!
4 Before purchasing materials for 100 banquet hall decorations, make a trial layout to make sure you can save time and money in the long run.
5 Feel free to combine DIY decor with professional services.
6 Browse wedding websites and repositories for free mockups for invitations or fun labels, stickers, prints to use in decor.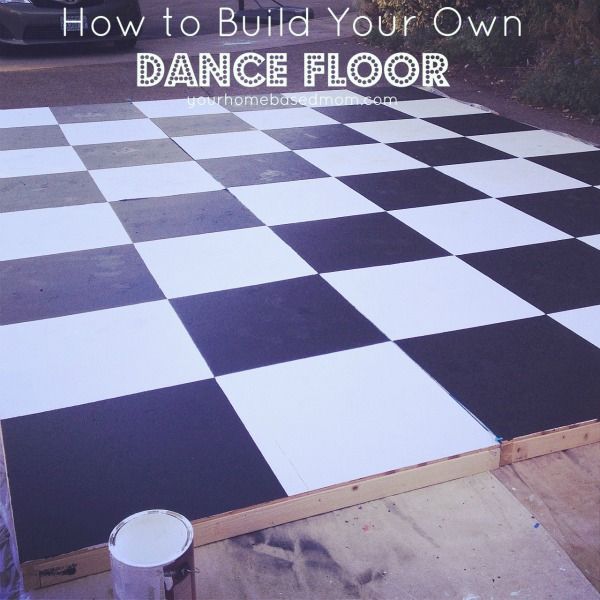
7 Don't procrastinate, I decided to start. You don’t want to pack presents for guests on your bride’s morning, do you?
8 Don't forget the cost. Many couples choose the DIY option to cut down on pre-wedding costs, but all too often they end up spending twice as much. Make garlands? All you need is paper and tape. Calligraphic background? Sheet, ink, brush (and a very steady hand!) But if you're aiming for something grander, you will need tools besides materials! Are you ready to invest in an expensive laser cutter or glue gun that may never be used again?
9 Remember, there is no shame in turning to professionals if you did not manage to realize your idea with dignity, as you saw it on Pinterest, for example.
Whatever you do with your own hands, you will always remember it with a smile and love. But don't forget that no one expects you to do everything for the wedding yourself! With your own hands, do only what you really like!
What can you do for a wedding with your own hands?
We in YesYes think almost everything! And we just have no right to limit your imagination! And in order to inspire you, we have selected a few handmade wedding ideas successfully implemented by brides for their holiday.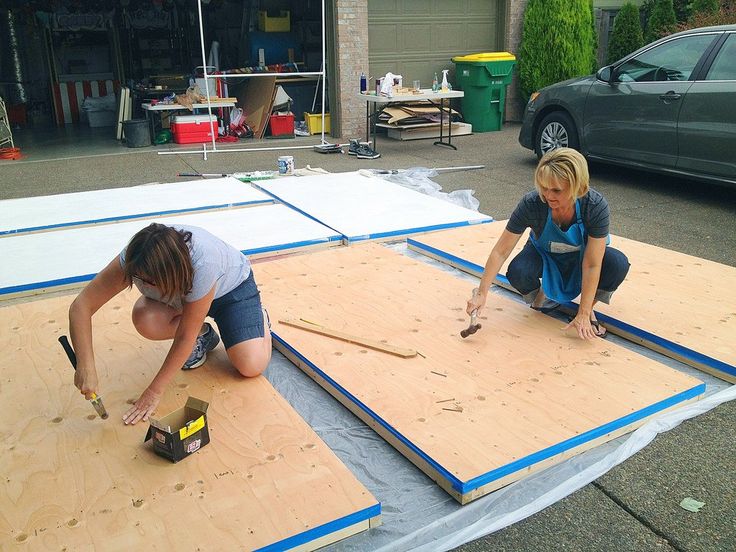
Decorating with feathers the place of the wedding ceremony or the dance floor
Just look at these floating feathers! Light, airy, they themselves fill the space with a romantic mood. And with the help of glitter paint, you can add glamour, festivity and shine. The most difficult thing in implementing this idea is to hang feathers under the ceiling, we think you will be able to find yourself an assistant with a stepladder.
Hanging bouquets for decorating chairs or halls
Even if you are not a florist at all, you can handle small bouquets. And so that the flowers keep their fresh look and sweet aroma for more than one hour, place the bouquets in mini-vases with water. As a container, you can use half a liter jars, decorated with lace and twine. Nothing complicated, right?
Decoration of a candy bar with an arch of balloons
Balloons - if this is not a classic, then one of the most affordable ways to decorate a holiday for sure.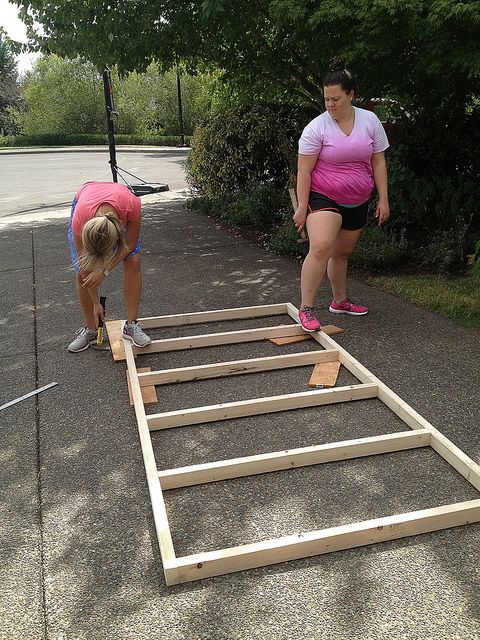 Helium balloons look great with metafan braid and an unusual print. But if you're looking to save money, we've got a colorful balloon arch idea for you. It is not at all difficult to make it, but for beauty it can be supplemented with fresh or paper flowers. DIY wedding decor is ready!
Floral arrangements for banquet tables
Banquet tables, according to the Western wedding tradition, are usually decorated not only with a variety of appetizing dishes, but also with no less diverse decorative elements. These can be vases with floating candles or openwork candlesticks, floral arrangements or thematic surroundings like old framed photographs, stacks of books tied with a ribbon, wooden and porcelain figurines. But most often, brides prefer floral arrangements, and deservedly so. YesYes found an idea for you to decorate your banquet table with flowers without a vase! We hope you enjoy!
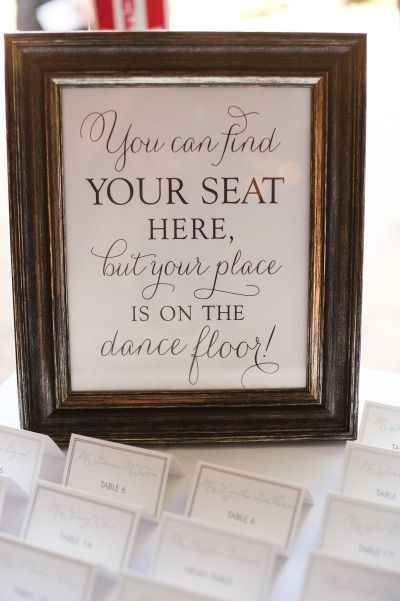
Seating plan and name cards
Not just a decorative element, but a very useful element! Especially if you are expecting more than twenty guests for your celebration, the seating plan and name cards will help everyone navigate and easily find their own place.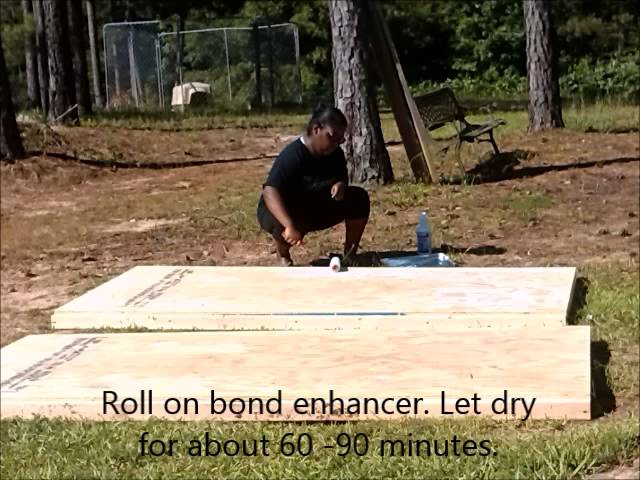 Not ready to spend money on printing? Then stock up on cardboard of a beautiful color, scissors and an ink pen. Believe me, each of your guests will be pleased to see their name handwritten by the bride.
Decorations for chairs for guests
It would seem, why decorate chairs when all the beauty is left behind. But that's just how it seems. Much, of course, depends on the seating scheme you choose. But even more important is the integrity of the design, when attention to detail makes the picture complete and perfect. Now imagine how the guests just enter the banquet hall, examining the space with admiration and interest. Moreover, decorating chairs is easy!
Paper garlands, pompoms and other handmade items to decorate the wedding photo zone
Modern wedding without a photo zone? No, you haven't! Your guests need beautiful photos for social networks and for memory no less than you! And don't be upset if your wedding budget doesn't include an extra $5,000 for that.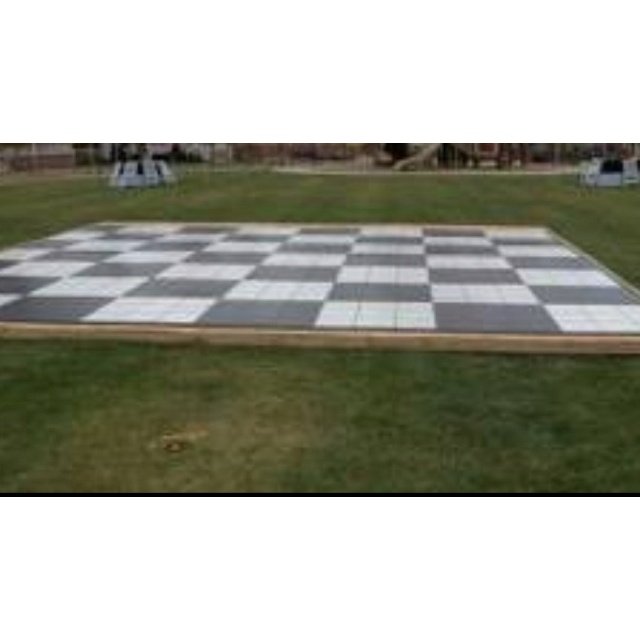 Paper garlands, voluminous pompoms, corrugated cardboard circles are not difficult to make, but they look spectacular! Get inspired and keep going!
Unusual banquet room lighting
Even classic New Year's garlands will help decorate a wedding holiday, creating coziness and intimacy. But if you feel the strength to be creative, feel free to create! From unusual candlesticks made from improvised materials to beautiful lampshades - the decor made by you personally will bring light and warmth. The perfect solution for a wedding with friends and family.
Decoration of gifts and compliments for guests
Handmade soap is only at first glance a very troublesome and time-consuming task. You will need: desire, imagination, quite a bit of time and a set of ingredients (solid baby soap, glycerin soap, sunflower and any essential oil). Making soap with your own hands gives free rein to your creativity.
Jam or jam made by your own hands, poured into small jars, with an elegant label on which you can write words of gratitude to the guests.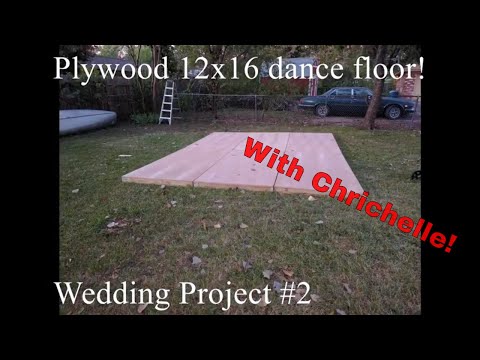 And attach a jam recipe to a jar - and success is guaranteed.
Bake cookies or make sweets - truffles, chocolate hearts or medals with inscriptions (your wedding date, your names) and put these delicious treats in a small decorative straw basket woven by yourself. Such a compliment will cause guests not only delight, but also respect for your culinary talents.
Wedding invitations
To touch your family and friends with such pleasant news as the news of your wedding, and invite them to share the celebration with you, it is not at all necessary to contact the printing house. A few lines written from the bottom of your heart by your hand will definitely make an impression! Blanks for invitations are already waiting for you in the "All for Creativity" shops, and if you wish, you can decorate them with lace, beads, clippings from postcards and photographs. Feel free to be sentimental!
The purpose of our article was to captivate you with the idea of hand-made at your wedding! You see, it is not at all necessary to have a limitless budget and invite high-class decorators to make the holiday beautiful.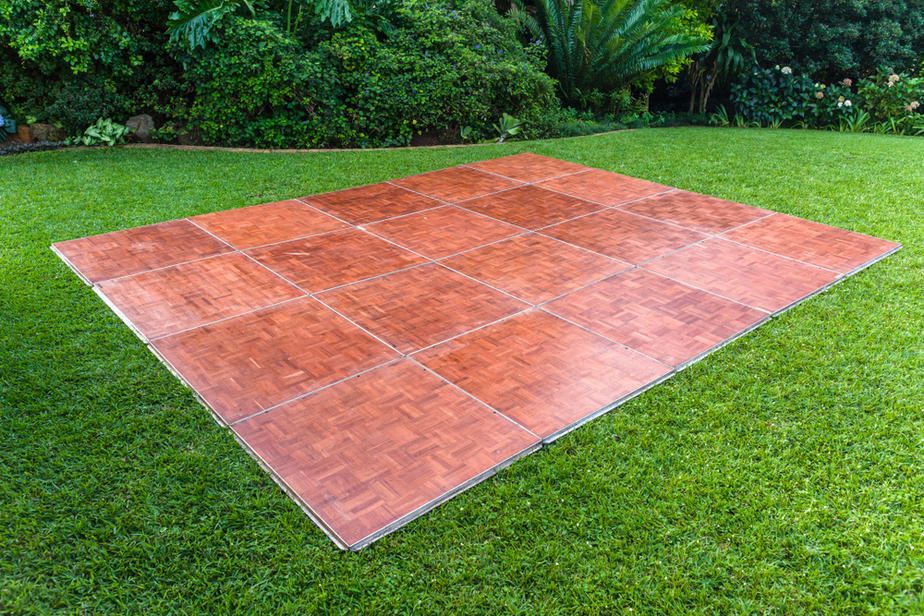 And creating decor with your own hands will be another precious memory of preparing for the most important day for your couple!
wedding decor and decoration, workshops, ideas and photos
Contents
- DIY wedding decor
- How to make your own wedding decorations
- Banquet hall decoration with flowers
- Decoration of the hall with fabric
- Original Jewelry Ideas
- Wedding table decor
When planning a wedding, the newlyweds are engaged not only in the selection of outfits and wedding rings, but also think through organizational issues related to the design of the celebration. Currently, there are many agencies involved in the creation of wedding decor, but the cost of their services is quite high. We suggest doing decoration event independently.
Do-it-yourself wedding decoration
Instead of having to order wedding decor from the organizers who charge a high price, newlyweds can decorate their wedding on their own.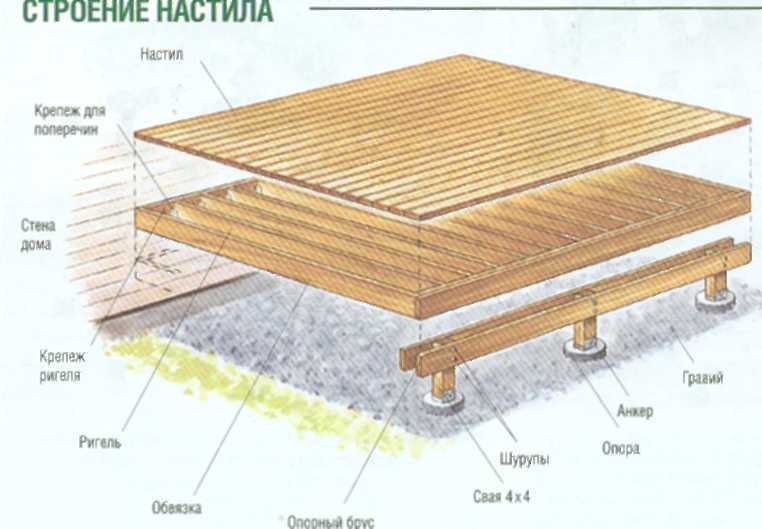 This issue must be approached with maximum attention, because often it is the nature of the wedding design that determines the success of the event.
Do-it-yourself wedding decoration: choosing a style
What needs to be done to make the banquet hall, dance floor, welcome area look harmonious? How to decorate all this yourself? To get started, consider the following details, if necessary, review the master classes (mk) on the network:
- Choice of wedding style. Despite the fact that the classics are always in fashion, many couples dream of having a wedding of a certain theme. The most common style is rustic, boho, Provence. Stylistic decisions are reflected in the outfits of the young, which should look harmoniously against the general background of the banquet room. In order for your holiday to be perfect, you need to decorate the hall in accordance with the general theme of the event.
- Color range. The most important factor in a harmoniously designed room is the color of the decorations, curtains and table decorations.
 The most commonly used standard wedding colors are white, pink, and lilac. Any pastel shades will be a good solution, but the implementation of original ideas involving the use of bright colors should be approached with caution.
 - Choice of fabrics. Fabric is used as the main material for self-decoration of the wedding. In this case, it is important to choose the right material and color of textiles. In addition to capes, tablecloths and other fabric elements of the banquet hall, textiles can be used to make kanzashi.
How to make wedding decorations with your own hands
Wanting to save money on wedding decoration, newlyweds can make decorations with their own hands , bringing to life original ideas. Decorative elements of the premises for the wedding are most often represented by the following products:
- Decor elements made of paper. They are represented by stylish cards on the tables that determine the places for guests.
 Corrugated paper makes lush flowers and bright garlands that adorn the columns, if any in the building.
 - Jewelry from beads and beads. Beaded items will look especially good at a themed wedding. Using the bead jewelry patterns suggested in the Internet master classes, you can create original hand bracelets for the young yourself or make beautiful little things for the guests of the holiday. For themselves, the newlyweds should purchase jewelry, for example, elegant bracelets.
Bracelet, SL (price on link)
- Fabric items. In order for the banquet hall to turn into a fairy-tale castle decorated with airy fabrics, decorate it with organza and tulle. Flowers from tulle often decorate the cars of the participants in the celebration. Pet owners who want their pets to take part in the celebration dress up their pets in organza bows. Decorations for animals from fabric ribbons are also relevant when the pet is a living gift to future spouses.
DIY wedding photo
- Foamiran crafts.
 Foamiran is this specific foamy material that allows you to create real works of art. As part of the holiday, foamiran is useful for decorating tables and making artificial bouquets and decorating brooms.
Festive decorations made from improvised materials can be used not only for the direct decoration of a solemn event, but also as gifts for guests. Handmade trinkets are packed using special paper or by sewing small bags; you can also decorate the box yourself.
Decoration of the banquet hall with flowers
Fragrant flower bouquets placed on tables and in floor vases are considered to be a traditional wedding attribute. When choosing flowers for a wedding, pay attention to the symbolism of the plants used. For example, the scarlet rose is universally recognized as a symbol of love and passion, while the lily symbolizes purity and luxury.
However, the purchase of fresh flowers will cost young lovers a round sum. To save money, you should use live plants only to a minimum:
- decorate the festive table with orchid petals;
- place small fragrant bouquets on the tables;
- rose petals look stylish in combination with small candles in glass holders.
DIY wedding decor photo
Bigger ideas can be made with artificial flowers . Unfortunately, most people associate artificial plants with mourning. The way out of the situation will be modern products made from materials that are as close to reality as possible. Gentle foamiran compositions, decorated with rhinestones, beads and sequins, look gorgeous.
Ways to use artificial flowers in the design of a banquet hall for a wedding:
- creation of a flower arch under which the newlyweds pass;
- railing decoration if the room has a staircase.
Floral style will create a special atmosphere for the event. However, avoid using cheap plastic flowers. To harmoniously decorate the hall with flowers, both live and artificial plants should be used.
Decorating the hall with fabric
Drapery with fabric is an excellent way to decorate a wedding venue. The choice of material is carried out according to the theme and style of the holiday. So, heavy satin fabrics are suitable for serious events, and tulle will decorate a romantic holiday.
We offer some interesting ideas for decorating the wedding hall:
- Decorating the newlyweds' place in a nautical style. To do this, you will need fabrics of the appropriate colors: blue, white, blue. The main background will be a light drapery, on which a wave of blue fabric is hung. The table of the young is decorated in the same way.
- Chair decoration. The simplest option for decorating places for guests is to decorate chairs with tulle. You can wrap the fabric around the chair chairs and secure it with stylish ribbons. The color scheme of the capes should match the overall tone of the event. Ribbons can be contrasting, but if you are afraid to make a mistake with a shade, use a rim in the same color as the tulle.
- Drapery lighting. An original solution would be to use electric garlands located under a sheet of light translucent fabric.
 Depending on the overall tone of the wedding, colored light bulbs can be used, but a classic white garland is a win-win. The downside of the idea is that its implementation involves only a darkened room.
The use of fabric as a decorative element will give the wedding space a stylish design
It is enough to choose harmonious color combinations and materials.
Original Decoration Ideas
Many wedding decoration ideas can be obtained from experienced decorators. We have chosen the most original solutions that will allow you to hold an unforgettable celebration that guests and newlyweds will remember for a lifetime:
- Use hanging pots. A common design trick with helium balloons can be replaced with hanging planters. Of course, flower pots cannot be placed on the entire ceiling. Flowers are hung over the tables of the guests, while the pots should not be too high. Flowers can be both artificial and real.
 The plant should beautifully descend from the edges of the pot for a long distance.
 - Collages of black and white photographs. By decorating the walls of the hall with black and white photographs, you will give the event a special style. These may be old family photographs. If your family doesn't keep photos, use pictures of couples in love from the 60s and 70s.
- Making your own garlands . For this purpose, it is best to use paper. You can make a garland of large flowers or triangles. In the process of decorating the hall with garlands, the most important thing is not to overdo it.
DIY paper wedding decoration photo
The holiday can be decorated according to the season, the interests of the young, etc. If you want to create a unique wedding decoration, use your imagination.
Wedding table decor
The largest amount of space at the banquet is occupied by the festive tables of guests and newlyweds, so in the process of decorating the wedding hall, you need to focus on them.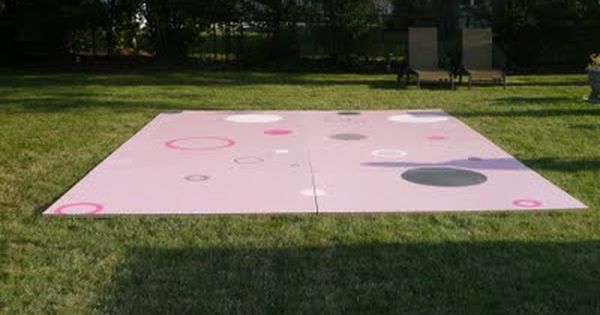
Use the following ideas to decorate the festive tables at the wedding with your own hands:
- Using fabric . The main decorative element of the table is the fabric presented in the form of a tablecloth and additional drapery. To stylishly decorate the surface of the table with fabrics, you need to choose dense fabrics in contrasting colors. For a flowing drapery, you will need tulle, slightly pulled together with a thread at several points.
- Table decoration with flowers . It can be small compositions, hanging pots, scattered petals.
- Original cutlery and napkin supply . For example, origami allows you to create unusual shapes from napkins. The dishes are decorated with ribbons, tied with a bow.
- Carving dishes . Food at a wedding should be not only tasty, but also beautiful. Carving workshops will teach you how to carve real works of art from fruits and vegetables that will decorate your wedding feast.