How to sew in a headpiece for dance
How to Secure a Costume Headpiece
dance headpiecePosted on by parmarishel
By Parma Rishel 2/13/2021
Imagine the embarrassment of having your headpiece fly off while you are dancing. It’s distracting and even dangerous for the other performers. The audience’s focus moves to the headpiece lying on the stage.
All performers must learn how to secure their costume headpiece. Continue reading to learn how to confidently secure your headpieces.
Styles of Dance Costume HeadpiecesPerformance headpieces are wildly different. Some are simple scrunchies, appliques, or just a strip of fabric. Others are made on a headband, barrettes, or combs.
Dancers may also have hats or masks to wear as part of their costumes. The weight and height of these head adornments can vary.
Methods for Securing Costume Hair PiecesNever rely on barrettes or elastics the come on the hairpiece. As soon as you do, the “headpiece fairy” will come and rip it off your head.
If your headpiece is a strip of fabric, applique, scrunchie, or bow, use plenty of bobby pins and hair spray. After putting it in place, use bobby pins whose color doesn’t distract from the costume piece.
You may wish to use strong-hold hairspray on the hair first to crease a stiffer texture. This helps ensure that the hairpiece will stay in place.
HatsYou must know if the hat stays on the head throughout the dance. If the choreography calls for the hat to taken off and put on, then you don’t need to attach it.
There are several approaches to securing hats. For soft-sided hats, cut a small hole in the sides and back. Then use bobby pins to attach it to the hair. Another option is to put an elastic strap on it that’s worn under the chin.
Staining white elastic with tea or makeup helps to hide if from the audience.
HeadbandsHeadband style headpieces can present a challenge.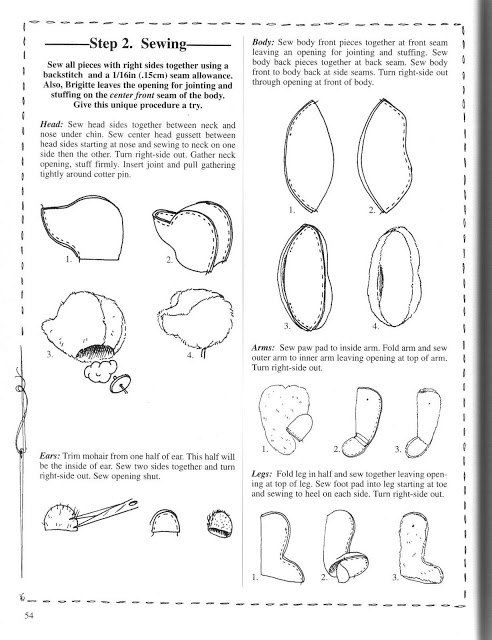 There are several approaches to try. One is to glue a ribbon inside the headband. Leave spaces where the ribbon isn’t glued. This will allow you to use bobby pins to hold it in place.
Another method is to integrate the headpiece placement into the hair bun process. Here are the simple steps to follow.
1. Glue or sew a piece of elastic to the ends of the headband so that it fits the head. If the headband “pokes” into the dancer’s head, you can glue some felt or foam to make it softer.
2. Hot glue a small loop of 1/4″ elastic at the top of of the headband. Put bobby pins through this loop going in opposite directions to secure the top of the headband.
3. Divide the back half of the hair and place the upper part in a ponytail.
4. Place the headband on the hair with the elastic across the back of the head. Pin the elastic band with bobby pins. Spray extra-hold hairspray over bobby pins.
5. Pull the lower half of the hair up and join it into the ponytail. This covers the elastic and helps secure the headband.
6. Finish making the ballet bun.
One of the best times in a dancer’s life is the performance. You have a chance to share your passion with an audience. Don’t let a costume headpiece falling off ruin your moment.
Dance for Joy Dancewear is your source for dancewear needs on the Mississippi Gulf Coast. We stock tights, nudies, soft ballet shoes, jazz shoes, and lyrical/contemporary shoes. You can also order other dancewear to meet your individual fashion and dance needs.
Shoe fittings are provided by a professional dance teacher with 15 years of teaching and over 30 years of dance experience. Check back frequently for more articles about dance. Contact us today for any questions or to place an order.
costume headpiece dance headpiece keep dance headpiece on secure headpiece
DIY Sparkly Dancer's Hair Clip That Doesn’t Fall Off! Perfect For Dancers :)
What accessories do you wear with your dance costume? 🙂
In the last couple of posts, I showed you how I’m decorating this costume, and I wanted to make a matching hair accessory.
So here’s a cute and easy hair clip to make, and the best part is, it won’t fall off even if you shake your head, which makes it perfect for dancers to wear! Let’s get started! 😀
To make this sparkly star flower hair clip, you need:
Applique – This is from my DIY Applique Kit, and you can get yours at SparklyBelly.com/shop, but you can use any applique you like for making this hair clip. The one I’m using here is about 10cm x 10cm (4in x 4in).
Hair clips – You need hair clips with little combs like ones often used for hair extension clips like these (affiliate). You need about 2-5 depending on the size of your applique.
Matching colour felt – same size as your applique
Fabric glue
Matching colour thread
How to Make a Sparkly Dancer’s Hair Clip
First, trace the applique on the felt, and cut along the lines.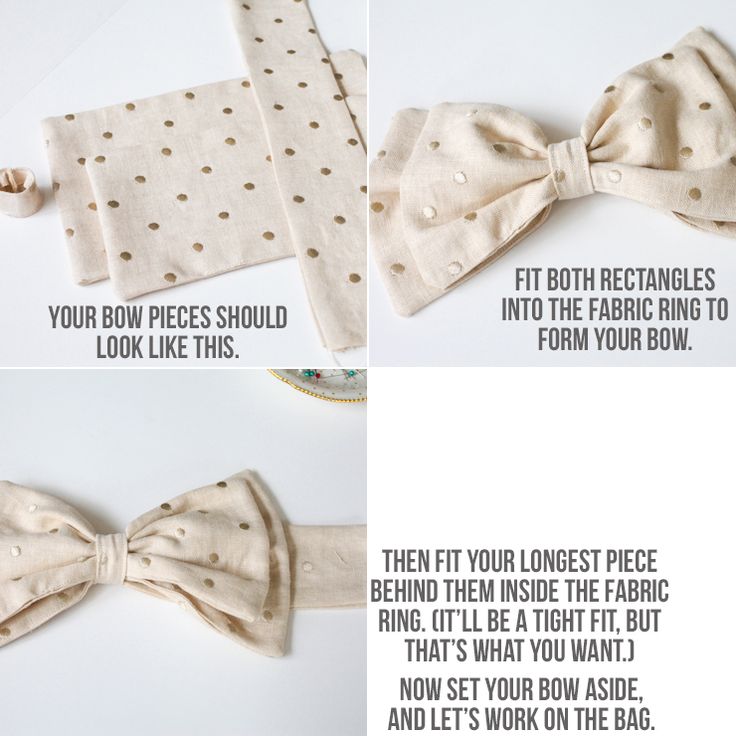
Then hold the felt with your applique, and place it on your head to see how you want the applique to sit on your head.
I find that the comb clips stay the best when they’re placed not in the same direction as the flow of your hair but perpendicular to the direction of your hair. So for mine, I want to wear it like this, so I should attach one of the clips this way.
And attach another one opposite from the first one like this.
On the felt side, place the clips and mark the positions with pins or you can even draw marks.
Leave the applique aside, and stitch the clips onto the felt using the holes of the clips.
When you stitch, make sure the comb side of the clip is facing you. So when you open the clip the comb comes out and grabs your hair.
Once the clips are sewn onto the felt, take the fabric glue, and glue the felt onto the back of the applique and wait 24 hours before you start wearing it. If you don’t have fabric glue, you can stitch around the edges to sew the felt backing to the applique as well. If there’s a little felt backing peeking out, trim the excess.
And now your hair clip is ready to wear! It’s really easy to make and creates a complete look with your costume. And the comb clips really grab onto your hair, so it makes a perfect hair accessory for dancers!
Hope you liked this sparkly dancer’s hair clip tutorial, and if you did, please share it with your troupe members as your next costuming idea!
In my next video, I’ll continue to decorate this costume, so stay tuned by subscribing to my channel or signing up for my newsletter below! 🙂
Click here to sign up for Sparkly Belly newsletter! (Bonus: you’ll get access to my free course, Belly Dance Costume Making 101! :))
Oh, and if you want to try making this applique, this design is still available at SparklyBelly.com/shop. Check out other designs too and find your favourite while you’re there!
Thanks for reading, and keep sparkling!
P.S. Pin this image for your future projects!
Like what you read? Want to make more costuming bits yourself?
Sign up for my newsletter here and get my free email course, Belly Dance Costume Making 101!
How to sew a beautiful headdress with your own hands - DIY - May 4 - 43169481932
Every woman can sew a headdress with her own hands. Surprised? Look for patterns in the article, create original products and give them to your near and dear ones.
Many women did not even think about the fact that you can not buy a hat, but sew it yourself. This is easy to do if you have a pattern. Below we offer master classes on sewing different hats.
Make such a product for yourself or your loved ones as a gift - they will be happy.
Sew a beautiful headdress with your own hands - for children, in the form of a scarf: pattern
What is made by mother's hands is done with love. The kid will be happy to wear a hat sewn and decorated by his mother's hands. You can decorate the headdress to your liking, showing imagination: lace, embroidery, appliqué and other decor.
Hat with bow
Materials needed:
- Knitted fabric measuring 1.5 meters by 30 centimeters
- Threads to match the fabric
- Pins
- Decor elements or some fabric to create a bow, as in the photo
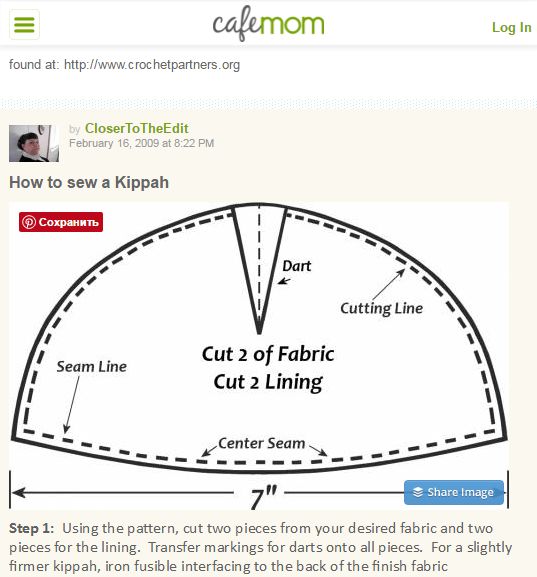
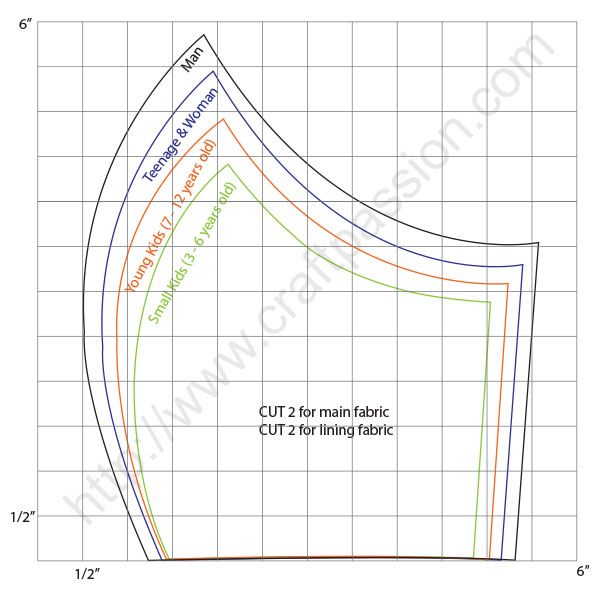
The hat will consist of two layers. The size of the pattern is suitable for a child 5-9 years old, for a head circumference of about 48-50 cm. Here is a pattern:
DIY pattern for a children's headdress
On each side, add 10 mm for the seams, and on the wedges it is enough to add 7 mm. Now cut out the pattern from the paper and transfer it to the fabric.
- The pattern is applied and drawn on the wrong side.
- Cut with seam allowances.
Cut out and cut out piece
- Sew the top first - connect all the wedges.
- Then fold the cap in half and pin the sides together.
- Sew the side of the resulting part.
- Then open and sew the inside of the hat in the same way (do not sew the side of this part).
- The inside will be slightly smaller. This is necessary so that it goes well into the outer part of the cap.
- Don't worry if the hat is too small as the size is determined by the inside part.
Turn right side out
- Now insert the inside of the first piece right side up.
- Secure the edge with pins and sew inside out.
- Turn sewn pieces right side out.
Sew the body and lining
- Sew the inside seam with a blind stitch. The hat is ready.
Now it can be ironed and worn. But you can also make an interesting decor in the form of a bow, embroidery or appliqués. The bow is easy to sew:
- Cut a 20x5 cm strip from the fabric from which you sewed the hat.
- Sew from the inside, leaving one edge unsewn.
- Turn right side out. Sew the left edge with a blind stitch.
- Use the same fabric or a different fabric to make a ribbon and tie a bow.
- It remains only to sew the bow in place. Ready.
Headdress for the summer in the form of a scarf
For the summer, a baby can have a headdress in the form of a scarf. Its advantage is that you do not need to suffer with strings, it sits well on the head, it is comfortable.
Headdress for the summer in the form of a kerchief
Pattern of such a kerchief. For its tailoring, you will need a little chintz, a small piece of linen gum.
Pattern for a headdress for the summer in the form of a scarf
Work steps:
- Overlock all details with an overlock or other seam.
- Sew 2 cut rectangles inside out along the long edges. Turn right side out and iron.
- Make 2 rib pockets in the middle: back off from the edge 1 cm at the beginning and do not finish sewing to the end of 1 cm. Fold 1 cm inward at the narrow edges and iron.
- Sew on 2 x 4 cm elastic bands. To make it easier to attach the elastic bands, pin them on the edges with a pin.
- First sew on the elastic bands on one side, then pull on the pins, the material will be gathered, and sew on on the second side. You should get an assembled part.
- Sew the main parts of the scarf along the edges. You can simply tuck the edge, or you can use a decorative stitch with contrasting threads.
- Now gather the edges of the base and insert into the gathers with elastic bands.
 Baste and sew on the machine.
Machine sew
The scarf is ready. You can sew some more decor or do without it.
Hat quickly without a pattern
It is worth noting that you can quickly sew a hat for a baby without a pattern. To do this, you only need material, for example, even an old blouse or T-shirt, and a hat that the baby is already wearing, may come up. Here are the steps for creating a hat:
- Fold the fabric or product in half and attach the old baby hat.
- Cut out pieces with a seam allowance.
Headpiece without a pattern
- Also cut out the collar as well.
Cut out pieces
- Fold the resulting hem piece in half.
- Then insert it inside the hat and sew the sides.
Insert one part inside the other
- The new thing is ready, you can try it on your baby.
The hat is ready
Watch the video below to see how you can sew a hat and snood for a child.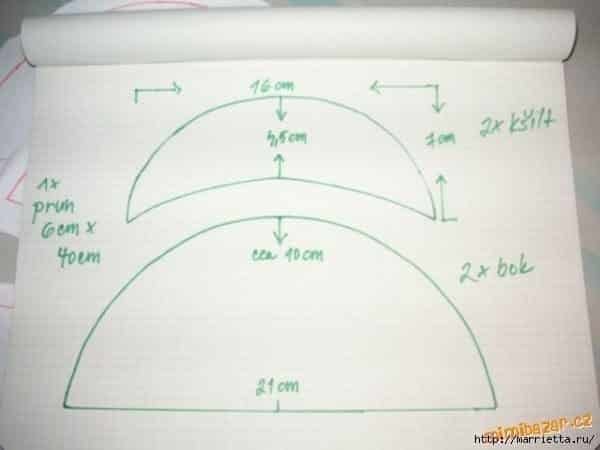 The craftswoman does it in 10 minutes - quickly and easily.
Video: How to sew a hat and snood in 10 minutes?
We sew a beautiful summer headdress with our own hands - for women: pattern
On the streets in the summer you can meet many women wearing a headdress that came from the last century. Now different hats are in fashion and in the summer you will have a great opportunity to wear a beautiful hat created by yourself.
Do-it-yourself beautiful summer headdress
Surely you have an old denim thing at home. Cut it at the seams to make several sheets. We will use them for the hat pattern.
Do-it-yourself summer hat pattern
This hat is sewn in the crezy-quilt style - patchwork. When creating a product in this style, you can use small patches of fabric with different patterns and textures to create large cuts from which the pattern is made. If you don't have different pieces of denim, you can use another fabric in the same color scheme. But you can also use the usual cut that you got after cutting the old thing. So the fabric is ready. Now follow these steps:
- Draw a pattern on paper, cut it out.
- Cut out all the pieces on the fabric according to the pattern, taking into account the seam allowances.
- Start sewing the lining first. Any fabric is suitable for this: cotton, synthetics, and so on.
- First sew the details of the crown and then the brim.
- Connect the base piece to the backing piece.
- Turn right side out and blind stitch.
Iron the hat and sew on any decorative element: a flower, a bow or something else.
Do-it-yourself men's hat: pattern, video
Do-it-yourself men's hat
For men, we offer to sew a warm fleece hat. This material is designed to create warm things, and a hat from it will turn out to be simple, but it will warm well in the cold. It is worth noting that you can even sew a hat from an old sweater or turtleneck that was knitted from not too thick threads and with a front or back fabric, for example, machine knit. You will spend no more than half an hour of your time on tailoring.
Do-it-yourself men's headdress
- First draw the pattern on a sheet of paper, and then transfer it to the fabric.
- Before making a pattern, measure the circumference of your head as shown in the figure below.
- The obtained parameters are needed for cutting individual parts of the cap.
DIY pattern for a men's headdress
- Divide the circumference of the head by 4, you get the size of one blade.
- Another parameter divided by 2 is the height of the wedge.
- You should have a triangular wedge with rounded side edges.
- Remember to add 1 cm for seams.
- To create a lapel, draw a rectangular piece: 1 side = OD + 1 cm for the seam.
Tip: In order not to draw and cut each piece separately, you can fold the fabric 4 times and cut out the piece, cut 4 wedges at once.
Be sure to fasten the fabric with pins so that the folded parts do not move.
Steps to create a men's hat with your own hands
- Pin all pieces together and machine sew from the wrong side.
- Turn the hat right side out.
- Now cut out the lapel and sew it to the main piece.
Worth remembering: Do not forget that fleece, like any other fabric, has a back and front side. To make the hat look beautiful, carefully sew all the details.
If you want to make the hat warmer, you can cut out the inner part from another or the same fabric. Then the outer main part should be made a little larger - by 1-1.5 cm. You need to sew the inner and outer parts facing each other, from the wrong side, as shown above (when sewing a children's hat).
Video: Sew a warm men's hat.
Sewing a Muslim headdress: master class, pattern
Do-it-yourself Muslim headdress
You can sew such a headdress and give it to someone from your family before prayer. When sewing a Muslim hijab, there are subtleties. All of them will be consecrated in this master class. You will need the following materials:
- Stretch knit in sober colors - 20 cm
- Threads to match the fabric
- Elastic band - 10 cm
- Sewing machine needles
Prepare fabric and tools
Sewing work should be done in the following steps:
- make details on fabric.
- To create the first part, the fabric must be folded. The second piece is a circle. All calculations are given already with seam allowances.
Cut out headpiece pieces
- Bend the tails of the part from the inside as shown in the figure below. Round corners.
- Machine sew where you pinned. These will be the ties of the future headdress.
Cut out and round the edges
- Now unfold the top part of the scarf with the ties, and from the inside, fasten it to the circle piece. To do this, find the middle of these parts and fix with pins.
- Machine sew with overlock. If the length is a little short, stretch the fabric slightly.
Join the middle of the two pieces
- You should already have something that looks like a headpiece.
Almost finished
- Then sew 3 cm at the back where the arrow shows in the picture below.
Sew 3 cm at the back of the headpiece
- At the bottom of the product, hem a couple of cm inside.
- Sew along the hem without reaching the ties.
- Normally flat stitch is used for sewing such parts. If your machine does not have this function, then process with a zigzag or overlock and sew through without sewing to the ties.
Fold and sew
- At the back of the scarf, fold the fabric 3 cm inward.
- Sew. It should turn out like in the picture.
Fold back again
- Now insert the elastic into the hem seam on the back of the scarf.
- Tighten the elastic so that there is no more than 6 cm at the back of the head.
- Pin and sew the elastic to the headpiece on both sides.
Insert elastic and sew on
The scarf is ready. But it remains to sew the decor. To do this, do the following:
- Twist the tourniquet from the rest of the fabric measuring 20x47 cm.
- Sew the ends and hand sew the tourniquet to the base of the headpiece.
Make a rope of fabric and sew it on
That's it - the Muslim headdress is ready. It turned out a comfortable and beautiful hijab that meets all the rules, namely, it covers the hair.
Tatar headdress - how to sew with your own hands: pattern, master class, photo
Tatar headdress
Every Tatar has a Tatar skullcap. But you can make such a headdress with your own hands and give it to a loved one for a national holiday. The pattern is simple and consists of two parts, since the Tatar skullcap is round and does not have wedges, like the Uzbek one. Therefore, you will sew a headdress quickly. Here is the pattern:
Pattern of the Tatar headdress
Dimensions are given without seam allowances. Therefore, add 1 cm on each side of each part. Velvet is used for sewing a skullcap. Decor can also be made by hand, for example, embroider a national pattern or sew on beads. For the rim, use a cotton lining to make the skullcap hard at the base, but pleasant to the scalp. We sew a Tatar headdress in the following stages:
- Start sewing from the headband. Make a pattern out of velvet and lining fabric.
- Sew a strip of velvet and lining, right side up. So that the lining is not visible, after sewing, turn the product inside out so that the velvet goes 1-2 mm inside out, and make a neat seam along the bottom of the product.
- Step up 3 mm from this seam and sew another seam.
- Now sew the top of the skullcap with the front part on the wrong side.
- The headpiece is ready. It remains only to make the decor.
When the work is finished, moisten the product a little and put it on some special form. Leave it like this until completely dry. After that, the skullcap can be put on.
Video: How to sew a Tatar skullcap with your own hands? Master class
Do-it-yourself “magpie” headdress – Russian folk: do-it-yourself pattern
In ancient times, head ornaments were the most expensive item of clothing. The rich wore gold-crushing magpies, decorated with precious stones and gold, and simple peasant women sewed such a headdress from rags of simple fabrics.
Forty headdress
This headdress was often worn over another - a scarf, cap, and so on. But it could also be worn as an independent product. Modern needlewomen also sew this headdress and use it as a national costume in theatrical performances, dances and other stage performances.
Velvet, silk fabrics, kumach are used for tailoring "magpies".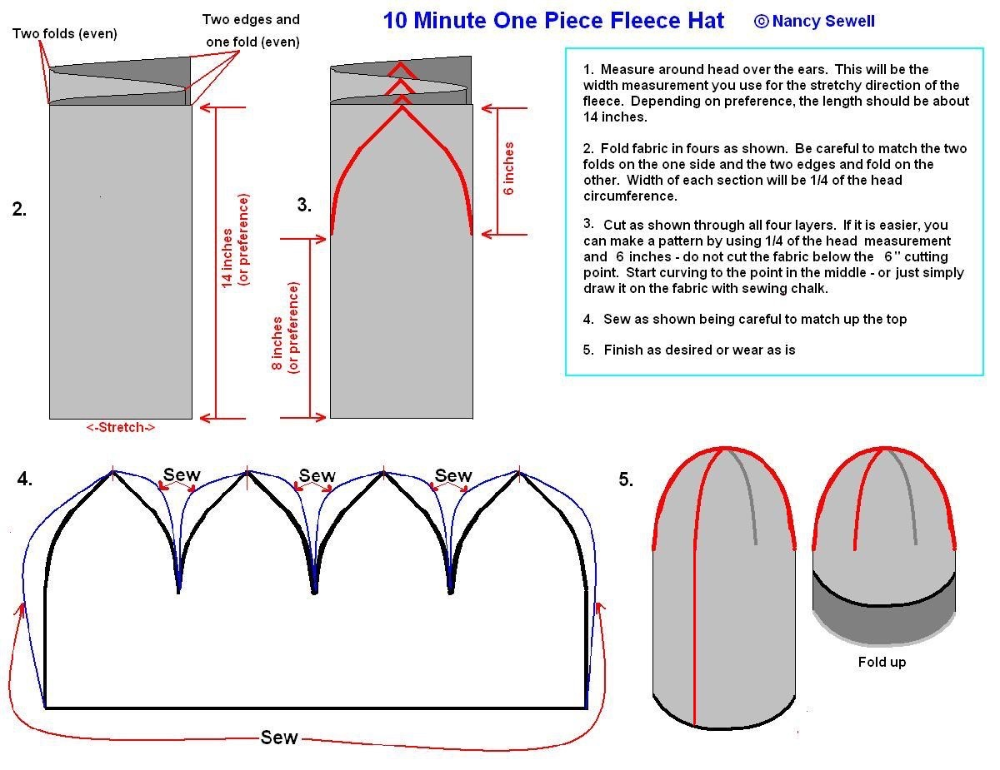 Such a headdress is decorated with embroidery, beads, gold embroidery. The sewing steps will be:
Prepare the fabric for cutting
- Cut a piece of red fabric measuring 54 cm by 20 cm.
- Sew different decorations on half the width. Leave a couple of centimeters at the bottom to hem the edge.
Decorate with ribbons and decorative tape
- Now fold in half lengthwise and sew along the folded edge. It turned out an ochelie.
The result is an ochelle
- Now take another piece of fabric with a size of 50x70 cm. You will get a headdress that will cover not only the back of the head, but also the back.
- In the middle of this cut, round off the upper part and cut off. From below, wash different decor.
- Sew on the hem or finish the edge differently as you like. Do not touch the rounded top yet.
- Now sew a wide stitch along the round edge so that the thread can be pulled off and gathered.
Sew and fold into a ruffle
- Then sew this ruffle with the bonnet. You need to sew in the place where we left a couple of cm. But sew only on one side.
- Flip the fabric to the wrong side and attach a piece of cardboard or thick paper, measuring 30x7 cm. It all depends on your imagination.
- Insert the ties into the headband (on the fabric where we applied the cardboard). Be sure to fold the fabric.
Insert the ties and sew
- On the wrong side, also fold everything over so that the threads do not come out of the fabric.
- In the area where the cardboard is located, mark with pins and then sew so that this “seal” of the ochelje is always in place.
- Sew all the seams you have made.
- That's it - the "magpie" is ready. You can make the part that is sewn to the headband from fabric of any color. It doesn't have to be red.
“Magpie” headdress made of fabrics of different colors
It should be noted that the strings and the headband can be made in one piece. Ties can be short or very long. In general, fantasize and create your own original headdress. The upper part is a scarf, you can leave it free, or you can tuck it under the strings. If you don't understand something, watch the video. In it, the craftswoman tells and shows all the stages of sewing.
Video: Workshop on creating an old magpie headdress
Sewing a beautiful headdress with your own hands - a headdress in the form of a scarf: pattern, instructions, master class peasant women and merchants. Accordingly, commoners sewed it from ordinary chintz, and merchant ladies from silk, decorating it with various decors. Now similar hats are in fashion, which can also be called a warrior. Modern beauties make such a headdress, combining fabrics of different colors and textures.
Headscarf in the form of a scarf
It is easy to sew - like a "magpie". In fact, this is just a cap with long strings that are twisted into a tourniquet and wrapped around the head, and tied into a beautiful knot. Stages of sewing a modern warrior:
- Ochelie is a piece of fabric equal in size to the volume of the head (for example, 54 cm). The width can be any - 5-10 cm. You can make a headband from a piece of fabric folded in half. Sew and finish the edges, leaving the sides unsewn, to insert the ties.
- Handkerchief - 50x60 cm piece of fabric. Also finish the edges in any way you like: overlock, beautiful stitching or bias binding.
- The strings should be 100-150 cm long on each side so that they can be twisted and tied nicely.
- Now sew all the details and you can put on the bat.
The technology of tying a calico boinik
Here is another tutorial on sewing a chintz poinik that can be worn in the summer, for example, in the forest, if you are gathering for mushrooms or while working in the garden. It is convenient and comfortable.
Cotton povoynik
So, here is a tutorial on sewing this product:
- First, make a pattern. On it, all dimensions are given in natural form, for a head size of approximately 52-54 cm. It can be made from any fabric in white or another color.
- The dimensions of the parts for the lining are the same as for the main part.
- Do not add seam allowances. This is what you should get after transferring the pattern to the fabric.
Cut out on the fabric
Cut out the lining
- Notch at the bottom of the lining. Fold the main circle and the lining circle right sides inward, and sew along the edge to these notches.
Notch
- Turn right side out and iron the seam.
- Now double stitch the rest of the circle so you can make a nice gathering.
- When you're done, try this cap on your head. If necessary, then assemble it again or, conversely, slightly relax the assembly.
Assemble and try on the cap
- Now sew the cape. Smooth out the seams in different directions with an iron.
Sew the headband
- Now fold these pieces right sides in and sew from the bottom.
- Turn right side out. Iron with an iron.
Iron
- Find the middle and mark.
- Fold the bottom and headband exactly in the middle where the marks are made.
Fold the bottom and neckband and baste
- Baste by hand from the middle, first to one side, then the other, to the end of the ties.
- Now machine stitch and turn right side out.
- Iron.
- Now all manipulations are carried out on the front side: baste the hood to the bottom.
Sew now from right side
- Baste to where the ties begin. Smooth out the ties with an iron.
- Then baste and machine sew.
Sew the strings on the machine
- That's it - the bat is ready.
 Once again, iron everything and put on a hat.
If you need a warrior for the national costume, then you can sew it from silk or other fabric in brighter colors. You can decorate such a headdress with embroidery, beads and any other decor.
Headdress for the church - sew with your own hands: pattern, master class
Headdress for the church
A truly church-going woman knows what clothes to wear to church services, what color and style it should be. Be sure to cover the shoulders, legs to the ankles. Nothing should be distracting during the service. The same applies to the scarf: it should not fall off or untie.
The most convenient model for this occasion is the Don scarf with a drawstring. It fits well on the shoulders and does not fall off the head. Here is a universal pattern for sewing such a scarf:
Pattern for sewing a headdress for a church
The dotted line marks the line where the drawstring will go. First, make a pattern on a piece of paper, and then transfer it to the fabric. You need to cut on a fabric folded in half. For such a scarf, white airy guipure, scalloped lace, silk, organza and other similar materials are suitable. You will need 1 meter of fabric 140-150 cm wide. Also prepare the following materials:
- 2 meters of bias tape
- 3.5 meters of lace
- 1.5 meters of satin ribbon or decorative cord
- 2 end caps
All fabrics must match your material for the scarf. When everything is ready, start sewing:
- Cut off the edge of the fabric first. Then make the cut symmetrical.
- To do this, fold it in half diagonally, at a right angle.
- If there is an extra strip on one side, cut it off.
- Now fold the cut in half inside out.
- Iron the fabric on the fold to make the pattern even and not beveled.
Important: Remember to iron delicate fabrics. The soleplate of the iron, hands and cloth must be clean. Otherwise, you can spoil the material without sewing the product.
Children's Church Hat
Now start cutting out:
- Attach the paper pattern to the fabric: Place the top left corner of the pattern against the top left corner of the fabric folded in half. All fold lines must match.
- Pin paper and fabric together and cut exactly to pattern. Be sure to mark the drawstring line.
Let's start sewing:
- Attach the drawstring to the marked line on the fabric, fix the bias trim.
- Continue trimming in a circular pattern. Secure with pins, make sure you work inside out!
- Turn the fabric over to the other side, continue to lay the trim. All stripes must match.
- Sew the drawstring on the machine, bending its edges so that a 2-3 mm strip of fabric remains. This is necessary for further finishing the edge.
The scarf is ready. It remains only to finish:
- Sew the lace on the front side. Do not sew up the tie holes.
- Thread the drawstring with a ribbon or cord with end caps.
 Instead of trailers, you can use an elastic band or a beautiful button, which should be sewn at the bottom of the hood.
Now you can put on the headscarf. If it is properly sewn and put on, then it will comfortably lie on the shoulders and not fall off the head. Leaving the temple, you can simply remove the upper part and place it on your shoulders like a hood.
Sewing a beautiful headdress with your own hands - Wolka: pattern, video, photo
Beautiful headdress with your own hands - Wolka
Wolka is a new brand of headwear created by actress Ekaterina Volkova. In fact, it's just a hood that fastens in front. Such a headdress can be made of fabrics of different textures and colors. You can even combine wool with lace or knitwear with silk. The main thing is that such a hat will turn out warm and comfortable.
Here is a hat pattern:
Pattern for sewing a hat with your own hands - Wolka
You need to cut out two side and one back part. This pattern fits all head sizes. In addition, the size can be adjusted using the fastener, which is located in the front. It can be easily moved to the right place. You will need the following materials for work:
- Fabric 1 m x 1 m.0020
- Threads to match the fabric.
- One beautiful button.
Sewing is done as follows:
- Sew the darts from the inside first.
- Then join the two pieces of the hood from the wrong side, leaving the bottom unsewn.
- Now turn the hood inside out. Attach the strip and sew right sides together.
- Turn inside out again, finish edges and seams.
- Sew on an eyelet and a button or other closure. Everything - the hat is ready.
You can make several of these hats and change your look every day.
Video: WOLKA — A new brand of hats from Ekaterina Volkova
We sew a hat for a sailor with our own hands: pattern
A capless cap may be needed for a boy to go to school, for example, on a holiday on February 23. If you have a sailor suit, but no headdress, then you can sew it yourself. It's simple, here is a pattern:
Pattern for sewing a headdress for a sailor with your own hands
To sew such a headdress, only one measurement is needed - the girth of the head. You will need the following materials:
- White fabric
- Blue fabric for band
- Doubler for sealing
- Threads to match the material, scissors
head circumference. Make 11 cm wide. This is a band that will keep the headdress on the head.
Do-it-yourself hat for a sailor
Now you need to sew on the decor. To hide the notches, glue a blue satin ribbon around the circumference of the band. From it, make two shoulder-length ribbons, which should develop in the wind, like a real sailor. Sew an anchor on the front of the band. Everything - the peakless cap is ready.
Handmade beautiful headdress - Elechek, turban: how to sew, pattern
Handmade beautiful headdress - Elechek, turban
Elechek - Kyrgyz headdress, like a turban for Kazakhs or a skullcap for Tajiks. In its full form, it consists of 3 parts: a hat with a braid, a small rectangular piece of fabric is put on top of it (it should cover the neck, sewn under the chin) and a turban of white fabric is put on top of all this.
If you need to make a Kyrgyz headdress, then it is not necessary to wear a hat with a braid. You can limit yourself to only a rectangular cut and a turban. Cut a rectangular piece of fabric (50 cm x 100 cm) and sew along the edges so that the threads do not come out. The turban is also made simply. Here is the pattern:
Pattern for sewing a hat with your own hands - Elechek, turban
Steps for sewing:
- Draw a pattern on paper and cut it out.
- Now place each detail on the fabric and outline with chalk. Do it from the inside out.
- Finish the edges, sew the edges on the sides and top. Leave the bottom edge free.
- Gather from the front. This can be done with a thread tie or specially laid folds.
- The turban is ready. You can decorate it with decorative braid or attach a brooch.
So, first put a rectangular piece of fabric on your head, then a turban. Kyrgyz headdress - elechek is ready.
Sewing a hat with your own hands - for a cook, a waitress: patterns
A hat with your own hands - cooks, waitresses
Professional clothing is important in working at catering establishments. Cooks, waiters, in addition to a special uniform, must wear a headdress. These are simple products that you can sew yourself. The fabric is used in white cotton, but it can also be of a different type and color. Here is the chef's hat pattern:
Pattern for a headdress with your own hands - cooks
First cut out the pattern on paper, and then transfer it to the fabric. The radius of the circle may be greater. Moreover, the larger this parameter, the more magnificent the cap will be. Work steps:
- First sew a crown that will cover the head and hold the cap. Fold the strip in half lengthwise. Attach a non-woven tape to one of its parts with an iron. It is better to do this on the part that will cover the head.
- Sew the headpiece from the inside out and turn right side out. Then sew the ends.
- Sew the top of the cap with a double stitch along the edge or make small pleats.
- Sew the top to the headband. The cap is ready.
The waitress headdress is also easy to sew. Here is the pattern and work steps:
Pattern for a headdress with your own hands - waitresses
To make such a “kokoshnik” dense, interlining or other similar fabric should be inserted inside. You can not make a bow, but replace it with another decor, made, for example, from lace or satin ribbon in the form of an assembly.
Sewing a beautiful headdress from a handkerchief: master class
If you have an old Pavloposad shawl in your house, then you can sew a hat out of it. Moreover, Old Slavic drawings on clothes are now in fashion. They can be found both on the catwalks of fashion houses and on the streets of our cities. Below is a master class on sewing a fashionable, warm and beautiful hat from a scarf. Here's what you need for work:
- Pavloposadsky scarf or patches from it
- Doublerin for strengthening
- Fleece fabric for insulation
- Threads in the same tone as a scarf
- Scissors, chalk
Pattern for a hat that we will sew from a scarf:
Pattern for a headdress with your own hands from a scarf it is necessary, since all sizes are in their purest form.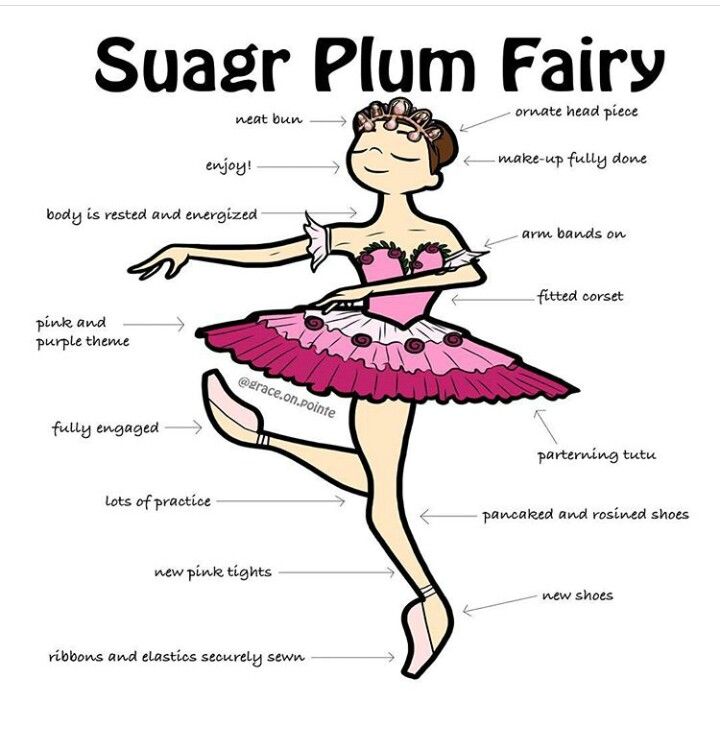 You can print and cut out of the fabric, but do not forget to add 1-1.5 cm from the edges for the seams. So, here are the steps for tailoring:
- To make it easier for you to cut the scarf, strengthen the fabric with dublerin. Glue it on the wrong side.
- Now lay out the handkerchief on the table and transfer the pattern. Cut out.
- Then fold the first part in half and place the handkerchief in that place so that the pattern matches exactly.
Cut one piece and attach to canvas to cut another piece
- Cut out the same second piece of the hat.
- Also cut out the hat pieces for the fleece lining. Please note that the lining parts need to be 2-2.5 times smaller.
Cut out the lining
- Sew the darts on the main parts of the hat.
- Now sew the pieces together, leaving a few centimeters to allow the piece to be turned right side out.
Stitch the pieces together
- Iron the resulting seams on all pieces, spreading them in different directions.
- Place body and lining facing each other and sew them together.
Lay pieces to be sewn right side together
- Now, through the hole that was left, sew a stitch no more than 1 mm wide from the edge. You need to do this in the face, tucking the allowance also towards the front side of the product.
- Turn the product inside out. Sew up the hole.
Scarf hat ready
- Hat ready. As you can see, the lining inside is small, so you can experiment and wear such a hat in different ways.
You can wear a scarf hat in the usual way
Other ways of putting on a hat from a scarf
Tuvan headdress: we sew it ourselves
Tuvan headdress
Previously, Tuvans used to sew their headdresses from felt and animal skin. Now there are a lot of modern materials that allow you to create exactly the same headdress, which this people calls a “board”. Dressmakers of that time did not even use a needle and thread for tailoring suits and boards, they simply glued the edges with special glue.
In fact, such a hat is a headband and 5 wedges. All these details must be sealed in order for the hat to keep its shape well. You can sew it on the principle of a skullcap and make a wedge at the top - the Tuvan hat is ready. How to sew a skullcap, see above in the text.
Tuvan headdress made of fur
Tuvan headdress can also be made of fur. But the main feature of such a boarder is the pointed top, which carries a sacred meaning for such a nomadic people.
How to sew a scarf hat: instructions, photo
Scarf hat
If you have a knitted scarf at home that you no longer wear, you can sew a baby hat out of it. Here are the instructions on how to do it:
- First, inspect the scarf for various decorations: sequins, tassels, beads, and so on. If there are any such items on the product, remove them.
- Now measure the child's head and transfer the measurement to the scarf. It should be a rectangle. Leave seam allowances.
- Sew a rectangular section of the scarf on both sides from the wrong side.
 The seams will be from the sides of the future hat. There will be a fold at the top.
 - Turn the garment right side out. Sew the top corners to make ears. You can simply tie them with decorative braid to match the cap or thread from a scarf.
A variant of sewing a hat from a scarf
- If the hat is plain, then you can embroider the muzzle of some animal (bear, cat) on the front part. You can also sew on other decor.
The hat is ready, it remains to sew on the ribbons for the ties, if necessary. You can put the product on the baby - it turned out original and beautiful.
How to sew a head hood with a neck: from mink fur, pattern, video
A head hood with a neck
A few years ago only little girls wore a hood. Such winter hats did not go out of children's fashion. Now women also wear hoods. This hat can be of different styles and made of different materials: wool, fur, knitwear and so on. The hood can be sewn according to the principle of the Wolka hat, the creation process of which was described above in the text. The only difference between the hood and the "wolves" is the presence of a scarf, a collar, which should lie on the shoulders.
Head hood with mink neck
To create a hood, this pattern is suitable: ready. Detailed instructions for creating a hood in the video below.
Video: How to sew a hood-snood? Hood with fur
Origin
Headwear for autumn. How to choose a hat for autumn. What if not a hat - choose a hat for the fall | NHS
Looking for ways to replace a hat that is boring as hell
Collage: Yury Orlov / Network of city portals
Share
The time has come when a headdress other than a hat no longer looks strange, inappropriate and, perhaps, in the eyes of passers-by even a little crazy.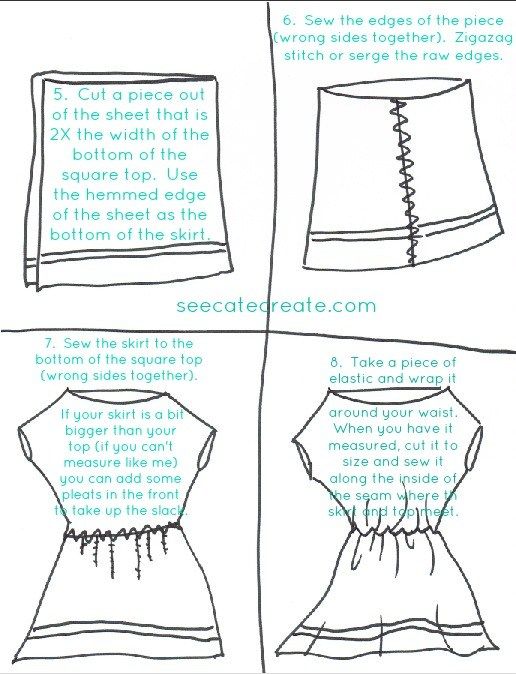 Increasingly, on the streets of Novosibirsk, we meet women in hats, panamas, berets or baseball caps. And in recent years, even more outlandish models have entered the world of everyday fashion: scarves, hoods, detachable hoods, balaclavas (yes, the very ones that we used to wear with a ski suit). We tell you how to choose a newfangled headdress according to the type of face.
At first glance it may seem that this trend is more in tune with summer trends, but even with the onset of cold weather, designers have successfully managed to integrate this accessory into our wardrobes. The main nuance when choosing options for autumn and winter is to rely on dense materials that will be comfortable even in cold weather. Actual models are made of eco-leather, bologna, quilted, woolen. Inflated models look especially impressive.
How do you like this option? Would you risk?
Collage: Yuri Orlov / Network of city portals
Share
Do not wear the scarf close to the hairline, move it closer to the crown, tie the edges of the scarf under the chin or wrap around the neck.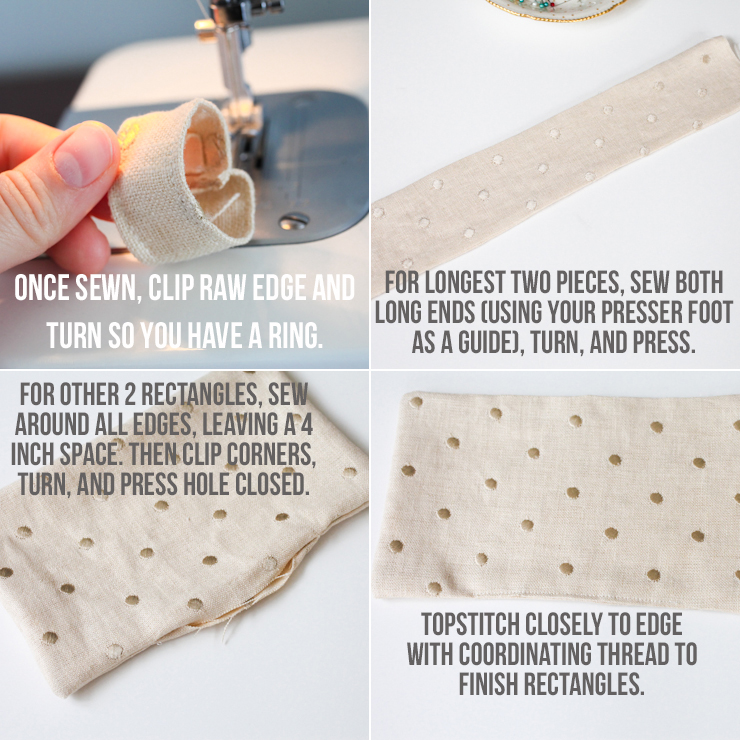 Here we note an important nuance: if you have a short neck, then this method does not suit you, otherwise your neck will visually look even shorter. Girls with large facial features are not advised to choose colorful models so that the image does not look rustic. Chubby girls should not wear a scarf tied up at the ends in front or hiding their hair completely, this method is more suitable for owners of a thin, elongated face.
Probably the most unusual trend of this winter. Not sure if he adapts quickly, but what if? The main thing, after all, is to be warm, and a balaclava is a real armor against bad weather. If earlier balaclavas simultaneously performed the functions of a hat and a scarf, then this year another one was added to them - a protective mask (but for reliability, it is still better to wear a medical one under them, which will not even be visible, and you will not leave a lipstick mark on a fashion accessory ).
An idea for the most daring. Who dares?
Collage: Yuri Orlov / Network of City Portals
Share
Depending on the design, these hats can look completely different: in pastel colors - to hide you from the attention of the crowd, and in bright colors - on the contrary, to bring you to the fore. Another way to stand out while wearing a balaclava is to wear bright makeup. Everything will do: from classic wide arrows to smoky in all shades of the rainbow. We wear a balaclava not only with a down jacket and a ski suit, we try options with a quilted or woolen coat, with sheepskin coats or eco-fur coats.
We remember that, don't we? They wore them in the 90s
Collage: Yuri Orlov / Network of city portals
Share
Perhaps the warmest and most comfortable trend of this season. It will be difficult to keep the perfect styling in it, but this is a great way to hide it when there is absolutely no time or desire to do a hairstyle. One of the main advantages of a hood is that it combines two accessories: a hat and a scarf. It warms well not only the head, forehead and ears, but also the entire neck, and sometimes the shoulders and back, if the hood is elongated.
Unusual, but maybe worth a try?
Collage: Yuri Orlov / Network of City Portals
Share
Everyone can safely put on a bonnet without embarrassment and fear of looking ridiculous. Wear it with coats, jackets, fur coats, down jackets, choose the models that you like: knitted from wool, knitted, fur. An alternative to a hood is a detachable hood: a stylish and unusual accessory that will add originality to your look, no doubt.
We were forced to wear these as children, remember?
Collage: Yury Orlov / Network of city portals
Share
This season, faux fur has become one of the most popular materials, which also turns out to be the most practical for cold weather.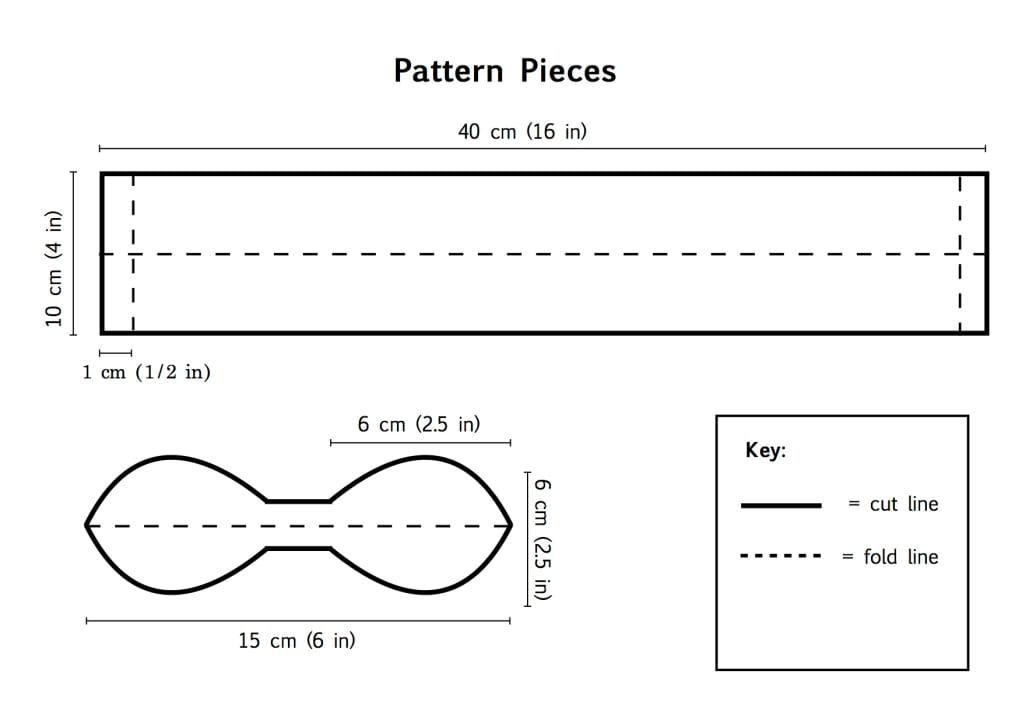 Look for a voluminous hat with earflaps if you are especially cold in winter. Choose from nylon or suede. Designers offer to wear a hat with earflaps with eco-leather jackets. Models with a print, for example, animalistic, are relevant (do you agree that there is something nostalgic about this, from childhood?).
Note that panama hats have arrived in the regiment of panama lovers. If last year, when the trend for them was just beginning, they looked at panama with distrust, today we increasingly notice them on the streets of the city. We will leave summer models on the shelf until the next season and pay attention to woolen, soft, plush models. Hint: A wide-brimmed bucket hat will protect you more from wind and rain.
The variant with strings is very successful - with our somewhat unstable weather
Collage: Yuri Orlov / Network of city portals
Share
Panama looks best on girls with an “inverted triangle” or “heart” face shape, but we suggest that owners of a round face refrain from such a headdress: a panama will visually make your face even more round. You can wear a panama with any outerwear option, but, of course, panama looks best in combination with an oversized jacket.
We used to wear berets exclusively with elegant looks in classic French style. Now the associations with the wardrobes of Parisians have subsided, designers are actively introducing berets even in the bold grunge style. Choose from leather, latex, velvet or opt for an unusual color. Models with printed patterns or berets with prints, for example, with floral, checkered or animalistic ornaments, will be no less relevant.
Well, bring your berets in, let's measure
Collage: Yuri Orlov / City Portal Network
Share
Girls with a round face are advised to choose small berets, those with a triangular face are advised to wear berets slightly to one side. It is important that the distance between the eyebrows and the edge of the beret is 1-2 cm, and ideally even more. The edges of the beret should cover the ears - the image will be hopelessly spoiled if one ear is hidden under the beret, and the second remains open: this will make you look ridiculous. Try, experiment, look for your own version of socks. Wear a beret with a coat, jacket, and in winter try on with an eco-fur coat.
Wide-brimmed felt or fabric hats have become a part of the wardrobe of true fashionistas since a few years ago. Designers actively show similar models on the catwalks. Among the trendy hats of the year, you can look for a bowler hat, a bucket hat or a wide-brimmed felt version. And so that we do not freeze in the cold, brands have offered an unusual way of styling - wear felt fedora hats over scarves. It is better if they are combined, for example, the shade of the hat will be present in the patterns on the scarf, however, contrasting combinations will be no less relevant.
It’s a great idea to tie a scarf under a hat: both warm and stylish
Collage: Yuri Orlov / Network of city portals
Share
Absolutely any model of hat will suit the owners of an oval face, for chubby girls a fedora would be an excellent option, stop your choice on hats with high crowns and straight brim to give the face a slight angularity. Discard hats with perfectly round crowns, which will only emphasize the round outlines of your face. Girls with a rectangular face can look for wide-brimmed hats to balance the height of the face. Avoid high top hats. If you have a heart-shaped face, medium-brimmed hats will suit you. Hint: move your hat to the side - this will make your face look thinner and you will draw more attention to your eyes.
Again, we are used to wearing them exclusively in the summer, but times, as you can see, are changing. The baseball cap was adapted for the cold using insulated materials. The trend is soft and plush fur models, quilted models will look great with a quilted coat or jacket. Some models have special turn-down ears for warmth - the designers did everything so that we would not freeze and look stylish.
Waiting for winter to see how it looks in reality
Photo: Yury Orlov / Network of city portals
Share
Finding a baseball cap for your face type is quite easy. If you have an oval face, any model will suit you, except be careful with models with a high crown: it can visually lengthen your face even more. It is better if the forehead is completely covered with a visor. Owners of a symmetrical round face should take a closer look at tight baseball caps with a high crown: they visually lengthen the contours. A visor covering the forehead complements a similar image, and you can wear a similar model slightly to one side.
For those with a rectangular face, as in the case of a classic oval, a baseball cap helps to reduce the elongated shape of the face: this is easily achieved with an elongated visor. People with a triangular face have a wide forehead. To visually reduce it, you can pick up a baseball cap with a long visor, but it is worth remembering that tight-fitting models can spoil the image: they will make the head asymmetrical and elongated upwards.