How to make a belly dance top
DIY Lace Wrap Top for dance practice & yoga
I’m in love with this lace wrap top!
In my last 2 posts (Part 1 & Part 2), I showed you how to make the unitard style dance practice wear (which so many of you loved! Thank you!)
In this post, I want to add a layer and extra coverage with this cute and comfy, stretch lace wrap top. Let’s get started!
Click here & sign up for the Sparkly Belly newsletter (+ Get access to my free email course, Belly Dance Costume Making 101!)
To make this DIY lace wrap top, you need:
- Pattern paper – just like one we used for making the unitard pattern, any paper will do. Use up your leftover wrapping paper if you like.
- Long sleeve shirt to use as a pattern
- Stretch lace – you’ll need about 1m (1yd).
- Matching color thread
First, put on your long sleeve shirt and mark the underbust level with a safety pin.
Make a lace wrap top patternFold your pattern paper in half.
Fold your shirt in half with the front side of the shirt together, and place it against the fold of your pattern paper.
If your shirt wasn’t very tight, and you want your wrap top to be more fitted, you can place it 1cm (3/8in) or so off the paper as shown in the image below. Then fold the sleeves out of the way.
Fold your shirt up to the level you marked with a safety pin earlier, and trace the shirt onto the paper. The armhole is a bit tricky, but just trace it as best as you can.
Add 2cm (3/4in) to the bottom edge and extend the side edge to meet the line.
Cut along the line, and that’s your back panel.
Next, fold your shirt the other way so you can see the front side of the shirt.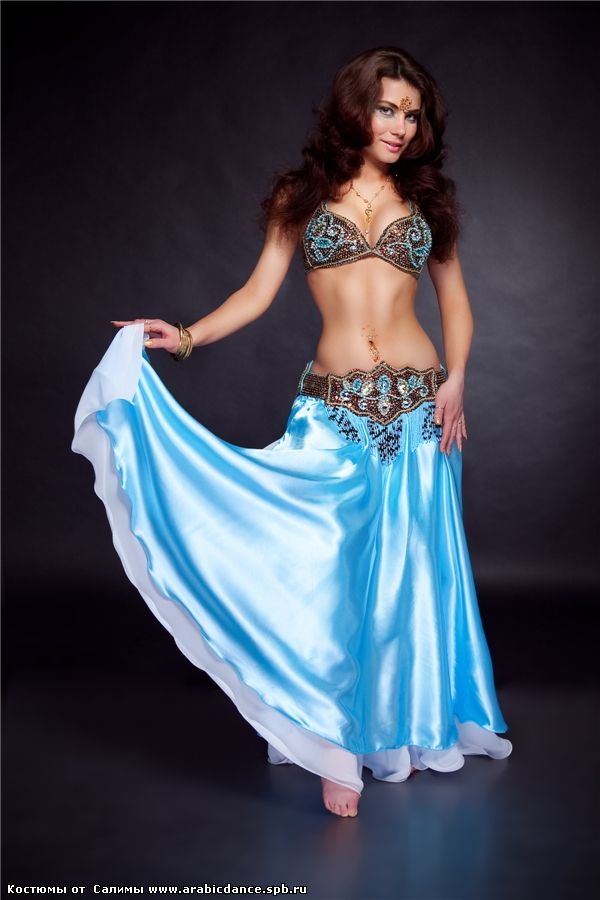 Place it on folded paper like you did for the back panel, fold away the sleeves and fold the shirt up to the safety pin, and trace it just like you did earlier. Add 2cm (3/4in) to the bottom edge and extend the side edge to meet the line.
Cut along the outline, and open it up. I didn’t have enough paper here so it’s not symmetrical, but we just need the right side and a little bit of the left side.
From the fold line of the paper, measure 2cm (3/4in) to the left (side that’s not marked). Make a mark at the bottom edge.
From there, draw a 2cm (3/4in) line upward. And connect the top of this line and the top of the shoulder seam with a straight line, and turn it into a nice curve. This doesn’t have to be a big curve. Just a small curve will do.
Back at the 2cm (3/4in) line, measure 1cm (3/8in) to the left and make a rectangular box at the bottom.
And cut along the outline. This is the front panel.
Finally, place the long fold of a sleeve against the edge of pattern paper, and trace the sleeve.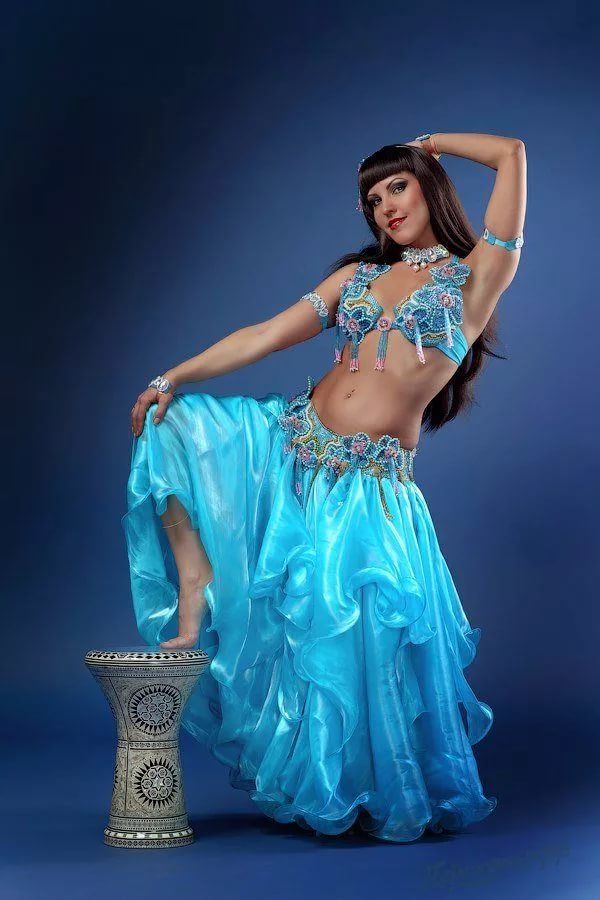
For this one, I wanted it to be a ¾ sleeve, so I ended the sleeve at about halfway between the elbow and wrist. You can adjust the length as you like. Then cut along the line. This is your sleeve pattern.
Cut fabricCheck to see which ways your fabric stretches, and place your pattern so the stretcher direction of the fabric is parallel to the width of the pattern.
Cut while adding a 1cm (3/8in) seam allowance.
Flip the front panel and cut another one, so you have a right side and left side.
Then fold the fabric so the direction of stretch is perpendicular to the fold, and place the sleeve pattern, right against the fold of the fabric. Cut while adding a 1cm (3/8in) seam allowance. And add a notch at the fold by making a small snip. This little snip acts as a mark.
Repeat so you have 2 sleeve panels.
Also, cut 2 long strips that are 6cm (2 3/8in) wide and about 1m (39in) long.
Alright, let’s assemble these pieces.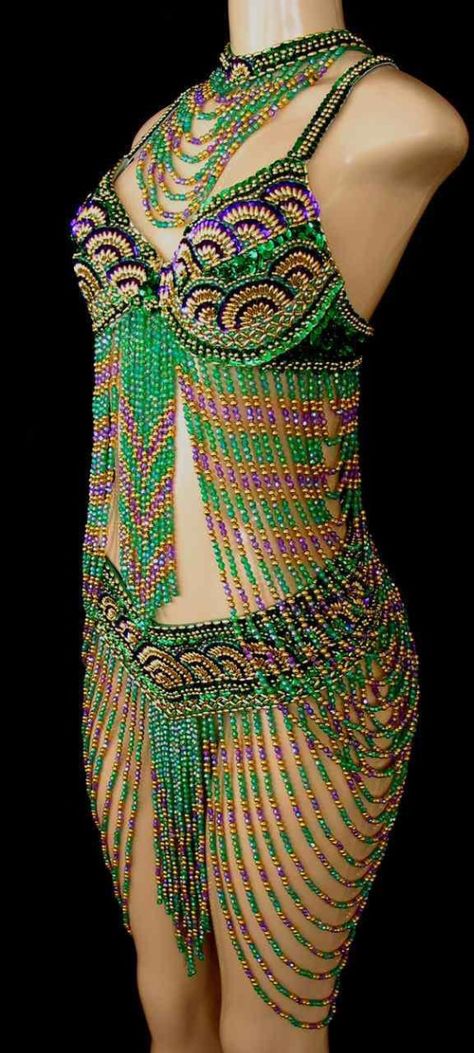
First, match up the shoulder seams of the front and back panels right sides together, and sew them together using a zigzag stitch with a 1cm (3/8in) seam allowance or other stretch stitch of your choice.
Then open it up, and take one of the sleeve panels. And match up the notch and the shoulder seam right sides together and place a pin or clip. Then match up the corners of the sleeve with the corresponding ends of the arm hole, and match up the rest. If this is your first time making sleeves, take your time here and match up these edges as best as you can. Do the same for the other side.
Then do a zigzag stitch along the edge with a 1cm (3/8in) seam allowance. Repeat for the other sleeve. If the edges don’t align well, pull the fabric gently as you sew, and the seam will come out fine.
Fold the top right sides together, and do a zigzag stitch all the way from the sleeve to the side seam for both sides.
And at the raw edges, fold 1cm (3/8in) from the edge towards the wrong side.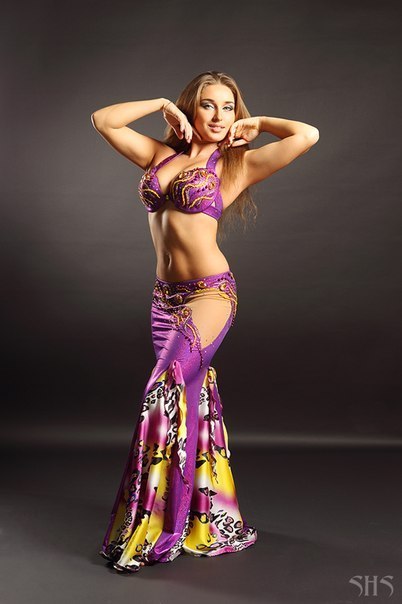 And do a zigzag stitch along the edge of the fabric. Do this around the neck line, bottom edge, and the ends of the sleeves.
Next, take the long strips, and fold them right sides together. And along the long edge and one of the short edges, do a straight stitch while stretching gently. Use a 3/8in (1cm) sean allowance. At the short edge, sew diagonally like this to get a pointy edge. Do this for both strips.
Trim the corners and turn the tubes inside out, and you have 2 ties. Press to make them flat.
Place one of the ties at the bottom end of one of the front panels, and match up the edges right sides together. Do a straight stitch here with a 1cm (3/8in) seam allowance.
Fold over the seam allowance towards the front panel on the wrong side, and do a top stitch to keep the tie nice and flat. Repeat for the other tie.
And your lace wrap top is complete! It’s so cute, lightweight and comfy because of the stretch. I like the long straps that wrap around the torso.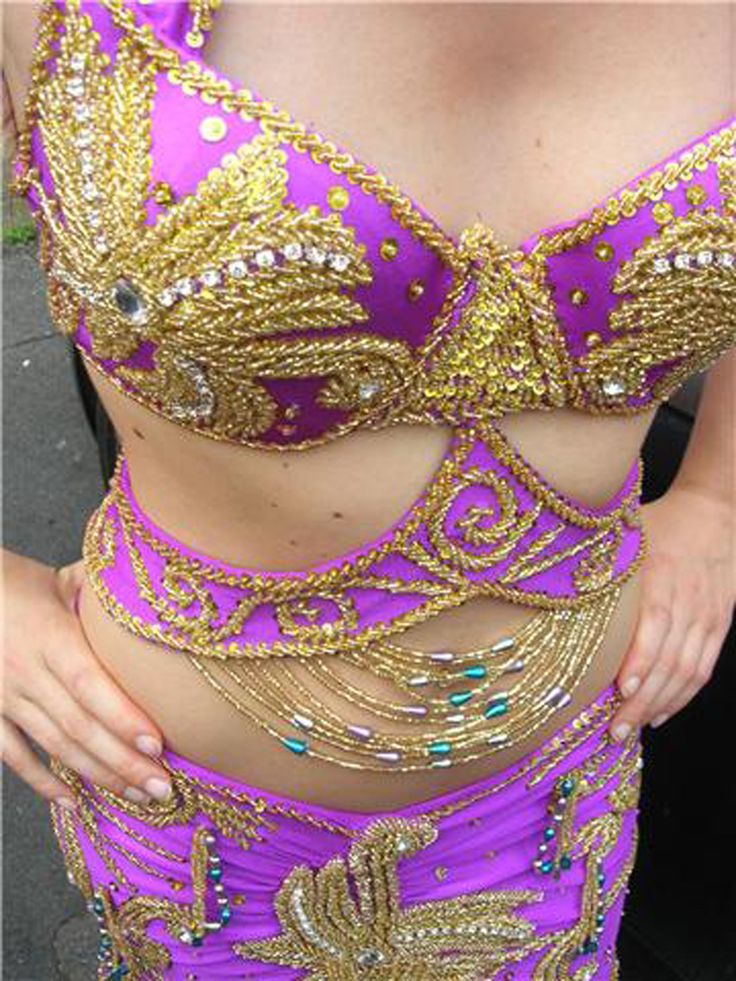 It’s a great top to layer over a tank top for a little extra coverage, and of course it’s very pretty as a costuming piece as well!
And in my next post, I’ll show you how to make this matching, ruffle overskirt. I love matching a practice top and overskirt, because they create a more polished look. It’s really easy too!
Click here & sign up for the Sparkly Belly newsletter so you won’t miss the next tutorial! (+ Get access to my free email course, Belly Dance Costume Making 101!)
I hope you liked this DIY lace wrap top tutorial, and if you did, please share this tutorial with your dancer friends!
And if you’re inspired and want to learn to make more costumes, I’m doing a course giveaway! It closes in a couple of days, so learn more and enter by January 31 at (Sparklybelly.com/giveaway).
Thanks for reading, and keep sparkling!
P.S. Pin this image on your practice outfit board 😉
Like what you read? Want to make more costuming bits yourself?
Sign up for my newsletter here and get my free email course, Belly Dance Costume Making 101!
3 Easy Steps to Make a Gorgeous Belly Dance Costume at Home
Belly dancing costume is the simplest thing to design, unlike the cosmopolitan notion.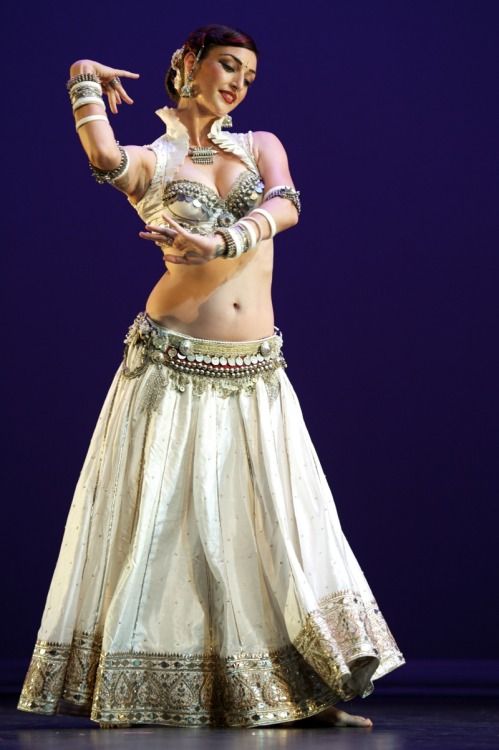 DancePoise gives you 3 simple steps to make a gorgeous belly dance costume.
Spangly Tip!
★ Try to match the color of the sequin belt (worn on waist) with the top.
★ The color of the beads or sequins on the top should match with the skirt.
Believe me, you may be having a belly dance costume in your own wardrobe! Whether you are learning to do belly dancing as a casual hobby, for exercising purposes, or as a secret obsession, simply dressing the way professional belly dancers do, will give you the feel of an experienced belly dancer.
These days, there are a number of design houses in the US, Egypt, and Turkey, to name a few, which design hundreds of costumes every year, of varying quality and styles, ranging from $200 – $2,000 a piece. Can you get these costumes and be satisfied? Absolutely not! Because, there are many of us who have trouble finding exactly what we want out there, and are not exactly the fitting we require. Plus, think of all the time and effort needed for alteration of the dress.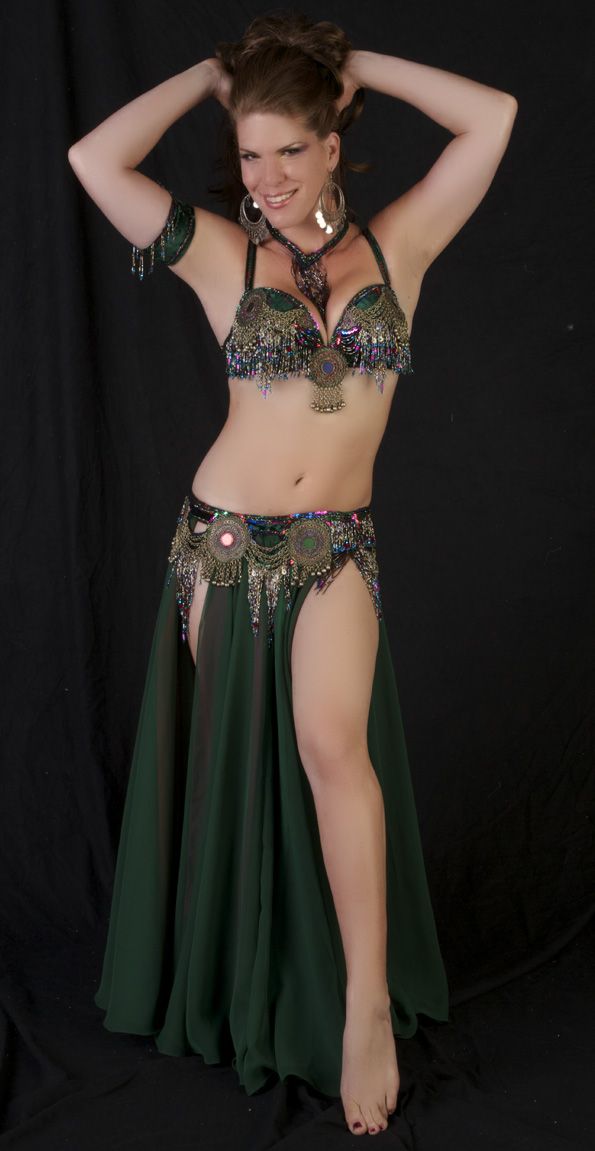 There are very limited selection options, for sizes other than 32B- or 34-inch hips.
This is where learning how to create your own costumes comes into picture. Making an authentic belly dance costume will be an expensive chance to be taken. You can make a basic belly dance dress, very much in your budget, by peeping just in your own closet.
We have explained the two most popular types of belly dancing costume: the one with Harem Pants and the other one with Long (lycra) Skirts. Notice the difference, and opt for the one you want.
Requirements
For a simple and elegant belly dance costume, you only need 3 pieces:
★ A long skirt or harem pants
★ A tight-fitting tank top (or crop top)
★ A hip scarf
STEP 1
Get a snug tank top or camisole that fit; almost any color and style will work perfectly for your belly dance costume. You can also create one by adding glittery details to your regular bra (refer to the image above). Sew on some beads at the perimeter of your bra.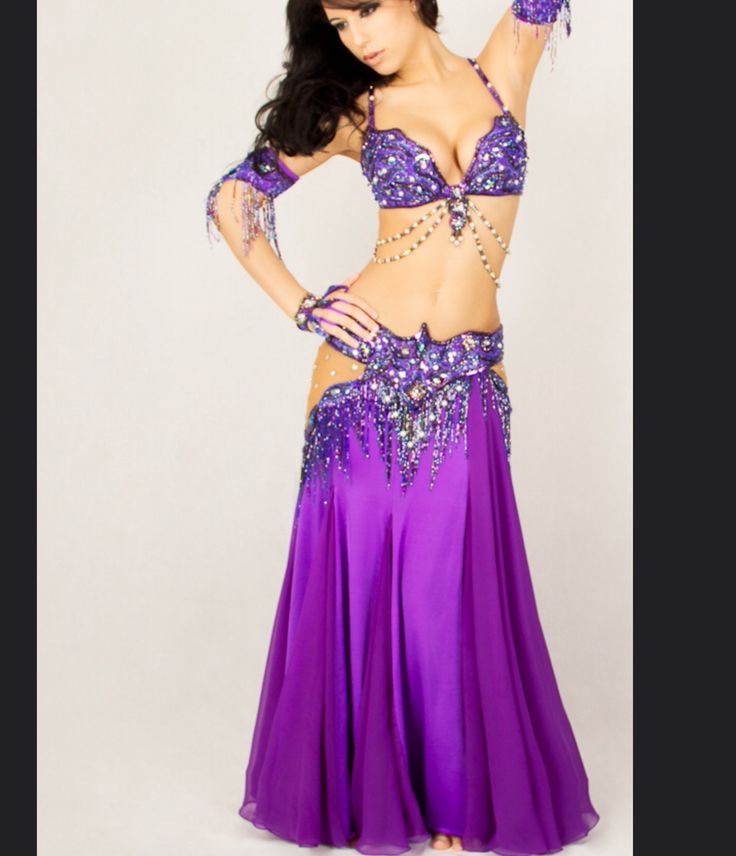
STEP 2
We need to make the belly dance belt. Generally, embellished scarfs are worn on the waist. So, get a scarf that is sufficiently large, and decorate it with a shimmery lace. You can sew the lace on its edge, or simply use fabric glues to do that.
You can also go for heavy material or metal detailing for making fringes or sequins (coins) on the hip scarf, to get the traditional Egyptian look.
STEP 3
Fetch a pair of harem pants, or find a loose, wavy, ankle-length skirt. It need not be expensive, and it can be of any color you want. Sew some lace or beads on the surface of the skirt.
In Conclusion
That’s your final look. Belly dancing is fun. Show all your creativity you have while readying this costume!
Some Design Fluctuations
★ We have a huge range of options for step 1―coin bra, choli top, bolero-tied tops, beaded bra, etc. You can opt for any one of these too.
★ The side of the harems or skirt can be slit to leave an opening, which can be outlined with decorative trim, and the two halves can be tied together with beaded strands, metallic ribbons, or other decorations of your choice.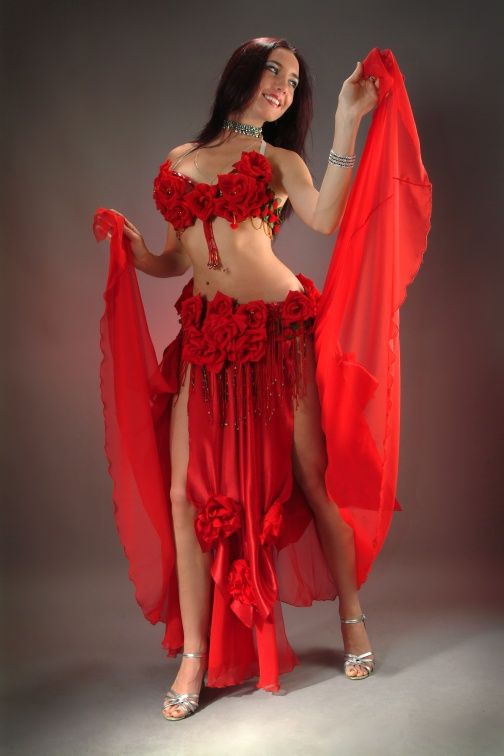
★ Scarfs can be sewn directly on pants.
★ Skirts can be of varied materials―opaque, silk, or chiffon; heavy material with embedded metals; large-tiered or flared ones with embellished embroidery and designs.
In the end, you can flaunt your belly dance costume along with attractive navel tattoos and sexy bellybutton accessories.
Like it? Share it!
Uncategorized
Get Updates Right to Your Inbox
Sign up to receive the latest and greatest articles from our site automatically each week (give or take)...right to your inbox.
Blog UpdatesEmail Address *
Do-it-yourself belly dance costume
- Sergey Sizov
- 10 Apr 2018, 22:01
- 114
- 0
Contents of the article
- 1 Master class for making a belly dance costume with your own hands.
- 2 Patterns for a belly dance costume.
- 3 DIY belly dance costume photo
- 4 Do-it-yourself belly dance costume video
Belly dance came to us from the Arab countries and conquered not only women, but also men with its beauty. The gracefulness of the body and the beauty of the movements are especially emphasized by the beautiful costumes that reveal the best parts of the female body and present them in an advantageous position during the movements. Such costumes are most often decorated with a large number of beads, stones, beads and others. This is what makes them so valuable. Do not be afraid because such a costume can be easily sewn with your own hands.
Master class for making a belly dance costume with your own hands.
Before tailoring any suit, you need to make the necessary measurements as clearly as possible. Then comes the selection of fabric for the suit. The fabric should be as pleasant to the body as possible, not cause allergic reactions (most often this happens when there are non-natural components in the composition) and not hinder movement (be as elastic as possible). For belly dancing, brighter fabric colors are needed, and one of the best options is silk as a material for tailoring a costume.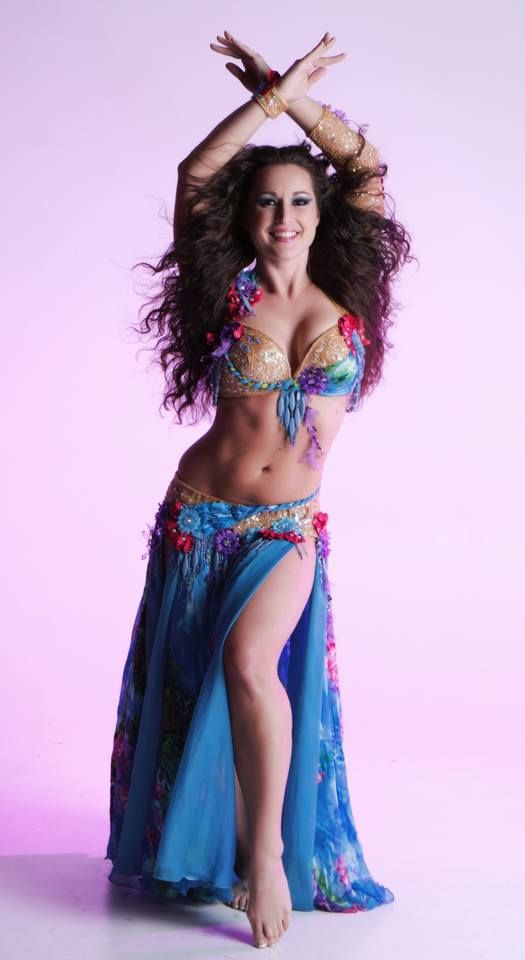 In addition to the material for such a costume, you may need various decorations - stones, rhinestones, beads, etc. As soon as the purchase of the necessary components is over, you can proceed directly to tailoring.
The costume consists of 3 elements:
- Bodice.
- Skirt or bloomers.
- Bandage. Over the skirt on the hips.
First you need to choose a bodice, it is best to buy a ready-made bodice, which can be transformed into a part of the costume with the help of simple manipulations. The bodice is better to choose, as shown in the figure without any patterns and decor, the usual solid color.
After you have found the most suitable bodice, many get rid of the internal filling of the cup. This should not always be done, but only if you naturally have your own large breasts and the push-up increases it even more and does not support it, as it is necessary for dancing. Many instead of push-up insert shreds of fabric, which gives rigidity and better fixes the chest.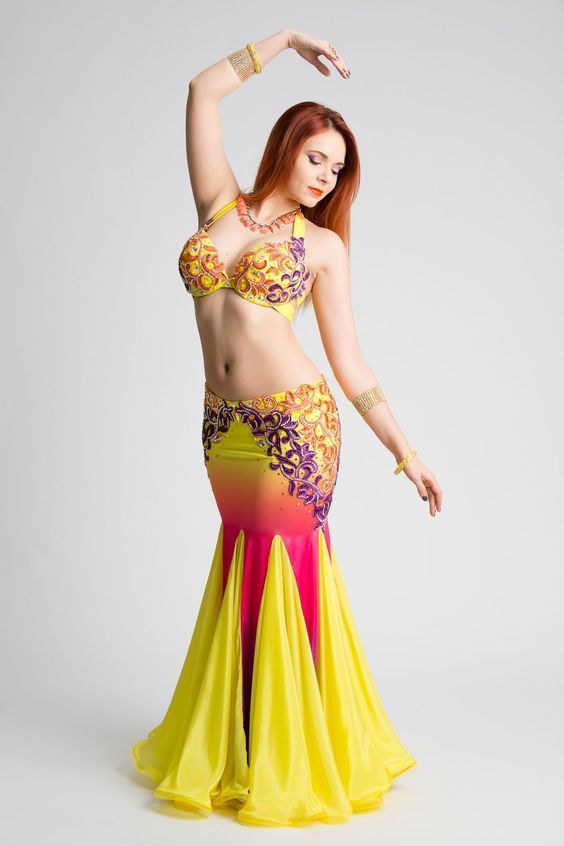
It is very important to change the hooks to this kind of rivet, as shown in the photo below. It is they who will support the chest more favorably during belly dancing.
And the last most favorite and most interesting point in the preparation of the bodice will be decoration. You can decorate it with absolutely any materials and according to your design.
After the bodice, proceed directly to the skirt of the suit.
First, measure the desired material size. Then we cut off the desired piece.
No lining needed. Elastic, threads and fabric - all you need for a skirt.
The elastic must be sewn to the waistband.
The hem of the skirt also needs to be processed so that everything looks as beautiful as possible and there are no protruding threads or uneven cut edges.
After the work done, we will get just such a skirt. Everyone chooses the right color and material from which to sew this skirt. It is also worth remembering that it should not be as long as possible and it is better to make one or two cuts on the sides. Then you can embroider and decorate this skirt with all possible beads, rhinestones, shreds from other materials.
The bodice and skirt are ready, only the belt remains to be sewn. The size and width of the belt can be different and vary only from personal wishes.
Using a sewing meter, measure the hips and transfer it to a piece of material. Next, we make a cardboard sketch of the belt itself.
After we outline the edges of the sketch and cut out the desired section of the fabric. This fabric needs to be stitched along all the edges so that the belt turns out to be even and beautiful.
Belt ready. It also needs to be decorated and the image will be complemented.
Patterns for a belly dance costume.
For beginners in the world of sewing, below will be given options for patterns, according to which it is as easy as possible to learn how to sew this kind of suits.
For those who decide to make a bodice with their own hands, and not to buy, this pattern is offered for viewing.
Skirt pattern.
Belt pattern.
DIY belly dance costume photo
These simple costumes can be made independently and relatively quickly.
The following options will require more time and more decoration materials. But the beauty of such outfits dazzles everyone.
These two outfits are insanely beautiful and bright, which makes the dance even more beautiful and sensual.
Any fashionista can make such an outfit, it just takes more time.
Do-it-yourself belly dance costume video
Now, you can also find a lot of videos with making a do-it-yourself belly dance costume. Here are the top 3:
Oriental dance costumes for girls with photo
Many modern girls are dancing. This skill allows you to make the body plastic, toned, to maintain posture. The classes themselves are distinguished by a riot of colors and a subtle touch of the mysterious East.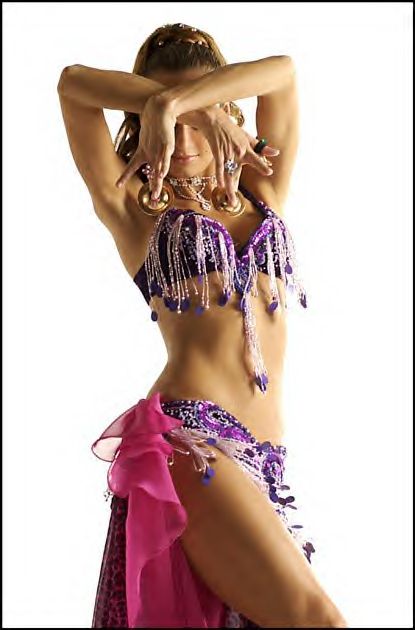 Often this theme is found at New Year's parties. After all, this is a great idea to replace the costumes of animals and snowflakes that have become boring for everyone with a bright image. We invite you to make oriental costumes for girls with your own hands. Delight the young model with a new outfit that will definitely come in handy in class or will be an interesting idea for a holiday party.
Mandatory attributes
So, back to the topic of the East. A traditional oriental costume for dancing can be either a trouser or a skirt.
The skirt model consists of a straight skirt or a sun skirt, sewn from a piece of light fabric or separate scarf fragments. The trouser suit is based on bloomers made of shiny translucent fabric. They can be either solid or have cuts on the sides, decorated with metal jewelry.
The top of an adult costume is usually represented by a luxuriously embroidered bodice, instead of which craftswomen often use a bra.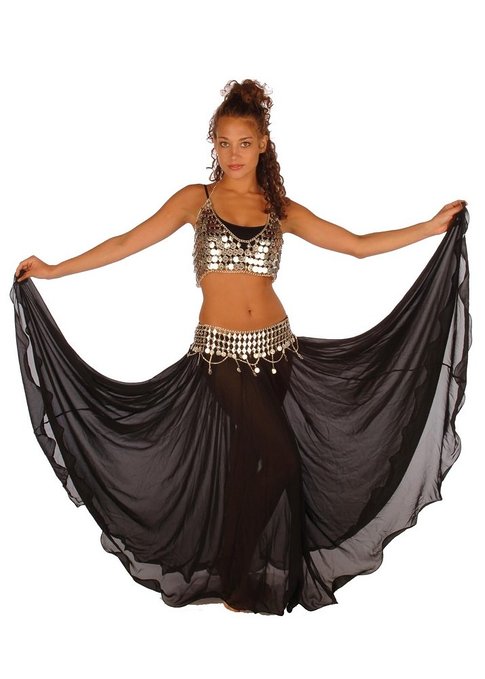 The children's costume consists of a top, also embroidered with sequins, beads, and decorative stones.
The image often includes a headdress consisting of an openwork ribbon adorned with pendants. A semblance of a veil can be attached to it. Children's images are complemented by lush armlets, which can be worn separately or attached to the top.
An indispensable attribute of a belly dance costume is a hard belt with beautiful embroidery, decorations and various pendants. It is he who is considered the highlight of the image, therefore, when creating a suit in an oriental style, special attention is paid to this wardrobe detail.
A special requirement is high-quality fastening. It is performed with buttons, Velcro, buttons, or firmly sewn to the base.
Why is this part so important? The belt visually increases the volume of the hips, which helps to create the effect of a greater range of motion during the dance.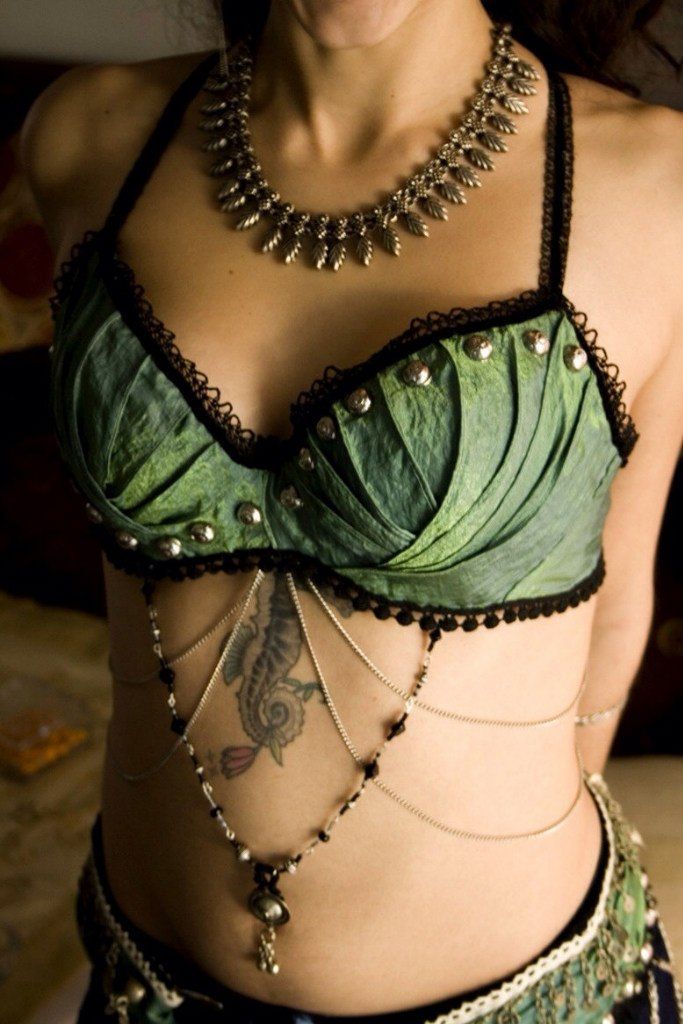 The hanging details of the belt also give the effect of mystery and draw the viewer's attention to the most important part of the dancer - the tummy.
Idea for a children's party
We suggest you create a costume for a 5-6 year old girl in oriental style. The baby can both use it for dancing classes and amaze everyone in a unique way at the matinee.
The costume will consist of a hat with pendants, a belt, trousers, a top. For its sewing you will need:
- golden cotton yarn;
- hook #2;
- beads, sequins, glass beads;
- sewing accessories;
- fabric - brocade, satin, organza;
- thin rubber spool.
If you don't know how to crochet, you can skip the hat step. It is enough to choose a beautiful ribbon and carefully embroider it with beads, decorating it with glass beads.
The hat can be knitted according to the simplest pattern.
The bottom is sized so that its diameter is equal to the size of the head divided by 3. 14. Strapping can be done with arches of air loops.
The finished cap needs to be embroidered with seklarus, forming droplets and pendants, as in the photo.
Bloomers are traditionally made wide, from translucent lightweight fabric. For their tailoring, special accuracy is not required, so you can use any pattern.
Topstitch the seams, iron the product, sew an elastic band into the waistband. Treat the lower part with an elastic band on the front side and decorate in the form of a ruffle.
For a top, make a simple pattern using a rectangle as a basis. The long side is equal to the girth of the chest, and the short side is the height of the product.
Sew on the side of the cut fabric and sew on the outside with ribbing in 2 cm wide rows.
Sew on the shoulder straps.
Use contrast fabric for the waistband. Stitch and turn the part inside out, insert the elastic into the back of the belt.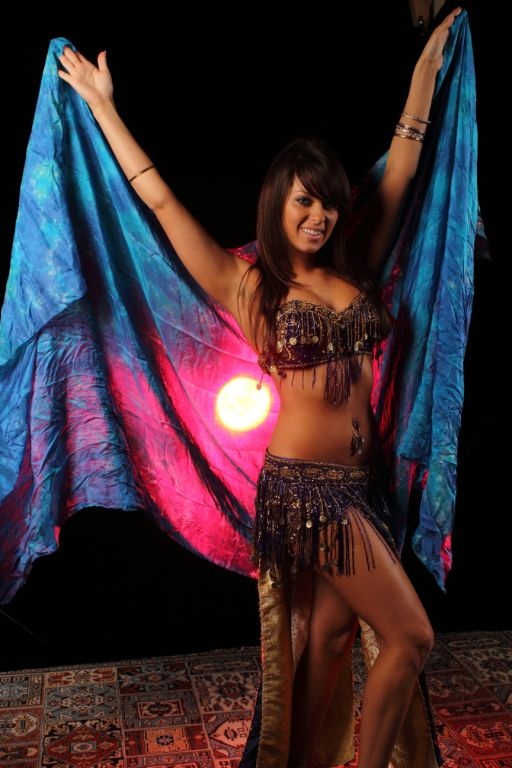
Now you have to do the most difficult and time-consuming work - to decorate the finished costume with embroidery, sequins, beads.
Oriental costume for baby is ready!
Costume with a skirt
For a 10-year-old girl who is engaged in oriental dancing, you can sew a costume yourself. We offer you a variant of a skirt suit.
The principle of making the bodice and belt remains the same as described above. It is better to use a shiny fabric, brocade is suitable. It will not only serve as a background, but will itself become an additional decoration of the image. The implementation of the skirt-sun is simple. Use the following pattern for sewing.
Cut out the lower part of the skirt from brocade or satin, and the upper part from organza. Cut out the upper elements arbitrarily in the form of petals or handkerchiefs. Sew the petals to the finished skirt along the edge of the belt.
You can even tailor a sun skirt and not stitch its details together, it is enough to strengthen them in the belt area.