How to loosen up your hips for dancing
Dance Advice | Flexible Hips and Hip Flexors — A Dancer's Life
Tight hips and hip flexor muscles are a common complaint for dancers. When your hip flexors are tight they restrict your range of motion, particularly hip hyperextension, which is required for that beautiful arabesque line we all long for. But what are the hip flexors and how can we prevent tightness and restricted movement? The hip flexors are a collection of muscles around the top of the thighs and groin which connect the upper leg to the hip. These muscles allow you to raise your leg and bend at the waist. Some of the main hip flexor muscles are the rectus femoris, tensor fasciae latae, artorius and iliopsoas. Tightness of these muscles can be a result of gripping in the front of the leg or sitting for long periods of time. The tighter these muscles get, the less flexibility we have which can lead to pain and discomfort. To compensate for the restriction that occurs as a result of this tightness, dancers tend to rotate the pelvis incorrectly, which can lead to further injuries, including lower back pain.
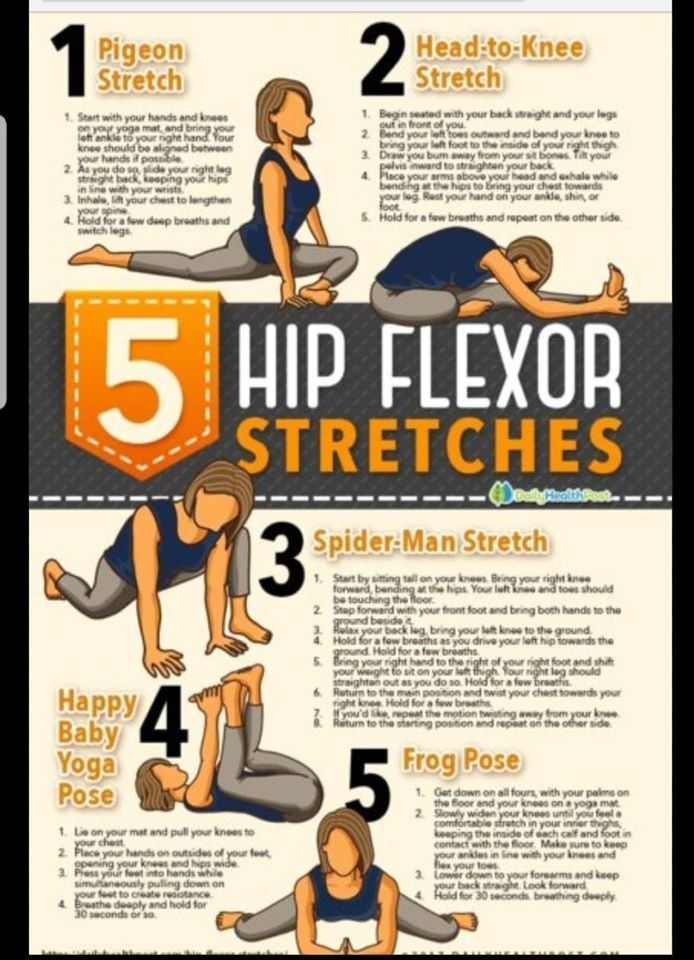
Pigeon Pose
Commonly seen in yoga practices, this stretch can be used daily to improve mobility and flexibility of the hips and hip flexors.
Begin on your hands and knees in a table top position.
Bring your right knee forward and place it behind your right wrist. Then place your right ankle in front of your left hip.
Straighten your left leg behind you, making sure your left knee is straight and your toes are pointed.
Keeping your hips square, gently lower yourself to the ground.
Hold the stretch for 15-30 seconds.
If you’re comfortable with this you can lean the upper body forward over the bent leg to enhance the stretch, arms stretched in front of the leg.
 Hold for another 30 seconds.
 Release the position by pushing up on your hands, lifting your hips and moving the legs back to the starting position on all fours. Repeat on the other side.
Kneeling Hip Flexor Stretch
This stretch can be performed daily with the intensity increasing each time you perform the exercise.
Kneel on your right knee.
Place your left foot on the floor in front of you at a 90º angle.
Straighten your upper body and place both of your hands on your left knee.
Extended your right leg behind you with your knee and top of the foot resting on the ground.
Drive your right hip forward to slightly deepen the stretch. Ensure to keep your core engaged and back straight.
Hold for 30 seconds then release. Repeat on the other side.
Static Hip Flexor Stretch
Best performed when your muscles are warm this stretch lengthens out the hip flexor muscles.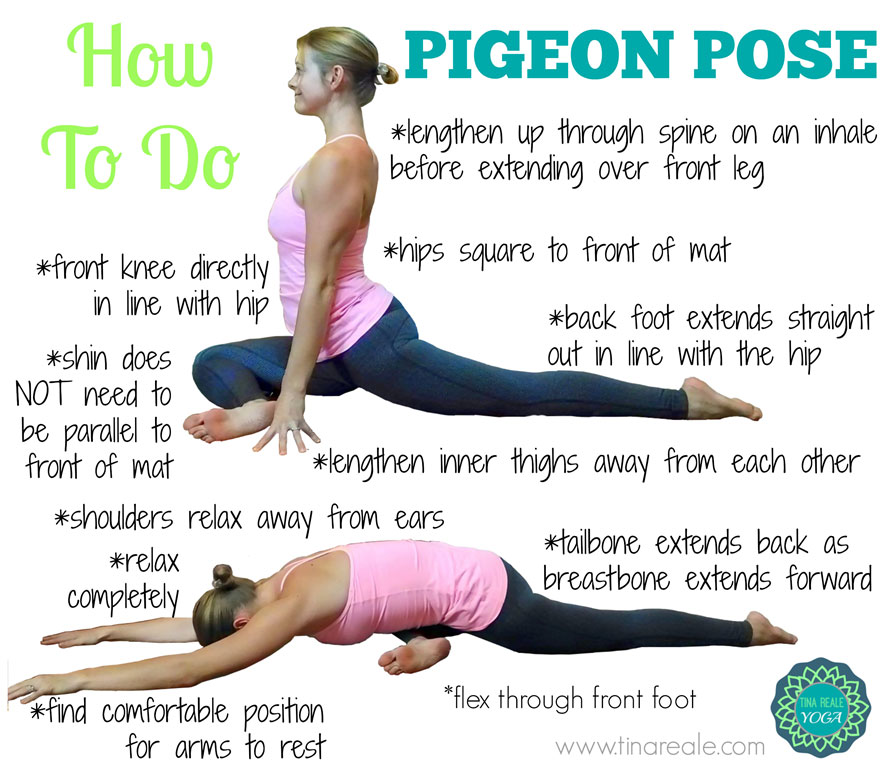
Kneeling on your right knee, place your left foot on the floor in front of you at a 90º angle.
Leaning forward, place your hands either side of the left foot .
Lift the back knee off the ground so you’re in a lunge position, maintaining a 90º angle with the front leg.
Hold the stretch for 15-30 seconds and then repeat on the other leg.
Butterfly Stretch
This is a great exercise to perform after sitting down for long periods of time or as part of your warm up or cool down.
Sit on the floor with both legs straight out in front of you.
Bring the soles of the feet together, moving your heels as close to the body as you can.
Lean your body forward over the feet with a straight back.
You can also push on your thighs with your elbows for a deeper stretch.
 Hold for 30 seconds.
Sitting Glute & Hip Stretch
The perfect exercise to do when you are watching TV, sitting at a desk or as part of your warm up/cool down.
Sit on a chair with your back straight.
Place your right ankle on your left knee.
Fold your torso forward until you feel a gentle stretch.
You can enhance the stretch by pushing down on the right knee with your right elbow as you’re leaning forward.
Hold for 60 seconds and then repeat on the other side.
If you feel your hips may need a little extra love, you can also incorporate the use of a foam roller or tennis ball into your warm up or cool down routine to assist with loosening the hip flexor muscles and surrounding muscles.
Emily wears the Lara Endurance Jacket, Dylan Legging and Neoprene Jazz Boot all in Black.
Hip flexibility and mobility is something that needs consistent work and attention. Some people will naturally have tighter hip flexors than others but that doesn’t mean they can’t also have flexible hips too. With regular stretching you’ll gradually start to see an improvement in your hip flexibility and strength which will flow into your dance ability.
For further tips and exercises to improve your flexibility and technique have a look at our Theraband Exercises for Dancers and Improving your Core Strength blogs.
Article by Sheree Ronai-Horvath
Photography by Elly Ford
Read More:
Thera-band Exercises for Dancers
So you want to be flexible…
Dance 101: Improving Your Core Strength
Dance Advice, Fitness, Health + FitnessEnergetikship flexor stretch, Hip flexor, Hips, flexibility, Dance Advice, exercises, Sheree Ronai-Horvath, Elly FordComment
0 LikesIncrease Dancer Hip Flexibility and Strength With These 5 Moves
I get asked a lot as a personal trainer for dancers about hip flexibility and strength. It seems to be an area of concern for coaches and dancers striving for flat splits, high kicks and extended leaps. The biggest issue however isn’t really a lack of flexibility, but a lack of movement in our every day lives. The increased time we spend sitting at work, school, in cars or buses causes our hip muscles to become tighter and shorter. This pulls on our low back and even our hamstrings. With these 5 movements, you’ll see a drastic change in hip flexibility but you can also enjoy some more movement in the back and legs.
1. Slide Reverse Lunge
Unilateral leg exercises like this one are great for imbalances in hip strength because you can focus on one side at a time. Many dancers are dominant on the right, so doing a slide reverse lunge can help the left catch up.
- Start standing with one leg on a towel or furniture mover.
- Keeping your core tight and chest up, slowly extend the leg on the towel backwards until you’re in an extended lunge position.
- Don’t go too far into the lunge, just enough to feel a stretch in the working hip.
- Press into the supporting leg and pull your working leg back into the starting position.
- Do 3 sets of 8 on each leg.
2. Assisted Hip Flexor Stretch
Unlike many stretches to increase hip flexibility, this stretch doesn’t involve a low lunge. Using your couch or wall you’ll be able to stretch your hip flexor and surrounding muscles like your quads. The movement is subtle but the stretch is intense.
- Come to all fours.
- Place one knee where the wall and floor meet and extend the shin up the wall. Place a yoga mat under your knee if needed.
- Use yoga blocks or tall books to help keep you balanced.
- Place your front foot in a 90-degree angle and position your glutes back toward your heel and chest up.
- Gently tuck your hips under WITHOUT lunging forward.
- Breathe deeply and hold for 30 seconds each side.
3. Assisted Splits
These “splits” are effective whether you already have a flat split or are trying to increase your hip flexibility and mobility. This stretch is a great follow up to the previous, or a warm up for a full split.
- Come to all fours.
- Place one knee where the wall and floor meet and extend the shin up the wall. Place a yoga mat under your knee if needed.
- Use yoga blocks or tall books to help keep you balanced.
- Place your front foot in a 90-degree angle and tuck your hips under.
- Gently extend the front foot while keeping the knee bent and foot flexed.
- Inhale and exhale slowly each time pushing deeper into the stretch
- Hold each side for 30 seconds
4. Hip Flexor Release
This is a fantastic choice if you need a low impact hip flexor stretch and a way to relax the low back. I recommend this for dancers who lack a lot of flexibility or beginners.
- Roll up a yoga mat or use a bolster and place it under your low back, right where your glutes meet your back.
- Begin by pulling one leg into your chest and extending the other straight.
- Hold for 30 seconds and let the weight of your body wrap around the yoga mat underneath you.
- Extend the same arm as leg above your head.
- Hold for 30 seconds and switch.
5. Heel Drive
This exercise to increase your hip flexibility takes a little bit of practice, but when you do it right, you’ll see your hamstring and hip flexibility improve almost immediately. Higher kicks and flatter leaps are just around the corner!
- Lie on your back and pull one leg toward your chest.
- Lace your fingers around your calf muscle allowing your knee to be slightly bent
- Extend the other leg straight, keeping it engaged.
- Use your arms; gently pull the gripped leg toward your chest and AT THE SAME TIME driving the same leg’s heel toward the floor.
- Press into your hands as if you’re trying to break the grip of your fingers around your leg.
- Press and pull for 5 seconds.
- Gently release, straighten the top leg and pull gently toward your shoulder, not your nose.
- Repeat 5 times on each leg
About the Author:
Katie Peyton is a Holistic Health Coach, Personal Trainer and world champion dancer. She has combined her 25 years of dance and her expertise in nutrition and fitness to create conditioning classes and nutrition lectures designed just for dancers. Katie empowers dancers to view themselves as athletes and gives them the tools to increase their strength, endurance, injury prevention, and overall performance.
For more, visit her website Dancer Fitness!
Check out her Instagram @ dancer_fitness.com_
Or email her at [email protected]
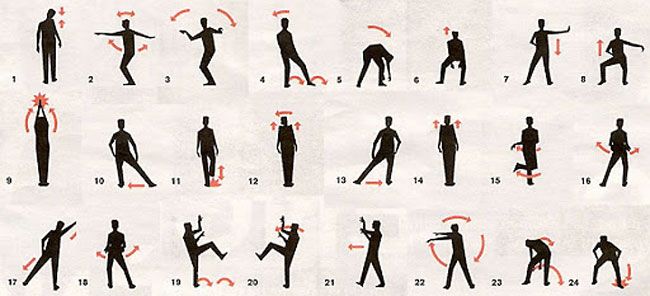
Hip movements.
 Belly dance. Master's Lessons. Advanced level
 Hip movements
Starting position: standing on a full foot, legs slightly apart (about the width of the foot) and located on the same line parallel to each other, the body is slightly tilted back, the back is straight, the stomach is relaxed, the arms are lowered along the body, the knees are “soft”.
Performing an exercise “Swinging hips back and forth (“inward” and “awayward”)”. We take the buttocks back as much as possible, while we do not deviate back, hands are brought behind the back. Then we draw the buttocks into ourselves as much as possible, and bring our hands forward with a smooth movement. We tighten the hips, sharply reducing the muscles of the buttocks so that the pelvis leans forward and up a little.
Hold this position for a few seconds. Then we take the hips back as far as possible - the legs and body remain motionless - and arch.
We work in the vertical (frontal) plane. Again, we reduce (squeeze) only the muscles of the buttocks so that the pelvis leans forward and up a little ("inward"). Movement of the pelvis forward and up - back and up, emphasis at the farthest point of this movement - again the pelvis "in itself" - again back and up, emphasis, etc.
Try to keep the movement in the frontal plane along the path of the lower arc of the semicircle. Remember your posture: shoulders down, back straight.
Starting position: standing on a full foot, legs slightly apart (about the width of the foot) and located on the same line parallel to each other, the body is slightly tilted back, the back is straight, the stomach is relaxed, the buttocks are tightened, the knees are “soft” and slightly bent, arms to the sides. We perform a rocking chair with the hips.
The rocking chair is performed by alternately straightening the knees: without changing the position of the left leg, we straighten the right leg at the knee, due to which the right thigh is “pushed” up and we sort of pull it under the rib (in this case, the lateral abdominal muscles contract).
While moving, do not tear off the heels and do not shift the center of gravity from foot to foot. The top remains motionless and does not sway during the work of the hips. We make sure that the hips move only up and down, do not take them to the side or back. They should be relaxed - only the knees work. Now we bend the right leg at the knee - we lead the left thigh up.
We continue the alternating movement with one or the other hip, without deflecting the body and keeping the line of the shoulders in the same position - parallel to the floor.
Imagine that you have a bowl of water on your head and your task is not to spill the water. You can also try to put a book on your head during this exercise and try to move so that it does not sway, much less fall.
Execute rocking hips to the sides in three counts: right-left and a little more slowly to the right - slightly slow down the knee extension until the movement starts in the other direction (without a pause in the movement), left-right and slightly slower to the left, slightly slowing down the knee extension until the next movement starts in the other direction. Movements should be smooth, unhurried, but continuous. Simultaneously with the rocking chair, we perform circular movements with the hands. Again we make a rocking chair with our hips to the sides without pauses. At the same time, we raise our hands up, at the same time performing rotations with the wrists along the trajectory of the eight. Repeat the movement with the hips at a fast pace.
If desired, the pace of side rocking with the hips can be increased even more: increasing it gradually and maintaining the rhythm, move on to shaking the hips. When shaking-rocking chair, the pelvis swings due to the work of the muscles of the lower back, the legs become freer. With this shaking, you can learn to walk quite easily. For example, climb on the "half-toes" and try to go forward with shaking, and then back. The faster the hips move, the more they need to relax. But don't forget to work with your hands.
If at first the shaking is good for you, and after a minute or two the muscles begin to “stone” and the shaking rhythm is lost, it does not matter. Stop, shake your legs alternately, relax your muscles and start shaking again. The vibration of the body is given by muscles relaxed at your will, and not by tension.
Performing a rocking chair at a fast pace, we take the pelvis forward, then back and then move in a circle to the left. So we impose movement "rocking hips back and forth" for movement "small circle of the hips in the horizontal plane" plus circular movements of the hands.
We connect the side rocker with the hips pulling with the hips, continuing to perform rotations with the wrists.
Hip pull is a basic element of oriental dance, a movement from the group of slips. It should be done every day during every workout.
Starting position: we stand straight on a full foot (legs are located on the same line), the body is slightly tilted back, the back is straight, the legs are shoulder-width apart, the knees are “soft”, the arms are at the sides.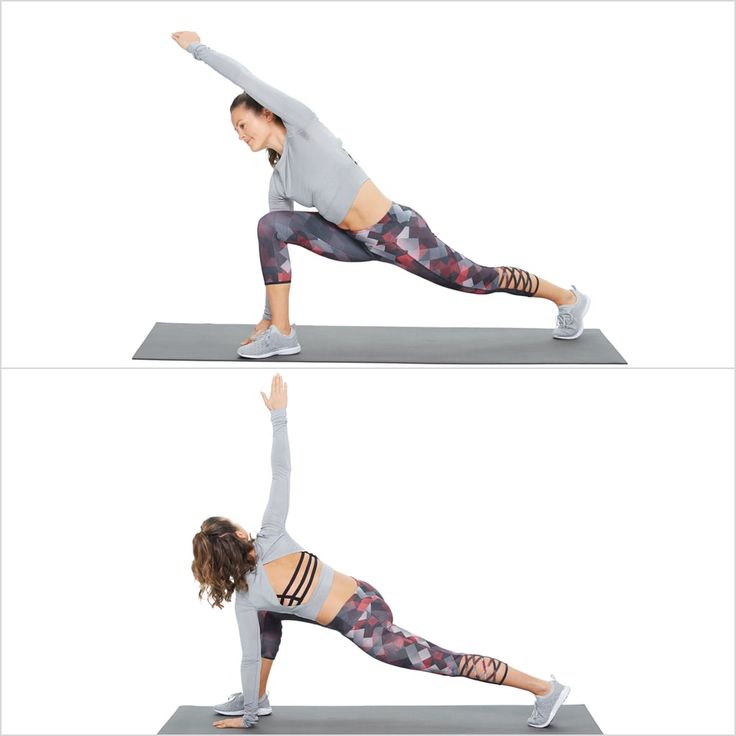 We take the hip as far as possible to the left (without ceasing to perform the rocking chair at the same time), leave the legs and the upper part of the body motionless and transfer the body weight to the left leg. Shoulders, belt line during pulling remain parallel to the floor, knees do not bend. We pull the hips to the right and transfer the weight of the body to the right leg. The hips move to the right and left with maximum amplitude.
Pulling with the hips stretches the lateral muscles, strengthens the muscles of the lower back and abdomen, perfectly tones the muscles of the waist, and also helps to prepare the body for further performance of various oriental movements (in particular, amplitude volumetric eights and rotations).
By sliding your hips, you can move back and forth and right and left.
After pulling with the hips, we move on to another basic movement, simple to perform, but effective and easily combined in dance with other elements, - eights. Let's start with the execution of horizontal eights (movements are performed in a horizontal plane clockwise and counterclockwise).
Horizontal figure eight backwards (“away from you”). While pulling, we lingered for a moment in a position where the left hip was maximally abducted to the left and, accordingly, the weight of the body was on the left leg.
Now we lead the right thigh diagonally forward to the right, turn it as much as possible and begin to outline the first half of the imaginary figure eight - we turn this thigh back.
Next, the left thigh is brought forward (the weight of the body is gradually transferred to the left leg), turns as much as possible (until you see your left buttock out of the corner of your left eye) and begins to outline the second half of the figure eight: to the left until it stops, and then back to the left.
Only the lower part of the body moves. Breathing remains even and smooth, like the movement itself.
You can help yourself a little: when the hips are twisting in one direction, slightly twist the body in the other (so that the hips do not drag it along).
Straight knees, feet that remain parallel, and heels that stay on the floor will help to achieve a smooth, soft and continuous movement. Imagine that you are making your way forward without the help of your hands through some rather dense, viscous substance and, as it were, are raking it with your hips, alternately pushing it to one side or the other.
This exercise increases the elasticity of the ligaments.
Movement "horizontal figure eight forward ("inward")" schematically looks the same as the previous one, only performed in the opposite direction. We take the left thigh back diagonally to the maximum twisted position (in which the chest still remains motionless).
The weight of the body is transferred to the left leg. With a smooth circular motion, we describe half of the eight forward with the left thigh, maximally turning the right thigh back. We transfer the weight of the body to the right leg.
In a circular motion, move the right thigh forward and describe the remaining half of the figure eight. We try to bring the hips forward no less than back. We do not turn our shoulders. They must always look ahead. If you are still not very good at “separating” the top from the bottom, try doing the figure eight with your whole body first. I managed to catch the trajectory - you can move on to fixing the body and start moving only the hips.
Try to bring your hips forward no less than back, then the movement will be smooth and symmetrical. Keep an eye on the upper body: it should remain motionless, but not enslaved, keep the line of the shoulders parallel to the floor line.
When performing the figure eight, the legs should be placed parallel to one another and on the same line, not just for stability or beauty: if you put them in eversion positions (heels together, toes apart), then, involuntarily pinching the buttocks, limit the amplitude of their movement.
Another version of the eights with the hips - vertical eights, or, as they are also figuratively called, "pendulums". The second name of this dance component was not born by chance: remember how the pendulum of the clock moves, describing the lower semicircle of an imaginary circle, like a young crescent turned upside down with “horns”. The oriental dancer reproduces the described trajectory with the help of hip movements in a strictly vertical plane. Vertical eights can be performed, like horizontal ones, in two directions opposite to each other: “away from you” (from top to bottom) and “into yourself” (from bottom to top).
We still stand on a full foot (legs are on the same line and parallel to one another), the body is slightly tilted back, the back is straight, the buttocks are tucked up. But now, to perform the "pendulum", put your feet together. Body weight on the left leg. We tear off the right heel from the floor and raise the thigh as high as possible.
The weight of the body is gradually transferred to the right leg. Further, drawing a quarter of a circle to the right and down, we begin to lower the right thigh, at the same time pushing it as far as possible to the side, that is, to the right. From this extreme side point, we continue to lower the thigh to the lowest point of the circle thanks to the “soft” knee. Body weight on the right leg. We put the heel of the right foot on the floor and lower the right thigh down.
Now tear off the left heel (knee is relaxed), lift (due to lifting the heel off the floor) the left thigh up (as if leading to the armpit) and push it to the side as far as possible, without deflecting the body in the opposite direction and outlining a rather steep semicircle of the imaginary eights.
Pull the thigh towards you, returning to the starting position. We continue to draw symmetrical circles in a vertical plane. The body should remain motionless, and the line of the shoulders should be parallel to the floor line.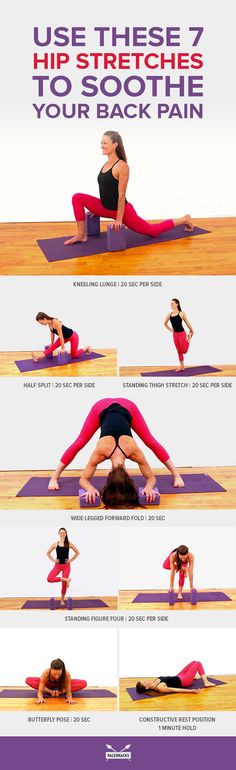 Add hand movement to this dance element.
Hands in oriental dance move depending on the nature of the music, and therefore often their movements do not coincide with the movement of the hips: the hands work at least twice as slowly as the hips. If the hips are the rhythm, then the arms are the melody.
From the previous starting position, smoothly proceed to the next movement - step Suher Zaki, or "stilts".
We stand on straight lines, located on the same line parallel to one another on toes, the body is slightly tilted back, the back is straight, arms to the sides. We begin to alternately lower the heels to the floor in three counts. We lower the heel of the left leg - the left thigh goes down, then we raise the heel of the left leg, returning to its original position (on the toes), and lower the heel of the right leg.
Left - right - left - paused for a moment. Right - left - right - lingered for a moment. And so several times in a row in the rhythm of the sounding melody. We do not bend our knees - we only raise our hips. The head is on the same level: the movement occurs mainly only due to the hips. Continuing to perform the movement, alternately tear off the legs from the floor.
And now we “walk” on the spot without delays and stops, but still in time with the melody.
If this movement is performed correctly, you will feel the movement of the oblique muscles of the abdomen.
Performing the following exercise − hip dumps (otherwise - hip-down strikes). Starting position: standing in a half-squat and half-turned to the viewer. The body looks forward, the hips and legs are turned to the side at an angle of 45 °. We put the leg closest to the viewer (mirror) (working in this movement) in front of the one behind, on the toe, and expose its thigh and turn it forward (toward the viewer), as far as the body allows. The back is straight and slightly tilted back, arms are spread apart.
Try to keep your knees together while moving.
So, keep your chest and shoulders straight. We start the movement with the left foot, so we put it on the toe in front of the right, raise the right hand up, take the left hand to the side. Raise the thigh of the working leg up by straightening the knee, then sharply lower (throw) the thigh, again bending the working leg at the knee.
Do not lower the heel to the floor. We do the emphasis while moving down (at its maximum lower point). At the same time, the hands make smooth circular rotational movements. We repeat the movement a few more times, and then change the leg - we become half-turned to the viewer (mirror) with the right hip forward, respectively raise the left hand up, take the right hand to the side and work with the right hip.
If you relax your hips well and bend your leg at the knee, the hip will "fall" by itself.
Let's complicate the main movement "hip drop" with a leg extension, and we get a new movement - "classic key" (thigh drop with leg extension).
Starting position - as in the previous exercise: standing in a half-squat and half-turned to the viewer. The body looks forward, the hips and legs are turned to the side at an angle of 45 °. We put the leg closest to the viewer (working in this movement) in front of the one behind (supporting), on the toe, and expose its thigh and turn it forward (toward the viewer). The back is straight and slightly tilted back, the arms are spread apart (option - the arm of the same name as the supporting leg is raised up).
We perform one reset with the right hip, the emphasis is while moving down (at its lowest point). Raise the right thigh again, and then lower it, while throwing the right leg forward, the toe of the foot stretches forward and down.
Raising the hip up each time, we continue to alternate the impact with the hip down (hip drop) with the hip drop with leg extension.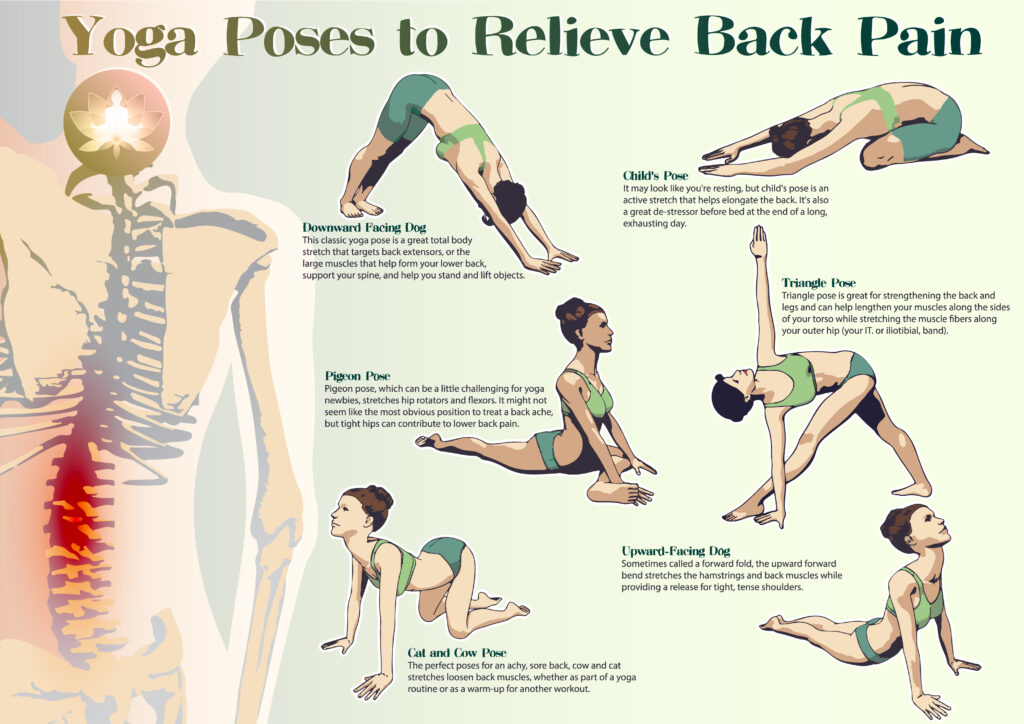 We perform this movement several times, and then change the leg - we work with the left thigh.
"Key" can be performed on weight. In this case, when the leg lunges forward, its toe does not touch the floor, that is, we keep the leg in the air.
We continue to develop the spine and back muscles.
We change the starting position: we stand on a full foot, legs slightly apart (about the width of the foot) and located on the same line parallel to each other. The body is slightly tilted back, the back is straight, the stomach is relaxed, the knees are “soft”, the arms are at the sides, the weight of the body is on the left leg (as in a pull).
Execute semicircle hips.
We take the hips forward - the body deviates back, but the head does not throw back in any case (!) - and take it to the right, outlining (with maximum amplitude) an imaginary semicircle.
Now let's do a full circle.
Hip circle is a movement familiar to each of us since school or even kindergarten times. He was certainly included and is still included in a variety of gymnastic complexes called "hip rotation".
At first, to help you check if your shoulders and upper chest are moving horizontally or vertically during the exercise, you can put your hands on your shoulders.
Combine the semicircle with the hips forward with the semicircle back and perform a full circle with the hips to the left on straight legs. The hips move along all four points: we take them forward (the body leans back, but the head does not throw back), we take them to the left, wrapping the hips, we take them back, transferring the body weight to the right leg, we take them to the right, etc.
While the hips make a circle, the head, shoulders and arms remain at the same level. We repeat the rotation of the hips to the left again, and then we perform a circle in the other direction: right - forward - left - back, trying not to move the upper body and keep the line of the shoulders parallel to the floor line.
This text is an introductory fragment.
Driving mode control information
Driving information When driving a car, the driver receives a huge amount of information, but attention must be focused on the main thing that determines the traffic situation at the moment or interferes with traffic and threatens to run over or
Circle movement adjustment
Adjusting the movement of the circles The speed of movement of the circles depends primarily on the specific gravity of the material from which they are made (foam and cork circles float faster in the wind than wooden ones). The thicker the circle, the faster the movement. At the circle with a thick and
Breast movements
Breast movements Check your posture. Stand up straight, pull in your stomach, push your chest slightly forward, both feet are stable and firmly on the floor, arms are spread apart. We start chest movements. Without moving the lower part of the body, we raise (push out) the chest with a short movement
Tilt motion
Tilt movements Let's move on to the movements in the pull. Starting position: stand straight on the full foot (legs are on the same line), the body is slightly tilted back, the back is straight, the legs are shoulder-width apart, the knees are “soft”, the arms are at the sides. Pull the hips to the right and shift the weight
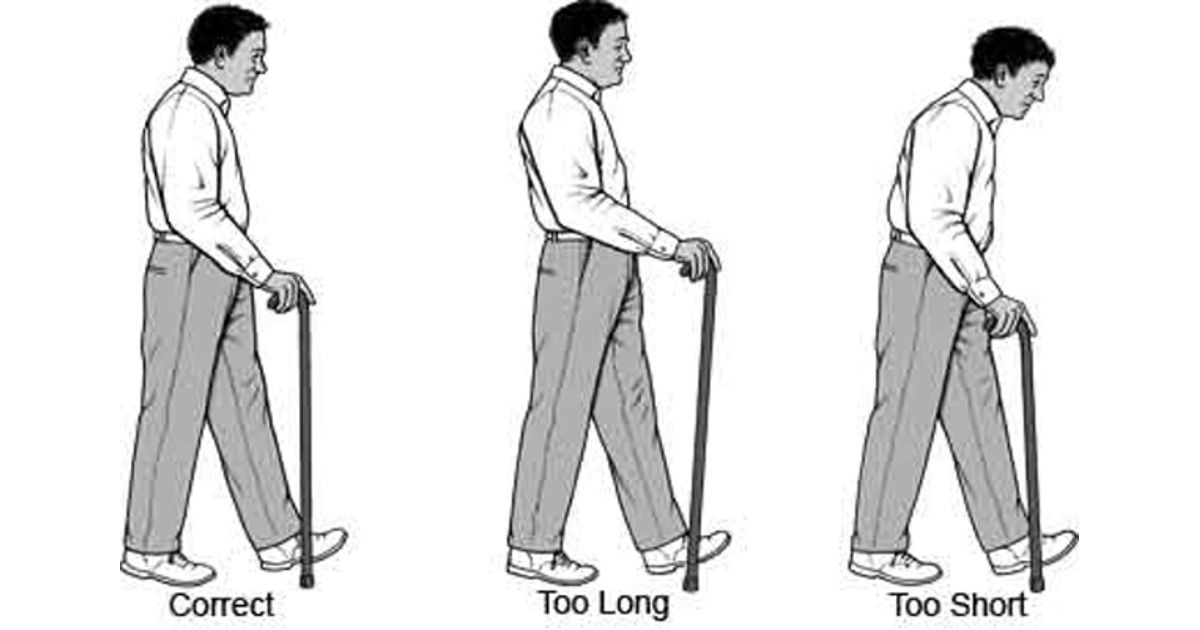
Walking with cane on shoulder
Walking with a cane on the shoulder Holding the cane on the right shoulder, perform penetration "C grade" with a turn in place around its axis in the direction to the left. Raise the left thigh and leg, bent at the knee, up. Then we lower the thigh down (while the left leg is still
Movement with shawl
Movements with a shawl The dance with a shawl (scarf, veil, handkerchief) is one of the most traditional. A scarf can amazingly transform, decorate the movements of a dancer. Its possibilities are almost limitless, and therefore working with it is a special pleasure. Competently
Travel speed
Travel speed One of the key factors affecting the efficiency of the car is the speed of movement. Everyone knows that the most economical driving mode is driving on a country road in calm weather at a speed of about 80–90 km/h at the highest (in
How the motion sensor
works How is the motion sensor In the middle of the sensor there are receivers of IR light - photocells. The Fresnel lens consists of many small lenses, each of which focuses IR light on the plane of the photocell, and one of them focuses directly on the photocell itself (signal
Motion sensor infrared Camelion
Infrared motion sensor Camelion The motion sensors of the Chinese company Camelion are widely and varied in stores. Economy-class infrared sensors, which were created as energy-saving switches, primarily lighting, although their functions are almost
3.5.6. Motion detectors LX-19B and LX-2000
3.5.6. Motion detectors LX-19B and LX-2000 Infrared motion sensors are commercially available, adapted in shape to wall light switches for flush wiring (Fig. 3.62) LX-19B and LX-2000 (Fig. 3.63) manufactured by the Chinese company Litarc Lighting & Electronic Ltd. Rice. 3.62. Household light switch
3.
 5.8. Setting motion sensors
 3.5.8. Setting motion sensors Sensors are adjusted by potentiometers; usually there are three of them (Fig. 3.69): • to set the sensitivity of the sensor (SENS), the brightness of the IR light is set, to which the sensor must respond; • to set the delay time for switching off the lighting
Dive into the depths of the dance. Structure and movement: zoukability — LiveJournal
Author: Murasheva NadezhdaThe article is a continuation of the first part: "Dive into the depth of dance. Muscles"
I met the concept of structure only in the last year of my active motor activity, which I think it's pretty weird right now. And at first I didn’t really understand what the meaning was in this concept in relation to the body and dance. It was only by delving deeper into the workings of the body and studying the physiology of movement in instructor courses that I began to understand what structure is and how it relates to our body and movement.
The phenomenon of structure is large and multifaceted, and I did not put everything at once in one huge article. Today I will share with you a general understanding of structure, the most comfortable, functional and safe body structure for dancing and the differences in structure in different workouts. About the secret of an interesting, varied, artistically filled dance.
WHAT IS STRUCTURE?
In the explanatory dictionaries, I found the two most suitable interpretations that apply to the structure of the body:
- "A certain interrelationship, mutual arrangement of components, structure, arrangement of something"
- "A set of internal connections"
That is, the structure of the body is what our body consists of (bones, muscles, nerves, vessels, etc. - their structure, location, functions), and also (which interests me much more) is the relationship of the components of the structure to each other. Today I will give you the basic idea of how it works and how it affects the dance, and next time I will continue on a deeper level.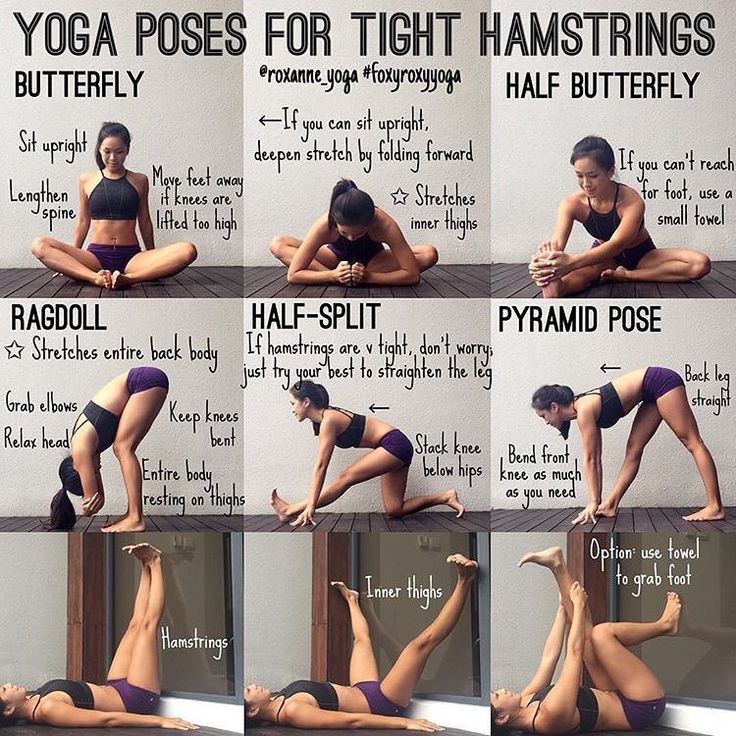
STATES OF MUSCLE TONE
In the context of this article, I will not analyze the structure of the muscle fiber as its structure, this is not necessary here. I am interested in the structure of different muscle states as a more global phenomenon that can be felt, touched, it can be consciously changed and used both in dance and in life.
So, there are three states available to any of our muscles: relaxation, tension, stretching.
Relaxation
Soft muscle, limp, feels like a piece of jelly. There is no tension in it, and, accordingly, there is no movement.
Unconscious relaxation of the muscle:
1) Normal healthy muscle: worked, got tired, after the completion of its work, it relaxed, since its further work is not required.
2) Weakened muscle (hypotonicity): does not work for some reason. Making it work at first is extremely difficult, all exercises feel very difficult and nasty (typical exercises for training the thoracic spine). Usually it is not felt in any way, as if it, in principle, is not in the body.
Mindful muscle relaxation:
We can adjust the speed of relaxation - in dance or in special slow exercises (Pilates, etc.) We can also consciously relax something that is chronically tense - for some this can be difficult, and this needs to be learned.
Tension
Rigid muscle contracted to perform some action. The greater the tension, the shorter and stiffer the muscle becomes. Tension can be dynamic (tightened up, performed an action - relaxed) and static (loads to hold a certain position, move a fixed support, etc.). Figuratively, tension can be compared to a spring compressed before a shot. After the shot, the spring should relax and return to its normal physiological state - relaxed, not compressed and not stretched. If this does not happen, then there is a dysfunction (hypertonicity) that must be dealt with, otherwise it will contribute to the development of more serious problems.
Unconscious muscle tension:
1) Healthy muscle: our nervous system controls the tension itself to perform any action (jump, bend, run, squat) - we do not need to think about the tension of all the necessary muscles in order to move It happened.
2) Muscle in hypertonicity: chronically tense, while not performing any action (lower back, upper trapezius, postural muscles of the spine). Rigid, immobile. At best, we feel its tension, stiffness, sometimes pain, we want to stretch and relax it. At worst, we live with this tension and are not aware of it until it leads to further problems. Here you need to spend extra time on learning to notice your tension, and then this will allow you to continue working on the problem. Chronic tension leads to infringement of nerve endings, to poor blood supply to muscles, connective tissues, internal organs, to the development of osteochondrosis, protrusions and diseases of the joints, to stretching of the tendons. I’ll tell you about the causes of chronic stress another time, I’ll tell you the great Secret ;))))
Conscious muscle tension:
This is when we consciously perform any movements or exercises, tracking the technique and condition of our muscles. A necessary stage in order to develop muscle memory in oneself and then move correctly already unconsciously.
Traction
An elongated muscle that is in moderate tone and maintains this condition for some time. Not over-relaxed and not over-stressed. It can be compared to a stretched string or a bowstring. An important condition necessary for the correct execution of many movements, maintaining balance, for the health of the spine, and even just for plastic surgery. You need to learn how to move forward. If a person does not know how to do this, then he will perform all movements through tension, because he cannot do otherwise. Then his body will be rigid, movements angular and sharp. If you are not completely sure that you understand the essence of stretching and do not know for sure whether you can do it, then you do not know how. When you master stretching, there is no doubt what it is and how to do it. This is a real physical sensation that you cannot confuse with something else.
Unconscious stretching : yawned, stretched.
Conscious stretching: we intentionally stretch our body in exercises, in dance. Ballet, Pilates, yoga will help you.
For harmonious control of one's body and technical dance it is important to be able to control all three states, switch them, combine several states at the same time.
Structure as a combination of states of muscle tone
In the dance there is a constant alternation of these states. Usually everything is built on traction. This allows you to keep a good balance, makes movements soft, flexible and strong at the same time, protects the joints from compression. By the way, all joint gymnastics and all Pilates are performed in traction.
In Zouk (with proper technique) we clearly see the constant alternation of stretching and relaxation. The same thing happens in contemporary and jazz-modern. In ballet, ballroom and more static styles, there is much less relaxation, and all movements are done on the stretch of the body, arms and legs.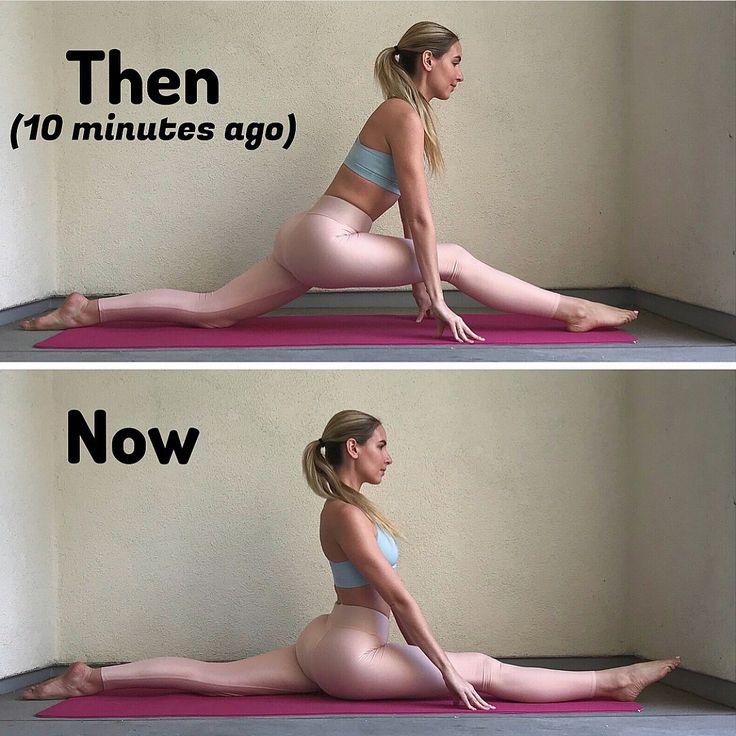 In contact improvisation and qigong, on the contrary, there is much more relaxation. But tension in all dances and many bodily practices is present only occasionally when performing some more complex elements and tricks: jumps, lifts, squats. If you are constantly tense in the dance, then you are clearly doing something wrong. Tension is the essence of strength training, not dance.
I think you yourself understand that in dance there will rarely be tension or relaxation in the whole body at once. Tension - in general, still happens - in ballet, etc. But complete relaxation can only be in contact improvisation, when we completely give our weight to the floor or partner. However, the zouk appears to be a very relaxed dance. Why?
In fact, in dance there is a simultaneous combination of states in constant dynamics. In Zouk, the most important thing is to stretch the body and relax the shoulder girdle. This is what allows you to make movements so plastic and flying. Only with a relaxed chest and a relaxed top of the trapezoid will it be possible to make beautiful, soft bones, waves, headworks, and so on. To prevent the body from falling apart and losing balance from this relaxation, the taut structure must be maintained in the center. If your center is something else (jelly or one big strain), then you will not have the physical ability to normally relax the top, and then you will move through tension in the chest, shoulders and neck. Visually, it may even seem flexible and beautiful, but physically you get very tired and feel badly leading / following a partner through your tension. In addition, this tension indicates the absence of a frame.
Spoiler for the next article: if your shoulders rise, then you do not and cannot have a frame. If you are a partner, then you lead with your hands, if you are a partner, then following goes through guessing.
What about the legs? The legs should be soft, this is important for balance, for even distribution of the load throughout the body and for good depreciation - then it does not burden the joints. If the legs are too sluggish, tangled, or, on the contrary, too stiff, then they do not perform this function, and you get an increased load on the spine and knees, as well as a constant overstrain of the muscles of the body.
Let's get back to understanding structure. What will be the structure of the body in the dance?
The whole pattern of tension and relaxation.
Stretched spine, soft legs, light top is an example of structure. A tense wooden body is also a structure, just uncomfortable and non-functional. A weak center and raised shoulders are also structure. I perceive the structure as a set of different materials and qualities of these materials, from which the building of our body and our dance is built. One builds with rubber bands and strong flexible bases, the other with cardboard and snot.
FRAME is also a structure. And in different styles of dance, the structure of the frame is different. The position of the hands, the degree of tension, the manner of touching, the tone of the shoulders, and so on - all this matters.
Grounding and overestimation of the center are also nuances of the structure. In some dances we gravitate more towards the floor (west coast, contempo, improvisation), in some we rush upwards more (ballet, lambazook).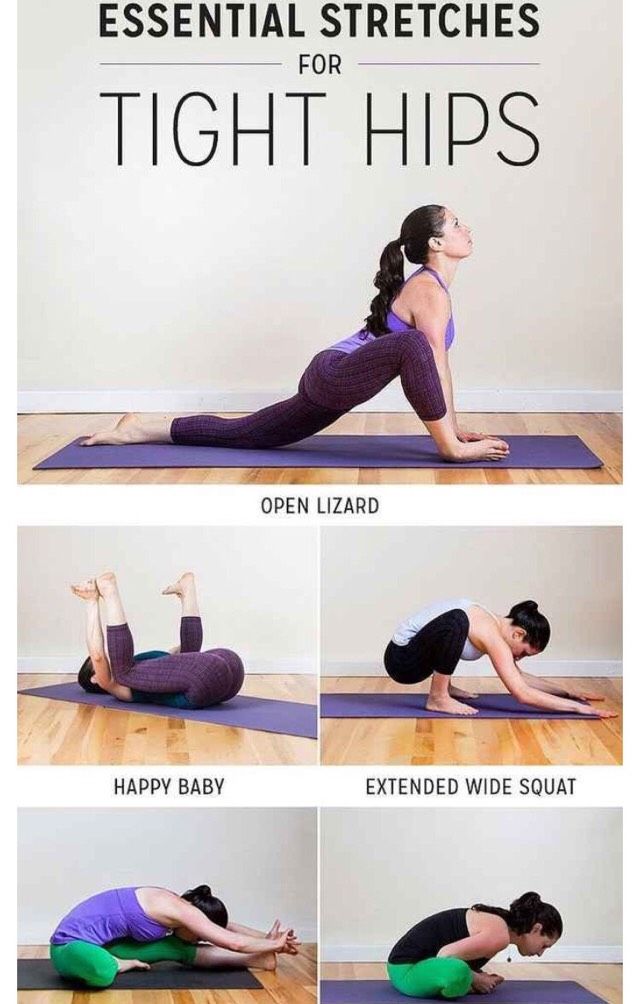 Zouk, in my opinion, is universal and allows you to play with the height of the center, which, in turn, will affect the manner of movements and the nature of the interaction of partners. The height of the center will depend on the height of the frame, on the degree of relaxation, on the structure of the bodies of both partners, and on each specific movement and point of contact. Even from shoes. Like it or not, heeled shoes raise the center higher.
Structure and interaction of partners
Rigid body poorly transmits movement and impulses. A tense partner will feel badly leading. A tense partner will lead the partner at the “volume level” available to him, conditionally, yell in her ear. Even if it is a very soft, sensitive partner. He cannot be quieter, simply because then he himself will not hear his words. He does not realize that "quieter" exists, and that this is actually the norm, and not a whim of a partner ("how picky you are"). For him, the norm is to yell in the ear. That's where the problem is.
An over-relaxed, shapeless structure also distorts the interaction, the movement loses control and manageability. In this state, it is easy to get injured, sprained by negligence and inattention.
Only the state of soft tone on the stretch makes the dance sensitive, pleasant and well controlled.
If we imagine the interaction of partners as a pair structure, then it is also heterogeneous. In an interesting dance, this structure will change: it will become softer or denser, tighter or more airy from movement to movement, depending on what is happening in the dance, on the music and the feelings of the partners. Contrabalances and supports require more stretch and tone. Fingertip contact requires a subtle air pull (in the tooth), which can then go into counterbalance or support. Bodyworks can be very soft and gentle or active and rhythmic. A good dancer is not subject to the same structure (because he doesn't know how to do it differently), he manages his own structure as an artist. This makes the dances exciting, expressive and different from each other, perfectly keeps the attention of the dancers in sensitive contact with each other.
An example of playing with structure in a dance. If you want a deeper understanding of what I'm writing about here, find moments in the video where relaxation, grounding, stretching up and to the side, interaction with the partner's weight, changing dynamics are used. Think about where Anderson and Brenda use their core muscles to move, and where they relax and give their body to gravity and momentum.
Structure and internal state
The structure of your body, the nature of movement and the internal state are closely interconnected and mutually influence each other. Your mood and mental characteristics affect the structure of your body both at the moment and in general (psychosomatics), which in turn affects how you dance and how you want to move. From the dance and movement of a person, you can tell a lot about him and his model of interaction with the world. And, on the other hand, work on the manner of movement, relaxation and stretching exercises will affect your mental state and mood, can even lift layers of old traumas and memories and serve as light therapy for the experience, and this will change the way you feel, how you move and what decisions you make. This is the basis of body-oriented and dance-movement psychotherapy.
This is where I wrap up today. To begin with, I wanted to convey a general idea of \u200b\u200bthe structure and its influence on movement. Think about what structure you usually dance with, do you know how to manage it? What works and what doesn't and why, in your opinion? Have you noticed how your structure changes with your mood?
Next time I will share the knowledge about the structural relationships in our body, which I received only in instructor courses. This will already give an understanding of the causes of tension in your body and a practical key to how to make your movement easier. It will be clear why it is pointless to ask someone to just drop their shoulders and why practicing the frame only on dance moves leads to almost nothing.