How to do a needle in dance
How to Get a Needle
Featured Image: Front Row Cheer Photos & FloCheer
I get so many messages asking for needle stretching tips and there are so many components involved it’s hard to describe everything in a short DM – so here’s a full description!
A needle is quite difficult to do and should be trained properly to avoid injury. This means knowing which areas to stretch and which muscles to engage in the position.
Just because someone has a needle that looks nice does not mean they are doing it safely or correctly.
So that you can get a better idea of what exactly is required of your body to bend into this position, let’s break it down into upper body and lower body sections.
Upper BodyForget the Lower BackYour shoulders and spine are the key areas involved here. Many people think the lower back is where all the bend should come from, but this is not true. In fact, trying to bend the lower back as much as possible is dangerous for the spine.
Take a look at this image highlighting the different sections of the spinal column. The yellow (lumbar spine) is where most people try to bend through when doing bridges, scorpions, needles, etc.
Although you do need some movement here when back bending, you shouldn’t rely only on that section. If you do, you end up placing compressive loads on the small joints of the vertebrae, which can cause back pain or even stress fractures if done enough.
Instead, you want to bend more through the blue area (thoracic spine), which will take load off of your lower back and allow you to bend further.
Improving mobility in this area of your spine will also allow your shoulders to move more, making it easier to raise your arms overhead and reach back to grab your leg.
Get Your Shoulders MovingPectoralis MinorTo further help the back bend, you must also improve the flexibility of your pectoralis minor and latissimus dorsi.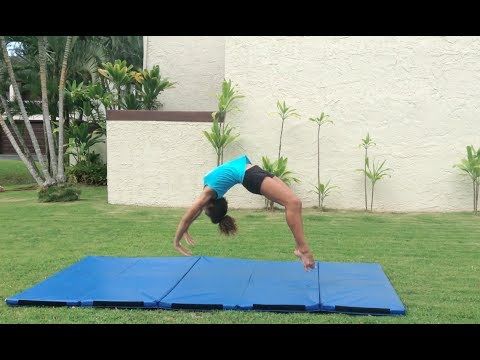 These muscles help to bring your arms overhead.
Your pectoralis minor, or pec minor for short, lays underneath your pec major, which is the main chest muscle you probably already know of. The pec minor attaches to your ribs and scapula (shoulder blade). Since your shoulder blade must move to allow your arm to lift overhead/up by your ears, a tight pec minor will restrict this movement.
Latissimus DorsiYour latissimus dorsi, or lats for short, are located on your back. The majority of the muscle originates from your thoracic spine (discussed above) and attaches onto your humerus (upper arm bone). By looking at the photo, you can see the lat on the right side will need to lengthen to allow the right arm to raise up overhead. If your lats are tight, it will be much harder to move your arm this way.
Lower BodyHamstringsThe hip and leg muscles are often ignored when stretching for a needle. If you look at the position, it requires a perfect split at minimum, so stretching the lower body is equally as important as the upper body!
There are two main muscle groups that require stretching: the hamstrings and hip flexors.
The hamstrings are a group of muscles located on the back of your thighs and the hip flexors are a group of muscles located on the front of your hips, attaching to your spine.
When pulling a needle, your bottom leg requires hamstring flexibility and your top leg requires hip flexor flexibility. Splits require the same muscles to be stretched; front leg involves the hamstrings and back leg involves the hip flexors.
Hip FlexorsTherefore, when stretching for a needle, focus on getting a 180 degree split or an oversplit with correct alignment.
The importance of a split with proper hip alignment cannot be stressed enough! If your back hip/leg tends to turn out when doing splits, re-position yourself so your kneecap is facing straight down into the floor. You will most likely go higher up in your split and feel like you became less flexible, but in this position you will be able to stretch the right muscles and place less strain on your hip joint.
How to Hold a NeedleIt’s important that you hold your needle with the right posture, not just so it looks pretty but also so you don’t stress your joints.
Like when doing the splits, you want your hips to remain square – meaning the hip of your top leg doesn’t turn out to the side. The photo below shows incorrect alignment of the hips.
Incorrect alignmentInstead, you want your knee to face backwards, like this photo.
Correct alignmentKeep Your Chest Facing ForwardYou should avoid trying to twist your upper body to get closer to your leg. Bending to the side is faking a needle in a way, since your spine is not properly aligned.
If you find you have trouble getting your opposite arm (if you’re pulling a left leg needle, this would be your right arm) up to your leg, work on stretching everything on the opposite side. This includes trying to pull needles on your “bad” side.
Engage Your GlutesThe last, and one of the most important things to focus on, is engaging your glutes! You must use your butt muscles when doing any type of back bending, especially if you complain about low back pain.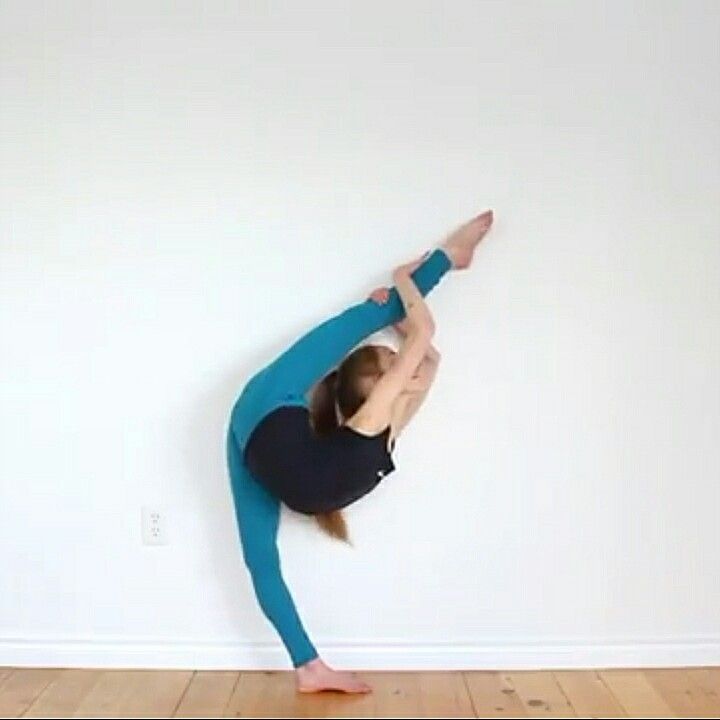
Your glutes act as a hip extensor, meaning they help pull your leg behind you. If you engage them while you stretch, more of your back bending motion will come from your hips, rather than your lower back. This decreases the compression on your spine, especially when combined with improved thoracic spine and shoulder mobility!
Reminders & Key Points- Stretching takes time… lots of time! Be patient.
- Stretch consistently, at least a few days a week
- Always do a thorough warm up before stretching
- For needles, focus on improving your shoulder & T-spine mobility, and your hip flexor & hamstring flexibility
- Engage your glutes and keep everything square
If you or your team would like help with getting a needle, please visit the Training Programs tab for more information on flexibility programs.
How To Achieve The Perfect Needle – FROM THE TOP!
Uncategorizedfromthetopdanceblog
Stretch To Help You Get Your Needle Stretch
What’s going on FTT Family! Today we are going to get our stretch on! We’ll be talking about effective stretches to help you achieve the beautiful needle stunt! Used in dance pictures for years and also providing a fantastic stretch, the needle is kind of a two in one.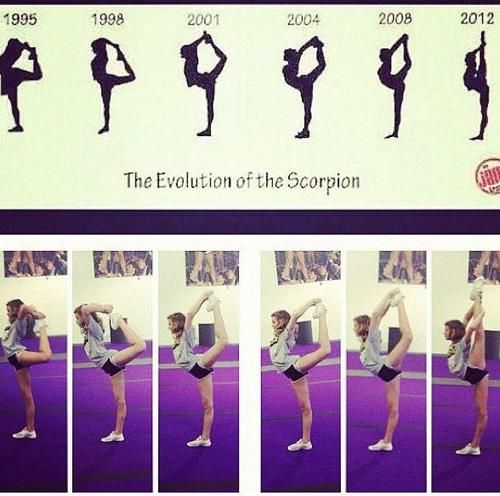 However to achieve this stunt we must, of course, stretch! So let’s dive into our list, shall we?
Okay, so when going about achieving your Needle, three targeted areas of the body are going to be our main focus: the hamstrings, the hip flexors and the lower back. A Needle is pretty much a standing split. So, let’s discuss how these stretches support these areas, as well as the goal at hand.
● Stretches For Hamstrings
– Knee-To-Chest Stretch: One of my favorite stretches for the hamstrings! This stretch was one of the key factors that helped me achieve my splits many moons ago and it has proven to be beneficial for so many other stretches as well. Needles being one of them! Be sure to stretch each leg towards your chest and to the side of your body, holding there for about 10 seconds each leg.
– Right & Left Split: Just as we mentioned before, a needle is pretty much just an upright, standing split. So naturally your right and left split would be the perfect stretch to help prepare you to master this new challenge. I would say that having your splits is very necessary in order to achieve your needle. If you already have your splits, I would suggest stretching them a couple of counts longer than usual to really get in a good, deep and SAFE stretch. If you do not have your splits, however, that’s completely fine! We can get you on the road to achieving them! Check out our blog post on right and left splits down below!
https://fromthetopdanceblog.blog/2018/09/21/tips-for-right-and-left-splits-how-to-get-your-splits-effectively-and-safetly/
● Stretches For Hip Flexors
– Pigeon Stretch: A hip flexor classic! Hold this stretch for about 15 seconds on both sides. Want to add a little something extra? Reach back with your opposite hand and grab the ankle of your extended back leg. This really helps you get a deeper and super effective stretch!
– Butterfly Stretch: Another classic, the butterfly stretch is perfect for the hip flexors and are a great prep for your needle stretch. Hold this for about 15-20 seconds.
– Frog Stretch: The frog stretch is kind of a challenge, as it undoubtedly feels a little weird (let’s be honest about it). However, the benefits are amazing! Especially for your needle stunt! For awesome results, hold this for about 20 – 30 seconds!
● Stretches For Your Lower Back
– Cobra Stretch: A From The Top Favorite! Hold this stretch for 10 seconds. To add an upper back element to this stretch, go directly into the downward facing dog right after holding your cobra stretch.
– Back Bend: If you have your back bend, this is also a wonderful prep for practicing your needle! Hold for 10 seconds.
      
– Seated Torso Twist: Used in every dance class, like ever, the seated torso twist definitely has a place on our list! Though very low key, this stretch is essential and very effective.
– Combre Back: And the last stretch on our list is combres! This stretch is probably my favorite lower back stretch of all because when done consistently, your back flexibility can increase in what seems like a snap of a finger! Hold this stretch for 8 counts, and feel free to do a couple of reps of these for faster results.
● The grand finale of them all…
– The Needle : Of course, the main way to achieve any goal is to practice it! A needle is a pretty big stunt, so please be sure to take your time. Don’t throw away any small signs of progress because slow and steady really does win the race. It’s always our objective to meet our goals safely. Be sure to stretch well and make sure your body is very warm before attempting this stunt. Practice your needle at the end of every stretch routine and we know that you will get it in no time!
We hope that you all enjoyed this week’s blog post! We wish you the best of luck as you work to achieve this goal, amongst many! Have a wonderful weekend and remember…
Keep dancing!
Lexi
  
Like this:
Like Loading...
Tagged #2020goals, #backtodance, #ballet, #blog, #contemporary, #dance, #danceteacher, #dancetips, #healthandfitness, #highkicks, #hiphopdance, #inspirational, #jazzdance, #lyricaldance, #nationaldanceday, #tapdanceView all posts by fromthetopdanceblog
What kind of love spell with a thread and a needle, with which girls are trying to bewitch guys
Tiktok users have made a new trend out of a love spell with a thread and a needle. Girls shoot videos with sewing accessories and believe that they can attract the attention of a young man if they hide the design in a phone case.
What kind of trend with a thread and a needle
At the end of October, a new trend appeared on tiktok, the participants of which wind the thread around the needle. They don't explain what they're doing, but the mysterious videos get hundreds of likes and thousands of views. One of the first to publish such a video was tiktoker _ddashha__ . Throughout the video, she is silent, only occasionally singing along to the song I Got Love by rappers MiyaGi & Endgame and Rem Digga.
A no less mysterious video was posted by a TikTok user with the nickname pay_ton_06 . The girl wound a red thread on a needle in advance, and then put the design in her phone case.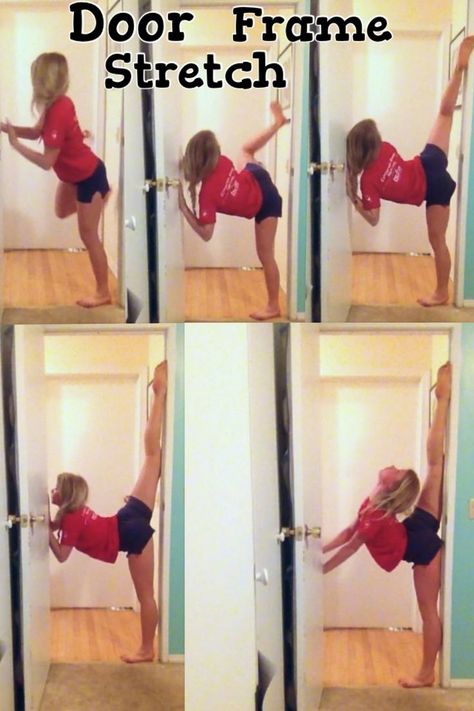
Who understood, he understood. If this thing doesn’t work, then I’ll change my ava,” the tiktoker wrote in the description of the video.
The user of the Network with the nickname daria.bondorenko brought some clarity to the challenge. In her video, the girl wrote that the young man refused her a relationship, and then she began to wind the thread on the needle.
“I don’t like you, come on in the next life,” the guy said, but the tiktoker was not upset and wound the thread around the needle at night.
Judging by the video, such a design should help the user of the social network to improve her personal life.
Why tiktokers wind a thread on a needle
Girls took up sewing accessories for a reason: they needed a needle and thread for a love spell. Tiktokers believe that in this way they can bewitch the guy they like, who does not want to start a relationship.
The meaning of the ritual was fully described by the Tiktoker moxiito.hub . According to the girl, it is supposedly possible to win the heart of a guy by wrapping a needle with a thread, while repeating the name of a young man seven times. When the design is ready, you need to put it in a phone case to always carry with you.
You put this thread and needle under your cover and wait, that's it.
The ritual may seem unreliable, but many of those girls who have tried it say that with the help of the “Thread and Needle Technique” they achieved the desired result. For example, tiktoker mar.zelik says that the young man whom she charmed finally wrote to her.
I did this technique with a needle. As a result, he wrote to me. And increased confidence. The technique works!
The girl did not show the correspondence, but another social network user with the nickname wrwrw.03 did. Judging by the screenshot of messages in the girl’s video, allegedly thanks to the “Thread and Needle Technique”, the young man wrote that he was bored.
Let's meet, I miss you very much. I think only about you.
However, not all young men were happy with the love spell. Tiktoker dashe4ka208 showed on the video that the guy she allegedly bewitched was indignant at the fact that he could not forget the girl and thought about her every day.
What the hell. [Why] do I think about you every day? Take it away, Dasha.
But the girl was in no hurry to “disenchant” her chosen one. In her video, she winds the thread around the needle again, apparently to fix the result.
However, many Internet users consider love spells useless and even dangerous. For example, some girls wrote that after using the technique, their relationship with young people did not get better, but deteriorated completely.
Another experimenter allegedly developed health problems due to a love spell.
However, apart from the words of tiktokers, there is no evidence that technology can harm health or destroy relationships. There is also no reliable evidence to the contrary, however, many users of the social network are sure that the love spell works, so they turned it into a trend and repeat it in their videos.
If the needle and thread did not work, you can try the Wrist Technique. Girls believe that the method will help attract a young man with the power of imagination.
Earlier, Medialeaks told how TikTokers supposedly find out the name of their future husband. They peer into the pattern of veins on their wrist and try to read fate.
Chain stitch with a needle: how to make (photo)
Chain stitch with a needle is classified as buttonhole stitch. On the surface of the fabric, it looks like a continuous thread chain or pigtail. The different technique of this seam makes it possible to easily modify the pattern on the front surface of the fabric.
Having understood how to make a chain stitch, having mastered simple and easy-to-remember techniques, as well as the fundamental differences between the varieties of chain stitches, you can embroider, in fact, using the same technique, but in the end you will get a decoratively finished fabric of different textures.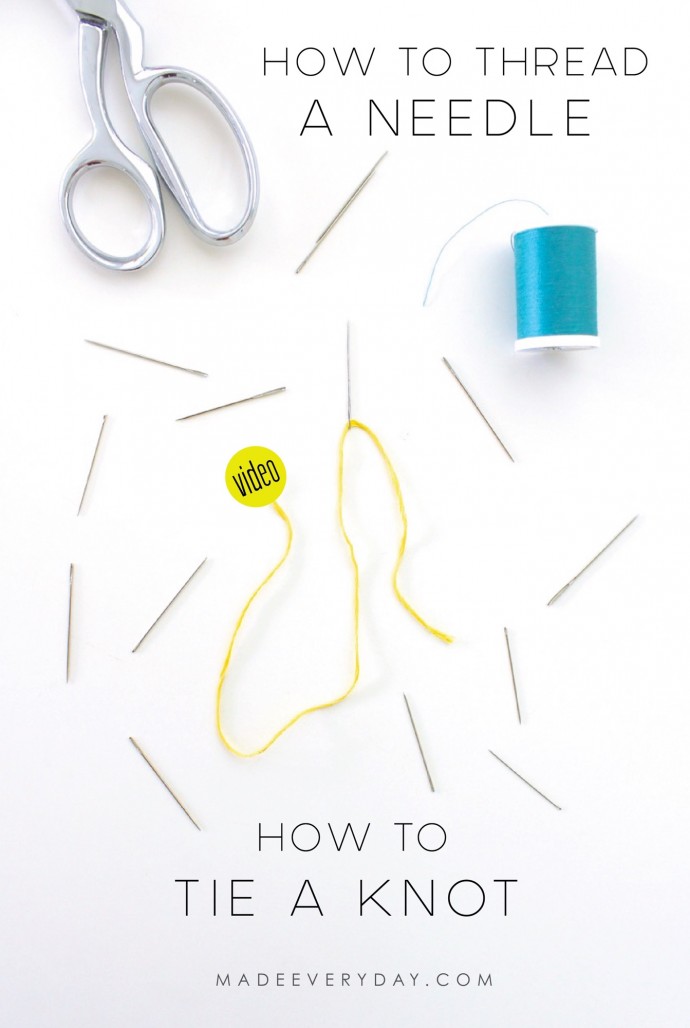
History of occurrence
Chain stitch with a needle has been known since the times of Ancient Rus'. At that time it was called "chain". Embroidery was mainly done on wooden hoops. The fabric stretched over them was similar to the working surface of the drum. And this word was pronounced as "tambura" or "tambourina". It is believed that the name of this type of seam came from this word.
In those days, products finished with a “chain” using a gilded thread were in demand. For greater expressiveness, the craftswomen twisted it with black, and this achieved the contrast of transitions and the expressiveness of the embroidery pattern.
Modern technology is increasingly using the "chain" for sewing satin stitch. With the help of a chain stitch and the use of its varieties in compositions, craftswomen manage to achieve natural transitions of light and shadow. Chain stitches made with multi-colored threads open up additional possibilities for the realization of the conceived idea.
Application
For the non-embroiderer, knowing the basics of how to make a chain stitch will help when mending clothes. With this technique, you can successfully imitate a machine chain stitch. With some practice, a high degree of similarity can be achieved.
Chain stitches can be sewn on patches if the goal is to make this detail stand out from the crowd. This seam is also used in the case when you need to make a series of loops for the transition from knitwear to knitting technique.
But still, the main purpose of chain stitches is decorative embroidery with a pattern or stitch. This technique makes it possible to finish the fabric with a strict chain pattern along the contour, and to fill parts of the composition completely with the formation of various types of patterns: stems, flowers, petals, leaves and other elements.
Material
Photos of the chain stitch on finished products are always distinguished by clear lines. Embroidery looks on any kind of fabric, the main thing is to choose a combination of working thread and the color of the base material. For cotton, linen and jeans, it is better to choose floss.
Silk, chiffon and other delicate fabrics are best trimmed with viscose or silk threads. Wool should be sewn with the same material. Chain stitch in bright colors looks best on plain fabrics without a pattern.
Colored threads are more suitable for heavier fabrics. Batiste, muslin, tulle or voile can be embellished with white embroidery with metallic inclusions to create special effects.
Technique in the hoop
First you need to understand the principle of loop formation in order to learn how to sew a chain stitch with a needle. How to make it - it will be easier to understand the technique of embroidery in the hoop.
The needle is inserted from the inside and out to the front surface. The injection is made in the contour of the future pattern. The thread is completely stretched and, as it were, fits along the marking of the center line of the future chain.
The needle then moves back to the exit point. In this case, the thread begins to form a loop. The needle is inserted in the same place and brought out inside out. The thread, following it, slowly tightens the loop. The next needle prick is made from the inside out with a certain step also into the contour of the center line. This creates a straight line.
The outgoing needle tip must now be inserted into the loop. It is left not too large, but also sufficient for the convenience of work. The needle is fully withdrawn. The stitch is tightened. The thread pulled out and stretched serves as a limiter and prevents the loop from going inside out. The distance between two needle pricks determines the length of the chain link.
Chain stitch with a needle: how to do it, detailed instructions
On clothes or a piece of fabric, where there is no convenience for working with a canvas stretched on a hoop, the execution technique is slightly different, but it is also performed along the contour lines.
The thread is brought out “on the face”, held by the thumb of the left hand, the needle is returned back to the point of exit. In this case, the same loop is formed, but pressed to the surface of the tissue. The next injection is made at the place where the thread is taken out. A stitch is made "forward the needle" to the required distance. The needle is brought out into the formed loop.
A photo of the chain stitch at the initial stage makes it possible to understand the principle of pulling the needle into the formed curl. The moment of loop formation is also visible. Then the needle passes over the thread pressed to the fabric. The loop is tightened - one link in the chain is formed.
Then everything repeats. The finger presses the thread, the next loop is formed, an injection is made with the formation of a “forward needle” stitch. On the wrong side, along the contour of the pattern, a continuous seam line is formed without gaps. It turns out that each new stitch ends in the middle of the loop.
Reverse chain
There are many more secrets of the chain stitch: how to make, for example, a reverse chain?
To form the first loop, you must first make a stop for it. This is usually combined with a back stitch at the beginning of a seam. To do this, perform one puncture "forward needle" from the inside into the contour of the future chain. The needle is withdrawn inside and repeated exactly the same puncture is made. The thread is fixed, it is from the inside.
The next thrust is made into the contour of the line at some distance. The size of this stitch determines the size of the loop and the future link of the chain. The needle is brought out “on the face”, stretched out completely. Now it needs to be brought under the threads that formed the first locking stitch.
This is done by moving from right to left without piercing the fabric and grabbing the base material. Then the needle returns to the place where the end of the thread came out and is brought out to the wrong side. The loop is tightened. Then the process is repeated again: a puncture with the desired step, the withdrawal of the thread “on the face”, picking up two threads of the previous loop, an injection at the point of withdrawal.
To keep the reverse chain stitch with a needle neat, you need to follow the exact size of the back stitches and tighten the buttonholes evenly.
Variations
This technique can be easily varied. You can just change the angle of each subsequent stitch, deviating it from the axial planned line of the pattern, and you get a herringbone stitch.
If you end each loop not at the exit point of the thread, but before reaching it, you will get an open chain. The greater the distance, the wider the seam will be. If you follow the opposite principle and finish the loop after the thread exit point (put it on top), then you will end up with a “cross chain stitch” with a needle.
Slightly modifying the technique or adding the same type of side stitches, you can get "interlaced", "rope" or "twisted" tambour stitch. By changing the points of the beginning of the formation of loops, a “rosette” or “zigzag” is obtained. By laying the chain next to the already formed one and picking up its loops, they get a “double” or “weighted” chain stitch with a needle.
Scheme and pattern of composition
Intricate embroidery can be obtained by combining loops in various groups. So, the foot is obtained from three basic stitches located side by side and emerging from one point, a rosette from four, a flower from five or more.
These groups can be used to trim the edges of clothing. If you combine them with the base chain, you can form bouquets and garlands, complementing them with stitches that form stems and leaves.
The pattern of the composition or the contour drawing of the chain stitch is transferred to a light-colored fabric through carbon paper. A paper sketch or a photocopy can be sewn to a dark base with a light thread with a basting seam along the main lines. After that, the paper breaks off, and after embroidery, the basting is unraveled.
Secrets of craftsmanship: chain stitch
How to make a stretch stitch so that it fits perfectly on an intricate pattern and goes well with other types of decorative stitching?
The shape of the loops that form one or another type of chain is determined by the distance between adjacent needle punctures.